Database testing is an essential aspect of software testing that focuses on verifying the correctness, reliability, and performance of the database components of an application. Database testing automation eliminates manual efforts involved in executing repetitive and time-consuming tasks, such as data setup, data validation, and query optimization. This article will teach us how to insert a new row in the table in Microsoft SQL Server by establishing a Java connection
Why do we need to connect to databases in automation?
To get test data – If the database is automated, test data may be immediately retrieved and processed using a test automation script. To verify the result – To confirm the outcome, we may use automation to cross-check the front-end result to the database’s back-end record. To delete test data created – It is best practice in automation to remove test data that has been created. To do this, we use database automation and immediately execute the delete query. To update certain data – Update queries can be used to update test data per the requirements of the test script.
Before inserting a new row in the table
After inserting a row
Connecting to SQL Server in Java
Get a connection to Database
Create a statement object
Execute the SQL query
Process the Result Set
Get a connection to Database
Need a connection string in the form of a JDBC URL
Pass in the SQL query. Here, we want to insert data, so we need to use executeUpdate.
executeUpdate – Executes the given SQL statement, which may be an INSERT, UPDATE, or DELETE statement or an SQL statement that returns nothing, such as an SQL DDL statement. This method cannot be called on a PreparedStatement or CallableStatement.
 int rowAffected = stmt.executeUpdate(
                    "insert into employees (last_name, first_name, email, department,salary) values ('Singh', 'Vibha','vibha.test@gmail.com', 'QA', 85000)");
Process the resultSet
Result Set is initially placed before the first row. Method: Result.next() -moves forward one row returns true if there are more rows to process Looping through the result set.
DriverManager helps to connect an application based on the database connection string JDBC API is defined by package – java.sql and javax.sql
In the previous tutorial, we discussed How to disable Test Cases using TestNG. In this tutorial, we will see how we can create a dependency between Selenium Test Cases using TestNG.
Imagine there is a situation in which a test case can only be executed if a particular test case executes successfully. This can be achieved in TestNG by dependsOnMethod().
Below is an example.
To Run the TestNG program, right-click on the Java Program – here it is TestNGMethodDependencyDemo, select Run As TestNG Test(Eclipse).
Below is an example of dependsOnMethod() method.
import org.testng.annotations.Test;

public class TestNGMethodDependencyDemo {

    @Test
    public static void FirstTest() {
        System.out.println("This is Test Case 1");
    }

    @Test(dependsOnMethods = "FirstTest")
    public static void SecondTest() {
        System.out.println("This is Test Case 2 and will be executed after Test Case 1 successfully executed");
    }

    @Test
    public static void ThirdTest() {
        System.out.println("This is Test Case 3");
    }

    @Test
    public static void FourthTest() {
        System.out.println("This is Test Case 4");
    }
}
The output of the above program is
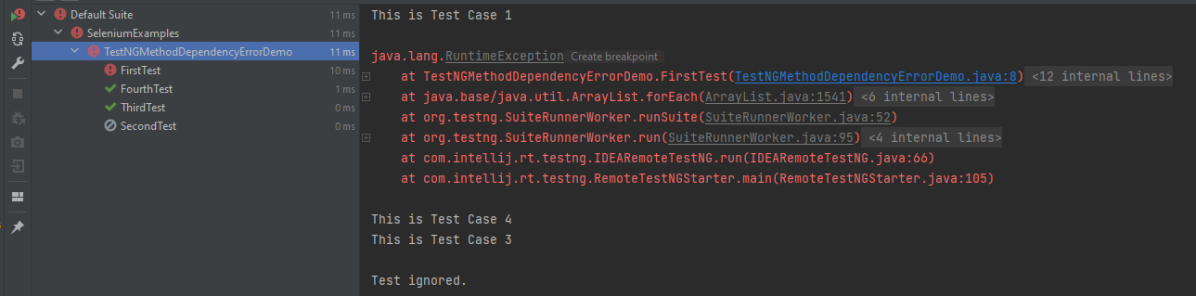
In the below scenario, Test Case 2 is dependent on Test CASE 1. If Test Case 1 fails, then Test Case 2 will skip.
package TestNGDemo;

import org.testng.annotations.Test;
public class TestNGMethodDependencyErrorDemo {

      @Test
      public static void FirstTest() {
            System.out.println("This is Test Case 1");
            throw new RuntimeException();
      }

      @Test(dependsOnMethods = "FirstTest")
      public static void SecondTest() {
          System.out.println("This is Test Case 2 and will be executed after Test Case 1 sucessfully executed");
     }

     @Test
     public static void ThirdTest() {
          System.out.println("This is Test Case 3");
     }

      @Test
      public static void FourthTest() {
            System.out.println("This is Test Case 4");
    }
}
The output of the above program is
We are done. Congratulations on making it through this tutorial and hope you found it useful!
TestNG is a testing framework inspired by JUnit and NUnit but introduces some new functionalities that make it more powerful and easier to use. The software testers to efficiently run the automated test scripts created in Selenium Webdriver use TestNG. Its full form is the “Testing New Generation” framework. It is used mostly to assert the results in an Automated Script as well as generate reports for test execution.
Follow the below steps to install TestNG on Eclipse:
Launch Eclipse go to the Help option present at the top and select –“Install New Software”.
A dialog box will appear, click on the Add button
A new dialog box will appear. Mention the Name as TestNG and the location as “http://beust.com/eclipse/” and click on the Add button.
Check the TestNG checkbox and click on the “Next” action button. The installation will start and the Eclipse will restart after installation.
To verify if TestNG is installed successfully or not, go to Window, select Show View, and then Other. Select Java and see within the Java folder, you will see TestNG. This shows that TestNG is successfully installed on the machine
Right-click on the project in Eclipse -> Select build path -> Configure Build Path.
Select the library tab -> Click on Add library button -> Select TestNG-> Click on Next -> Click on Finish and Apply and close.
6. It allows for cross-browser testing which means a web application tests on different browsers and operating systems. Here, mention different browser names in the parameter.
<parameter name="browser" value="Edge" />
7. It helps to integrate the TestNG framework in CI/CD pipelines such as GitLab, GitHub, Jenkins.
5. What are the types of Asserts in TestNG?
There are two types of assert in TestNG – Hard Assert and Soft Assert.
Hard Assert: Hard Assert is the normal assert that is used to do validations in the TestNG class.
We have to use the Assert class for hard assert as follows:
6. What is TestNG Assert and list out some common Assertions supported by TestNG?
TestNG Asserts help us to verify the condition of the test in the middle of the test run. Based on the TestNG Assertions, we will consider a successful test only if it completed the test run without throwing any exception. Some of the common assertions supported by TestNG are:
Groups are specified in your testng.xml file and can be found either under the <test> or <suite> tag. Groups specified in the <suite> tag apply to all the <test> tags underneath.
import org.testng.annotations.Test;

public class TestNGGroupDemo {

    @Test(alwaysRun = true, groups = { "e2etest", "integerationtest" })
    public void testPrintMessage() {
        System.out.println("This method is run by both e2e and integeration test");
    }

    @Test(alwaysRun = true, groups = { "e2etest" })
    public void testE2EMessage() {
        System.out.println("This method is run by e2e test");
    }

    @Test(alwaysRun = true, groups = { "integerationtest" })
    public void testingIntegrationMessage() {
        System.out.println("This method is run by integeration test");
    }

    @Test(alwaysRun = true, groups = { "acceptancetest" })
    public void testingAcceptanceMessage() {
        System.out.println("This method is run by Acceptance test");
    }

    @Test(alwaysRun = true, groups = { "e2etest", "acceptancetest" })
    public void testE2EAndAcceptanceMessage() {
        System.out.println("This method is run by both e2e and acceptance test");
    }

    @Test(alwaysRun = true, groups = { "e2etest", "integerationtest", "acceptancetest" })
    public void testE2EAndAcceptanceAndIntegrationMessage() {
        System.out.println("This method is run by e2e, integration and acceptance test");
    }

}
TestNG.xml
<?xml version = "1.0" encoding = "UTF-8"?>
<!DOCTYPE suite SYSTEM "http://testng.org/testng-1.0.dtd" >
<suite name = "TestNG Demo">
    <test name = "TestNG Grouping">
        <groups>
            <run>
                <include name = "e2etest" />
            </run>
        </groups>
        <classes>
            <class name = "TestNGGroupDemo" />
        </classes>
    </test>
</suite>
We use priority attribute to the @Test annotations. If no priority is assigned to a Test Case, then the annotated test methods are, executed as per the alphabetical order of the tests
import org.testng.annotations.Test;

public class TestNGPriorityDemo {

    @Test(priority = 3)
    public static void FirstTest() {
        System.out.println("This is Test Case 1, but after priority Test Case 3");
    }


    @Test(priority = 4)
    public static void SecondTest() {
        System.out.println("This is Test Case 2, but after priority Test Case 4");
    }


    @Test(priority = 2)
    public static void ThirdTest() {
        System.out.println("This is Test Case 3, but after priority Test Case 2");
    }


    @Test(priority = 1)
    public static void FourthTest() {
        System.out.println("This is Test Case 4, but after priority Test Case 1");
    }
}
9. How can we make one test method dependent on others using TestNG?
Using the dependsOnMethods parameter inside @Test annotation in TestNG we can make one test method run only after the successful execution of the dependent test method. Dependencyis a feature in TestNG that allows a test method to depend on a single or a group of test methods. Method dependency only works if the “depend-on-method” is part of the same class or any of the inherited base classes (i.e. while extending a class)
         @Test
            public static void FirstTest() {
                        System.out.println("This is Test Case 1");
            }

          @Test(dependsOnMethods = "FirstTest")
             public static void SecondTest() {
                        System.out.println("This is Test Case 2 and will be executed after Test Case 1 sucessfully executed");
            }

           @Test
           public static void ThirdTest() {
                       System.out.println("This is Test Case 3");
             }

           @Test
             public static void FourthTest() {
                            System.out.println("This is Test Case 4");
         }
}
11. How do you exclude a group from the test execution cycle?
Excluding a group in TestNG denotes that this particular group refrains from running during the execution, and TestNG will ignore it. Additionally, the name of the group that we want to exclude is defined in the XML file by the following syntax:
<?xml version = "1.0"encoding = "UTF-8"?>
<!DOCTYPE suite SYSTEM "http://testng.org/testng-1.0.dtd">
<suite name = "Suite1">
   <test name = "Test Demo">
      <groups>
         <run>
            <exclude name = "e2etest"/>
         </run>
      </groups>
      <classes>
         <class name = "com.selenium.testng.TestNGDemo.TestNGGroupDemo"/>
      </classes>
   </test>
</suite>
By putting our group “e2etest” inside the exclude tag, we are requesting TestNG to ignore the test cases under the group “e2etest”.
12. How to run test cases in parallel using TestNG?
In testng.xml, if we set the ‘parallel’ attribute on the tag to ‘methods’, testNG will run all the ‘@Test’ methods in the tag in a separate thread.
The parallel attribute of suite tag can accept four values:
tests – All the test cases inside tag of testng.xml file will run parallel classes – All the test cases inside a java class will run parallel methods – All the methods with @Test annotation will execute parallel instances – Test cases in same instance will execute in parallel but two methods of two different instances will run in a different thread.
13. What is the use of @Listener annotation in TestNG?
A listener is defined as an interface that modifies the default TestNG’s behavior. It allows customizing TestNG reports or logs. There are many types of TestNG listeners available. Here are a few listeners:
20. How to pass the parameter in the test case through testng.xml file?
TestNG can pass different test data to a test case as arguments which is called parametrization
@Parameters("value")
TestNG.xml looks like this as shown below. Here, the parameter name is the browser name value for the browser is “Chrome”. So, this “Chrome” value is passed to Test as a parameter, and as a result a Google Chrome browser opens.
<?xml version = "1.0" encoding = "UTF-8"?>
<!DOCTYPE suite SYSTEM "http://testng.org/testng-1.0.dtd" >
<suite name = "TestSuite">
  <test name="ChromeTest">
<parameter name="browser" value="Chrome" />
<classes>
<class name="com.selenium.testng.TestNGDemo.TestNGParameterizationDemo">
</class>
</classes>
</test>
</suite>
TestNG provides several features like prioritizing the test cases, grouping the test cases, skipping the test cases, defining dependencies between test cases, and so on. The previous tutorial has explained the parameters in TestNG.
In this tutorial, we will see how the test cases can be prioritized using TestNG. If no priority is assigned to a Test Case, then the annotated test methods are executed as per the alphabetical order of the tests.
Below is an example
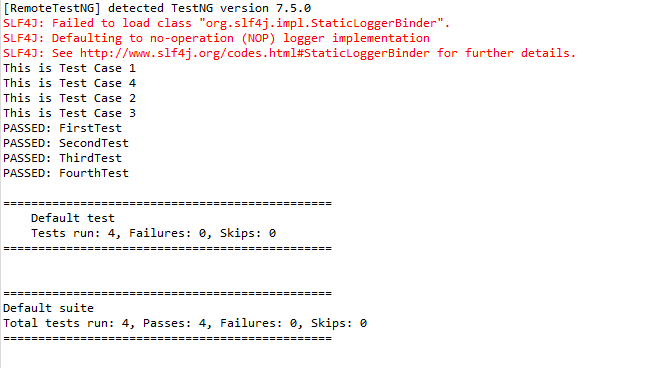
import org.testng.annotations.Test;

public class TestNGPriorityDemo {


     @Test
     public static void FirstTest() {
           System.out.println("This is Test Case 1");
     }

     @Test
     public static void SecondTest() {
           System.out.println("This is Test Case 2");
     }

     @Test
     public static void ThirdTest() {
           System.out.println("This is Test Case 3");
     }

     @Test
     public static void FourthTest() {
           System.out.println("This is Test Case 4");
     }
}
The output of the above program is
In the above example, FirstTest and FourthTest have the highest preference as per the alphabetical order. F comes before S and T. FirstTest is executed before Fourth because preference of I is higher than O.
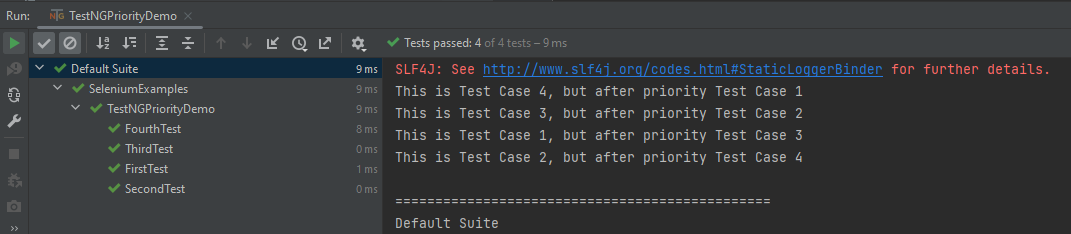
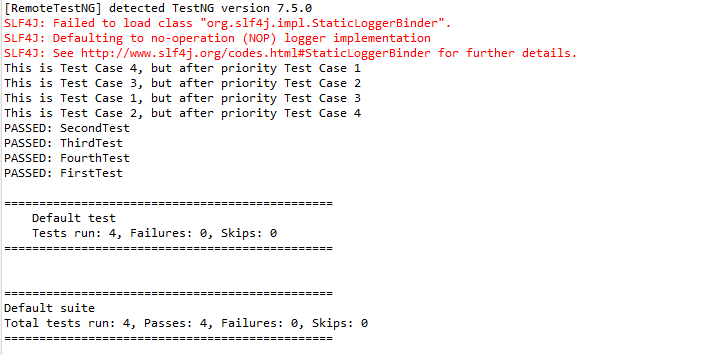
The methods can be prioritized by assigning a number to the annotated test cases. The smaller the number, the higher the priority. Priority can be assigned as parameters while defining the test cases. In the below example, we have assigned priority to test cases, and now they are executed as per the priority. The Test Case with priority = 1 has the highest precedence. It overrides the rule of executing test cases by alphabetical order.
To Run the TestNG program, right-click on the program, select Run As TestNG Test.
import org.testng.annotations.Test;

public class TestNGPriorityDemo {


     @Test(priority = 3)
     public static void FirstTest() {
           System.out.println("This is Test Case 1, but after priority Test Case 3");
     }


     @Test(priority = 4)
     public static void SecondTest() {
           System.out.println("This is Test Case 2, but after priority Test Case 4");
     }


     @Test(priority = 2)
     public static void ThirdTest() {
           System.out.println("This is Test Case 3, but after priority Test Case 2");
     }


     @Test(priority = 1)
     public static void FourthTest() {
          System.out.println("This is Test Case 4, but after priority Test Case 1");
     }
}
The output of the above program is
We are done. Congratulations on making it through this tutorial and hope you found it useful!
There are two types of access modifiers in Java – access modifiers and non-access modifiers.
The access modifier of Java specifies the scope of the variable, method, constructor, or class. We can change the access level of variables, methods, constructors, and classes by applying access modifiers to them.
There are 4 types of access modifiers.
Private:The code is only accessible within the declared class. It cannot be accessed from outside the class.
Default: The code is only accessible in the same package. It cannot be accessed from outside the package. If you do not specify any access level, it will be the default.
Protected:The code is accessible in the same package and subclasses. If you do not make the child class, it cannot be accessed from outside the package.
Public: The class is accessible by any other class. It can be accessed from within the class, outside the class, within the package, and outside the package.
Java Access Modifiers
Private
The private access modifier is accessible only within the class.
In this example, I have created one class – Demo_1 in package Parent_A. It contains a private variable and a private method. We can access private variables and methods within the class.
package Parent_A;

public class Demo_1 {

	private int x = 10; // private variable

	private void display() { // private method
		System.out.println("Display private method");
	}

	public static void main(String[] args) {

		Demo_1 obj1 = new Demo_1();

		System.out.println("Value of X :" + obj1.x);
		obj1.display();
	}

}
The output of the above program is
In the below example, we have 2 classes – Demo_1 and Demo_2. Class Demo_1 contains private data members and private methods. We are accessing these private members from outside the class, another class Demo_2 so there is a compile-time error.
Demo_1
package Parent_A;

public class Demo_1 {

	private int x = 10; // private variable

	private void display() { // private method
		System.out.println("Display private method");
	}

}
Demo_2
package Parent_A;

public class Demo_2 {

	public static void main(String[] args) {

		Demo_1 obj1 = new Demo_1();
		System.out.println("Value of X :" + obj1.x);
		obj1.display();
	}

}
The output of the above program is
Private Constructor
In the below example, the private constructor is accessible within the class.
package Parent_A;

public class Demo_1 {
    private int x = 10; // private variable

    private Demo_1() {

        System.out.println("Private Constructor: Value of x : " + x);
    }

    private void display() { // private method
        System.out.println("Display private method");
    }

    public static void main(String[] args) {

        Demo_1 obj1 = new Demo_1();

    }
}
The output of the above program is
If you make any class constructor private, you cannot create the instance of that class from outside the class.
Demo_1
package Parent_A;

public class Demo_1 {

	private int x = 10; // private variable

	private Demo_1() {

		System.out.println("Private Constructor");
	}

	private void display() { // private method
		System.out.println("Display private method");
	}

}
Demo_2
package Parent_A;

public class Demo_2 {

	public static void main(String[] args) {

		Demo_1 obj1 = new Demo_1();
	}

}
The output of the above program is
Default
If we don’t use any modifier, it is treated as a default access modifier. The default modifier is accessible only within the package. It cannot be accessed from outside the package. It provides more accessibility than private. But, it is more restrictive than protected and public.
In this example, we have created two classes – Demo_1 and Demo_2 in package – Parent_A. We are accessing the class Demo_2 from within its package, since it is default, so it can be accessed from within the package.
Demo_1
package Parent_A;

public class Demo_1 {

    int x = 10; // default variable

    Demo_1() {

        System.out.println("Default Constructor: Value of x : " + x);
    }

    void display() { // default method
        System.out.println("Display default method");
    }

}
Demo_2
package Parent_A;

public class Demo_2 {

	public static void main(String[] args) {

		Demo_1 obj1 = new Demo_1();
		System.out.println("Value of X :" + obj1.x);
		obj1.display();
	}

}
The output of the above program is
Protected
The protected access modifier is accessible within the package and outside the package but through inheritance only.
The protected access modifier can be applied to the data member, method, and constructor. It can’t be applied to the class.
In the below example, I have created two packages Parent_A and Parent_B. The class Demo_1 of Parent_A package is public, so can be accessed from outside the package. However the variable, constructor, and method of this package are declared as protected, so it can be accessed from outside the class only through inheritance.
Demo_1
package Parent_A;

public class Demo_1 {

    protected  int x = 10; // protected variable

    protected Demo_1() {

        System.out.println("Protected Constructor: Value of x : " + x);
    }

    protected void display() { // protected method
        System.out.println("Display Protected method");
    }

}
Demo_3
package Parent_B;

import Parent_A.Demo_1;

public class Demo_3 extends Demo_1{

    public static void main(String[] args) {

        Demo_3 obj1 = new Demo_3();
        System.out.println("Value of X :" + obj1.x);
        obj1.display();
    }

}
The output of the above program is
Public
Thepublic access modifier is accessible everywhere. It has the widest scope among all other modifiers.
In the below example, I have created two packages Parent_A and Parent_B. The variable, constructor, and method of this package are declared as public, so it can be accessed from outside the class or outside the package.
Demo_1
package Parent_A;

public class Demo_1 {
    public   int x = 10; // public variable

    public  Demo_1() {

        System.out.println("Public Constructor: Value of x : " + x);
    }

    public  void display() { // public method
        System.out.println("Display Public method");
    }

}
Demo_4
package Parent_B;

import Parent_A.Demo_1;

public class Demo_4 {

    public static void main(String[] args) {

        Demo_1 obj1 = new Demo_1();

        System.out.println("Value of X :" + obj1.x);
        obj1.display();

    }

}
A keyword-driven framework is a software testing framework that separates the test script logic from the test data through a set of keywords or actions.
1. Keywords: Keywords or actions represent the basic building blocks of the test script. Examples of keywords can include “click,” “sendKeys,” “verifyText,” etc. These keywords are defined in a central repository or spreadsheet, along with the associated test data and expected results.
2. Test Data: Test data is the input or parameters required to perform a specific keyword action. It can be stored in a separate data source such as an Excel spreadsheet or XML file. Test data includes information like usernames, passwords, URLs, input values, and expected outcomes.
3. Test Scripts: Test scripts are developed to execute the keywords. Each test script consists of a series of actions driven by the keywords. The test script fetches the keyword from the central repository and performs the associated action using the test data. It also captures and verifies the results against the expected outcome.
4. Central Repository: The central repository contains all the keywords, associated test data, and expected results. It acts as a bridge between test scripts and test data, allowing for easy maintenance and modification.
Project Structure
Here is the final snapshot of our project.
Dependency List
Selenium – 4.21.0
TestNG – 7.10.2
Apache POI – 5.2.5
Commons – 2.16.1
Maven Surefire – 3.2.5
Maven Compiler – 3.13.0
Java 17
Maven – 3.9.6
Implementation Steps
Step 1- Download and Install Java
Selenium needs Java to be installed on the system to run the tests. Click here to learn How to install Java.
Step 2 – Download and setup Eclipse IDE on the system
The Eclipse IDE (integrated development environment) provides strong support for Java developers, which is needed to write Java code. Click here to learn How to install Eclipse.
Step 3 – Setup Maven
To build a test framework, we need to add many dependencies to the project. It is a very tedious and cumbersome process to add each dependency manually. So, to overcome this problem, we use a build management tool. Maven is a build management tool that is used to define project structure, dependencies, build, and test management. Click here to learn How to install Maven.
Step 6 – Create a Java Keyword Class for each page
In this example, we will access 2 web pages, “Login” and “Home” pages.
Hence, we will create 2 Java classes for keywords – LoginPageKeywords.java and HomePageKeywords.java and a BasePage class to initialize the driver using PageFactory.
BasePage
package com.example.pages;

import org.openqa.selenium.WebDriver;
import org.openqa.selenium.support.PageFactory;

public class BasePage {
    public WebDriver driver;

    public BasePage(WebDriver driver) {
        this.driver = driver;
        PageFactory.initElements(driver,this);
    }

}
LoginPageKeywords
package com.example.keywords;

import com.example.utils.ExcelUtils;
import org.openqa.selenium.WebDriver;
import org.openqa.selenium.WebElement;
import org.openqa.selenium.support.FindBy;

public class LoginPageKeywords extends BasePage{

    public LoginPageKeywords(WebDriver driver) {
        super(driver);

    }

    @FindBy(name = "username")
    public WebElement userName;

    @FindBy(name = "password")
    public WebElement password;

    @FindBy(xpath = "//*[@class='oxd-form']/div[1]/div/span")
    public WebElement missingUsernameErrorMessage;

    @FindBy(xpath = "//*[@class='oxd-form']/div[2]/div/span")
    public WebElement missingPasswordErrorMessage;

    @FindBy(xpath = "//*[@class='oxd-form']/div[3]/button")
    public WebElement loginBtn;

    @FindBy(xpath = "//*[@id='app']/div[1]/div/div[1]/div/div[2]/div[2]/div/div[1]/div[1]/p")
    public  WebElement errorMessage;


    public void enterUsername(String strUserName) {
        userName.sendKeys(strUserName);
    }

    public void enterPassword(String strPassword) {
        password.sendKeys(strPassword);
    }

    public void login() {
        loginBtn.click();
    }

    public void login(String strUserName, String strPassword) {

        userName.sendKeys(strUserName);
        password.sendKeys(strPassword);
    }

    public String getMissingUsernameText() {
        return missingUsernameErrorMessage.getText();
    }

    public String getMissingPasswordText() {
        return missingPasswordErrorMessage.getText();
    }

    public String getErrorMessage() {
        return errorMessage.getText();
    }

    public LoginPageKeywords saveTestResults(int row, int column) {
        ExcelUtils.rowNumber = row ;
        ExcelUtils.columnNumber = column;
        return this;
    }

}
HomePageKeywords
package com.example.keywords;

import org.openqa.selenium.WebDriver;
import org.openqa.selenium.WebElement;
import org.openqa.selenium.support.FindBy;

public class HomePageKeywords extends BasePage {

    public HomePageKeywords(WebDriver driver) {
        super(driver);

    }

    @FindBy(xpath = "//*[@id='app']/div[1]/div[1]/header/div[1]/div[1]/span/h6")
    public  WebElement homePageUserName;

    public String verifyHomePage() {
        return homePageUserName.getText();
    }
}
Step 7 – Create an ExcelUtils Class
To manipulate Excel files and do Excel operations, we should create an Excel file and call it “ExcelUtils” under the utilspackage as shown below.
package com.example.utils;

import org.apache.poi.ss.usermodel.DataFormatter;
import org.apache.poi.xssf.usermodel.XSSFCell;
import org.apache.poi.xssf.usermodel.XSSFRow;
import org.apache.poi.xssf.usermodel.XSSFSheet;
import org.apache.poi.xssf.usermodel.XSSFWorkbook;

import java.io.FileInputStream;
import java.io.FileOutputStream;
import java.io.IOException;

public class ExcelUtils {


    public static String testDataExcelPath = null; //Location of Test data excel file
    private static XSSFWorkbook excelWorkBook; //Excel WorkBook
    private static XSSFSheet excelWorkSheet; //Excel Sheet
    private static XSSFCell cell; //Excel cell
    private static XSSFRow row; //Excel row
    public static int rowNumber; //Row Number
    public static int columnNumber; //Column Number
    public static FileInputStream ExcelFile;

    public static DataFormatter formatter;
    public static FileOutputStream fileOut;


    // This method has two parameters: "Test data excel file name" and "Excel sheet name"
    // It creates FileInputStream and set excel file and excel sheet to excelWBook and excelWSheet variables.
    public static void setExcelFileSheet(String sheetName) throws IOException {

        testDataExcelPath = Constants.currentDir + Constants.resourcePath;

        // Open the Excel file
        ExcelFile = new FileInputStream(testDataExcelPath + Constants.testDataExcelFileName);
        excelWorkBook = new XSSFWorkbook(ExcelFile);
        excelWorkSheet = excelWorkBook.getSheet(sheetName);

    }

    //This method reads the test data from the Excel cell.
    public static String getCellData(int rowNum, int colNum) {
        cell = excelWorkSheet.getRow(rowNum).getCell(colNum);
        formatter = new DataFormatter();
        return formatter.formatCellValue(cell);
    }

    //This method takes row number as a parameter and returns the data of given row number.
    public static XSSFRow getRowData(int rowNum) {
        row = excelWorkSheet.getRow(rowNum);
        return row;
    }

    //This method gets excel file, row and column number and set a value to the that cell.
    public static void setCellData(String value, int rowNum, int colNum) throws IOException {
        row = excelWorkSheet.getRow(rowNum);
        cell = row.getCell(colNum);
        if (cell == null) {
            cell = row.createCell(colNum);
            cell.setCellValue(value);
        } else {
            cell.setCellValue(value);
        }

        // Write to the workbook
        fileOut = new FileOutputStream(testDataExcelPath + Constants.testDataExcelFileName);
        excelWorkBook.write(fileOut);
        fileOut.flush();
        fileOut.close();
    }
}
In this file, I wrote all Excel operation methods.
setExcelFileSheet: This method has two parameters: “testdata.xlsx” and “LoginData”. It creates FileInputStream and sets Excel file and Excel sheet to excelWorkBook and excelWorkSheet variables.
getCellData: This method reads the test data from the Excel cell. We are passing row numbers and column numbers as parameters.
getRowData: This method takes the row number as a parameter and returns the data of the given row number.
setCellData: This method gets an Excel file, row, and column number andsets a value to that cell.
Step 8 – Create a Listener Class
We need to create a TestNG Listener class to check the status of each of the tests.
import com.example.tests.BaseTests;
import org.openqa.selenium.WebDriver;
import org.testng.ITestContext;
import org.testng.ITestListener;
import org.testng.ITestResult;
import java.io.IOException;
public class TestListener implements ITestListener {
private static String getTestMethodName(ITestResult iTestResult) {
return iTestResult.getMethod().getConstructorOrMethod().getName();
}
@Override
public void onStart(ITestContext iTestContext) {
System.out.println("I am in onStart method :" + iTestContext.getName());
}
@Override
public void onFinish(ITestContext iTestContext) {
System.out.println("I am in onFinish method :" + iTestContext.getName());
}
@Override
public void onTestStart(ITestResult iTestResult) {
System.out.println("I am in onTestStart method :" + getTestMethodName(iTestResult) + ": start");
}
@Override
public void onTestSuccess(ITestResult iTestResult) {
System.out.println("I am in onTestSuccess method :" + getTestMethodName(iTestResult) + ": succeed");
try {
ExcelUtils.setCellData("PASSED", ExcelUtils.rowNumber, ExcelUtils.columnNumber);
} catch (IOException e) {
throw new RuntimeException(e);
}
}
@Override
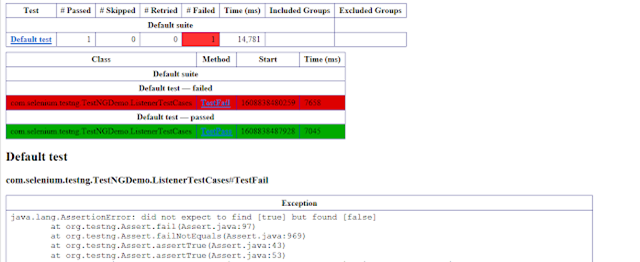
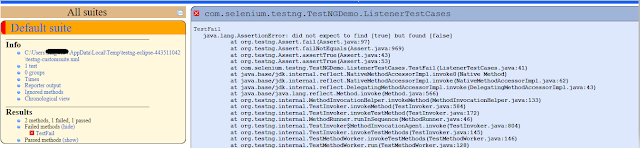
public void onTestFailure(ITestResult iTestResult) {
System.out.println("I am in onTestFailure method :" + getTestMethodName(iTestResult) + " failed");
try {
ExcelUtils.setCellData("FAILED", ExcelUtils.rowNumber, ExcelUtils.columnNumber);
} catch (IOException e) {
throw new RuntimeException(e);
}
}
@Override
public void onTestSkipped(ITestResult iTestResult) {
System.out.println("I am in onTestSkipped method :" + getTestMethodName(iTestResult) + ": skipped");
try {
ExcelUtils.setCellData("SKIPPED", ExcelUtils.rowNumber, ExcelUtils.columnNumber);
} catch (IOException e) {
throw new RuntimeException(e);
}
}
@Override
public void onTestFailedButWithinSuccessPercentage(ITestResult iTestResult) {
System.out.println("Test failed but it is in defined success ratio " + getTestMethodName(iTestResult));
}
}
Step 9 – Create a Constant Class
Create a new class file named “Constants” in the utils package in which the tester will define constants like URL, filePath, and excelData. The source code looks as below:
package com.example.utils;

public class Constants {

    public static final String testDataExcelFileName = "Test_Cases.xlsx"; //Global test data excel file
    public static final String currentDir = System.getProperty("user.dir");  //Main Directory of the project
    public static final String resourcePath = "\\src\\test\\resources\\";  //Main Directory of the project
    public static final String excelTestDataName = "LoginData";
}
Step 10 – Create a BaseTests Class
This BaseTests class contains the setup and tearDown methods to initialize the driver at the start of the test and exit the driver at the end of the test.
import org.openqa.selenium.WebDriver;
import org.openqa.selenium.chrome.ChromeDriver;
import org.openqa.selenium.chrome.ChromeOptions;
import org.testng.annotations.AfterMethod;
import org.testng.annotations.BeforeMethod;

import java.time.Duration;

public class BaseTests {

    public static WebDriver driver;
    public final static int TIMEOUT = 10;

    @BeforeMethod
    public void setup() {

        ChromeOptions options = new ChromeOptions();
        options.addArguments("--remote-allow-origins=*");
        options.addArguments("--no-sandbox");
        options.addArguments("--disable-dev-shm-usage");
        options.addArguments("--headless");
        driver = new ChromeDriver(options);
        driver.manage().window().maximize();
        driver.get("https://opensource-demo.orangehrmlive.com/");
        driver.manage().timeouts().implicitlyWait(Duration.ofSeconds(TIMEOUT));

    }

    @AfterMethod
    public void tearDown() {
        driver.quit();
    }

}
Step 11 – Create a Test Excel File
Create a test file – Test_Cases.xlsx and place it in src/test/resources. I have stored the following data in the file.
Sno – Numbering of the test cases
Name – Name of the test case
Step_ID – Number of each step of a test case
Description – Detail of each keyword
Keyword – Keyword defined for each step
InputData – This is an optional field. We need this field to provide the input data like username, password, error message, and other validations.
ExpectedResponse – This is the response we expect to get from the execution for the particular test.
ActualResponse – This is the response we get after the execution of the particular test
Status – This could be pass, fail, skip
Step 12 – Create the Tests in src/test/java
In the below LoginPageTests class, we have 2 different tests and the test result will be saved in Test_Cases.xlsx file for both the tests.
In Java, a properties file is a simple text-based file used to store configuration or settings in key-value pairs. It provides a convenient way to externalize application-specific parameters that can be easily modified without modifying the source code.
Properties File always stores information about the configuration parameters such as project configuration data such as URL, username, password, and project settings config like browser name, environment, and so on.
Properties files have a “.properties” extension.
How to modify specific value in a Properties File without overwriting all the existing values
Imagine we want to update the value of a particular key in the existing properties file.
Below is an example of userCreated.properties.
We want to replace the password from Admin to Admin123.
Java API has java.util.Properties class, and it has utility stores() methods to store properties in Text format.
You can write properties to a properties file using the Properties class. Create a Properties object and use the load() method to load the existing properties from the file.
 Properties properties = new Properties();

 FileInputStream fileInputStream = new FileInputStream("src/test/resources/userCreated.properties");
 properties.load(fileInputStream);
Modify the specific value by using the “setProperty()” method to update the key-value pair in the “Properties” object.
properties.setProperty("password", "Admin123");
Save the changes back to the file. Create a “FileOutputStream” object and specify the same file path. Use the “store()” method to save the modified properties back to the file.
FileOutputStream fileOutputStream = new FileOutputStream("src/test/resources/userCreated.properties");

// store() method is used to write the properties into properties file
properties.store(fileOutputStream, "File is modified");
Below is a complete example:
package org.example;

import java.io.FileInputStream;
import java.io.FileOutputStream;
import java.io.IOException;
import java.util.Properties;

public class ModifyPropertiesExample {

    public static void main(String args[]) {

        // Creating properties files from Java program
        Properties properties = new Properties();

        try {
            FileInputStream fileInputStream = new FileInputStream("src/test/resources/userCreated.properties");
            properties.load(fileInputStream);
        } catch (IOException ex) {
            ex.printStackTrace();
        }

        properties.setProperty("password", "Admin123");
        try {
            FileOutputStream fileOutputStream = new FileOutputStream("src/test/resources/userCreated.properties");

            // store() method is used to write the properties into properties file
            properties.store(fileOutputStream, "File is modified");

            fileOutputStream.close();
        } catch (IOException ex) {
            ex.printStackTrace();
        }
    }
}
The updated userCreated.properties file is shown below:
Thank you for completing this tutorial! I’m glad you found it helpful. Happy learning and cheers to your success!
Are you familiar with Rest API and want to test your understanding? This post contains 25 useful Rest API multiple-choice questions (quiz) to self-test your knowledge of Rest API .
You can find the questions for the below-mentioned answers in this post –
Are you familiar with REST APIs and want to test your understanding? This post contains 25 useful REST API multiple-choice questions (quiz) to self-test your knowledge of REST API development.
3. Which REST constraint specifies that knowledge and understanding obtained from one component of the API should be generally applicable elsewhere in the API?
4. Which of the following HTTP Status code means FORBIDDEN, states that user is not having access to method being used for example, delete access without admin rights?
  @Test
    public void test() {

        JSONObject data = new JSONObject();

        data.put("employee_name", "MapTest");
        data.put("profile_image", "test.png");

        RestAssured
                .given().contentType(ContentType.JSON).body(data.toString())

                .when().post("https://dummy.restapiexample.com/api/v1/create")

                .then().assertThat().statusCode(201)
                .body("data.employee_name", equalTo("MapTest"))
                .body("message", equalTo("Successfully! Record has been added."));

    }
}
10. Which of the following is correct about web services?
Choose one option
A web service is a collection of open protocols and standards used for exchanging data between applications or systems.
Software applications written in various programming languages and running on various platforms can use web services to exchange data among them over computer networks like the Internet.
In Java, a properties file is a simple text-based file used to store configuration or settings in key-value pairs. It provides a convenient way to externalize application-specific parameters that can be easily modified without modifying the source code.
Properties File always stores information about the configuration parameters such as project configuration data such as URL, username, password, and project settings config like browser name, environment, and so on.
Properties files have a “.properties” extension.
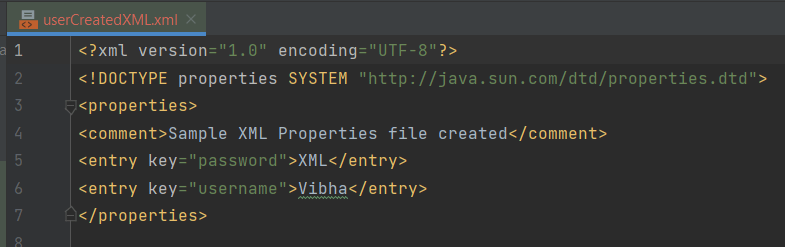
How to write data in a Properties File in XML Format?
Java API got java.util.Properties class and it has several utility stores() methods to store properties in either Text or XML format. In order to store property in text format, Store() method can be used. storeToXML() is used to make in XML format.
You can write properties to a properties file using the Properties class. Create a Properties object and set the key-value pairs
Properties properties = new Properties();
properties.setProperty("username", "Vibha");
properties.setProperty("password", "XML");
Specify the output file path and create an FileOutputStream object.
FileOutputStream fileOutputStream = new FileOutputStream("src/test/resources/userCreatedXML.xml");
Write the properties to the output stream in XML format
properties.storeToXML(fileOutputStream, "Sample XML Properties file created");
Below is a complete example:
package org.example;

import java.io.FileInputStream;
import java.io.FileOutputStream;
import java.io.IOException;
import java.util.Properties;

public class WritePropertiesXMLExample {

    public static void main(String args[]) {

        Properties properties = new Properties();
        properties.setProperty("username", "Vibha");
        properties.setProperty("password", "XML");

        try {
            // userCreated.properties is created at the mentioned path
            FileOutputStream fileOutputStream = new FileOutputStream("src/test/resources/userCreatedXML.xml");

            // storeToXML() method is used to write the properties into properties xml file
            properties.storeToXML(fileOutputStream, "Sample XML Properties file created");
            fileOutputStream.close();
        } catch (IOException ex) {
            ex.printStackTrace();
        }
    }
}
FileOutputStream: This class is used to create or overwrite the existing property file.
Pass this stream into the “storeToXML()” method of “Properties”, which writes the contents of the “Properties” object into the file in XML Format.
The output of the above execution is
userCreatedXML.xml file is created in src/test/resources.
The userCreatedXML.xml file is shown below:
Thank you for completing this tutorial! I’m glad you found it helpful. Happy learning and cheers to your success!