The glue option helps Cucumber locate the step definition file. In the glue cucumber option, we specify the package to load the glue code. Where glue code is our step definitions or hooks.
The glue code in Cucumber performs the following tasks:
– Scans the project for step definitions and associates them with the corresponding steps in the feature files. – Executes the automation code defined in the step definitions when the corresponding step is encountered during test execution. – Provides a way to configure Cucumber runtime options, such as defining test hooks, plugins, and other settings.
Cucumber Glue Example
import org.junit.runner.RunWith;
import io.cucumber.junit.Cucumber;
import io.cucumber.junit.CucumberOptions;

@RunWith(Cucumber.class)
@CucumberOptions(plugin = "pretty", features = "src/test/resources/features",
glue = "com.example.customer")

public class CucumberRunnerTest {

}
This option specifies the package where the step definition classes are located. In this example, the step definitions are expected to be present in the “com.example.customer” package.
How Glue Locate Step Definitions
1. By default, Cucumber expects the step definitions to be in the same package as the Test Runner class. 2. If the “glue“ option is not specified in the Cucumber options, Cucumber will automatically assume that the step definitions are located in the same package as the test runner. Therefore, if your test runner class is “com.example.runner“, Cucumber will consider the “com.example.runner“ package as the default package for locating the step definitions.
You can comment or remove the “glue“ line in the Cucumber options if your test runner and step definitions are in the same package.
Multiple StepDefinitions in Glue Code
If the step definitions are present in 2 different packages, you can separate packages using a comma and double quotes.
Without proper glue settings, Cucumber will not be able to connect the feature files’ scenarios with the corresponding implementation, resulting in unimplemented step errors.
We are done! Congratulations on making it through this tutorial and hope you found it useful! Happy Learning!!
Reading data from Excel files is a common practice in software development and testing. Excel provides a tabular format which is easy to understand and navigate. Data can be written to Excel for manipulation, analysis and visualization using Java, Python, R and soon. There are several ways to read the data from Excel in Python, but we will discuss openpyxl.
Prerequisite:
Python is installed PIP is installed PyCharms is installed
from openpyxl.workbook import Workbook
#Create a new workbook
workbook = Workbook()
sheet = workbook.active
#Rename the sheet
sheet.title ="Sample Sheet"
#Sample data
data =[
    ["Name", "Designation", "EmployeeId"],
    ["Tom", "BA", 11001],
    ["Trina", "PO", 11002],
    ["Will", "Dev", 11003]
]
#Write data to the sheet
for row in data:
    sheet.append(row)
#Save the workbook
workbook.save("C:\\Users\\Documents\\Vibha\\Automation\\WriteExcel.xlsx")
print("Data is written the Excel file successfully")
The output of the above program is
The Excel is created and saved at the specified location.
Header with bold font
Below is the complete program:
from openpyxl.styles import Font
from openpyxl.workbook import Workbook

#Create a new workbook
workbook = Workbook()
sheet = workbook.active

#Rename the sheet
sheet.title ="Sample Sheet"

#Sample data
headers =  ["Name", "Designation", "EmployeeId"]
rows =[
    ["Tom", "BA", 11001],
    ["Trina", "PO", 11002],
    ["Will", "Dev", 11003]
]

#Write headers with bold font
for col_num, header in enumerate(headers, start=1):
    cell = sheet.cell(row=1, column=col_num, value=header)
    cell.font = Font(bold=True)


#Write rows
for row_num, row_data in enumerate(rows, start=2):
    for col_num, cell_value in enumerate(row_data, start=1):
       sheet.cell(row=row_num, column=col_num, value=cell_value)

#Save the workbook
workbook.save("C:\\Users\\Documents\\Vibha\\Automation\\FormattedExcel.xlsx")
print("Data is written the Excel file successfully")
Define the list “headers” containing the name of the headers. Iterate over the headers using enumerate(headers, start=1), which provides an index starting from 1. For each header, create a cell in the first row and corresponding column and set its value.
Use Font(bold=True) to make the font of the header bold and assign it to “cell.font”.
The output of the above program is
Formatted Excel
We are done! Congratulations on making it through this tutorial and hope you found it useful! Happy Learning!!
Step 6 – Create a Row. A spreadsheet consists of rows and cells. It has a grid layout.
XSSFRow row = sheet.createRow(rownum++);
Step 7 – Import XSSFRow from package
import org.apache.poi.xssf.usermodel.XSSFRow;
Step 8 – Create cells in a row. A row is a collection of cells. When you enter data in the sheet, it is always stored in the cell.
XSSFCell cell = row.createCell(cellnum++);
Step 9 – Import XSSFCell from package.
XSSFCell cell = row.createCell(cellnum++);
Step 10 – Iterate over Data and Write to the sheet
int rownum = 0;
for (Object[] employeeDetails : data) {
// Create Row
XSSFRow row = sheet.createRow(rownum++);
int cellnum = 0;
for (Object obj : employeeDetails) {
// Create cell
XSSFCell cell = row.createCell(cellnum++);
// Set value to cell
if (obj instanceof String)
cell.setCellValue((String) obj);
else if (obj instanceof Double)
cell.setCellValue((Double) obj);
else if (obj instanceof Integer)
cell.setCellValue((Integer) obj);
}
}
Step 11 – Open a FileOutputStream to a new file named “EmployeeDetails.xlsx”. Write data to an OutputStream. Use the below code to write output stream.
FileOutputStream out = new FileOutputStream(new File("EmployeeDetails.xlsx"));
workbook.write(out);
Step 12 – Close the output stream.
out.close();
Below is the sample code for writing the data in an excel in Java.
import java.io.File;
import java.io.FileOutputStream;
import java.io.IOException;
import java.util.ArrayList;
import org.apache.poi.xssf.usermodel.XSSFCell;
import org.apache.poi.xssf.usermodel.XSSFRow;
import org.apache.poi.xssf.usermodel.XSSFSheet;
import org.apache.poi.xssf.usermodel.XSSFWorkbook;
public class ReadWriteExcelFile {
public static void main(String[] args) throws IOException {
// create blank workbook
XSSFWorkbook workbook = new XSSFWorkbook();
// Create a blank sheet
XSSFSheet sheet = workbook.createSheet("Write_TestData");
ArrayList<Object[]> data = new ArrayList<Object[]>();
		data.add(new String[] { "Name", "Id", "Salary" });
		data.add(new Object[] { "Jim", "001A", 10000 });
		data.add(new Object[] { "Jack", "1001B", 40000 });
		data.add(new Object[] { "Tim", "2001C", 20000 });
		data.add(new Object[] { "Gina", "1004S", 30000 });
// Iterate over data and write to sheet
	int rownum = 0;
		for (Object[] employeeDetails : data) {

			// Create Row
			XSSFRow row = sheet.createRow(rownum++);

			int cellnum = 0;
			for (Object obj : employeeDetails) {

				// Create cell
				XSSFCell cell = row.createCell(cellnum++);

				// Set value to cell
				if (obj instanceof String)
					cell.setCellValue((String) obj);
				else if (obj instanceof Double)
					cell.setCellValue((Double) obj);
				else if (obj instanceof Integer)
					cell.setCellValue((Integer) obj);
			}
		}
try {
// Write the workbook in file system
FileOutputStream out = new FileOutputStream(new File("EmployeeDetails.xlsx"));
workbook.write(out);
out.close();
System.out.println("EmployeeDetails.xlsx has been created successfully");
} catch (Exception e) {
e.printStackTrace();
} finally {
workbook.close();
}
}
}
The output of the above program is
Summary:
Create a WorkBook and Sheet
Prepare the data. Use ArrayList to store the rows of data.
Write Data to the Excel by iterating over each row and cell
Save the Workbook
Handle the exceptions appropriately
That’s it! We have written data in Excel.
Congratulations on making it through this tutorial and hope you found it useful! Happy Learning!! Cheers!!
In the previous tutorial, I have explained How to update data in existing excel in Java. In this Java Excel tutorial, I will explain how to create an Excel with formula in a Java program. Excel is very excellent in calculating formulas. The Apache POI library provides excellent support for working with formulas in Excel.
I’m using Apache POI to write data to the excel file. To download and install Apache POI, refer here.
If you are using maven, then you need to add below dependency in pom.xml.
Step 9 – Write the workbook to a File and close the workbook
try {

			// Write the workbook in file system
			FileOutputStream out = new FileOutputStream(new File("Salary_Slip.xlsx"));
			workbook.write(out);
			out.close();
			System.out.println("Excel written successfully.");

		} catch (IOException e) {
			e.printStackTrace();

		}
In the above line, note that you should make sure that the cell at position (1, 5) does exist, otherwise you get a NullPointerException.
Let us see a program where I have created a cell which contains the formula.
import org.apache.poi.xssf.usermodel.XSSFRow;
import org.apache.poi.xssf.usermodel.XSSFSheet;
import org.apache.poi.xssf.usermodel.XSSFWorkbook;

import java.io.File;
import java.io.FileOutputStream;
import java.io.IOException;

public class FormulaExcelDemo {

    public static void main(String[] args) {

        // Create object of XSSFWorkbook class
        XSSFWorkbook workbook = new XSSFWorkbook();

        // Create object of XSSFSheet class
        XSSFSheet sheet = workbook.createSheet("Calculate Salary");

        // Create Header row using XSSFRow class
        XSSFRow header = sheet.createRow(0);
        header.createCell(0).setCellValue("Employee_Name");
        header.createCell(1).setCellValue("Base_Salary");
        header.createCell(2).setCellValue("Variable_Pay");
        header.createCell(3).setCellValue("Other_Benefits");
        header.createCell(4).setCellValue("Total Salary");
        header.createCell(5).setCellValue("Base_Variable Salary");

        XSSFRow dataRow = sheet.createRow(1);
        dataRow.createCell(0).setCellValue("George");
        dataRow.createCell(1).setCellValue(5000);
        dataRow.createCell(2).setCellValue(650);
        dataRow.createCell(3).setCellValue(1200);

        // Set formula
        dataRow.createCell(4).setCellFormula("B2+C2+D2");
        dataRow.createCell(5).setCellFormula("SUM(B2:C2)");

        try {

            // Write the workbook in file system
            FileOutputStream out = new FileOutputStream(new File("Salary_Slip.xlsx"));
            workbook.write(out);
            out.close();
            System.out.println("Excel written successfully.");

        } catch (IOException e) {
            e.printStackTrace();

        }
    }
}
The output of the above program is
Updated Excel
That’s it! Well Done! Cheers!!
Congratulations on making it through this tutorial and hope you found it useful! Happy Learning!!
Reading data from Excel files is a common practice in software development and testing. Excel provides a tabular format which is easy to understand and navigate. Data can be read from Excel for manipulation, analysis and visualization using Java, Python, R and soon. There are several ways to read the data from Excel in Python, but we will discuss openpyxl.
Prerequisite:
Python is installed PIP is installed PyCharms is installed
for row in sheet.iter_rows(min_row=1, max_row=sheet.max_row, min_col=1, max_col=sheet.max_column):
    for cell in row:
        print(cell.value)
The complete program is
from openpyxl import load_workbook
from tabulate import tabulate

#Load the workbook
workbook = load_workbook("C:\\Users\\Vibha\\Automation\\SearchInBing.xlsx")

#Select the active worksheet
sheet = workbook.active

#Iterate over rows and columns
for row in sheet.iter_rows(min_row=1, max_row=sheet.max_row, min_col=1, max_col=sheet.max_column):
    for cell in row:
        print(cell.value)
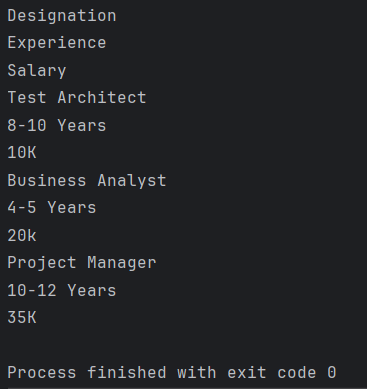
The output of the above program is
sheet.iter_rows() is used to iterate over the specified rows and columns
cell.value extracts the data from the each cell.
As we can see that the output is not displayed in structured format.
To display the output in the structure format, use the below program:
from openpyxl import load_workbook
from tabulate import tabulate

#Load the workbook
workbook = load_workbook("C:\\Users\\Vibha\\Automation\\SearchInBing.xlsx")

#Select the active worksheet
sheet = workbook.active

#Display data in a structured format
for row in sheet.iter_rows(min_row=1, max_row=sheet.max_row, min_col=1, max_col=sheet.max_column):
    row_data =[]
    for cell in row:
        row_data.append((cell.value))
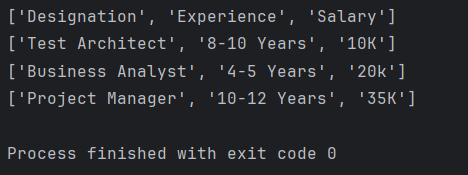
    print(row_data)
The output of the above program is
Display the Excel data in Tabular Format
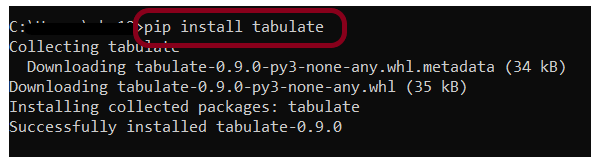
Install the tabulate library
pip install tabulate
Below is the complete program:
from openpyxl import load_workbook
from tabulate import tabulate

#Load the workbook
workbook = load_workbook("C:\\Users\\Vibha\\Automation\\SearchInBing.xlsx")

#Select the active worksheet
sheet = workbook.active

#Display data in a tabular format
data =[]
for row in sheet.iter_rows(values_only = True):
    data.append(list(row))

print(tabulate(data, headers='firstrow', tablefmt='grid'))
sheet.iter_rows(values_only = True) reads the rowss in the sheet and values_only=True ensures that we get the cell values only. Collect the data onto a list of lists.
tabulate(data, headers=’firstrow’, tablefmt=’grid’) is used to print the data nicely in grid format. headers=firstrow uses the first row as headers and tablefmt=grid sets the format to a grid style.
The output of the above program is
We are done! Congratulations on making it through this tutorial and hope you found it useful! Happy Learning!!
Python requests are generally used to fetch the content from a particular resource URI. Whenever we make a request to a specified URI through Python, it returns a response object. Now, this response object would be used to access certain features such as status code, status line, body, content, headers, etc.
If you are using PyCharm IDE then you need to install the Request library. Execute the below command using pip.
pip install -U requests
Install pytest
pip install -U pytest
Verifying HTTP Response Status Code
A response code indicating the status of the request (e.g., 200 OK, 404 Not Found). The status code that the server returns tells us whether the request was successful or not. If the request was successful, the server sends the status code in the range of 200-299. If the request was not successful, then the status code other than the range is returned.
response.status_code attribute allows us to access the HTTP status code returned by an HTTP request.
import requests


def test_get_statuscode():

    # Define the API endpoint
    url = "https://reqres.in/api/users/2"

    # Make a GET request to the API endpoint
    response = requests.get(url)

    # Retrieve status code
    status_code = response.status_code

    # Display the results
    print("Status Code:", status_code)
    assert status_code == 200
Save above file as ResponseStatusCode_test.py and run using the below command:
pytest ResponseStatusCode_test.py -s
Note: -s is shortcut for –capture=no
The output of the above program is
Handling different status code
The requests library handles different status codes through the response.status_code attribute.
import requests


def test_get_statuscode():

    # Define the API endpoint
    url = "https://reqres.in/api/users/200000"

    # Make a GET request to the API endpoint
    response = requests.get(url)

    # Retrieve status code
    status_code = response.status_code

    # Display the results
    if status_code == 200:
        print("Request is successful")
    elif status_code == 401:
        print("Unauthorized Request")
    elif status_code == 404:
        print("Resource not found")
    elif status_code == 500:
        print("Server Error")
    elif status_code == 503:
        print("Service Unavailable")
    else:
        print("Status Code:", status_code)
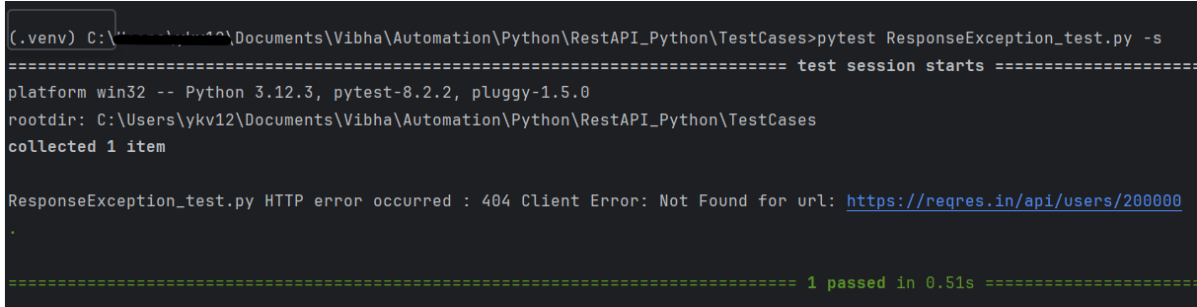
The output of the above program is
Raising an Exception for HTTP Errors
response.raise_for_status() method is use to raise an HTTP Error if the HTTP response returned an unsuccessful status code like 4xx, 5xx.
import requests


def test_get_statuscode():

    # Define the API endpoint
    url = "https://reqres.in/api/users/200000"

    # Make a GET request to the API endpoint
    response = requests.get(url)

    # Retrieve status code
    status_code = response.status_code

    # Display the results
    try:
        response.raise_for_status()
        print("Request is successful")
    except requests.exceptions.HTTPError as http_err:
        print(f"HTTP error occurred : {http_err}")
    except Exception as err:
        print(f"Other error occurred: {err}")
The output of the above program is
Verifying HTTP Response Status Line
import requests


def test_get_statusline():

    # Define the API endpoint
    url = "https://reqres.in/api/users/2"

    # Make a GET request to the API endpoint
    response = requests.get(url)

    # Retrieve status line (in this example, requests library does not provide status line directly, so we can construct it)
    status_line = f"{response.status_code} {response.reason}"

    # Display the results
    print("Status Line:", status_line)
    assert status_line == "200 OK"
The output of the above program is
Verifying HTTP Response Body
response.content returns the content of the response, in bytes.
import requests


def test_get_responsebody():

    # Define the API endpoint
    url = "https://reqres.in/api/users/2"

    # Make a GET request to the API endpoint
    response = requests.get(url)

    # Retrieve response content
    content = response.content

    # Display the results
    print("Response Content:", content)
The output of the above program is
Verifying HTTP Response HeaderContent Type
response.headers returns a dictionary of response headers. Headers are used for different purposes such as Authentication/ Passing and retrieving data from the server, etc.
import requests


def test_get_headers():

    # Define the API endpoint
    url = "https://reqres.in/api/users/2"

    # Make a GET request to the API endpoint
    response = requests.get(url)

    # Retrieve content type
    content_type = response.headers['Content-Type']

    # Display the results
    print("Content Type:", content_type)
    assert content_type == "application/json; charset=utf-8"
The output of the above program is
We are done! Congratulations on making it through this tutorial and hope you found it useful! Happy Learning!
In this tutorial I will explain the steps to delete a directory in Java.
The delete() method of the File class deletes the files and empty directory represented by the current File object. If a directory is not empty or has files, then it can’t be deleted directly. First, empty the directory, then delete the folder.
Suppose there exists a directory with path Desktop\Test. The next image displays the files and directories present inside Test folder. The Test directory has folders Demo_1, Demo_2, and Demo_3.
The next java programs illustrate how to delete a directory. This example uses a recursive method to delete the directory and all its contents, including subdirectories.
package org.example;

import java.io.File;

public class DeleteDirectoryDemo {

    public static void main(String[] args) {

        String directoryPath = "C:\\Users\\Vibha\\Desktop\\Test";

        //Create a file object for the directory
        File directory = new File(directoryPath);

        if(directory.exists()&& directory.isDirectory()) {
            boolean successful = deleteDirectory(directory);
            if (successful) {
                System.out.println("Directory deleted :" + directoryPath);
            } else {
                System.out.println("Failed to delete Directory :" + directoryPath);
            }
        } else {
            System.out.println("Directory does not exists :" + directoryPath);

            }
        }

        private static boolean deleteDirectory(File directory) {
            File[] allContents = directory.listFiles();

            if (allContents != null) {
                for (File file : allContents) {
                    deleteDirectory(file);
                    System.out.println("File deleted :" + file);
                }
            }
            return directory.delete();
        }
    }
Explanation
Step 1 – Check if the directory exists.
if(directory.exists()&& directory.isDirectory())
Step 2 – List files in the directory.
File[] allContents = directory.listFiles();
Step 3 – Delete files and subdirectories recursively
In this tutorial, we will discuss how to validate the HTTP response status code, status like, header, body and Content Type using REST Assured. Every HTTP Response received from a server in response to an HTTP request sent by the client has a status code.
Verifying HTTP Response Status Code with Rest Assured
A response code indicating the status of the request (e.g., 200 OK, 404 Not Found). The status code that the server returns tells us whether the request was successful or not. If the request was successful, the server sends the status code in the range of 200-299. If the request was not successful, then the status code other than the range is returned.
The getStatusCode() method returns an integer and then we can verify its value.
Below is an example.
@Test
    public void verifyStatusCode() {

        String BaseURL = "https://dummy.restapiexample.com/api";

        // GIVEN
       Response response =  given()

                // WHEN
                .when()
                .get("https://reqres.in/api/users/2")

                // THEN
                .then()
               .extract().response();

       int actualStatusCode = response.getStatusCode();
       System.out.println("Status Code : " + actualStatusCode);

        Assert.assertEquals(200, actualStatusCode);

    }
The output of the above program is
Verifying HTTP Response Status Line with Rest Assured
The getStatusLine() method returns a string and then we can verify its value.
 @Test
    public void verifyStatusLine() {

        // GIVEN
        Response response =  given()

                // WHEN
                .when()
                .get("https://reqres.in/api/users/2")

                // THEN
                .then()
                .extract().response();

        String actualStatusLine = response.getStatusLine();
        System.out.println("Status Line : " + actualStatusLine);

        Assert.assertEquals("HTTP/1.1 200 OK", actualStatusLine);

    }
The output of the above program is
Verifying HTTP Response Body with Rest Assured
In the below example, we are obtaining the body content of the HTTP response using the getBody().
XML Path Language(XPath) is a query language for selecting nodes from an XML document. XPath provides a syntax for navigating through elements and attributes in an XML document. Paths can be absolute or relative:
Absolute paths starts from the root node, using a single slash (/) e.g., “//rootelement”.
Relative paths start from the current context node, using the double slashes (//) e.g., “//element”.
What is XmlPath in Rest Assured?
XmlPath is a utility that allows us to parse and query XML responses. XmlPath is analogous to JsonPath, but it is specifically designed for handling the XML data.
Add the below mentioned dependency to the pom.xml.
In this tutorial we’re going to talk about parameterizing the REST Assured tests.
What is Parameterization?
Parameterization refers to the process of passing different set of data to the same code. This allows you to verify that the code behaves as expected for various inputs without writing multiple test cases. It enhances the coverage of the test suite by testing the functionality with different data sets and helps identify edge cases or potential bugs that could occur with different input values.
We are using junit4-dataprovider dependency here.
<!-- Data Provider -->
 <dependency>
      <groupId>com.tngtech.junit.dataprovider</groupId>
      <artifactId>junit4-dataprovider</artifactId>
      <version>${junit.dataprovider.version}</version>
      <scope>test</scope>
</dependency>
The first step is to create a test data collection, which is a collection of input and expected outcome values that we want to feed to our test.
@RunWith(DataProviderRunner.class): This annotation tells JUnit to run the tests in this class using the DataProviderRunner, which allows the use of the @DataProvider annotation for parameterized tests
@RunWith(DataProviderRunner.class)
@DataProvider: This annotation marks the method responseData as a provider of test data. The method returns a 2D array of objects (Object[][]), where each inner array represents a set of parameters for a single test run. The responseData method provides four sets of parameters: an ID, a first name, and a last name.
This code defines a parameterized test that verifies the first name and last name of users returned by the API https://reqres.in/api/users/{id} for given user IDs. The test runs multiple times, once for each set of parameters provided by the responseData method. The RestAssured library is used to perform the API requests and assertions.
The output of the above program is
Congratulations on making it through this tutorial and hope you found it useful! Happy Learning!! Cheers!!