In this tutorial, I will explain how to Integrate Allure Report 3 with Playwright, Java and JUnit5.
What is an Allure Report?
Allure Framework is a flexible, lightweight, multi-language test report tool. It shows a very concise representation of what has been tested in a neat web report form. It also allows everyone participating in the development process to extract maximum useful information from the everyday execution of tests.
Refer to this tutorial to install allure – What is Allure Report?.
In this tutorial, we are using Allure Report 3.
Table of Contents
- What is an Allure Report?
- System requirements
- Dependency List
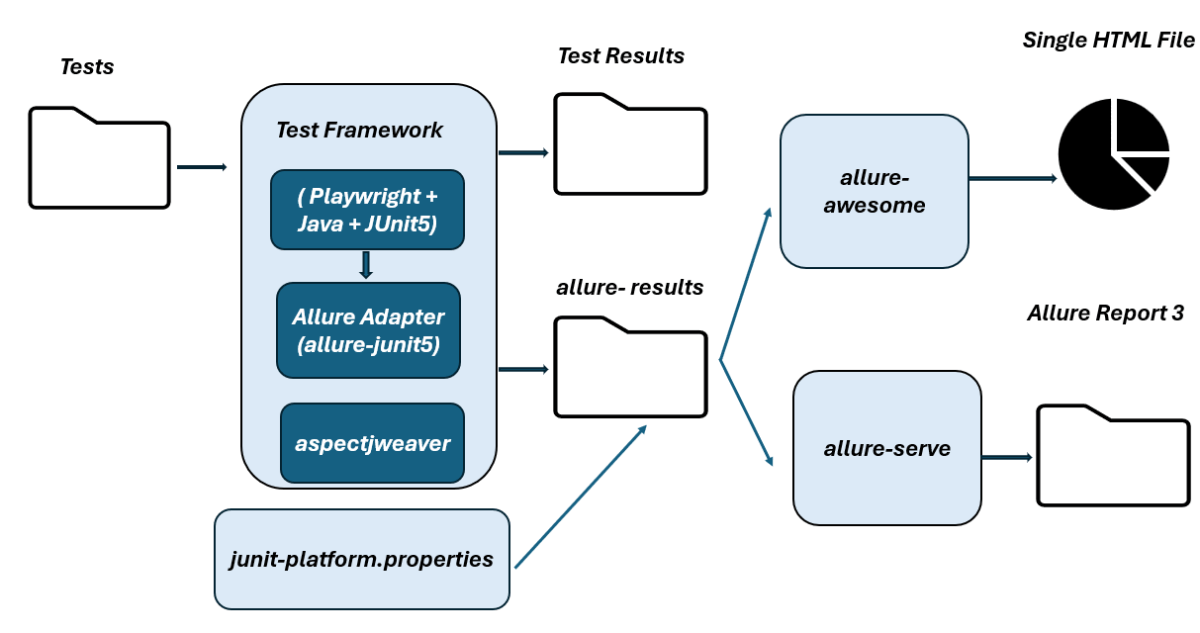
- High-Level Execution Flow
- Implementation Steps
- 1. Set Up the Environment
- Project Structure for Maintainability
- Creating Page Object Classes in src/test/java
- Create the utility package in src/test/java
- Write the Test Scripts
- Specifying Allure Results location
- Run the Tests and Generate Allure Report
- How to Generate an Allure Report
- How to View a Report
System requirements
- Java 17 installed
- Maven installed
- Eclipse or IntelliJ installed
- Allure installed
- Browsers on which tests need to be run, like Chrome, Firefox, etc.
Dependency List
- Playwright – 1.57.0
- Java 17
- Maven – 3.9.6
- Allure Report – 2.32.0
- Aspectj – 1.9.25
- Maven Compiler Plugin – 3.13.0
- Maven Surefire Plugin – 3.5.4
High-Level Execution Flow
Implementation Steps
1. Set Up the Environment
Step 1 – Update the Properties section in Maven pom.xml
<properties>
    <project.build.sourceEncoding>UTF-8</project.build.sourceEncoding>
    <playwright.version>1.57.0</playwright.version>
    <junit.jupiter.engine.version>6.1.0-M1</junit.jupiter.engine.version>
    <junit.jupiter.api.version>6.1.0-M1</junit.jupiter.api.version>
    <junit.jupiter.params.version>6.1.0-M1</junit.jupiter.params.version>
    <junit.platform.launcher.version>6.1.0-M1</junit.platform.launcher.version>
    <maven.compiler.plugin.version>3.14.1</maven.compiler.plugin.version>
    <maven.compiler.source.version>17</maven.compiler.source.version>
    <maven.compiler.target.version>17</maven.compiler.target.version>
    <maven.surefire.plugin.version>3.5.4</maven.surefire.plugin.version>
    <maven.compiler.source>17</maven.compiler.source>
    <maven.compiler.target>17</maven.compiler.target>
    <maven.site.plugin.version>4.0.0-M16</maven.site.plugin.version>
    <allure.version>2.32.0</allure.version>
    <aspectj.version>1.9.25.1</aspectj.version>
  </properties>
Step 2 – Add dependencies to pom.xml
Add Playwright, JUnit Jupiter Engine, JUnit Jupiter API, JUnit Param, JUnit Platform and Allure-JUnit5 dependencies to pom.xml (Maven Project).
 <dependencyManagement>
      <dependencies>
        <dependency>
          <groupId>io.qameta.allure</groupId>
          <artifactId>allure-bom</artifactId>
          <version>${allure.version}</version>
          <type>pom</type>
          <scope>import</scope>
        </dependency>
      </dependencies>
    </dependencyManagement>

  <dependencies>

    <dependency>
      <groupId>com.microsoft.playwright</groupId>
      <artifactId>playwright</artifactId>
      <version>${playwright.version}</version>
    </dependency>

    <dependency>
      <groupId>org.junit.jupiter</groupId>
      <artifactId>junit-jupiter-engine</artifactId>
      <version>${junit.jupiter.engine.version}</version>
      <scope>test</scope>
    </dependency>

    <dependency>
      <groupId>org.junit.jupiter</groupId>
      <artifactId>junit-jupiter-api</artifactId>
      <version>${junit.jupiter.api.version}</version>
      <scope>test</scope>
    </dependency>

    <dependency>
      <groupId>org.junit.jupiter</groupId>
      <artifactId>junit-jupiter-params</artifactId>
      <version>${junit.jupiter.params.version}</version>
      <scope>test</scope>
    </dependency>

    <dependency>
      <groupId>org.junit.platform</groupId>
      <artifactId>junit-platform-launcher</artifactId>
      <version>${junit.platform.launcher.version}</version>
      <scope>test</scope>
    </dependency>

    <dependency>
      <groupId>io.qameta.allure</groupId>
      <artifactId>allure-junit5</artifactId>
      <scope>test</scope>
    </dependency>

  </dependencies>
Step 3 – Update the Build Section of pom.xml in the Allure Report Project
Allure leverages AspectJ for the functionality of @Step and @Attachment annotations.
 <build>
    <plugins>
      <plugin>
        <groupId>org.apache.maven.plugins</groupId>
        <artifactId>maven-compiler-plugin</artifactId>
        <version>${maven.compiler.plugin.version}</version>
        <configuration>
          <source>${maven.compiler.source.version}</source>
          <target>${maven.compiler.target.version}</target>
        </configuration>
      </plugin>

      <plugin>
        <groupId>org.apache.maven.plugins</groupId>
        <artifactId>maven-surefire-plugin</artifactId>
        <version>${maven.surefire.plugin.version}</version>
        <configuration>
          <argLine>
            -javaagent:"${settings.localRepository}/org/aspectj/aspectjweaver/${aspectj.version}/aspectjweaver-${aspectj.version}.jar"
          </argLine>
        </configuration>
        <dependencies>
          <dependency>
            <groupId>org.aspectj</groupId>
            <artifactId>aspectjweaver</artifactId>
            <version>${aspectj.version}</version>
          </dependency>
        </dependencies>
      </plugin>

    </plugins>
  </build>
The entire pom.xml is
<project xmlns="http://maven.apache.org/POM/4.0.0" xmlns:xsi="http://www.w3.org/2001/XMLSchema-instance"
         xsi:schemaLocation="http://maven.apache.org/POM/4.0.0 http://maven.apache.org/xsd/maven-4.0.0.xsd">
  <modelVersion>4.0.0</modelVersion>

  <groupId>com.example</groupId>
  <artifactId>PageObjectModel_Playwright_JUnit5</artifactId>
  <version>1.0-SNAPSHOT</version>
  <packaging>jar</packaging>

  <name>PageObjectModel_Playwright_JUnit5</name>
  <url>http://maven.apache.org</url>

  <properties>
    <project.build.sourceEncoding>UTF-8</project.build.sourceEncoding>
    <playwright.version>1.57.0</playwright.version>
    <junit.jupiter.engine.version>6.1.0-M1</junit.jupiter.engine.version>
    <junit.jupiter.api.version>6.1.0-M1</junit.jupiter.api.version>
    <junit.jupiter.params.version>6.1.0-M1</junit.jupiter.params.version>
    <junit.platform.launcher.version>6.1.0-M1</junit.platform.launcher.version>
    <maven.compiler.plugin.version>3.14.1</maven.compiler.plugin.version>
    <maven.compiler.source.version>17</maven.compiler.source.version>
    <maven.compiler.target.version>17</maven.compiler.target.version>
    <maven.surefire.plugin.version>3.5.4</maven.surefire.plugin.version>
    <maven.compiler.source>17</maven.compiler.source>
    <maven.compiler.target>17</maven.compiler.target>
    <maven.site.plugin.version>4.0.0-M16</maven.site.plugin.version>
    <allure.version>2.32.0</allure.version>
    <aspectj.version>1.9.25.1</aspectj.version>
  </properties>


    <!-- Add allure-bom to dependency management to ensure correct versions of all the dependencies are used -->
    <dependencyManagement>
      <dependencies>
        <dependency>
          <groupId>io.qameta.allure</groupId>
          <artifactId>allure-bom</artifactId>
          <version>${allure.version}</version>
          <type>pom</type>
          <scope>import</scope>
        </dependency>
      </dependencies>
    </dependencyManagement>

  <dependencies>

    <dependency>
      <groupId>com.microsoft.playwright</groupId>
      <artifactId>playwright</artifactId>
      <version>${playwright.version}</version>
    </dependency>

    <dependency>
      <groupId>org.junit.jupiter</groupId>
      <artifactId>junit-jupiter-engine</artifactId>
      <version>${junit.jupiter.engine.version}</version>
      <scope>test</scope>
    </dependency>

    <dependency>
      <groupId>org.junit.jupiter</groupId>
      <artifactId>junit-jupiter-api</artifactId>
      <version>${junit.jupiter.api.version}</version>
      <scope>test</scope>
    </dependency>

    <dependency>
      <groupId>org.junit.jupiter</groupId>
      <artifactId>junit-jupiter-params</artifactId>
      <version>${junit.jupiter.params.version}</version>
      <scope>test</scope>
    </dependency>

    <dependency>
      <groupId>org.junit.platform</groupId>
      <artifactId>junit-platform-launcher</artifactId>
      <version>${junit.platform.launcher.version}</version>
      <scope>test</scope>
    </dependency>

    <dependency>
      <groupId>io.qameta.allure</groupId>
      <artifactId>allure-junit5</artifactId>
      <scope>test</scope>
    </dependency>

  </dependencies>

  <build>
    <plugins>
      <plugin>
        <groupId>org.apache.maven.plugins</groupId>
        <artifactId>maven-compiler-plugin</artifactId>
        <version>${maven.compiler.plugin.version}</version>
        <configuration>
          <source>${maven.compiler.source.version}</source>
          <target>${maven.compiler.target.version}</target>
        </configuration>
      </plugin>

      <plugin>
        <groupId>org.apache.maven.plugins</groupId>
        <artifactId>maven-surefire-plugin</artifactId>
        <version>${maven.surefire.plugin.version}</version>
        <configuration>
          <argLine>
            -javaagent:"${settings.localRepository}/org/aspectj/aspectjweaver/${aspectj.version}/aspectjweaver-${aspectj.version}.jar"
          </argLine>
        </configuration>
        <dependencies>
          <dependency>
            <groupId>org.aspectj</groupId>
            <artifactId>aspectjweaver</artifactId>
            <version>${aspectj.version}</version>
          </dependency>
        </dependencies>
      </plugin>
    </plugins>
  </build>

</project>
2. Project Structure for Maintainability
Creating a well-organized project structure is crucial for maintaining a scalable and efficient automation framework.
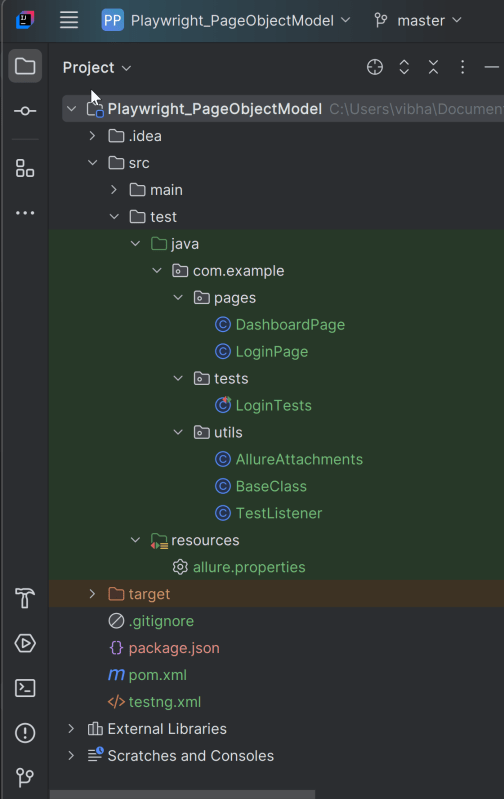
3. Creating Page Object Classes in src/test/java
Please refer to – Setting Up Page Object Model with Playwright and JUnit5 to know more about the Page Object Classes and the respective code.
LoginPage
package com.example.pages;

import com.microsoft.playwright.Locator;
import com.microsoft.playwright.Page;
import io.qameta.allure.Step;

public class LoginPage {

    private final Page page;

    // Locators
    private final Locator usernameLocator;
    private final Locator passwordLocator;
    private final Locator submitLocator;
    private final Locator invalidCredentialsLocator;
    private final Locator missingUsernameErrorMessageLocator;

    public LoginPage(Page page) {
        this.page = page;
        this.usernameLocator = page.locator("input[name='username']");
        this.passwordLocator = page.locator("input[name='password']");
        this.submitLocator = page.locator("button[type='submit']");
        this.invalidCredentialsLocator = page.locator("//p[contains(@class, \"oxd-text oxd-text--p oxd-alert-content-text\")]");
        this.missingUsernameErrorMessageLocator = page.locator("//span[contains(@class, 'oxd-text oxd-text--span oxd-input-field-error-message oxd-input-group__message')]");
    }

    @Step("Enter credentials")
    public void login(String user, String pass){
        usernameLocator.fill(user);
        passwordLocator.fill(pass);
        submitLocator.click();
    }

    @Step("Get Error Message for invalid credentials")
    public String getErrorMessage () {
        return invalidCredentialsLocator.textContent();
    }

    @Step("Get Error Message for missing username")
    public String getMissingUsernameErrorMessage () {
        return missingUsernameErrorMessageLocator.textContent();
    }
}
DashboardPage
package com.example.pages;

import com.microsoft.playwright.Locator;
import com.microsoft.playwright.Page;
import io.qameta.allure.Step;

public class DashboardPage {

    private Page page;

    private final Locator headingLocator;

    public DashboardPage(Page page){
        this.page = page;
        this.headingLocator = page.locator("//h6[contains(@class, \"oxd-topbar-header-breadcrumb-module\")]");
        this.assignLeaveLocator = page.locator("//[contains(@text, \"Assign Leave\")]");
        this.leaveListLocator = page.getByTitle("Leave List");

    }

    @Step("Get Heading of Dashboard page")
    public String getDashboardPageHeading() {
        return headingLocator.textContent();
    }

}
4. Create the utility package in src/test/java
BaseClass
This class contains the common variables and methods used throughout the project, like setup and teardown methods.
package com.example.utils;

import com.microsoft.playwright.*;
import org.junit.jupiter.api.*;

// Subclasses will inherit PER_CLASS behavior.
@TestInstance(TestInstance.Lifecycle.PER_CLASS)
public class BaseTests {

    // Shared between all tests in the class.
    static Playwright playwright;
    static Browser browser;

    // New instance for each test method.
    BrowserContext context;
    protected Page page;

    @BeforeAll
    public static void launchBrowser() {
        playwright = Playwright.create();
        browser = playwright.chromium().launch(new BrowserType.LaunchOptions().setHeadless(false));

    }

    @AfterAll
    public static void closeBrowser() {
        playwright.close();
    }


    @BeforeEach
    public void createContextAndPage() {
        context = browser.newContext();
        page = context.newPage();
        page.navigate("https://opensource-demo.orangehrmlive.com/web/index.php/auth/login");
    }

    @AfterEach
    public void closeContext() {
        context.close();
    }
}
5. Write the Test Scripts
Create a Test files under src/test/java. Use these page classes in your test scripts to perform end-to-end scenarios. This will keep your tests clean and focused on logic rather than details about the UI elements.
We will be automating the following test scenario using Playwright Java and run them in Chromium.
- Verify the invalid username generates error message “Invalid credentials” with different set of invalid test data.
- Verify that the user is able to login to the application successfully.
Creating a Login Page Test Class:
package com.example.tests;

import com.example.pages.DashboardPage;
import com.example.pages.LoginPage;
import com.example.utils.BaseTests;
import org.junit.jupiter.api.Assertions;
import org.junit.jupiter.api.Test;
import org.junit.jupiter.params.ParameterizedTest;
import org.junit.jupiter.params.provider.CsvFileSource;
import io.qameta.allure.Description;
import io.qameta.allure.Issue;
import io.qameta.allure.Link;
import io.qameta.allure.Owner;
import io.qameta.allure.Severity;
import io.qameta.allure.TmsLink;
import org.junit.jupiter.api.DisplayName;

import static io.qameta.allure.SeverityLevel.CRITICAL;

public class LoginTests extends BaseTests {

    @ParameterizedTest
    @CsvFileSource(files = "src/test/resources/testData/credentials.csv", numLinesToSkip = 1)
    @DisplayName("Login Authentication")
    @Description("This test attempts to log into the website using a incorrect username and a password. Fails if any error happens.")
    @Severity(CRITICAL)
    @Owner("Vibha Singh")
    @Link(name = "Website", url = "https://opensource-demo.orangehrmlive.com/web/index.php/auth/login")
    @Issue("AUTH-123")
    @TmsLink("TMS-456")
    public void unsuccessfulLogin(String username, String password, String expectedErrorMessage) {

        LoginPage loginPage = new LoginPage(page);
        loginPage.login(username,password);
        String actualErrorMessage = loginPage.getErrorMessage();
        Assertions.assertEquals(expectedErrorMessage, actualErrorMessage, "Incorrect error message is displayed");

   }

    @Test
    @DisplayName("Successful Login Authentication")
    @Description("This test attempts to log into the website using a correct username and a password. Fails if any error happens.")
    @Severity(CRITICAL)
    @Owner("Vibha Singh")
    @Link(name = "Website", url = "https://opensource-demo.orangehrmlive.com/web/index.php/auth/login")
    @Issue("AUTH-124")
    @TmsLink("TMS-460")
    public void successfulLogin() {

        LoginPage loginPage = new LoginPage(page);
        loginPage.login("Admin","admin123");
        DashboardPage dashboardPage = new DashboardPage(page);
        String actualHeading = dashboardPage.getDashboardPageHeading();
        Assertions.assertEquals("Dashboard",actualHeading, "Unable to login to the application");

    }

}
Use the @Description() annotation to set a description statically or use the description() method to set it dynamically in runtime.
@Description("This test attempts to log into the website using a invalid login and a password that result in error")
6. Specifying Allure Results location
Allure, by default, saves test results in the project’s root directory. However, it is recommended to store your test results in the build output directory.
To configure this, create an junit-platform.properties file and place it in the test resources directory of your project, which is typically located at src/test/resources:
#allure.properties
allure.results.directory=target/allure-results
7. Run the Tests and Generate Allure Report
To run the tests, use the below command
mvn clean test
The output of the above program is
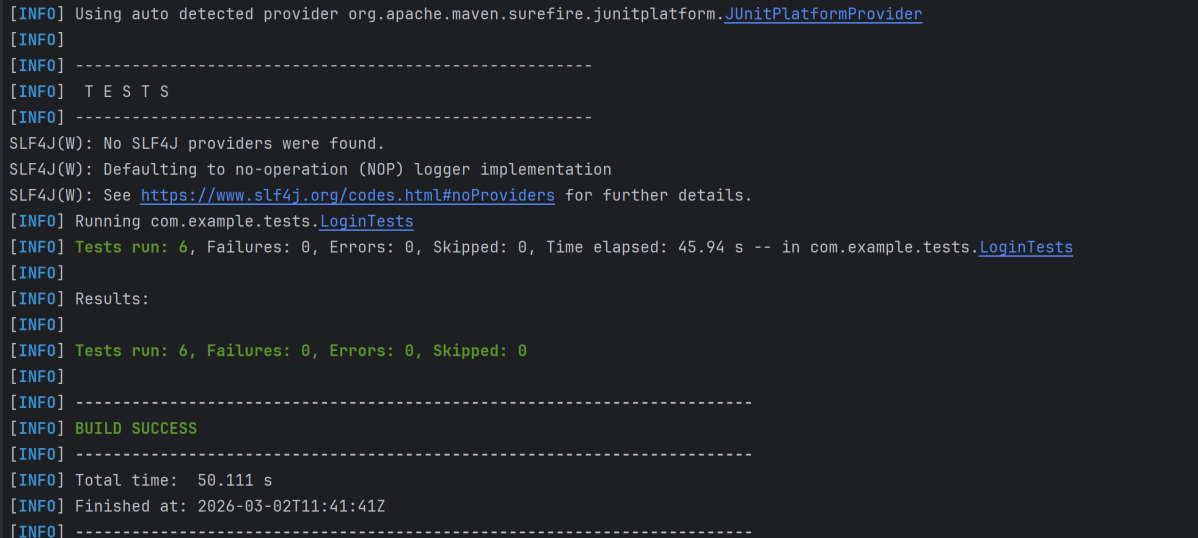
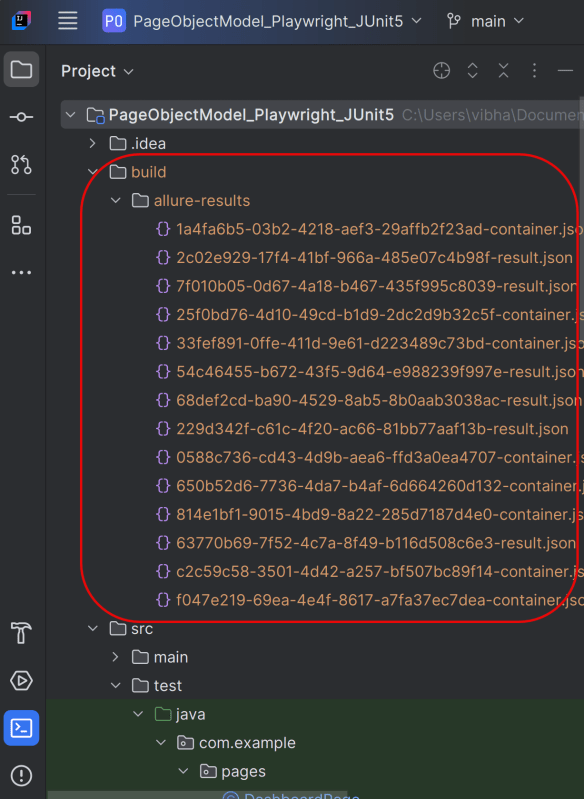
This will create the allure-results folder with all the test reports within build folder. These files will be used to generate Allure Report.
8. How to Generate an Allure Report
allure generate processes the test results and saves an HTML report into the allure-report directory. To view the report, use the allure open command.
allure serve creates the same report as allure generate, then automatically opens the main page of the report in a web browser.
Use the command below to generate the Allure Report
allure serve build/allure-results

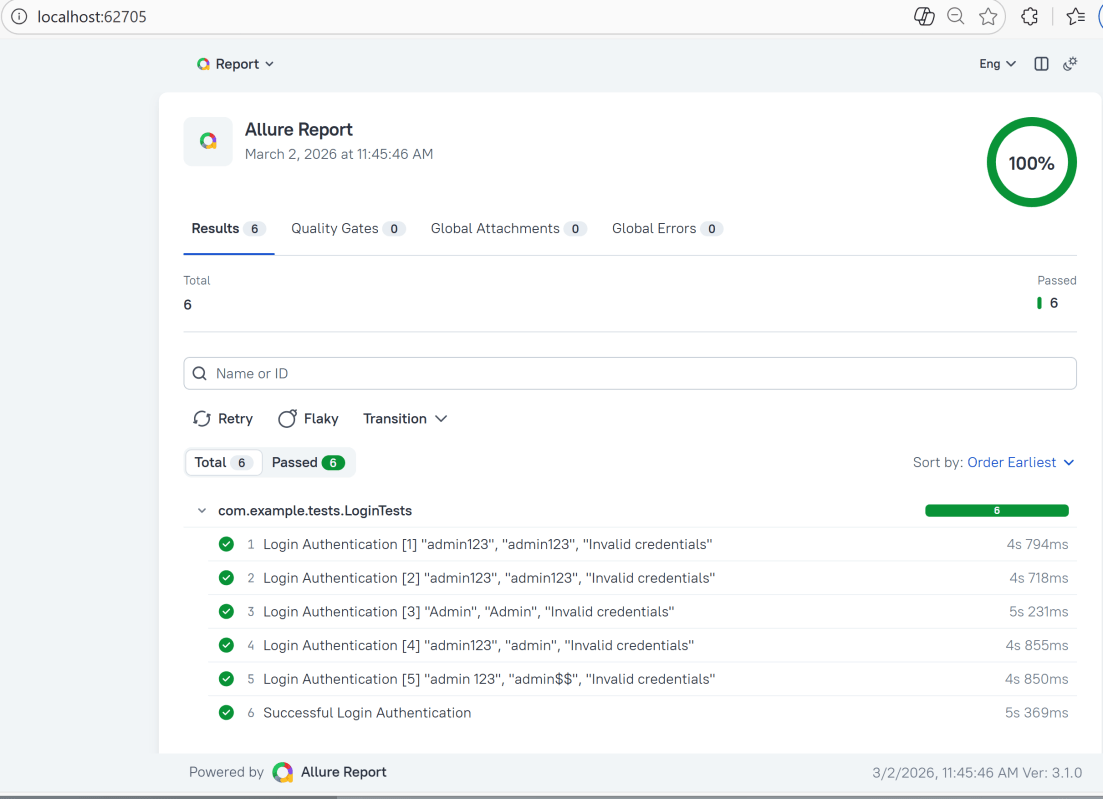
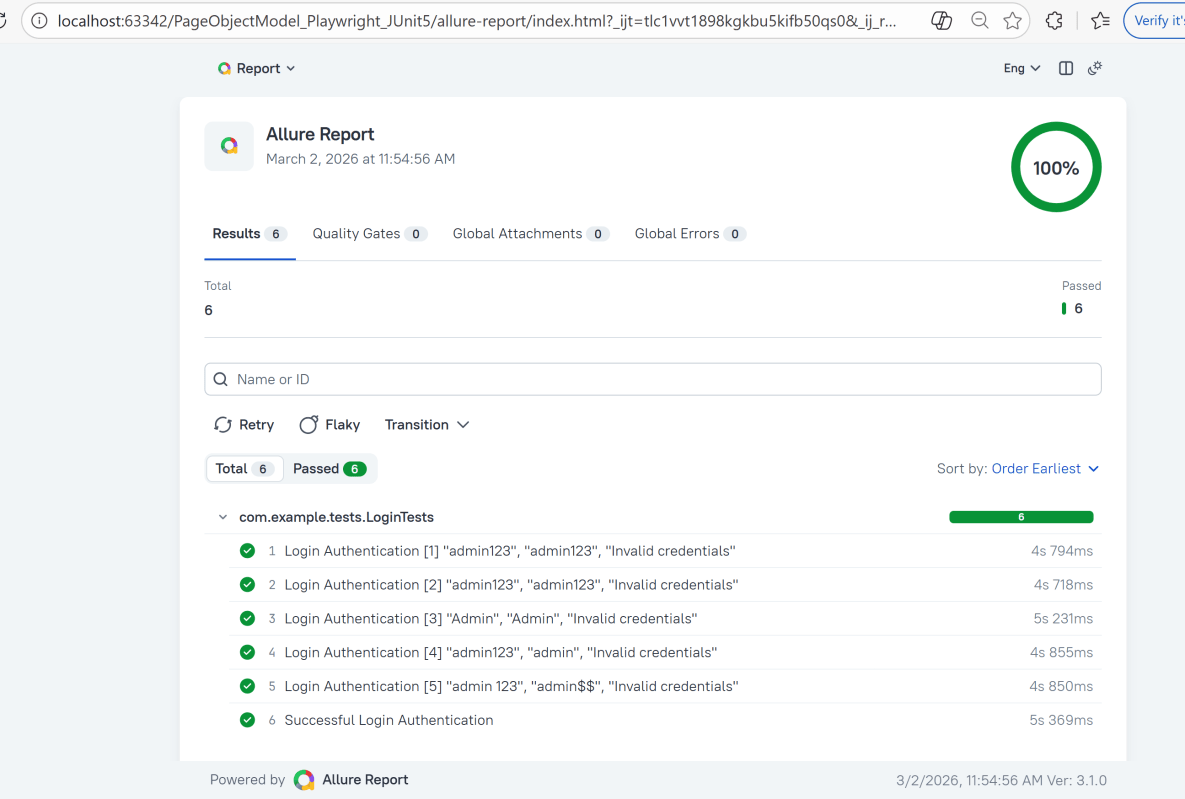
This will generate the beautiful Allure Test Report as shown below.
9. How to View a Report
Test reports generated with Allure Report are basically small HTML websites intended to be viewed in a web browser.
Title
A human-readable title of the test. If not provided, the function name is used instead.
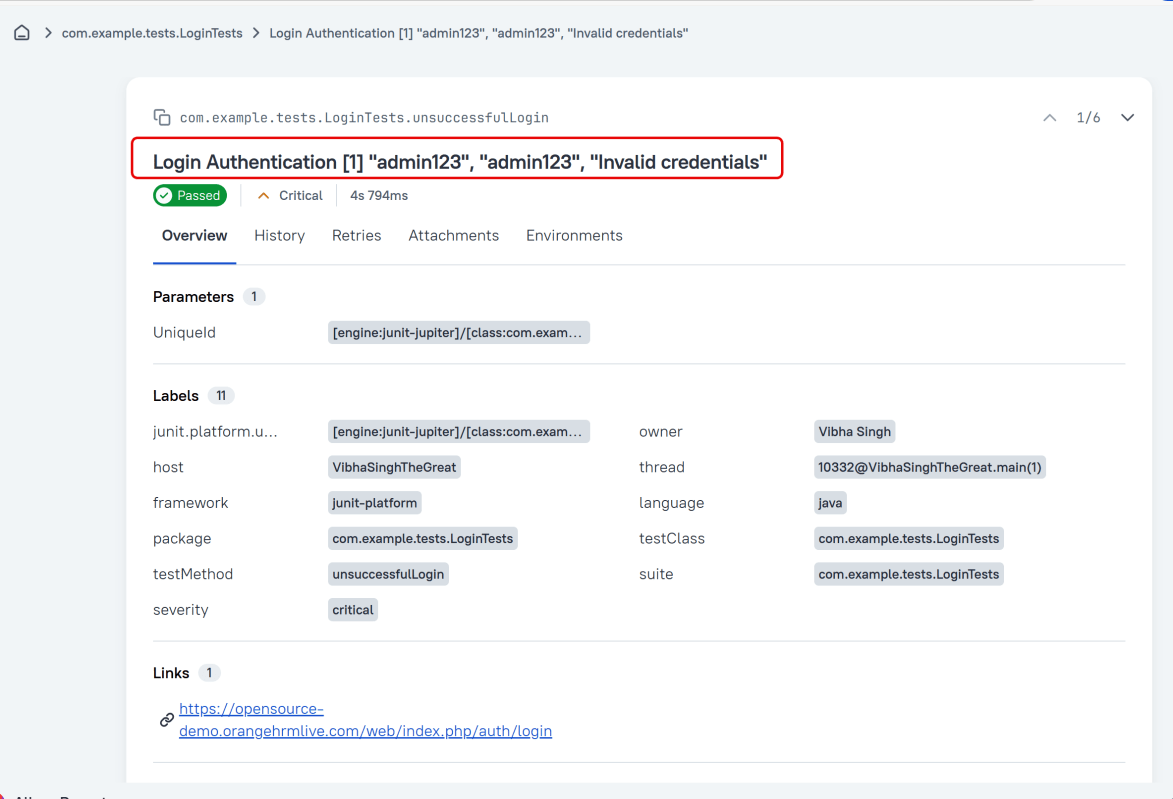
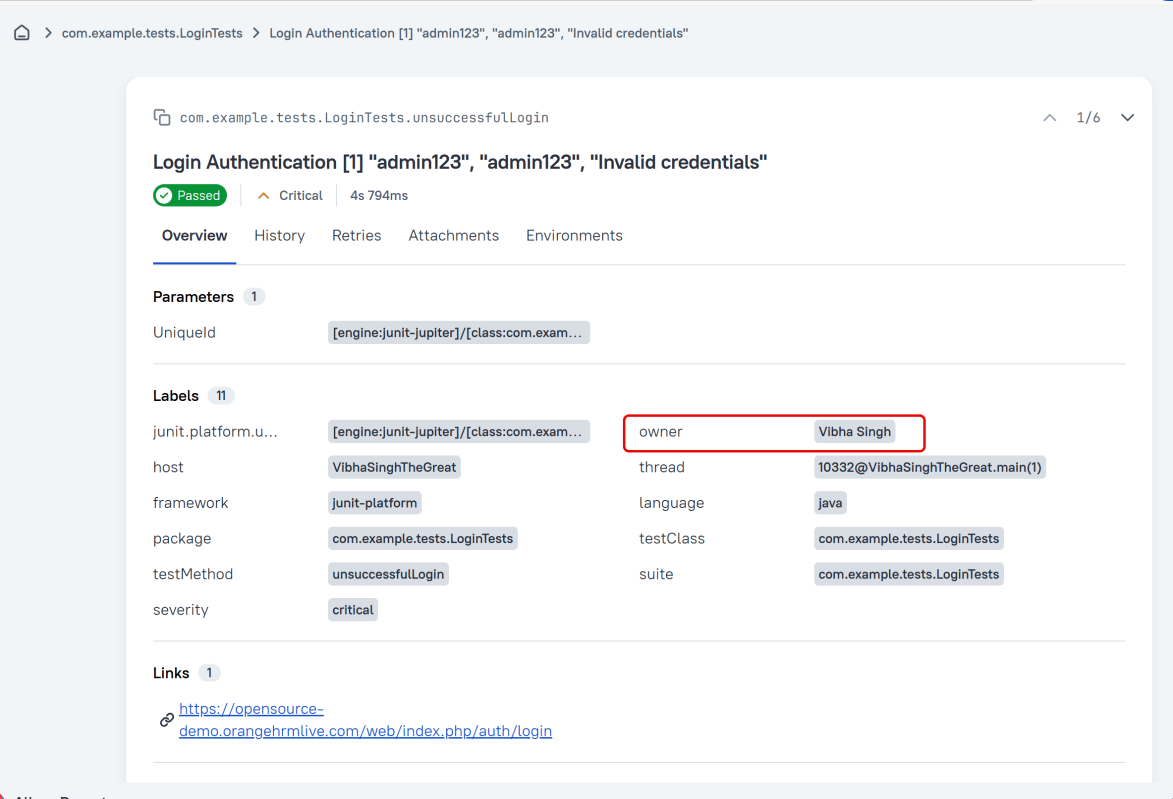
Owner
The team member who is responsible for the test’s stability. For example, this can be the test’s author, the leading developer of the feature being tested, etc.
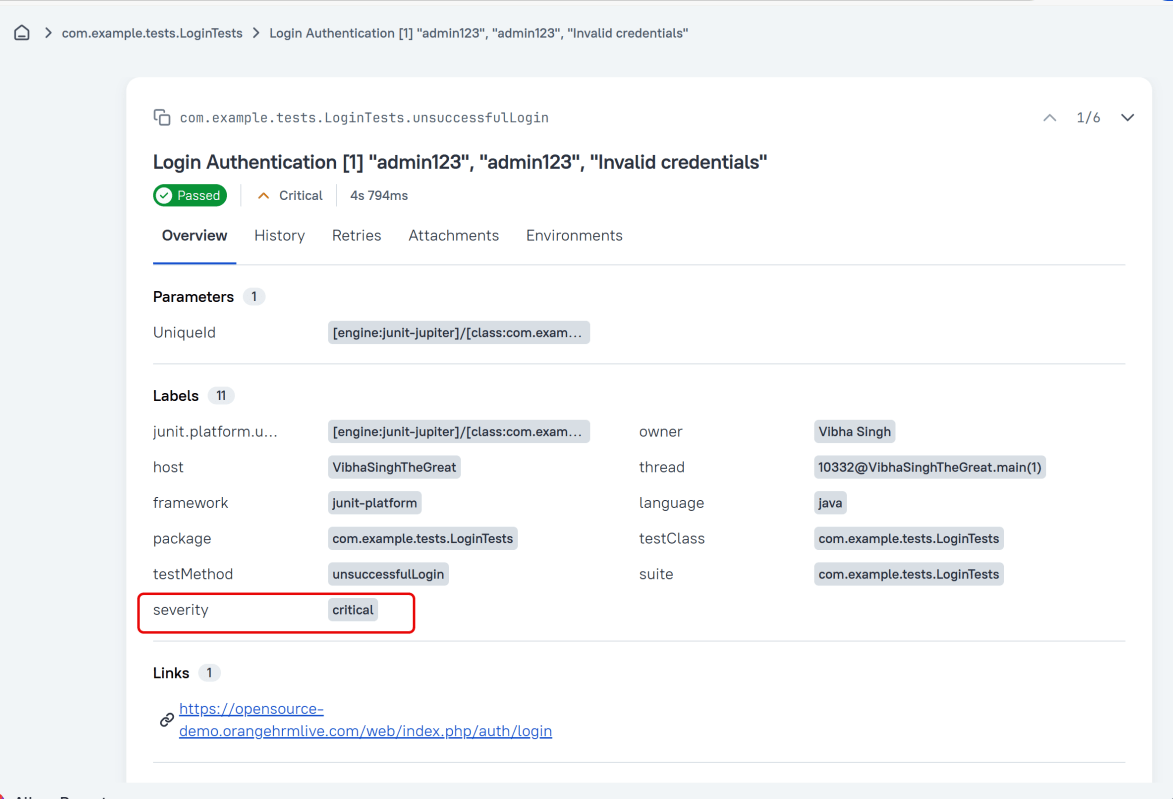
Severity
A value indicating how important the test is. This may give the future reader an idea of how to prioritize the investigations of different test failures.
Allowed values are: “trivial”, “minor”, “normal”, “critical”, and “blocker”.
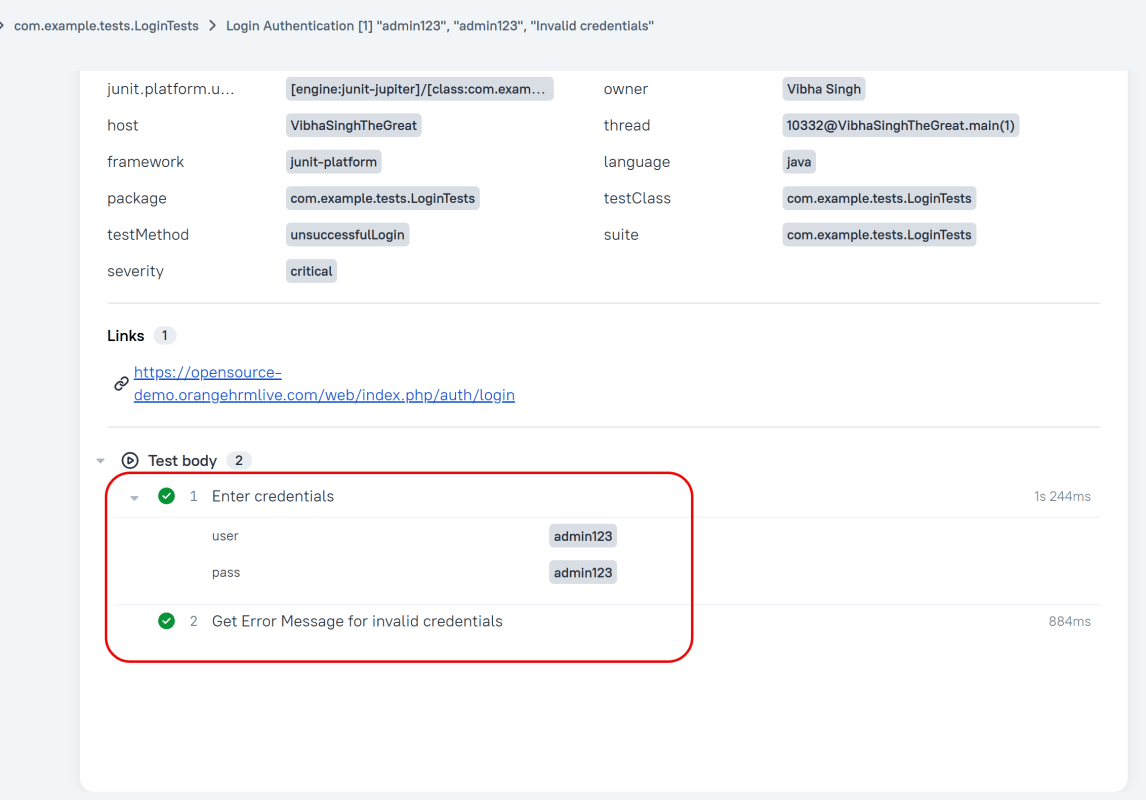
Steps
Allure JUnit 5 provides three ways of creating steps and sub-steps: “annotated steps”, “lambda steps” and “no-op steps”
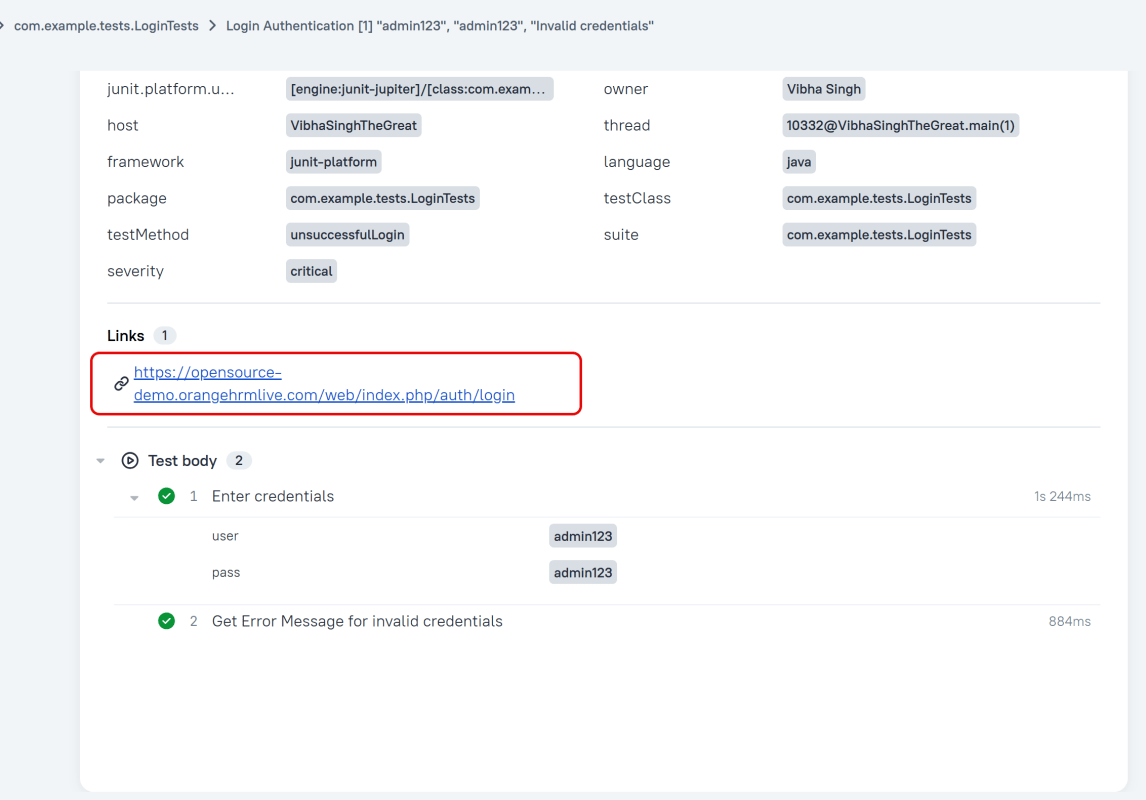
Links
We can provide list of links to webpages that may be useful for a reader investigating a test failure.
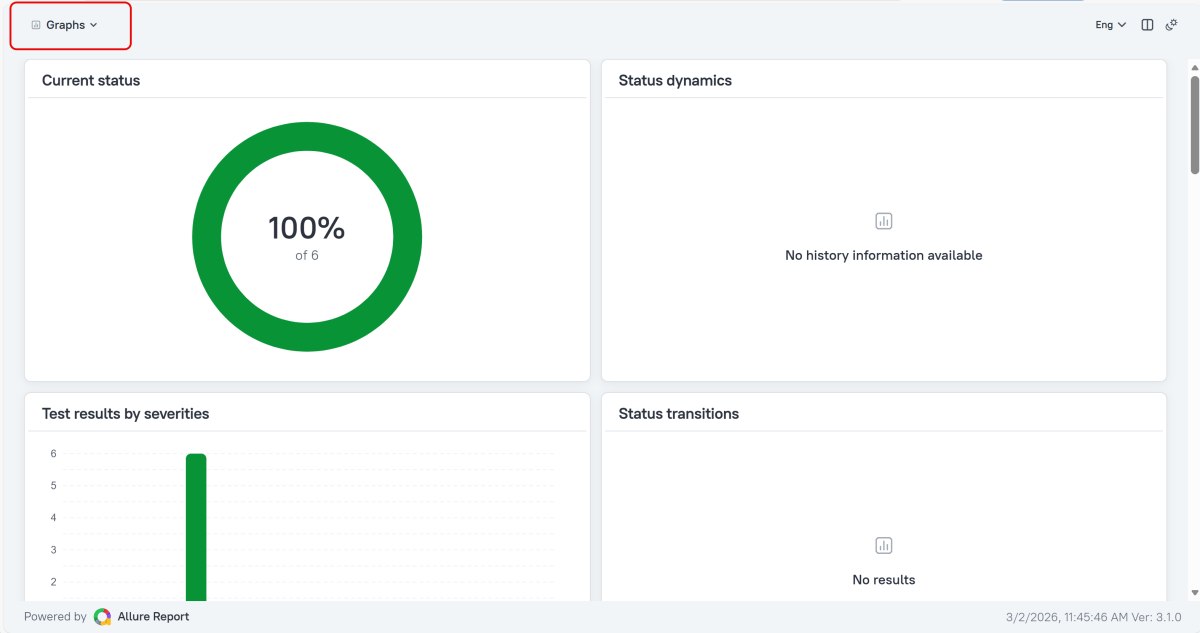
Graphs in Allure Report
Graphs allow you to see different statistics collected from the test data: status breakdown or severity and duration diagrams.
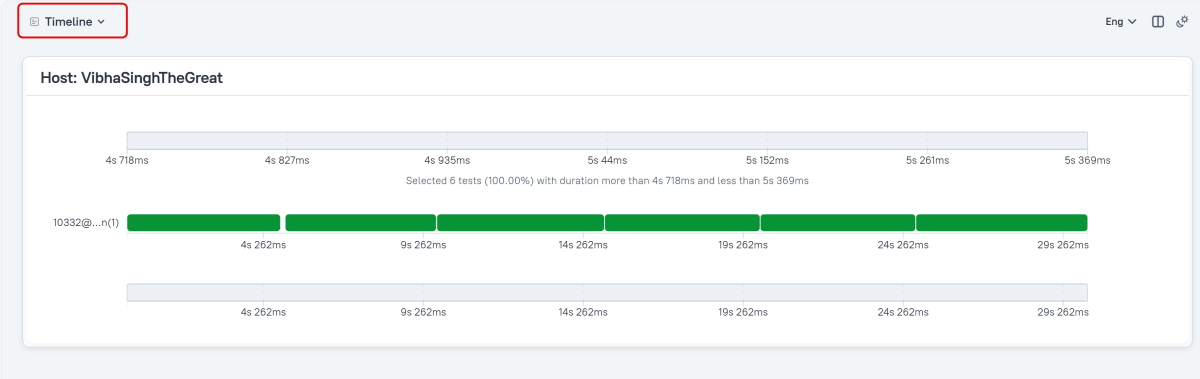
Timeline in Allure Report
The timeline tab visualizes retrospective test execution. Allure adaptors collect precise timings of tests. Here on this tab, they are arranged according to their sequential or parallel timing structure.
Generate Reports with the Allure Awesome Plugin
Allure 3 Report also features an advanced report generator plugin – Allure Awesome. It supports additional configuration options, such as generating the report as a single HTML file, setting the theme, custom branding and language of the generated report, and taking known issues into account.
To manually generate a customized Allure Awesome report, use the awesome command:
allure awesome build/allure-results

This will create the allure-report folder with all the test files and index.html report.
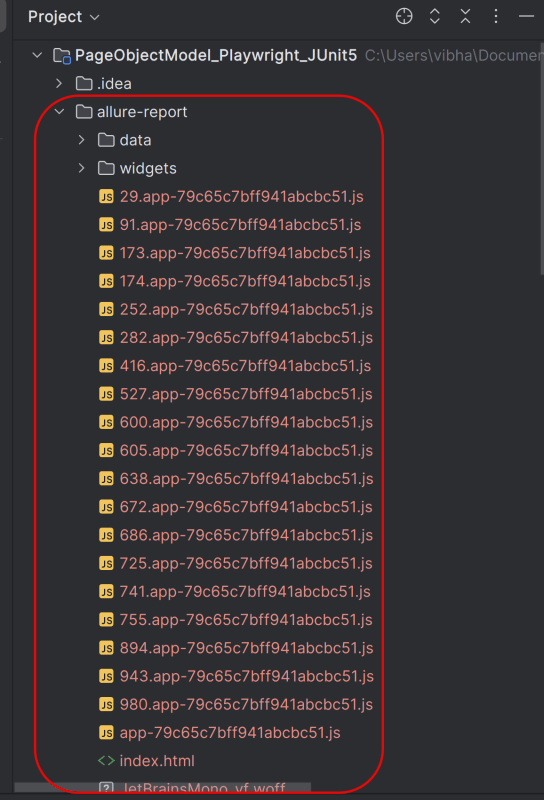
Open “index.html“, as this is an HTML report, and open it with the browser. The below image shows index.html.
Right click on index.html->Open In ->Browser ->Edge( any browser).
Summary:
- Add required dependencies – Include Playwright, JUnit 5, and Allure JUnit5 in pom.xml, and configure the Allure Maven plugin.
- Write Test Case – Implement test cases using JUnit 5 syntax, leveraging Playwright for browser-based actions. Use annotations like @Test, @BeforeEach and @AfterEach to structure your tests.
- Enable JUnit 5 extension auto-detection – Create src/test/resources/junit-platform.properties and turn on extension autodetection.
- Annotate tests & capture artifacts – Use Allure annotations (@Epic, @Feature, @Story, @Severity, @Description), log steps with Allure.step, and attach screenshots or other files.
- Execute Tests and Generate Reports – Execute mvn clean test, then run allure serve allure-results to build and open the HTML report.
Congratulations!! We have integrated an allure report with Playwright, Java, and JUnit5. I hope this tutorial is useful to you.
Additional Tutorials on Allure Reports
Integration of Allure Report with Selenium and JUnit4
Integration of Allure Report with Selenium and TestNG
Gradle – Allure Report for Selenium and JUnit4
Gradle – Allure Report for Cucumber, Selenium and TestNG
Integration of Allure Report with Rest Assured and JUnit4
