In the previous tutorial, I explained about Integration Testing of SpringBoot Application with Serenity BDD, Cucumber and JUnit4. This one provides a comprehensive tutorial on integration testing of a SpringBoot application using SpringBoot Test and TestNG. It covers essential topics like SpringBoot application, RestController, prerequisites, dependency list, project directory structure, and detailed test implementation steps.
Table of Contents
- What is SpringBoot Application?
- Prerequisite
- Dependency List
- Project Directory Structure
- Test Implementation Steps
- Create a source folder – src/test/resources
- Add dependencies to the project
- Create the Test classes
- Create an application.properties file in src/test/resources
- Run the tests from Test Class
- Run the tests from testng.xml
- TestNG Report Generation
- Run the tests through Maven Command Line
- Surefire Report Generation
What is SpringBoot Application?
Spring Boot is an open-source micro-framework that provides Java developers with a platform to get started with an auto-configurable production-grade Spring application.
- Comes with embedded HTTP servers like Tomcat or Jetty to test web applications.
- Adds many plugins that developers can use to work with embedded and in-memory databases easily. Spring allows you to easily connect with database and queue services like Oracle, PostgreSQL, MySQL, MongoDB, Redis, Solr, ElasticSearch, Rabbit MQ, and others.
What is RestController?
HTTP requests are handled by a controller in Spring’s approach to building RESTful web services. The @RestController annotation identifies these components, and the GreetingController shown below (from src/main/java/com/example/HelloController.java) handles GET requests for / and /qaautomation by returning a new instance of the Greeting class. Spring RestController takes care of mapping request data to the request-defined handles method.
import org.springframework.web.bind.annotation.GetMapping;
import org.springframework.web.bind.annotation.RestController;

@RestController
public class HelloController {

    @GetMapping(path="/")
    String hello() {
        return "Hello World, Spring Boot!";
    }


    @GetMapping(path="/qaautomation")
    String qaautomation() {
        return "Hello QA Automation!";
    }

}
In this tutorial, I will explain the Integration Testing of the SpringBoot Application using SpringBoot Test and TestNG.
Prerequisite
Spring Boot 3.0.4 requires Java 17 and is compatible with and including Java 19. Spring Framework 6.0.6 or above is also required.
Explicit build support is provided for the following build tools:
- Maven – 3.5+
- Gradle – 7.x (7.5 or later) and 8.x
Dependency List
- SpringBoot Starter Parent – 3.2.5
- TestNG – 7.10.2
- Rest Assured – 5.4.0
- Java 17
- Maven – 3.9.6
Project Directory Structure
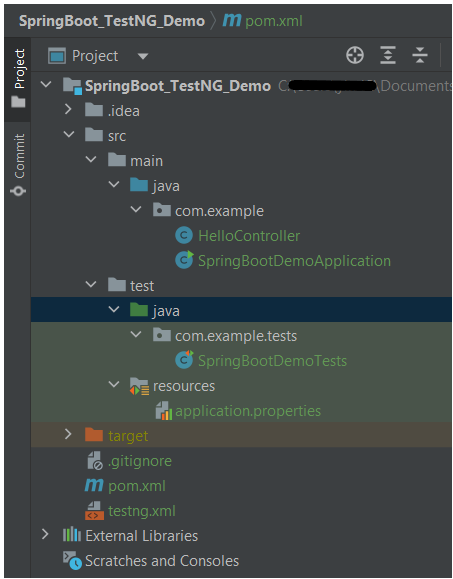
Test Implementation Steps
Step 1 – Create a source folder – src/test/resources
Create a source folder – src/test/resources to properties file in it.
Right-click on the test directory and select New->Directory and select resources (Maven Source Directories).

Step 2 – Add dependencies to the project
We have added SpringBootTest, SpringBoot Tomcat, SpringBoot Web, Spring Web, Rest Assured, and TestNG dependencies to the pom.xml.
<project xmlns="http://maven.apache.org/POM/4.0.0" xmlns:xsi="http://www.w3.org/2001/XMLSchema-instance"
  xsi:schemaLocation="http://maven.apache.org/POM/4.0.0 http://maven.apache.org/xsd/maven-4.0.0.xsd">
  <modelVersion>4.0.0</modelVersion>

  <parent>
    <groupId>org.springframework.boot</groupId>
    <artifactId>spring-boot-starter-parent</artifactId>
    <version>3.3.0-SNAPSHOT</version>
    <relativePath/> <!-- lookup parent from repository -->
  </parent>

  <groupId>com.example</groupId>
  <artifactId>SpringBoot_TestNG_Demo</artifactId>
  <version>1.0-SNAPSHOT</version>
  <packaging>jar</packaging>

  <name>SpringBoot_TestNG_Demo</name>
  <url>http://maven.apache.org</url>

  <properties>
    <java.version>17</java.version>
    <rest.assured.version>5.4.0</rest.assured.version>
    <testng.version>7.10.2</testng.version>
    <maven.compiler.plugin.version>3.13.0</maven.compiler.plugin.version>
    <maven.compiler.source.version>17</maven.compiler.source.version>
    <maven.compiler.target.version>17</maven.compiler.target.version>
    <maven.surefire.plugin.version>3.2.5</maven.surefire.plugin.version>
  </properties>

  <dependencies>
    <dependency>
      <groupId>org.springframework.boot</groupId>
      <artifactId>spring-boot-starter</artifactId>
    </dependency>

    <dependency>
      <groupId>org.springframework.boot</groupId>
      <artifactId>spring-boot-starter-test</artifactId>
      <scope>test</scope>
    </dependency>

    <dependency>
      <groupId>org.springframework.boot</groupId>
      <artifactId>spring-boot-starter-web</artifactId>
    </dependency>

    <dependency>
      <groupId>org.springframework.boot</groupId>
      <artifactId>spring-boot-starter-tomcat</artifactId>
      <scope>provided</scope>
    </dependency>

    <dependency>
      <groupId>org.springframework</groupId>
      <artifactId>spring-web</artifactId>
    </dependency>

    <!-- Rest Assured -->
    <dependency>
      <groupId>io.rest-assured</groupId>
      <artifactId>rest-assured</artifactId>
      <version>${rest.assured.version}</version>
      <scope>test</scope>
    </dependency>

    <!-- TestNG -->
    <dependency>
      <groupId>org.testng</groupId>
      <artifactId>testng</artifactId>
      <version>${testng.version}</version>
      <scope>test</scope>
    </dependency>


  </dependencies>

  <build>
    <plugins>
      <plugin>
        <groupId>org.springframework.boot</groupId>
        <artifactId>spring-boot-maven-plugin</artifactId>
      </plugin>

      <plugin>
        <groupId>org.apache.maven.plugins</groupId>
        <artifactId>maven-surefire-plugin</artifactId>
        <version>${maven.surefire.plugin.version}</version>
        <configuration>
          <suiteXmlFiles>
            <suiteXmlFile>testng.xml</suiteXmlFile>
          </suiteXmlFiles>
        </configuration>
        <dependencies>
          <dependency>
            <groupId>org.apache.maven.surefire</groupId>
            <artifactId>surefire-testng</artifactId>
            <version>${maven.surefire.plugin.version}</version>
          </dependency>
        </dependencies>
      </plugin>

      <plugin>
        <groupId>org.apache.maven.plugins</groupId>
        <artifactId>maven-compiler-plugin</artifactId>
        <version>${maven.compiler.plugin.version}</version>
        <configuration>
          <source>${maven.compiler.source.version}</source>
          <target>${maven.compiler.target.version}</target>
        </configuration>
      </plugin>
    </plugins>
  </build>


</project>
Step 3 – Create the Test classes
- uses @SpringBootTest annotation which loads the actual application context.
- uses WebEnvironment.RANDOM_PORT to create and run the application at some random server port.
- @LocalServerPort gets the reference of the port where the server has started. It helps in building the actual request URIs to mimic real client interactions.
Below is the code of the sample Test class. These classes are created in the src/test/java directory.
import io.restassured.response.ValidatableResponse;
import org.springframework.beans.factory.annotation.Value;
import org.springframework.boot.test.context.SpringBootTest;
import org.springframework.boot.test.web.server.LocalServerPort;
import org.springframework.test.context.testng.AbstractTestNGSpringContextTests;
import org.testng.Assert;
import org.testng.annotations.Test;
import static io.restassured.RestAssured.given;

@SpringBootTest(webEnvironment = SpringBootTest.WebEnvironment.RANDOM_PORT)
public class SpringBootDemoTests extends AbstractTestNGSpringContextTests {

    private final static String BASE_URI = "http://localhost:";

    @LocalServerPort
    private int port;

    @Value("${server.servlet.context-path}")
    private String basePath;

    private ValidatableResponse response;

    @Test
    public void verifyController1()  {
         response = given().contentType("application/json")
                    .header("Content-Type", "application/json")
                 .when().get(BASE_URI + port + basePath + "/").then().statusCode(200);

         String Actual = response.extract().asString();
          System.out.println("Result :"+Actual);
          Assert.assertEquals("Hello World, Spring Boot!", Actual);
    }

    @Test
    public void verifyController2()   {
        response = given().contentType("application/json")
                .header("Content-Type", "application/json")
                .when().get(BASE_URI + port + basePath + "/qaautomation").then().statusCode(200);

        String Actual = response.extract().asString();
        System.out.println("Result :"+Actual);
        Assert.assertEquals("Hello QA Automation!", Actual);
    }
}
The AbstractTestNGSpringContextTests is an abstract base class having the ApplicationContext supported in the testNG explicitly.
This class sends the request and receives a response after performing the GET operation. Here, the validation of the response also takes place by asserting the expected and actual response.
Step 4 – Create an application.properties file in src/test/resources
Application.properties is created under src/ test/java.
spring.profiles.active=test
server.port=8089
server.servlet.context-path=/demo
spring.profiles.active – property to specify which profiles are active. The default profile is always active.
server.port – By default, the embedded server starts on port 8080. Now the server will start on port 8089
server.servlet.context-path – the context path in Spring Boot can be changed by setting a property, server.servlet.context-path.
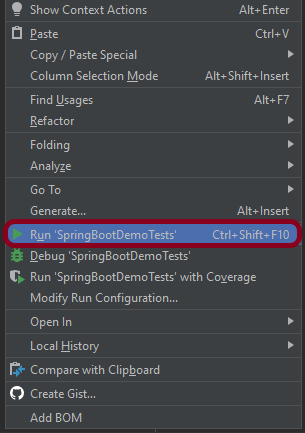
Step 5 – Run the tests from Test Class
Right-click on the Test class and select Run ‘SpringBootDemoTests’.
The output of the above program is
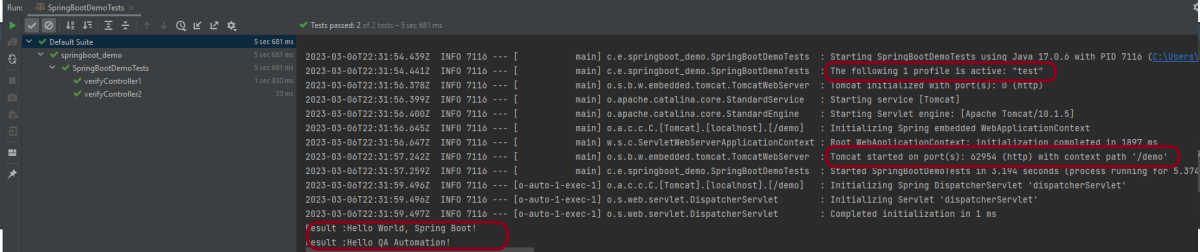
This image shows that the profile name is “test”. Application is started on port – “62954” and the context path is “/demo”.
Step 6 – Run the tests from testng.xml
First, we need to create a testng.xml at the root of the project.
<?xml version = "1.0"encoding = "UTF-8"?>
<!DOCTYPE suite SYSTEM "http://testng.org/testng-1.0.dtd">
<suite name = "Suite1">
    <test name = "TestNG Demo">
        <classes>
            <class name = "com.example.tests.SpringBootDemoTests"/>
        </classes>
    </test>
</suite>
Right-click on testng.xml and select Run ‘…\testng.xml’.
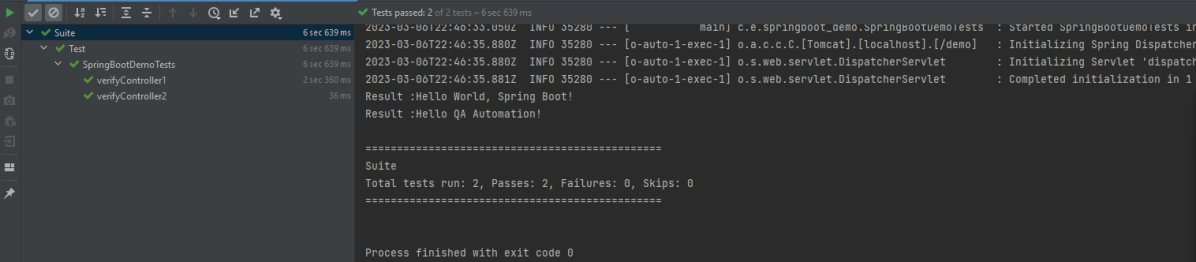
The output of the above program is
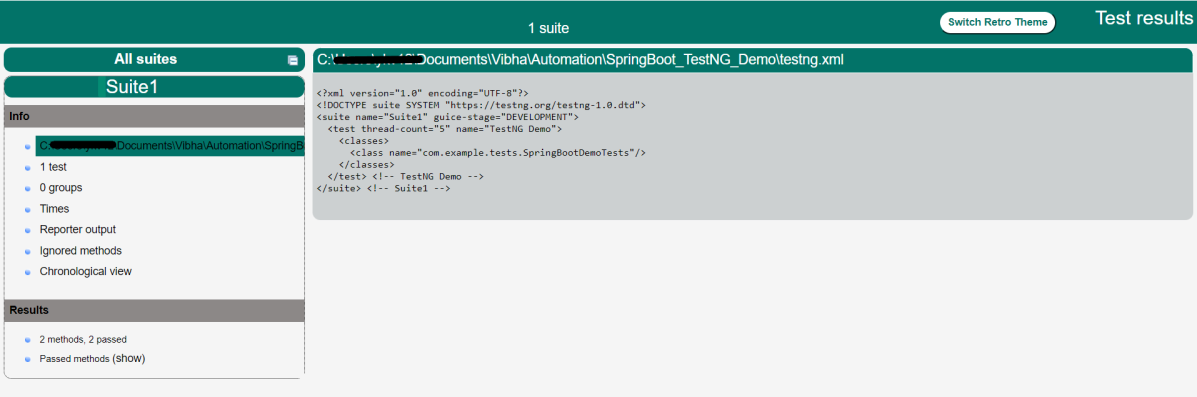
Step 7 – TestNG Report Generation
The test report generated by TestNG is placed under test-output/index.html.

Index.html
TestNG produces an “index.html” report, and it resides under the test-output folder. The below image shows index.html report. This report contains a high-level summary of the tests.
Emailable-Report.html
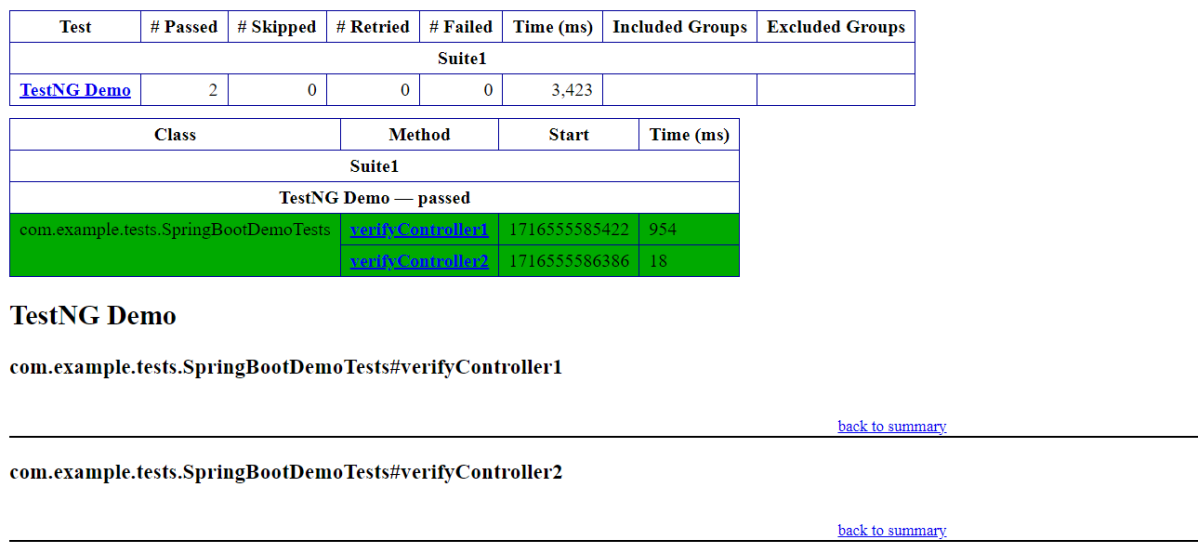
Test-Output folder also contains Emailable-Report.html. Open “emailable-report.html“, as this is an HTML report open it with the browser. The below image shows emailable-report.html.
Step 8 – Run the tests through Maven Command Line
Starting from SpringBoot 3.1.0 version, we need to add the below dependency to the surefire plugin to run the tests through Maven Command Line.
<plugin>
  <groupId>org.apache.maven.plugins</groupId>
  <artifactId>maven-surefire-plugin</artifactId>
  <version>${maven.surefire.plugin.version}</version>
  <configuration>
    <suiteXmlFiles>
      <suiteXmlFile>testng.xml</suiteXmlFile>
    </suiteXmlFiles>
  </configuration>
  <dependencies>
    <dependency>
      <groupId>org.apache.maven.surefire</groupId>
      <artifactId>surefire-testng</artifactId>
      <version>${maven.surefire.plugin.version}</version>
    </dependency>
  </dependencies>
</plugin>
To run the tests, use the below mentioned command:
mvn clean test
The output of the above program is
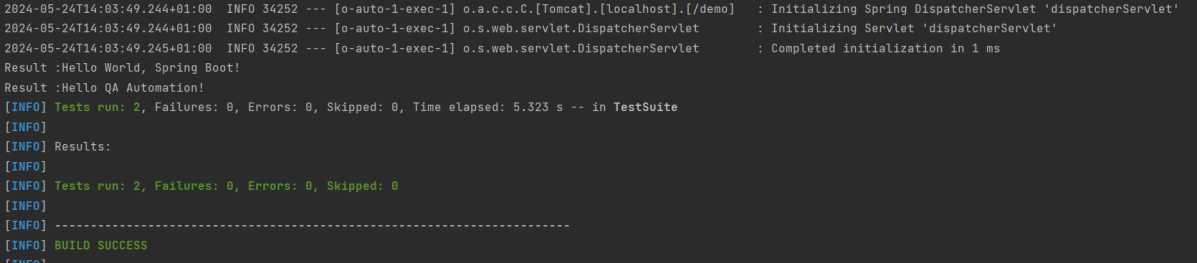
Step 9 – Surefire Report Generation
Maven Command Line generates the report in target folder as shown below:

Complete Source Code:
Refer to GitHub for the source code – https://github.com/vibssingh/SpringBoot_TestNG_Demo
Congratulations on making it through this tutorial and hope you found it useful! Happy Learning!! Cheers!!

Hi, I want to run my spring boot tests in GitHub pipeline.Any suggestions? I don’t find much documentation online
LikeLike
Hi, you can refer this tutorial to get some idea on running the springboot tests in github pipeline – https://qaautomation.expert/2023/06/26/how-to-run-springboot-tests-with-github-actions/.
LikeLike
Thank you for the quick reply. I want to schedule my test runs . How can I do that? I have worked with Gitlab and know the way to schedule jobs there but quite new with GitHub so struggling
LikeLike
Hi Shikha, to schedule a job in GitHub, use schedule: event. Synatx is
schedule:
-cron: 0 8 * * *
This means the job will run at 8:00 AM every day.
LikeLike
if i am running mvn test for above code i am getting 0 tests
when i am removing Springboot test dependency annotaion then considering test
if i replace testng @Test annotation with junit then also working fine
LikeLike
Hi, you need to add a dependency to the surefire plugin to run the tests through Maven Command Line. I have updated the tutorial with the same information.
LikeLike
How you run the same xml Testcases after creating JAR from the repo? Basically, I want to run the JAR inside the docker container.
I had thought to copy the code inside the container and then run the TC but this approach needs dependencies to be resolved first and then i can execute the mvn command to run the test. Its time consuming process and not a good practice. So avoiding this approach and want to know solution for JAR based testcases execution.
Any help would be much appreciated 🙂
LikeLike