Create a new Environmentin Postman (top right → Environments → Add
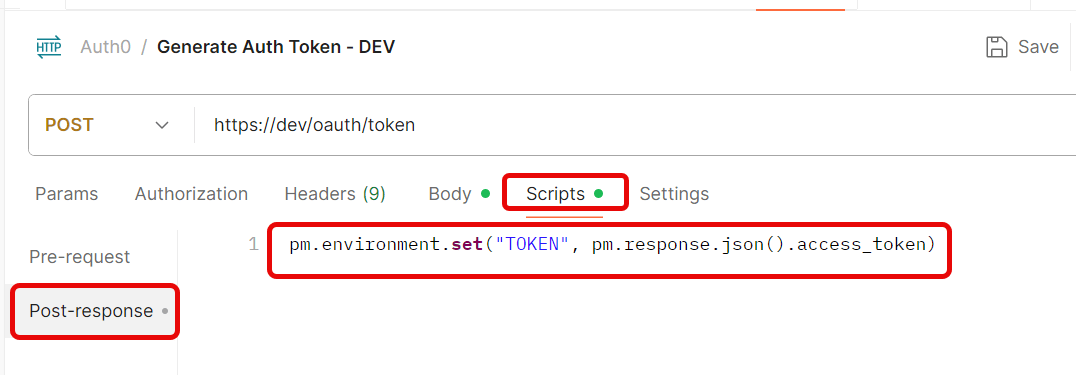
Save the request.
Step 3: Use the Token in Another Request
Create a new request.
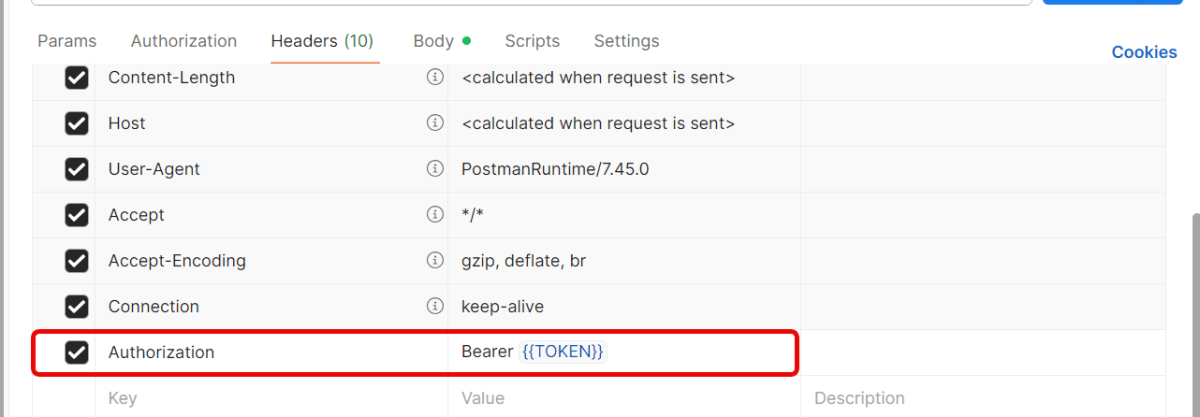
Go to the Headerstab.
Add this header:
Key: Authorization
Value: Bearer {{Token}}
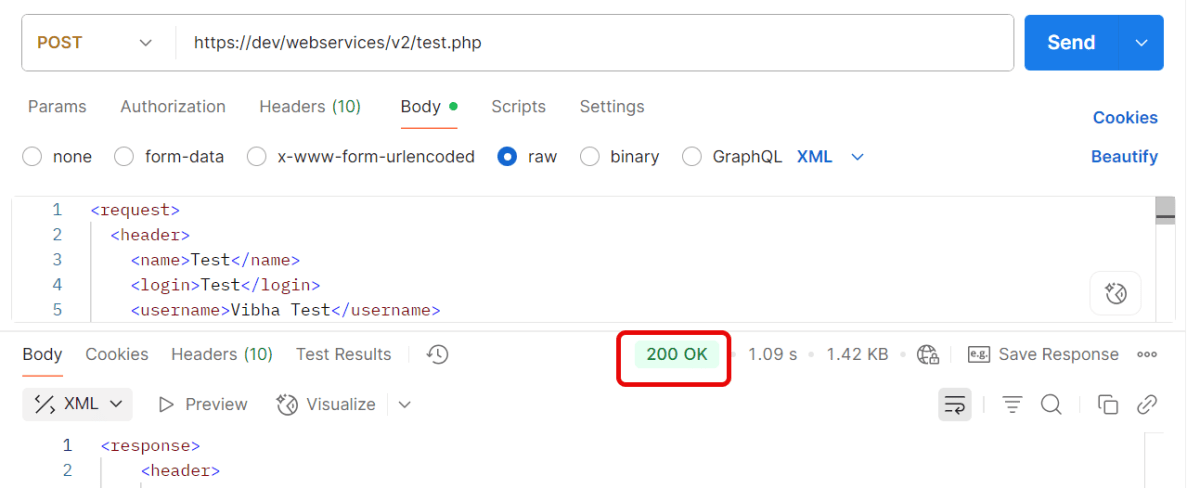
Send the request — Postman will automatically insert the token from the environment variable.
Quick Troubleshooting Checklist
1.Is the token saved correctly in environment variables? Token saved in one environment, but request uses another. Make sure you’ve selected the same environment (top-right dropdown in Postman).
2. Is the Authorization: Bearer {{Token}} header present?
3. Does the account have the correct permissions/scopes? Token is valid, but the user doesn’t have permission for that endpoint. Verify that your account has the right role/permissions.
4. Correct Content-Type is sent. Set header → Content-Type: application/json.
In this tutorial, we will discuss how to validate the HTTP response status code, status like, header, body and Content Type using REST Assured. Every HTTP Response received from a server in response to an HTTP request sent by the client has a status code.
Verifying HTTP Response Status Code with Rest Assured
A response code indicating the status of the request (e.g., 200 OK, 404 Not Found). The status code that the server returns tells us whether the request was successful or not. If the request was successful, the server sends the status code in the range of 200-299. If the request was not successful, then the status code other than the range is returned.
The getStatusCode() method returns an integer and then we can verify its value.
Below is an example.
@Test
    public void verifyStatusCode() {

        String BaseURL = "https://dummy.restapiexample.com/api";

        // GIVEN
       Response response =  given()

                // WHEN
                .when()
                .get("https://reqres.in/api/users/2")

                // THEN
                .then()
               .extract().response();

       int actualStatusCode = response.getStatusCode();
       System.out.println("Status Code : " + actualStatusCode);

        Assert.assertEquals(200, actualStatusCode);

    }
The output of the above program is
Verifying HTTP Response Status Line with Rest Assured
The getStatusLine() method returns a string and then we can verify its value.
 @Test
    public void verifyStatusLine() {

        // GIVEN
        Response response =  given()

                // WHEN
                .when()
                .get("https://reqres.in/api/users/2")

                // THEN
                .then()
                .extract().response();

        String actualStatusLine = response.getStatusLine();
        System.out.println("Status Line : " + actualStatusLine);

        Assert.assertEquals("HTTP/1.1 200 OK", actualStatusLine);

    }
The output of the above program is
Verifying HTTP Response Body with Rest Assured
In the below example, we are obtaining the body content of the HTTP response using the getBody().
Are you familiar with Rest API and want to test your understanding? This post contains 25 useful Rest API multiple-choice questions (quiz) to self-test your knowledge of Rest API .
You can find the questions for the below-mentioned answers in this post –
Are you familiar with REST APIs and want to test your understanding? This post contains 25 useful REST API multiple-choice questions (quiz) to self-test your knowledge of REST API development.
3. Which REST constraint specifies that knowledge and understanding obtained from one component of the API should be generally applicable elsewhere in the API?
4. Which of the following HTTP Status code means FORBIDDEN, states that user is not having access to method being used for example, delete access without admin rights?
  @Test
    public void test() {

        JSONObject data = new JSONObject();

        data.put("employee_name", "MapTest");
        data.put("profile_image", "test.png");

        RestAssured
                .given().contentType(ContentType.JSON).body(data.toString())

                .when().post("https://dummy.restapiexample.com/api/v1/create")

                .then().assertThat().statusCode(201)
                .body("data.employee_name", equalTo("MapTest"))
                .body("message", equalTo("Successfully! Record has been added."));

    }
}
10. Which of the following is correct about web services?
Choose one option
A web service is a collection of open protocols and standards used for exchanging data between applications or systems.
Software applications written in various programming languages and running on various platforms can use web services to exchange data among them over computer networks like the Internet.
Are you familiar with Rest API and want to test your understanding? This post has 25 useful Rest API multiple-choice questions (quiz) to self-test your knowledge of Rest API.
You can find the questions for the below-mentioned answers in this post –
Here is a brief explanation of the different status codes
– 401: Unauthorized – The request requires user authentication. – 402: Payment Required – This status code is reserved for future use. – 403: Forbidden – The server understood the request but refuses to authorize it. – 404: Not Found – The server can’t find the requested page.
6) 1) 500
Here’s a brief explanation of the different status codes:
– 500: Internal Server Error – The server encountered an unexpected condition that prevented it from fulfilling the request. – 501: Not Implemented – The server either does not recognize the request method, or it lacks the ability to fulfill the request. – 502: Bad Gateway – The server received an invalid response from the upstream server while trying to fulfill the request. – 504: Gateway Timeout – The server, while acting as a gateway or proxy, did not receive a timely response from the upstream server.
7) 3) Success
8) 1) CREATE
CREATE is not an HTTP method. The standard HTTP methods include:
– GET: Retrieve data from a server. – POST: Send data to a server to create a resource. – PUT: Update or create a resource on the server with the provided data. – DELETE: Remove a resource from the server. – OPTIONS: Describe the communication options for the target resource. – HEAD: Similar to GET but without the response body. – PATCH: Apply partial modifications to a resource. – TRACE: Perform a message loop-back test along the path to the target resource. – CONNECT: Establish a tunnel to the server identified by the target resource.
It clearly indicates the resource (/users) and the specific item of that resource ({id}).
16) 1) 403
403: Forbidden – This status indicates that the server understands the request but refuses to authorize it.
404: Not Found – Indicates that the requested resource could not be found on the server.
406: Not Acceptable – Indicates that the server cannot generate a response that is acceptable to the client based on the accept headers sent in the request
409: Conflict – Indicates that the request could not be completed due to a conflict with the current state of the resource, such as a version control conflict.
17) 3) The resource requested has been found and moved temporarily to new URL location.
18) 4) Informational
19) 2) PUT updates the entire resource, while PATCH updates only specific fields of a resource
20) 2) It defines the format of the request payload
21) 3) It provides authentication credentials for accessing protected resources
22) 2) The property that a method can be called multiple times without different outcomes
23) 2) To retrieve the communication options available on a resource or server
Are you familiar with REST APIs and want to test your understanding? This post contains 25 useful REST API multiple-choice questions (quiz) to self-test your knowledge of REST API development.
16. Which of the following HTTP Status code means FORBIDDEN, states that user is not having access to method being used for example, delete access without admin rights?
1) 2) Representational State Transfer 2) 2) HTTP 3) 4) Request Header 4) 3) Both (1) and (2) 5) 2) 404 6) 1) 500 7) 3) Success 8) 1) CREATE 9) 1) POST 10) 2) PUT 11) 1) /{resource}/{resource-id}/{sub-resource}/{sub-resource-id} 12) 2) Created 13) 1) GET, POST, PUT, DELETE 14) 2) DELETE 15) 1) GET /users/{id} 16) 1) 403 17) 3) The resource requested has been found and moved temporarily to new URL location. 18) 4) Informational 19) 2) PUT updates the entire resource, while PATCH updates only specific fields of a resource 20) 2) It defines the format of the request payload 21) 3) It provides authentication credentials for accessing protected resources 22) 2) The property that a method can be called multiple times without different outcomes 23) 2) To retrieve the communication options available on a resource or server 24) 3) curl 25) 4) no-cache/no-store
Cucumber is not an API automation tool, but it works well with other API automation tools.
There are 2 most commonly used Automation Tools for JVM to test API – Rest-Assured and Karate. In this tutorial, I will use RestAssured with Cucumber and TestNG for API Testing.
REST Assured is a Java library that provides a domain-specific language (DSL) for writing powerful, maintainable tests for RESTful APIs. REST Assured can be used easily in combination with existing unit testing frameworks, such as JUnit and TestNG. Rest assured, no matter how complex the JSON structures are, Rest Assured has methods to retrieve data from almost every part of the request and response.
What is Cucumber?
Cucumber is one such open-source tool, which supports Behaviour Driven Development(BDD). In simple words, Cucumber can be defined as a testing framework, driven by plain English. It serves as documentation, automated tests, and development aid – all in one.
Each scenario is a set of steps that the Cucumber must complete. Cucumber validates the software’s compliance with the specification and generates a report indicating success or failure for each scenario.
The cucumber must adhere to some basic syntax rules known as Gherkin to comprehend the scenarios.
In this tutorial, I will explain creating a framework for the testing of Rest API in Cucumber BDD.
Dependency List
Cucumber – 7.18.0
Java 17
TestNG – 7.10.2
Maven – 3.9.6
Rest Assured – 5.4.0
Maven Compiler – 3.13.0
Maven Surefire – 3.2.5
Project Structure
Implementation Steps
Step 1 – Download and Install Java
Cucumber and Rest-Assured need Java to be installed on the system to run the tests. Click here to learn How to install Java.
Step 2 – Download and setup Eclipse IDE on the system
The Eclipse IDE (integrated development environment) provides strong support for Java developers. Click here to learn How to install Eclipse.
Step 3 – Setup Maven
To build a test framework, we need to add several dependencies to the project. Click here to learn How to install Maven.
Step 4 – Create a new Maven Project
File -> New Project-> Maven-> Maven project-> Next -> Enter Group ID & Artifact ID -> Finish
Step 5 – Install the Cucumber Eclipse plugin for the Eclipse project(Eclipse Only)
The Cucumber plugin is an Eclipse plugin that allows Eclipse to understand the Gherkin syntax. Cucumber Eclipse Plugin highlights the keywords present in the Feature File. To install Cucumber Eclipse Plugin, please refer to this tutorial – How to install Cucumber Eclipse Plugin.
Step 6 – Create source folder src/test/resources
Create source folder src/test/resources to create test scenarios in the Feature file.
A new Maven Project is created with 2 folders – src/main/java and src/test/java. To create test scenarios, we need a new source folder called – src/test/resources. To create this folder, right-click on your Maven project ->select New ->Java, and then Source Folder.
Mention the source folder name as src/test/resources and click the Next button. This will create a source folder under your new Maven project.
Step 7 – Add dependencies to the project
Add Rest Assured, Cucumber, and TestNG dependencies in the pom.xml/build.gradle. REST Assured includes JsonPath and XmlPath as transitive dependencies.
Step 8 – Add Maven Compiler Plugin and Surefire Plugin
The compiler plugin is used to compile the source code of a Maven project. This plugin has two goals, which are already bound to specific phases of the default lifecycle:
Step 9 – Create a feature file under src/test/resources
Create a folder with name features. Now, create the feature file in this folder. The feature file should be saved with the extension .feature. This feature file contains the test scenarios created to test the application. The Test Scenarios are written in Gherkins language in the format of Given, When, Then, And, But.
Below is an example of a Test Scenario where we are using the GET method to get the information from the API.
Feature: Validation of get method

  @GetUserDetails
  Scenario Outline: Send a valid Request to get user details

    Given I send a request to the URL to get user details
    Then the response will return status <statusCode> and id <id> and email "<employee_email>" and first name "<employee_firstname>" and last name "<employee_lastname>"

    Examples:
    | statusCode | id  | employee_email          | employee_firstname | employee_lastname |
    | 200        | 2   | janet.weaver@reqres.in  | Janet              | Weaver            |
Step 10 – Create the Step Definition class or Glue Code
StepDefinition acts as an intermediate to your runner and feature file. It stores the mapping between each step of the scenario in the Feature file. So when you run the scenario, it will scan the step definition file to check the matched glue or test code.
import io.cucumber.java.en.Given;
import io.cucumber.java.en.Then;
import io.restassured.http.ContentType;
import io.restassured.response.ValidatableResponse;

import static io.restassured.RestAssured.given;
import static org.hamcrest.Matchers.equalTo;

public class APIDemoDefinitions {

    private ValidatableResponse validatableResponse;
    private String endpoint = "https://reqres.in/api/users/2";

    @Given("I send a request to the URL to get user details")
    public void sendRequest(){
        validatableResponse = given().contentType(ContentType.JSON)
                .when().get(endpoint).then();

        System.out.println("Response :"+validatableResponse.extract().asPrettyString());
    }

    @Then("the response will return status {int} and id {int} and email {string} and first name {string} and last name {string}")
    public void verifyStatus(int expectedStatusCode, int expectedId, String expectedEmail, String expectedFirstName, String expectedLastName){

        validatableResponse.assertThat().statusCode(expectedStatusCode).body("data.id",equalTo(expectedId)).and()
                .body("data.email",equalTo(expectedEmail)).body("data.first_name",equalTo(expectedFirstName))
                .body("data.last_name",equalTo(expectedLastName));

    }
}
To use REST assured effectively it’s recommended to statically import methods from the following classes:
A runner will help us run the feature file and act as an interlink between the feature file and the StepDefinition Class.
import io.cucumber.testng.AbstractTestNGCucumberTests;
import io.cucumber.testng.CucumberOptions;

@CucumberOptions(tags = "", features = {"src/test/resources/features"}, glue = {"com.example.stepdefinitions"},
        plugin = {})
public class CucumberRunnerTests extends AbstractTestNGCucumberTests {

}
Note:- The name of the Runner class should end with Test otherwise we can’t run the tests using Command-Line.
Step 12 – Create a testng.xml file
Create a testng.xml at the root of the project.
<?xml version="1.0" encoding="UTF-8"?>
<!DOCTYPE suite SYSTEM "https://testng.org/testng-1.0.dtd">
<suite name="Suite">
    <test  name="Rest Assured, Cucumber with TestNG Test">
        <classes>
            <class name="com.example.runner.CucumberRunnerTests"/>
        </classes>
    </test> <!-- Test -->
</suite> <!-- Suite -->
Step 13 – Run the tests from TestNG
You can execute the test script by right-clicking on TestRunner class -> Run As TestNG (Eclipse).
You can execute the test script by right-clicking on TestRunner class -> Run CucumberRunnerTests (IntelliJ).
Step 14 – Run the tests from the testng.xml
Right-click on the testng.xml. Click on Run’...\testng.xml’.
Step 15 – TestNG Report Generation
TestNG generates various types of reports under the test-output or target folder like emailable-report.html, index.html, and testng-results.xml.
We are interested in the ‘emailable-report.html’ report. Open “emailable-report.html“, as this is an HTML report, and open it with the browser. The below image shows emailable-report.html.
emailable-report.html
Index.html
TestNG also produces “index.html” report, and it resides under the test-output folder. The below image shows the index.html report.
Step 16 – Run the tests from the Command Line
Run the below command in the command prompt to run the tests and to get the test execution report.
mvn clean test
The output of the above program is
Step 17 – Cucumber Report Generation
To get Cucumber Test Reports, add cucumber.properties under src/test/resources and add the below instruction in the file.
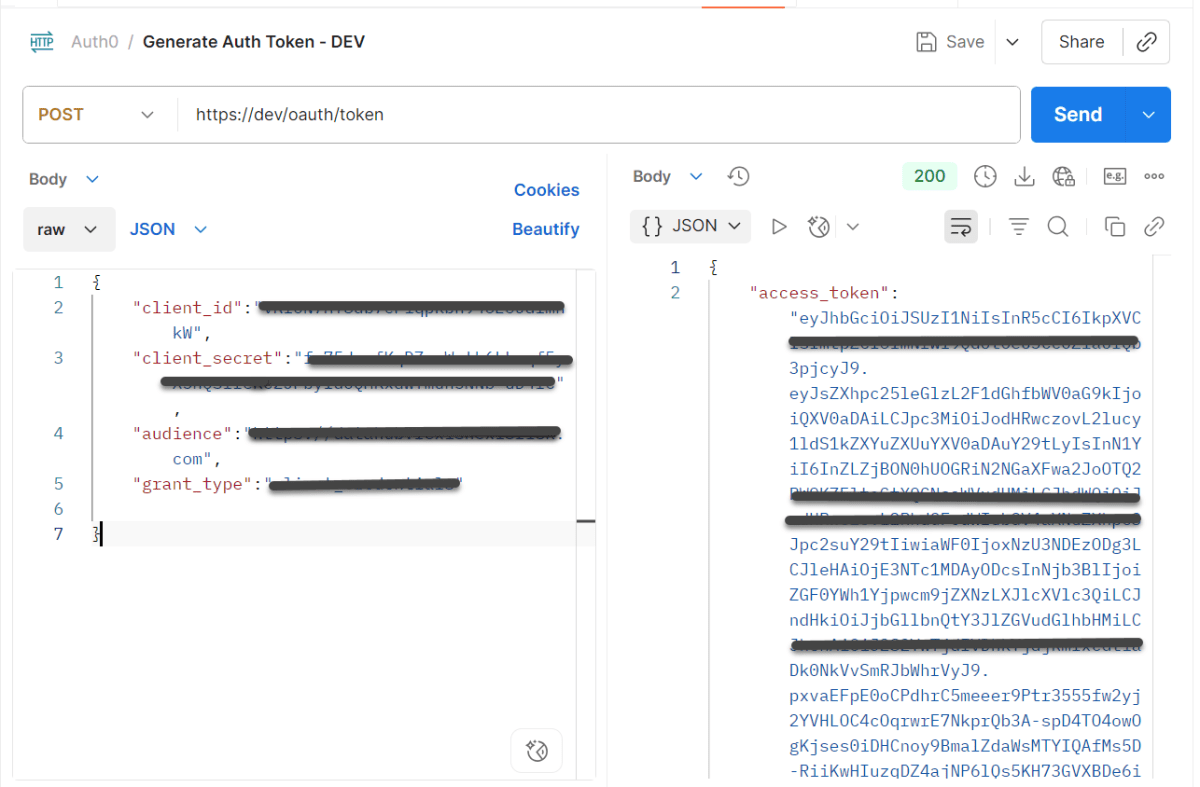
Many REST API endpoints require authentication to return the response. To authenticate the request, we will need to provide an authentication token with the required scopes or permissions. First, we need to generate an access token. Then, we pass it to the second request to get the desired response.
What is an Access Token?
An access token is a credential that is used to authenticate and authorize requests made to an API. It proves the user’s identity and permissions. This allows them to access protected resources or perform specific actions within the API.
Access tokens are usually represented as strings of characters (e.g., alphanumeric) that are generated by the server and provided to clients upon successful authentication. Access tokens often have an expiration time associated with them, after which they become invalid. This helps ensure security by limiting their lifespan.
Using access tokens helps ensure secure communication between clients and servers by preventing unauthorized access to protected resources. Without a valid access token, requests may be rejected or limited in their scope.
Access tokens enable stateless communication between client and server. This means that each request contains all necessary authentication and authorization information within itself. This eliminates the need for servers to store session-related data, improving scalability and reducing overhead.
Let us create a class that will generate the access token.
In the above example, a token is generated as shown below.
It is a JSON Response. We need only the token part and not the {“access_token”} part. So we have used the below command to extract the token part only.
JsonPath jsonPath = new JsonPath(token);
accessToken = jsonPath.getString("access_token");
What is Oauth2()?
OAuth 2.0 (Open Authorization 2.0) is an industry-standard protocol for authorization and delegation of access to protected resources on the web. It allows users to securely grant limited access to their resources hosted on one website or application. This site is called the “resource server.” The access is given to another website or application, which is called the “client.”
Below is a test. We are passing the token generated in the previous request for authentication. This token is used in another request with oauth2().
AccessToken_Example
import java.io.IOException;

public class AccessToken_Example extends AbstractHelper {

    Response response;

   @Test
    public void testRequest() throws IOException {

        response = RestAssured.given()
                .auth().oauth2(generateToken())
                .when().get("https://localhost/8080/coreid").then()
                .extract()
                .response();

        System.out.println("Response :" + response.asString());
        int statusCode = response.getStatusCode();

        Assert.assertEquals(200,statusCode);
    }
}
The output of the above program is
Summary:
1. Access tokens are obtained through an authentication process. This may include logging in with a username and password or using a third-party authentication service like OAuth. 2. Once authenticated, the access token contains information about the user’s permissions and privileges within the system. Use this access token and pass it to another request to get the required response.
We can parse the JSON or XML response into POJO classes. After parsing into POJO classes, we can easily get values from the response easily. This is called De-serialization. For this, we can use any JSON parser APIs. Here, we are going to use Gson API.
To start with, add the below dependency to the project.
Let us create a class called Employee with a field name exactly (case-sensitive) the same as node names in the above JSON string because with the default setting while parsing JSON object to Java object, it will look on getter setter methods of field names.
public class Employee {

	// private variables or data members of POJO class
	private String firstName;
	private String lastName;
	private int age;
	private double salary;
	private String designation;
	private String contactNumber;
	private String emailId;

	// Getter and setter methods
	public String getFirstName() {
		return firstName;
	}

	public void setFirstName(String firstName) {
		this.firstName = firstName;
	}

	public String getLastName() {
		return lastName;
	}

	public void setLastName(String lastName) {
		this.lastName = lastName;
	}

	public int getAge() {
		return age;
	}

	public void setAge(int age) {
		this.age = age;
	}

	public double getSalary() {
		return salary;
	}

	public void setSalary(double salary) {
		this.salary = salary;
	}

	public String getDesignation() {
		return designation;
	}

	public void setDesignation(String designation) {
		this.designation = designation;
	}

	public String getContactNumber() {
		return contactNumber;
	}

	public void setContactNumber(String contactNumber) {
		this.contactNumber = contactNumber;
	}

	public String getEmailId() {
		return emailId;
	}

	public void setEmailId(String emailId) {
		this.emailId = emailId;
	}

}
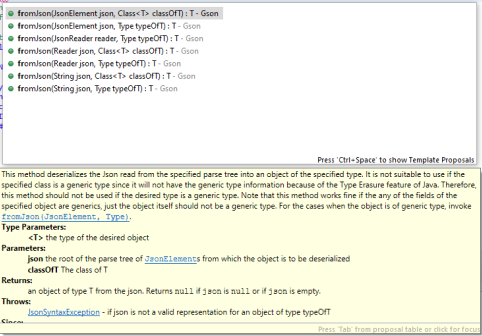
Gson class provides multiple overloaded fromJson() methods to achieve this. Below is a list of available methods:-
In the below test, I have mentioned the JSON Payload string in the test and used Gson API to deserialize the JSON payload to JAVA Object.
@Test
public void getDetailFromJson() {
// De-serializing from JSON String
String jsonString = "{\r\n" + " \"firstName\": \"Tom\",\r\n" + " \"lastName\": \"John\",\r\n"
+ " \"age\": 30,\r\n" + " \"salary\": 50000.0,\r\n" + " \"designation\": \"Lead\",\r\n"
+ " \"contactNumber\": \"+917642218922\",\r\n" + " \"emailId\": \"abc@test.com\"\r\n" + "}";
Gson gson = new Gson();
// Pass JSON string and the POJO class
Employee employee = gson.fromJson(jsonString, Employee.class);
// Now use getter method to retrieve values
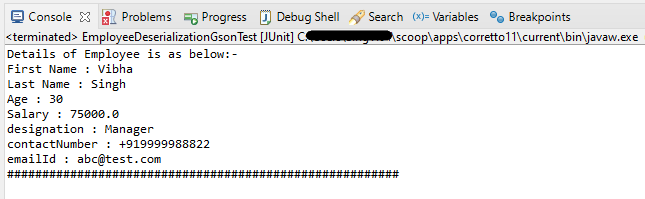
System.out.println("Details of Employee is as below:-");
System.out.println("First Name : " + employee.getFirstName());
System.out.println("Last Name : " + employee.getLastName());
System.out.println("Age : " + employee.getAge());
System.out.println("Salary : " + employee.getSalary());
System.out.println("designation : " + employee.getDesignation());
System.out.println("contactNumber : " + employee.getContactNumber());
System.out.println("emailId : " + employee.getEmailId());
System.out.println("########################################################");
}
The output of the above program is
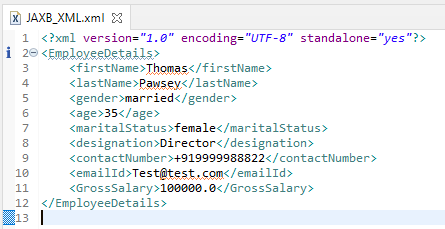
We can get the JSON payload from a file present in a project under src/test/resources as shown in the below image.
public class EmployeeDeserializationGsonTest {

	@Test
	public void fromFile() throws FileNotFoundException {

		Gson gson = new Gson();
		// De-serializing from a json file
		String userDir = System.getProperty("user.dir");
		File inputJsonFile = new File(userDir + "\\src\\test\\resources\\EmployeePayloadUsingGson.json");
		FileReader fileReader = new FileReader(inputJsonFile);
		Employee employee1 = gson.fromJson(fileReader, Employee.class);

		// Now use getter method to retrieve values
		System.out.println("Details of Employee is as below:-");
		System.out.println("First Name : " + employee1.getFirstName());
		System.out.println("Last Name : " + employee1.getLastName());
		System.out.println("Age : " + employee1.getAge());
		System.out.println("Salary : " + employee1.getSalary());
		System.out.println("designation : " + employee1.getDesignation());
		System.out.println("contactNumber : " + employee1.getContactNumber());
		System.out.println("emailId : " + employee1.getEmailId());
		System.out.println("########################################################");
	}
}
The output of the above program is
We are done! Congratulations on making it through this tutorial and hope you found it useful! Happy Learning!!
As of Java 11, JAXB is not part of the JRE anymore, and you need to configure the relevant libraries via your dependency management system, for example, either Maven or Gradle.
Configure the Java compiler level to be at least 11 and add the JAXB dependencies to your pom file.