The general practices say that automated tests should be able to run independently and with no specific order, as well as the result of the test should not depend on the results of previous tests. But there are situations where a specific order of test execution can be justified, especially in integration or end-to-end tests. The test methods don’t follow a specific order by default to execute the tests. The test cases need not necessarily execute in the order in which they have been written.
There are different ways or modes to set the order of execution for the test cases. This article shows how to control the JUnit 5 test execution order via the following MethodOrderer classes:
- DisplayName – sorts test methods alphanumerically based on their display names
- MethodName – sorts test methods alphanumerically based on their names and formal parameter lists
- Alphanumeric – sorts test methods alphanumerically based on their names and formal parameter lists. This is deprecated from JUnit Version 5.7 onwards
- OrderAnnotation – sorts test methods numerically based on values specified via the
@Orderannotation - Random – orders test methods pseudo-randomly and support the configuration of a custom seed
- Custom Order – A custom ordering sequence can be implemented by the interface MethodOrderer and providing it as the argument to @TestMethodOrder.
Let us create JUnit5 Tests and execute them.
public class OrderRandomDemo {

    @Test
    void test_Add() {

        System.out.println("test_Add()");
        assertEquals(10, 3 + 7);
    }

    @Test
    void test_Subtract() {

        System.out.println("test_Subtract()");
        assertEquals(10, 14 - 4);
    }

    @Test
    void test_Multiply() {

        System.out.println("test_Multiply()");
        assertEquals(10, 5 * 2);
    }

    @Test
    void test_Divide() {

        System.out.println("test_Divide()");
        assertEquals(10, 30 / 3);
    }

    @Test
    void test_IsEven() {

        System.out.println("test_IsEven()");
        assertEquals(0, 10%2);
    }

}
The output of the above program
1. DisplayName
It sorts test methods alphanumerically based on their display names. Test Method can be anything annotated with @Test, @RepeatedTest, @ParameterizedTest, @TestFactory, or @TestTemplate.
@TestMethodOrder(MethodOrderer.DisplayName.class)
@TestMethodOrder is a type-level annotation that is used to configure a MethodOrderer for the test methods of the annotated test class or test interface.
MethodOrderer defines the API for ordering the test methods in a given test class.
Test Method – It is any method annotated with @Test, @RepeatedTest, @ParameterizedTest, @TestFactory, or @TestTemplate.
DisplayName.class – MethodOrderer that sorts methods alphanumerically based on their names using String.compareTo(String).
If two methods have the same name, String representations of their formal parameter lists will be used as a fallback for comparing the methods.
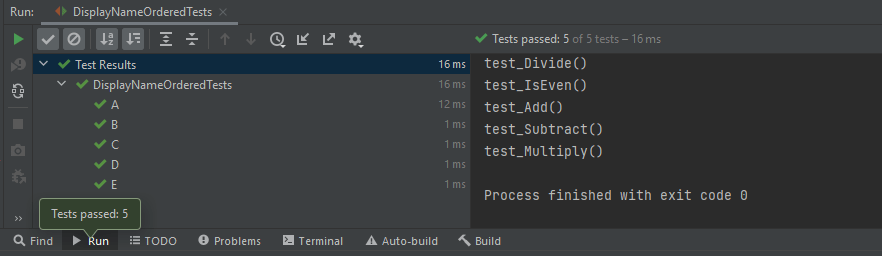
An example of sorting the tests based on their display names.
import org.junit.jupiter.api.DisplayName;
import org.junit.jupiter.api.MethodOrderer;
import org.junit.jupiter.api.Test;
import org.junit.jupiter.api.TestMethodOrder;
import static org.junit.jupiter.api.Assertions.assertEquals;

@TestMethodOrder(MethodOrderer.DisplayName.class)
public class DisplayNameOrderedTests {

    @DisplayName("C")
    @Test
    void test_Add() {

        System.out.println("test_Add()");
        assertEquals(10, 3 + 7);
    }


    @DisplayName("E")
    @Test
    void test_Multiply() {

        System.out.println("test_Multiply()");
        assertEquals(10, 5 * 2);
    }

    @DisplayName("A")
    @Test
    void test_Divide() {

        System.out.println("test_Divide()");
        assertEquals(10, 30 / 3);
    }


    @DisplayName("D")
    @Test
    void test_Subtract() {

        System.out.println("test_Subtract()");
        assertEquals(10, 18 - 8);
    }

    @DisplayName("B")
    @Test
    void test_IsEven() {

        System.out.println("test_IsEven()");
        assertEquals(0, 18%2);
    }
}
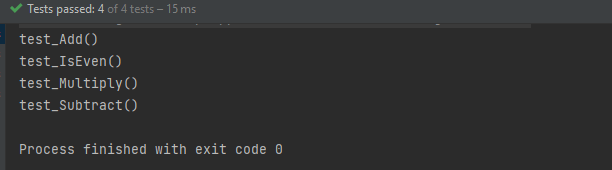
We can see that the test methods are sorted alphanumerically based on their display name starting from A to E. The output of the above program
2. MethodName
This annotation sorts methods alphanumerically based on their names using String.compareTo(String).
If two methods have the same name, String representations of their formal parameter lists will be used as a fallback for comparing the methods.
@TestMethodOrder(MethodOrderer.MethodName.class)
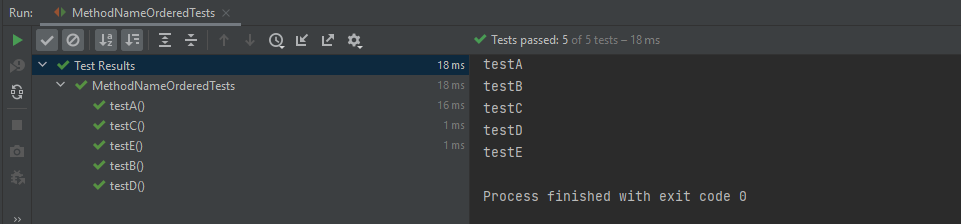
Let us see an example of MethodName.
import org.junit.jupiter.api.MethodOrderer;
import org.junit.jupiter.api.Test;
import org.junit.jupiter.api.TestMethodOrder;
import static org.junit.jupiter.api.Assertions.assertEquals;

@TestMethodOrder(MethodOrderer.MethodName.class)
class MethodNameOrderedTests {

    @Test
    void testE() {

        System.out.println("testE");
        assertEquals(10, 3 + 7);
    }

    @Test
    void testA() {

        System.out.println("testA");
        assertEquals(10, 14 - 4);
    }

    @Test
    void testC() {
        System.out.println("testC");
        assertEquals(10, 5 * 2);
    }

    @Test
    void testB() {
        System.out.println("testB");
        assertEquals(10, 30 / 3);
    }

    @Test
    void testD() {
        System.out.println("testD");
        assertEquals(10, 10 + 0);
    }

}
The output of the above program
3. OrderAnnotation
This sorts test method numerically based on values specified via the @Order annotation.
Any methods that are assigned the same order value will be sorted arbitrarily adjacent to each other.
When any method is not annotated with @Order, it will be assigned the default order value, which will effectively cause them to appear at the end of the sorted list.
@TestMethodOrder(MethodOrderer.OrderAnnotation.class)
Let us see an example of OrderAnnotation.
import org.junit.jupiter.api.MethodOrderer;
import org.junit.jupiter.api.Order;
import org.junit.jupiter.api.Test;
import org.junit.jupiter.api.TestMethodOrder;
import static org.junit.jupiter.api.Assertions.assertEquals;
@TestMethodOrder(MethodOrderer.OrderAnnotation.class)
public class OrderAnnotationDemo {
@Test
@Order(3)
void test_Add() {
System.out.println("test_Add()");
assertEquals(10, 3 + 7);
}
@Test
@Order(4)
void test_IsOdd() {
System.out.println("test_IsOdd()");
assertEquals(1, 11%2);
}
@Test
void test_Subtract() {
System.out.println("test_Subtract()");
assertEquals(10, 14 - 4);
}
@Test
@Order(1)
void test_Multiply() {
System.out.println("test_Multiply()");
assertEquals(10, 5 * 2);
}
@Test
@Order(4)
void test_Divide() {
System.out.println("test_Divide()");
assertEquals(10, 30 / 3);
}
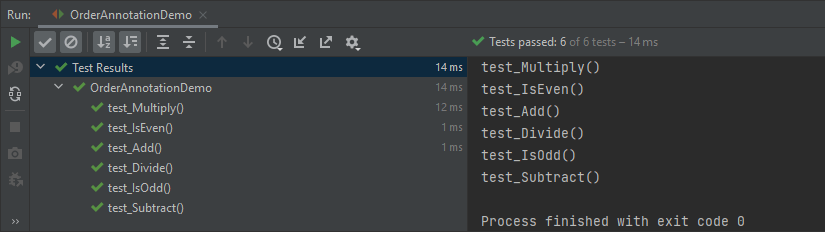
@Test
@Order(2)
void test_IsEven() {
System.out.println("test_IsEven()");
assertEquals(0, 10%2);
}
}
Here, test_Subtract() is not assigned any order value, so it is displayed as the last one in the last.
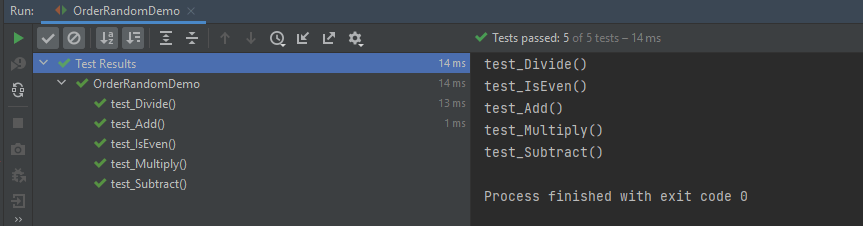
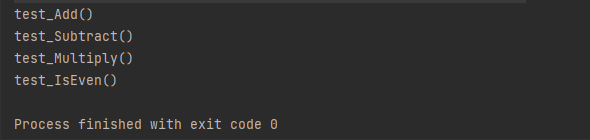
4. Random
These sorts of test methods are pseudo-randomnly.
@TestMethodOrder(MethodOrderer.Random.class)
Let us create a program to show the random order of tests in JUnit5.
import org.junit.jupiter.api.MethodOrderer;
import org.junit.jupiter.api.Test;
import org.junit.jupiter.api.TestMethodOrder;
import static org.junit.jupiter.api.Assertions.assertEquals;

@TestMethodOrder(MethodOrderer.Random.class)
public class OrderRandomDemo {

    @Test
    void test_Add() {

        System.out.println("test_Add()");
        assertEquals(10, 3 + 7);
    }

    @Test
    void test_Subtract() {

        System.out.println("test_Subtract()");
        assertEquals(10, 14 - 4);
    }

    @Test
    void test_Multiply() {

        System.out.println("test_Multiply()");
        assertEquals(10, 5 * 2);
    }

    @Test
    void test_Divide() {

        System.out.println("test_Divide()");
        assertEquals(10, 30 / 3);
    }

    @Test
    void test_IsEven() {

        System.out.println("test_IsEven()");
        assertEquals(0, 10%2);
    }
}
The output of the above program

5. Custom Order
We can define our own custom ordering sequence by implementing the interface MethodOrderer and providing it as the argument to @TestMethodOrder.
Here, the tests are arranged in descending method order.
import org.junit.jupiter.api.MethodDescriptor;
import org.junit.jupiter.api.MethodOrderer;
import org.junit.jupiter.api.MethodOrdererContext;

public class DescendingMethodOrder implements MethodOrderer {

    @Override
    public void orderMethods(MethodOrdererContext context) {
        context.getMethodDescriptors().sort((MethodDescriptor m1, MethodDescriptor m2) ->
                m2.getMethod().getName().compareTo(m1.getMethod().getName()));
    }

}
Now, test the above custom order.
import org.junit.jupiter.api.Test;
import org.junit.jupiter.api.TestMethodOrder;
import static org.junit.jupiter.api.Assertions.assertEquals;

@TestMethodOrder(DescendingMethodOrder.class)
public class CustomOrderTests {

    @Test
    void test_Add() {
        System.out.println("test_Add()");
        assertEquals(10 , 4 + 6);
    }

    @Test
    void test_Subtract() {
        System.out.println("test_Subtract()");
        assertEquals(10 , 17 - 7);
    }

    @Test
    void test_Multiply() {
        System.out.println("test_Multiply()");
        assertEquals(10 , 5 * 2);
    }

    @Test
    void test_Divide() {
        System.out.println("test_Divide()");
        assertEquals(10 , 20/2);
    }

    @Test
    void test_IsEven() {
        System.out.println("test_IsEven()");
        assertEquals(0 , 20%2);
    }
}
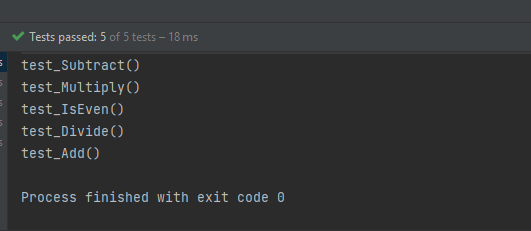
Notice the test output. The tests are executed in descending order. The result of the above program is
Test Classes Ordering
- ClassName: sorts test classes alphanumerically based on their fully qualified class names.
- DisplayName: sorts test classes alphanumerically based on their display names (see display name generation precedence rules).
- OrderAnnotation: sorts test classes numerically based on values specified via the @Order annotation.
- Random: orders test classes pseudo-randomly and support the configuration of a custom seed.
The configured ClassOrderer will be applied to all top-level test classes (including static nested test classes) and @Nested test classes.
1. ClassName
The Test Classes are sorted alphanumerically based on their fully qualified class names.
package JUnit5;

import org.junit.jupiter.api.ClassOrderer;
import org.junit.jupiter.api.Nested;
import org.junit.jupiter.api.Test;
import org.junit.jupiter.api.TestClassOrder;

import static org.junit.jupiter.api.Assertions.assertEquals;

@TestClassOrder(ClassOrderer.ClassName.class)
public class ClassNameOrderTests {

    @Nested
    class Addition {

        @Test
        void test_Add() {
            System.out.println("test_Add()");
            assertEquals(10, 3 + 7);
        }
    }

    @Nested
    class IsEven {

        @Test
        void test_IsEven() {
            System.out.println("test_IsEven()");
            assertEquals(0, 10 % 2);
        }
    }

    @Nested
    class Subtraction {

        @Test
        void test_Subtract() {
            System.out.println("test_Subtract()");
            assertEquals(9, 14 - 5);
        }
    }

    @Nested
    class Multiply {

        @Test
        void test_Multiply() {
            System.out.println("test_Multiply()");
            assertEquals(10, 5 * 2);
        }
    }
}
The result of the above program is
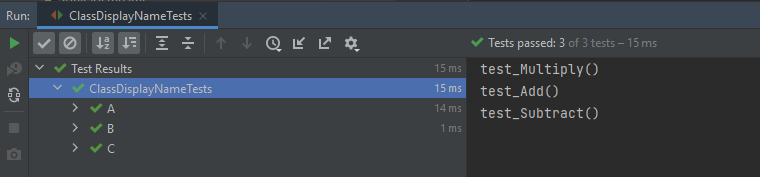
2. DisplayName
It sorts test classes alphanumerically based on their display names.
package JUnit5;

import org.junit.jupiter.api.*;

import static org.junit.jupiter.api.Assertions.assertEquals;

@TestClassOrder(ClassOrderer.DisplayName.class)
public class ClassDisplayNameTests {

    @Nested
    @DisplayName("B")
    class AppFlowTests {

        @Test
        void test_Add() {
            System.out.println("test_Add()");
            assertEquals(10, 6 + 4);
        }
    }

    @Nested
    @DisplayName("C")
    class TearDownTests {

        @Test
        void test_Subtract() {
            System.out.println("test_Subtract()");
            assertEquals(10, 15 - 5);

        }
    }

    @Nested
    @DisplayName("A")
    class SetupTests {

        @Test
        void test_Multiply() {
            System.out.println("test_Multiply()");
            assertEquals(10, 5 * 2);
        }
    }
}
The result of the above program is
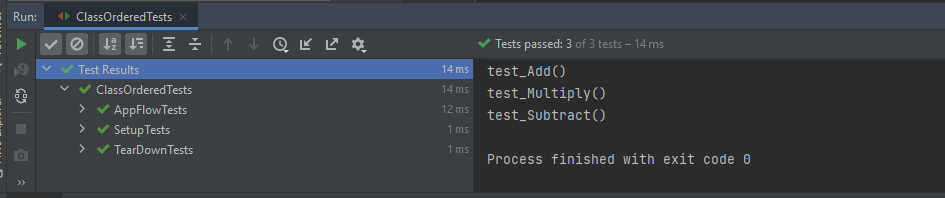
3. OrderAnnotation in Class
The test classes are sorted numerically based on values specified via the @Order annotation.
import org.junit.jupiter.api.*;

import static org.junit.jupiter.api.Assertions.assertEquals;

@TestClassOrder(ClassOrderer.ClassName.class) //sorts test classes alphanumerically based on their fully qualified class names.
public class ClassOrderedTests {

    @Nested
    @Order(2)
    class AppFlowTests {

        @Test
        void test_Add() {
            System.out.println("test_Add()");
            assertEquals(10, 3 + 7);
        }
    }

    @Nested
    @Order(3)
    class TearDownTests {

        @Test
        void test_Subtract() {
            System.out.println("test_Subtract()");
            assertEquals(9, 14 - 5);
        }
    }

    @Nested
    @Order(1)
    class SetupTests {

        @Test
        void test_Multiply() {
            System.out.println("test_Multiply()");
            assertEquals(10, 5 * 2);
        }
    }
}
The result of the above program is
4. Random
The test classes are sorted pseudo-randomly and support the configuration of a custom seed.
import org.junit.jupiter.api.*;
import static org.junit.jupiter.api.Assertions.assertEquals;

@TestClassOrder(ClassOrderer.Random.class)
public class ClassRandomTests {

    @Nested
    class Addition {

        @Test
        void test_Add() {
            System.out.println("test_Add()");
            assertEquals(10, 3 + 7);
        }
    }

    @Nested
    class IsEven {

        @Test
        void test_IsEven() {
            System.out.println("test_IsEven()");
            assertEquals(0, 10 % 2);
        }
    }

    @Nested
    class Subtraction {

        @Test
        void test_Subtract() {
            System.out.println("test_Subtract()");
            assertEquals(9, 14 - 5);
        }
    }

    @Nested
    class Multiply {

        @Test
        void test_Multiply() {
            System.out.println("test_Multiply()");
            assertEquals(10, 5 * 2);
        }
    }
}
The result of the above program is
Congratulation!! We have gone through different types of ordering in JUnit5. Happy Learning!!