In this tutorial, we’ll have a look at the JSONAssert library – a library focused on understanding JSON data.
Add the below-mentioned dependency in pom.xml.
  <dependency>
      <groupId>org.skyscreamer</groupId>
      <artifactId>jsonassert</artifactId>
      <version>1.5.1</version>
      <scope>test</scope>
    </dependency>
Table of Contents
- Comparing two Exact same JSON Arrays – LENIENT Mode
- Comparing two JSON Arrays with the same fields but different in order – Lenient
- Comparing two JSON Arrays with the same fields but different in order – Strict
- Comparing two JSON Arrays with the same fields but different values
- Comparing two JSON Arrays with the case sensitivity
- Comparing two JSON Arrays with the same fields but different datatype of values
- Comparing two JSON Arrays by adding one more attribute to the second JSON – Lenient
- Comparing two JSON Arrays with the addition – STRICT mode
- Comparing two JSON Arrays
There are two modes, strict and non-strict in JSONAssert. In most cases, you will probably want to set strict to false, since that will make the tests less brittle.
Strict tests require all the elements requested to be returned, and only those elements (ie, the tests are non-extensible). Arrays of elements must be returned to the same order as expected.
In Lenient mode, extensibility will be allowed, and no strict ordering will be checked. Let’s see example programs for comparing JSON Arrays.
Comparing two Exact same JSON Arrays – LENIENT Mode
import org.json.JSONArray;
import org.junit.Test;
import org.skyscreamer.jsonassert.JSONAssert;
import org.skyscreamer.jsonassert.JSONCompareMode;

public class JsonArrayAssertDemo {

    @Test
    public void sameArray() {

        // same no of elements, values and in same order
        String jsonArray1 = "[\"Vibha\",\"Abha\",\"Nysha\"]";
        String jsonArray2 = "[\"Vibha\",\"Abha\",\"Nysha\"]";

        JSONAssert.assertEquals(jsonArray1, jsonArray2, JSONCompareMode.LENIENT);
   }
}
The output of the above program is

Comparing two JSON Arrays with the same fields but different in order – Lenient
    @Test
    public void sameArrayDifferentOrder() {

        // Same no of elements but different order
        String jsonArray1 = "[\"Vibha\",\"Abha\",\"Nysha\"]";
        String jsonArray2 = "[\"Nysha\",\"Vibha\",\"Abha\"]";

        JSONAssert.assertEquals(jsonArray1, jsonArray2, JSONCompareMode.LENIENT);
    }
The output of the above program is

LENIENT mode does not care about the order of the fields in the JSON.
Comparing two JSON Arrays with the same fields but different in order – Strict
    @Test
    public void sameArrayDifferentOrder_Strict() {

        // same no of elements, values and in same order
        String jsonArray1 = "[\"Vibha\",\"Abha\",\"Nysha\"]";
        String jsonArray2 = "[\"Nysha\",\"Vibha\",\"Abha\"]";

        JSONAssert.assertEquals(jsonArray1, jsonArray2, JSONCompareMode.STRICT);
    }
The output of the above program is
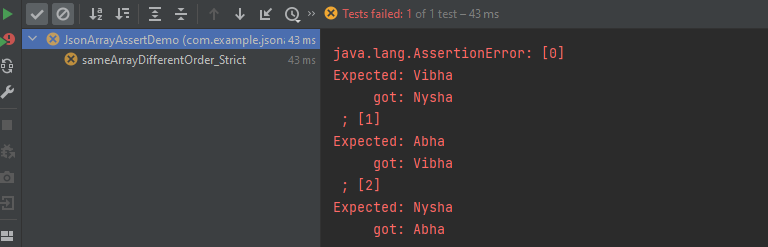
STRICT mode cares about the order of the fields in the JSON Array.
Comparing two JSON Arrays with the same fields but different values
    @Test
    public void sameArrayDifferentValue() {

        // Same no of elements but different values
        String jsonArray1 = "[\"Vibha Singh\",\"Abha\",\"Nysha\"]";
        String jsonArray2 = "[\"Vibha\",\"Abha\",\"Nysha\"]";

        JSONAssert.assertEquals(jsonArray1, jsonArray2, JSONCompareMode.LENIENT);
    }
The output of the above program is
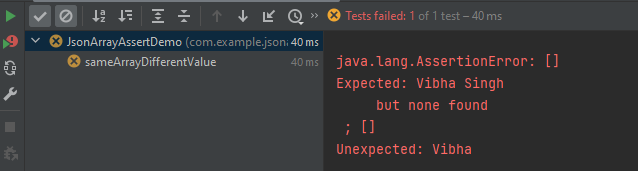
In this scenario assertEquals() will fail as a value is not matching.
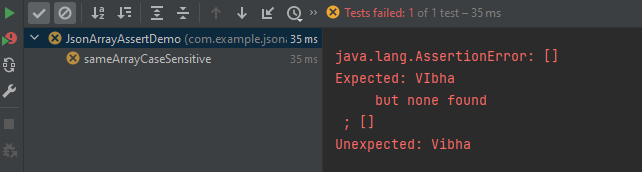
Comparing two JSON Arrays with the case sensitivity
   @Test
    public void sameArrayCaseSensitive() {

        // case sensitive
        String jsonArray1 = "[\"VIbha\",\"Abha\",\"Nysha\"]";
        String jsonArray2 = "[\"Vibha\",\"Abha\",\"Nysha\"]";

        JSONAssert.assertEquals(jsonArray1, jsonArray2, JSONCompareMode.LENIENT);
    }
The output of the above program is
Comparing two JSON Arrays with the same fields but different datatype of values
    @Test
    public void sameJsonArrayWithDifferentDataType() {

        String jsonArray1 = "[\"Vibha\",\"Abha\",\"145000\"]";
        String jsonArray2 = "[\"Vibha\",\"Abha\",145000]";


        JSONAssert.assertEquals(jsonArray1, jsonArray2, JSONCompareMode.LENIENT);
    }
The output of the above program is
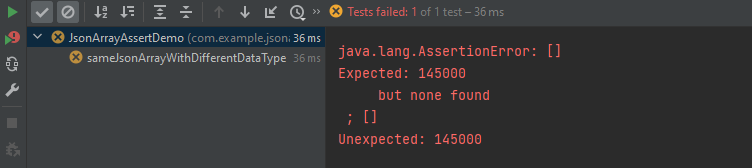
Here, 145000 is a string in the first and an integer in the second one. These are not the same. So, the test fails.
Comparing two JSON Arrays by adding one more attribute to the second JSON – Lenient
   @Test
    public void sameArrayDifferentNumber() {

        String jsonArray1 = "[\"Vibha\",\"Abha\",\"Nysha\", \"Pooja\"]";
        String jsonArray2 = "[\"Vibha\",\"Abha\",\"Nysha\"]";

        JSONAssert.assertEquals(jsonArray1, jsonArray2, JSONCompareMode.LENIENT);
    }
The output of the above program is

Here, both the JSON Arrays have the same structure, but we have added one more attribute to the second one. In this case, the assertion fails as it counts the number of items in the arrays.
Comparing two JSON Arrays with the addition – STRICT mode
    @Test
    public void sameArrayDifferentNumber() {

        String jsonArray1 = "[\"Vibha\",\"Abha\",\"Nysha\", \"Pooja\"]";
        String jsonArray2 = "[\"Vibha\",\"Abha\",\"Nysha\"]";

        JSONAssert.assertEquals(jsonArray1, jsonArray2, JSONCompareMode.STRICT);
    }
The output of the above program is

The compare mode can also be defined by using an overloaded method that takes boolean instead of JSONCompareMode where LENIENT = false and STRICT = true.
        JSONAssert.assertEquals(jsonArray1, jsonArray2, JSONCompareMode.LENIENT);
        JSONAssert.assertEquals(jsonArray1, jsonArray2, false);

        JSONAssert.assertEquals(jsonArray1, jsonArray2, JSONCompareMode.STRICT);
        JSONAssert.assertEquals(jsonArray1, jsonArray2, true);
Comparing two JSON Arrays
 @Test
    public void jsonArray() {

        JSONObject data1 = new JSONObject();
        data1.put("first_name", "Vibha");
        data1.put("last_name", "Singh");

        JSONObject data2 = new JSONObject();
        data2.put("first_name", "Nysha");
        data2.put("last_name", "Verma");


        // Creating JSON array to add both JSON objects
        JSONArray array1 = new JSONArray();
        array1.put(data1);
        array1.put(data2);

        System.out.println("JSON Array :" + array1);

       //Second JSON Array

        JSONObject data3 = new JSONObject();
        data3.put("first_name", "Nysha");
        data3.put("last_name", "Verma");

        JSONObject data4 = new JSONObject();
        data4.put("first_name", "Vibha");
        data4.put("last_name", "Singh");

        // Creating JSON array to add both JSON objects
        JSONArray array2 = new JSONArray();
        array2.put(data3);
        array2.put(data4);

        System.out.println("JSON Array :" + array2);

        JSONAssert.assertEquals(array1, array2, JSONCompareMode.STRICT);
    }
The output of the above program is
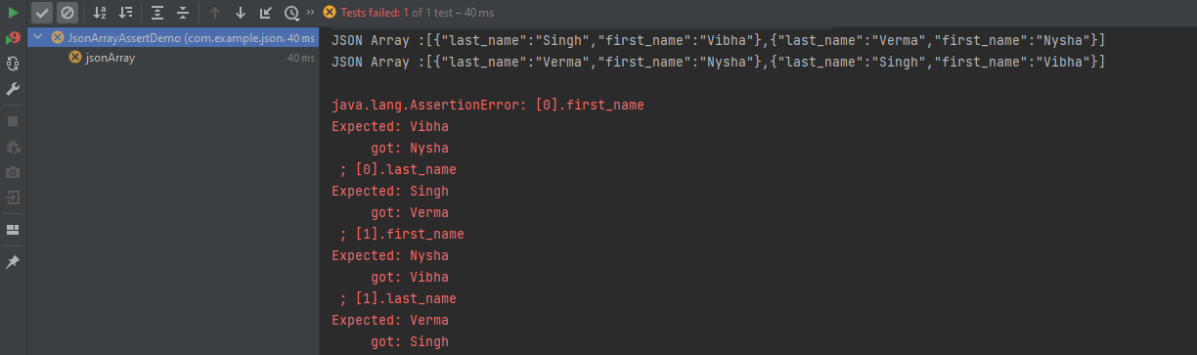
In the above example, we have changed the order of the objects in the JSON Array. So, the test has failed.
Congratulations on making it through this tutorial and hope you found it useful! Happy Learning!! Cheers!!