Java Exceptions Tutorial: Built-in and User-defined Exceptions

HOME

Table of Contents

  1. These are exceptions that are checked at compile-time.
  2. They must be either handled using a try-catch block or declared in the method signature using the `throws` keyword.
  3. Examples include IOException, SQLException, and FileNotFoundException.

It is thrown when an exception has occurred in an arithmetic operation. Below is an example of this exception.

public class ArithmeticExceptionDemo {

	public static void main(String[] args) {
		{
			try {
				int a = 30, b = 0;
				int c = a / b; // cannot divide by zero
				System.out.println("Result = " + c);
			} catch (ArithmeticException e) {
				System.out.println("Can't divide a number by 0");
			}
		}
	}
}

2. ArrayIndexOutOfBoundsException

It is thrown when an array has been accessed with an illegal index. The index is either negative or greater than or equal to the size of the array.

public class ArrayIndexOutOfBoundsExceptionDemo {

	public static void main(String[] args) {
		{
			try {
				// Create an array of size 5
				int a[] = new int[5];

				// Access 11th element from array of size 5
				a[10] = 9;
			} catch (ArrayIndexOutOfBoundsException e) {
				System.out.println("Array Index is Out Of Bounds");
			}
		}
	}
}

3. StringIndexOutOfBoundsException

It is thrown by String class methods to indicate that an index is either negative or greater than the size of the string.

public class StringOutOfBoundDemo {

	public static void main(String[] args) {
		{
			try {
				String a = "This is testing"; // length is 15
				System.out.println("Length of String :" + a.length());

				char b = a.charAt(20); // accessing 20th element
				System.out.println(b);
			} catch (StringIndexOutOfBoundsException e) {
				System.out.println("StringIndexOutOfBoundsException");
			}
		}
	}
}

4. NullPointerException

This exception is thrown when referring to the members of a null object.

public class NullPointerDemo {

	public static void main(String[] args) {
		{
			try {
				String a = null; // null value
				System.out.println(a.length());
			} catch (NullPointerException e) {
				System.out.println("NullPointerException");
			}
		}
	}
}

5. NumberFormatException

This exception is thrown when a method can not convert a string into a numeric format.

public class NumberFormatDemo {

	public static void main(String[] args) {
		try {
			// "java" is not a number
			int num = Integer.parseInt("java");

			System.out.println(num);
		} catch (NumberFormatException e) {
			System.out.println("Number format exception");
		}
	}
}

6. FileNotFoundException

This Exception is thrown when a file is not accessible or does not open.

import java.io.File;
import java.io.FileNotFoundException;
import java.io.FileReader;

public class FileNotFoundDemo {

	public static void main(String[] args) {
		try {

			// Following file does not exist
			File file = new File("C://demofile.txt");

			FileReader fr = new FileReader(file);
		} catch (FileNotFoundException e) {
			System.out.println("File does not exist");
		}
	}
}

7. ClassNotFoundException

This Exception is raised when we try to access a class whose definition is not found.

package JavaDemo;

public class ClassNotFoundExceptionDemo {

	public static void main(String[] args) {
		try {
			Class temp = Class.forName("gfg");
			// Calling the clas gfg which is not present in the
			// current class temp instance of calling class it
			// will throw ClassNotFoundException;
		} catch (ClassNotFoundException e) {
			// block executes when mention exception occur
			System.out.println("Class does not exist check the name of the class");
		}
	}
}

8. IOException

It is thrown when an input-output operation failed or interrupted.

import java.io.BufferedReader;
import java.io.FileReader;
import java.io.IOException;

public class IOExceptionDemo {

	public static void main(String[] args) {

		String filepath = "C:\\Users\\Desktop\\IOTest1.txt";
		BufferedReader br1 = null;
		String curline;

		try {
			br1 = new BufferedReader(new FileReader(filepath));

			while ((curline = br1.readLine()) != null) {
				System.out.println(curline);
			}
		} catch (IOException e) {
			System.err.println("IOException found :" + e.getMessage());
		} finally {
			try {
				if (br1 != null)
					br1.close();
			} catch (IOException e) {
				e.printStackTrace();
			}
		}
	}
}

9. NoSuchMethodException

It is thrown when accessing a method which is not found.

10. InterruptedException

It is thrown when a thread is waiting , sleeping , or doing some processing , and it is interrupted.

11. NoSuchFieldException

It is thrown when a class does not contain the field (or variable) specified.

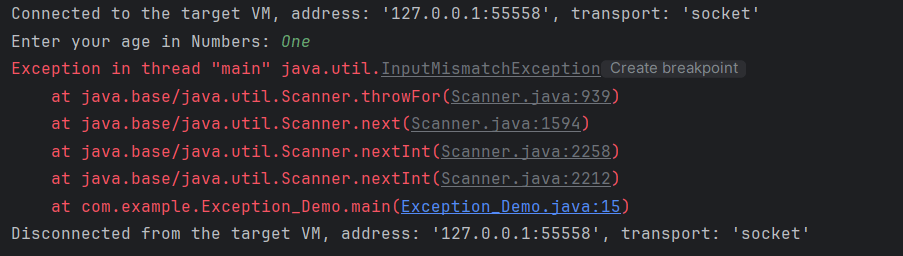
12. RuntimeException

This represents any exception which occurs during runtime. They are ignored during compilation time. Such as logical bugs.

import java.util.Scanner;

public class RunTimeDemo {

	public static void main(String[] args) {
		// Reading user input
		Scanner input_dev = new Scanner(System.in);
		System.out.print("Enter your age in Numbers: ");
		int age1 = input_dev.nextInt();
		if (age1 > 20) {
			System.out.println("You can view the page");
		} else {
			System.out.println("You cannot view the page");
		}
	}
}

13. SQLException

This type of exception occurs while executing queries on a database related to the SQL syntax.

14. IllegalArgumentException

It is thrown when an inappropriate and incorrect argument is passed to the method. Suppose, a method does not allow null, but we are providing null as the parametr, then this exception is thrown.

Exception Handling in Java

HOME

What is Exception in Java?

An exception is an unwanted or unexpected event which occurs at the run time of the program, that leads to the disruption of the normal flow of execution of the program.

What is Exception Handling?

Exception Handling is a mechanism to handle runtime errors happen in the program such as ClassNotFoundException, IOException, SQLException, RemoteException, etc, which disruptes the normal execution of the program.

Suppose there are 6 statements in your program and there occurs an exception at statement 3, the rest of the code will not be executed i.e. statement 4 to 6 will not be executed. If we perform exception handling, the rest of the statement will be executed. That is why we use exception handling in Java.

What is the difference between Error and Exception?

Error: An Error indicates serious problem that a reasonable application should not try to catch. Error are used by the Java run-time system(JVM) to indicate errors having to do with the run-time environment itself(JRE) or StackOverflowError or OutOfMemoryError

Exception: Exception indicates conditions that a reasonable application might try to catch. Example of exceptions are IOException, SQLException, etc.

Types of Exceptions

1) Checked Exception
The classes which directly inherit Throwable class except RuntimeException and Error are known as checked exceptions e.g. IOException, SQLException etc. Checked exceptions are checked at compile-time.

2) Unchecked Exception
The classes which inherit RuntimeException are known as unchecked exceptions e.g. ArithmeticException, NullPointerException, ArrayIndexOutOfBoundsException etc. Unchecked exceptions are not checked at compile-time, but they are checked at runtime.

Hierarchy of Java Exception classes

Keywords used in Exception Handling in Java

1. try keyword – It is used to specify a block where we should place exception code. The try block must be followed by either catch or finally. It means, we can’t use try block alone.

2. catch keyword – It is used to handle the exception. It must be preceded by try block which means we can’t use catch block alone. It can be followed by finally block later.

3. finally keyword – It is used to execute the important code of the program irrespective the exception is handled or not.

4. throw keyword – It is used to throw an exception explicitly in the program inside a function or inside a block of code.

5. throws keyword – It is used to declare exceptions. It doesn’t throw an exception. It specifies that there may occur an exception in the method. It is always used with method signature.

Exception Handling Example in Java

Let’s see an example of exception handling where we can use try-catch block and will not use try-catch statements. Below example shows an exception without try-catch block.

package JavaDemo;

public class ExceptionHandlingDemo {

	static String a = null;

	public static void main(String[] args) {

		System.out.println(a.length());
	}

}

Output
Exception in thread "main" java.lang.NullPointerException
	at JavaDemo.ExceptionHandlingDemo.main(ExceptionHandlingDemo.java:9)

Below example shows an exception with try-catch block.

package JavaDemo;

public class ExceptionHandlingDemo {
	static String a = null;

	public static void main(String[] args) {
		// TODO Auto-generated method stub

		try {
			System.out.println(a.length());
		} catch (NullPointerException e) {
			System.out.println(e);
		}
		System.out.println("Exception is handled");
	}

}

Output
java.lang.NullPointerException
Exception is handled

Page Object Model with Page Factory in Selenium

HOME

What Is Page Object Model (POM)?

Page Object model is an object design pattern in Selenium, where web pages are represented as classes, and the various elements on the page are defined as variables in the class and all possible user interactions can then be implemented as methods in the class.

The benefit is that if there is any change in the UI for the page, the tests themselves don’t need to change, only the code within the page object needs to change. Subsequently all changes to support that new UI are located in one place.

Advantages:

1. Readable There is a clean separation between test code and page specific code such as locators and methods.

2. Maintainability  – In this model, separate classes are created for different pages of a web application like login page, the home page, employee detail page, change password page, etc. So, if there is any change in any element of a website then we only need to make changes in one class, and not in all classes.

3. Reusable If multiple test scripts use the same web elements, then we need not write code to handle the web element in every test script. Placing it in a separate page class makes it reusable by making it accessible by any test script.

4. Easy project Structure – Its project structure is quite easy and understandable.

5. PageFactory – It can use PageFactory in the page object model in order to initialize the web element and store elements in the cache.

In case there are lots of web elements on a page, then the object repository class for a page can be separated from the class that includes methods for the corresponding page.

Example: If the New Customer page has many input fields. In that case, there can be 2 different classes. One class called NewCustomerObjects.java that forms the object repository for the UI elements on the register accounts page.

A separate class file NewCustomerMethods.java extending or inheriting NewCustomerObjects that includes all the methods performing different actions on the page could be created.

Consider the below script to login to an application and navigate to home page.

This is a small script. Therefore, script maintenance and readability looks very easy.

Imagine there are 50 different tests present in this script. In that case, the readability of the script decreases as well as maintenance become very difficult.

Scenario

  1. Launch the Firefox browser.
  2. The demo website opens in the browser.
  3. Verify the Login Page
  4. Enter username and Password and login to the demo site.
  5. Verify the home page.
  6. Close the browser.
package PageObjectModel;

import java.util.concurrent.TimeUnit;
import org.openqa.selenium.By;
import org.openqa.selenium.WebDriver;
import org.openqa.selenium.firefox.FirefoxDriver;
import org.testng.Assert;
import org.testng.annotations.AfterTest;
import org.testng.annotations.BeforeTest;
import org.testng.annotations.Test;

public class NonPOMExample {

     WebDriver driver;

     @BeforeTest
     public void setup() {

           ChromeOptions options = new ChromeOptions();
           driver = new ChromeDriver(options);
           driver.manage().window().maximize();
           driver.manage().timeouts().implicitlyWait(10, TimeUnit.SECONDS);
           driver.get("https://opensource-demo.orangehrmlive.com/");
     }

     @Test(priority = 0)
     public void Login() {
           String pageTitle = driver.findElement(By.id("logInPanelHeading")).getText();
           Assert.assertTrue(pageTitle.contains("LOGIN Panel"));
     }

     @Test(priority = 1)
     public void HomePage() {

           driver.findElement(By.name("txtUsername")).sendKeys("Admin");
           driver.findElement(By.name("txtPassword")).sendKeys("admin123");
           driver.findElement(By.id("btnLogin")).submit();
           String homePageText = driver.findElement(By.id("welcome")).getText();
           Assert.assertTrue(homePageText.contains("Welcome"));
     }

     @AfterTest
     public void close() {
           driver.close();
     } 
}

What Is Pagefactory?

PageFactory is a way of implementing the “Page Object Model”. Here, we follow the principle of separation of Page Object Repository and Test Methods. It is an inbuilt concept of Page Object Model which is very optimized.

1. The annotation @FindBy is used in Pagefactory to identify an element while POM without Pagefactory uses the driver.findElement() method to locate an element.

2. The second statement for Pagefactory after @FindBy is assigning an <element name> of type WebElement class that works exactly similar to the assignment of an element name of type WebElement class as a return type of the method driver.findElement() that is used in usual POM (userName in this example).

Non POM

driver.findElement(By.name("txtUsername"));

POM

@FindBy(name = "txtUsername")
WebElement userName;

3. Below is a code snippet of non PageFactory Mode to set Firefox driver path. A WebDriver instance is created with the name driver and the FirefoxDriver is assigned to the ‘driver’.  The same driver object is then used to launch the demo website, locate the webelements and to perform various operations

Basically, here the driver instance is created initially and every web element is freshly initialized each time when there is a call to that web element using driver.findElement() or driver.findElements().

ChromeOptions options = new ChromeOptions();
driver = new ChromeDriver(options);
driver.manage().window().maximize();
driver.manage().timeouts().implicitlyWait(10, TimeUnit.SECONDS);
driver.get("https://opensource-demo.orangehrmlive.com/");

But with POM with PageFactory approach, all the elements are initialized with initElements() without explicitly initializing each web element.

The initElements is a static method of PageFactory class which is used to initialize all the web elements located by @FindBy annotation. Thus, instantiating the Page classes easily. It is used to initialize the WebElements declared, using driver instance from the main class. In other words, WebElements are created using the driver instance. Only after the WebElements are initialized, they can be used in the methods to perform actions.

public Login(WebDriver driver) {
           this.driver = driver;
           // This initElements method will create all WebElements
           PageFactory.initElements(driver, this);
     }

Implementation Steps

Step 1 – Create a Maven Project

Click here to know How to create a Maven project.

Step 2 – Add dependencies to the pom.xml

<project xmlns="http://maven.apache.org/POM/4.0.0" xmlns:xsi="http://www.w3.org/2001/XMLSchema-instance"
  xsi:schemaLocation="http://maven.apache.org/POM/4.0.0 http://maven.apache.org/xsd/maven-4.0.0.xsd">
  <modelVersion>4.0.0</modelVersion>

  <groupId>com.example</groupId>
  <artifactId>PageObjectModel</artifactId>
  <version>1.0-SNAPSHOT</version>
  <packaging>jar</packaging>

  <name>PageObjectModel</name>
  <url>http://maven.apache.org</url>

  <properties>
    <project.build.sourceEncoding>UTF-8</project.build.sourceEncoding>
    <selenium.version>4.21.0</selenium.version>
    <testng.version>7.10.2</testng.version>
    <maven.surefire.plugin.version>3.2.5</maven.surefire.plugin.version>
    <maven.compiler.plugin.version>3.13.0</maven.compiler.plugin.version>
    <maven.compiler.source>17</maven.compiler.source>
    <maven.compiler.target>17</maven.compiler.target>
  </properties>

  <dependencies>
    <dependency>
      <groupId>org.seleniumhq.selenium</groupId>
      <artifactId>selenium-java</artifactId>
      <version>${selenium.version}</version>
    </dependency>

    <dependency>
      <groupId>org.testng</groupId>
      <artifactId>testng</artifactId>
      <version>${testng.version}</version>
    </dependency>
  </dependencies>

  <build>
    <plugins>
      <plugin>
        <groupId>org.apache.maven.plugins</groupId>
        <artifactId>maven-compiler-plugin</artifactId>
        <version>${maven.compiler.plugin.version}</version>
        <configuration>
          <source>${maven.compiler.source}</source>
          <target>${maven.compiler.target}</target>
        </configuration>
      </plugin>
      <plugin>
        <groupId>org.apache.maven.plugins</groupId>
        <artifactId>maven-surefire-plugin</artifactId>
        <version>${maven.surefire.plugin.version}</version>
        <configuration>
          <suiteXmlFiles>
            <suiteXmlFile>testng.xml</suiteXmlFile>
          </suiteXmlFiles>
        </configuration>
      </plugin>
    </plugins>
  </build>
</project>

Step 3 – Create a Java Class for each page

In this example, we will access 2 web pages, “Login” and “Home” pages.

Hence, we will create 2 Java classes in Page Layer  –  Login.java and HomePage.java

3.1. Define WebElements as variables using Annotation @FindBy:

We would be interacting with:

  • Message on Login Page, Username, Password, Login button field on the Login Page.
  • Successful message on the Home Page

For Example: If we are going to identify the Username using attribute name, then its variable declaration is

 @FindBy(name = "txtUsername")
 WebElement userName;

3.2 Create methods for actions performed on WebElements.

Below actions are performed on WebElements in Login Page:

  • Get Text on Login Page
  • Type action on the Username field.
  • Type action in the Password field.
  • Click action on the Login Button

Note: A constructor has to be created in each of the class in the Page Layer, in order to get the driver instance from the Main class in Test Layer and also to initialize WebElements(Page Objects) declared in the page class using PageFactory.InitElement().

package com.example.pages;

import org.openqa.selenium.WebDriver;
import org.openqa.selenium.support.PageFactory;

public class BasePage {
    public WebDriver driver;

    public BasePage(WebDriver driver) {
        this.driver = driver;
        PageFactory.initElements(driver,this);
    }

}

Login Page

package com.example.pages;

import org.openqa.selenium.WebDriver;
import org.openqa.selenium.WebElement;
import org.openqa.selenium.support.FindBy;

public class LoginPage extends BasePage{

    public LoginPage(WebDriver driver) {
        super(driver);

    }

    @FindBy(name = "username")
    public WebElement userName;

    @FindBy(name = "password")
    public WebElement password;

    @FindBy(xpath = "//*[@class='oxd-form']/div[3]/button")
    public WebElement login;

    @FindBy(xpath = "//*[@id='app']/div[1]/div/div[1]/div/div[2]/div[2]/div/div[1]/div[1]/p")
    public  WebElement errorMessage;


    public void login(String strUserName, String strPassword) {

        userName.sendKeys(strUserName);
        password.sendKeys(strPassword);
        login.click();

    }

    public String getErrorMessage() {
        return errorMessage.getText();
    }


}

HomePage. java

package com.example.pages;

import org.openqa.selenium.WebDriver;
import org.openqa.selenium.WebElement;
import org.openqa.selenium.support.FindBy;

public class HomePage extends BasePage {

    public HomePage(WebDriver driver) {
        super(driver);

    }

    @FindBy(xpath = "//*[@id='app']/div[1]/div[1]/header/div[1]/div[1]/span/h6")
    public  WebElement homePageUserName;

    public String getHomePageText() {
        return homePageUserName.getText();
    }

}

Step 4 –  Create test class for the tests of these pages

package com.example.tests;

import org.openqa.selenium.WebDriver;
import org.openqa.selenium.chrome.ChromeDriver;
import org.openqa.selenium.chrome.ChromeOptions;
import org.testng.annotations.AfterMethod;
import org.testng.annotations.BeforeMethod;

import java.time.Duration;

public class BaseTests {

    public static WebDriver driver;
    public final static int TIMEOUT = 10;

    @BeforeMethod
    public void setup() {

        ChromeOptions options = new ChromeOptions();
        options.addArguments("--remote-allow-origins=*");
        options.addArguments("--no-sandbox");
        options.addArguments("--disable-dev-shm-usage");
        options.addArguments("--headless");
        driver = new ChromeDriver(options);
        driver.manage().window().maximize();
        driver.get("https://opensource-demo.orangehrmlive.com/");
        driver.manage().timeouts().implicitlyWait(Duration.ofSeconds(TIMEOUT));

    }

    @AfterMethod
    public void tearDown() {
        driver.quit();
    }

}

LoginPageTests.java

package com.example.tests;

import com.example.pages.HomePage;
import com.example.pages.LoginPage;
import org.testng.Assert;
import org.testng.annotations.Test;

public class LoginPageTests extends BaseTests{

    String actualResponse;

    @Test
    public void invalidCredentials()  {

        LoginPage objLoginPage = new LoginPage(driver);
        objLoginPage.login("admin", "admin");
        actualResponse = objLoginPage.getErrorMessage();
        Assert.assertEquals(actualResponse,"Invalid credentials");
    }

    @Test
    public void validCredentials() {

        LoginPage objLoginPage = new LoginPage(driver);
        objLoginPage.login("Admin", "admin123");
        HomePage objHomePage = new HomePage(driver);
        actualResponse = objHomePage.getHomePageText();
        Assert.assertEquals(actualResponse,"Dashboard");

    }

}

Step 5 – Execute the tests

To run the test, right click and select as Run As and then select TestNG Test (Eclipse).

Step 6 – Create TestNG.xml

You can add TestNG.xml and run the tests from there also.

<?xml version = "1.0"encoding = "UTF-8"?>
<!DOCTYPE suite SYSTEM "http://testng.org/testng-1.0.dtd">
<suite name = "PageObjectModel">
    <test name = "PageObjectModel Tests">
        <classes>
            <class name ="com.example.tests.LoginPageTests"/>
        </classes>
    </test>
</suite>

Step 7 – Run the tests from TestNG.xml

Right click on TestNG.xml and select Run As TestNG Suite.

The execution status looks like as shown below.

Step 8 -TestNG Report Generation

Once the execution is finished, refresh the project. It will create a test-output folder containing various reports generated by TestNG. Below is the screenshot of the report folder.

Index.html

emailable-report.html

mvn clean test

How to Download and Install Eclipse IDE

HOME

 Eclipse IDE is a software that allows you to write your programs and test scripts in multiple programming languages (with Java being the most popular one).

Download Eclipse IDE

 1. Open the below mentioned link. Latest version of Eclipse available is Eclipse IDE 2024-09 R Packages  Eclipse Download .

       
 2. Select – Eclipse IDE for Java Developers. Depending on type of Operating System, download either 32 bit or 64 bit. My system is 64 bit, so downloading 64 bit Eclipse .

3. Click on the Download button to start downloading process.

Install/Setup Eclipse

  1.  We do not need to install Eclipse, just unzip the Eclipse downloaded folder. Go to the path where Eclipse downloaded and unzip the folder .

2.    Eclipse folder have Eclipse Editor (Eclipse.exe), double click on it.

3.   Eclipse Workplace directory will get open. You can provide name to this directory. In Eclipse, all the projects saved in Eclipse Directory

4.  A folder with same Eclipse Directory name creates in same path as mentioned above.

Note: –  There are chances that you may face the issue while trying to access Eclipse IDE – Java was started but returned exit code =13. This is because there is configuration mistake in Eclipse.ini (Eclipse Configuration) file. The error will look like something below:-

To fix this issue, open the Eclipse Configuration file. It will be present in unzipped Eclipse Folder. 

Add the below mentioned line in Eclipse Configuration file:-

-vm
      C:\Program Files\Java\jre1.8.0_201\bin\java.exe

 More details can found from below link                                  

https://wiki.eclipse.org/Eclipse.ini#Specifying_the_JVM

How to Download & Install Java JDK 11 in Windows

HOME

The Java Development Kit(JDK) allows you to code and run Java programs. The JDK is essentially a toolkit that provides the necessary components to write, compile, and run Java programs. It includes the Java Runtime Environment (JRE), compilers, and various tools such as debuggers and documentation generators. In this tutorial, we show you how to install Java 11 on Windows and set up the environment variable JAVA_HOME

Download Java

1. Refer to the link to download JDK11. Here, I have a 64-bit system and windows operating system, so I selected –  jdk-11.0.16.1_windows-x64_bin.exe

2. Click on the name – jdk-11.0.816.1_windows-x64_bin.exe, and a dialog box as shown below will appear.

3.  If you do not have an Oracle account, then go to the AdoptOpenJDK link . AdoptOpenJDK uses infrastructure, build and test scripts to produce prebuilt binaries from OpenJDK™ class libraries and a choice of either OpenJDK or the Eclipse OpenJ9 VM. All AdoptOpenJDK binaries and scripts are open sources licensed and available free.

Select appropriate version and JVM.

Here, I have selected Version – OpenJDK 11 and JVM as HotSpot. Click on the blue download button. It will take you to the new location.

4.  Select the appropriate Operating System, Architecture, Package Type & Version. I have selected OS as Windows, Architecture as x64, Package Type as JDK, and Version as 11. Select the .zip extension and download the exe.

5. Once the file is downloaded, Right-click and extract the files to the desired location. I have placed it in C: driver under Program Files.

How to set Java JDK 11 Path in Windows 10?

1.  Type – “View Advance” in the search option and we will see the option – View Advanced system setting. 

2. In System Properties dialog, select Advanced tab and click on the Environment Variables button.

3. In “Environment variables” dialog, system variables. Click on the New button. Add a JAVA_HOME variable and specify the variable value. Mention the path where the Java folder is located.

4. Update System Path. In the “Environment Variables” window, go to “System variables.” Select Path and click Edit. Add the path of Java with bin.

To verify, if JAVA is installed properly or not, open command prompt and type

java - version

To verify, if JAVA_HOME is configured properly or not, open command prompt and type

echo %JAVA_HOME%

runAsync and supplyAsync in ComputableFuture in Java8

This tutorial is to explain the functionality of ComputableFuture class introduced as Java 8 Concurrency API improvement.

ComputableFuture class implements the Future interface; means can be use for future implementation but with additional logic. 
Static methods runAsync and supplyAsync allow us to create a ComputableFuture instance out of Runnable and Supplier functional types accordingly.

runAsync  – Returns a new CompletableFuture that is asynchronously completed by a task running in the ForkJoinPool.commonPool() after it runs the given action. It returns the new CompletableFuture.

CompletableFuture<Void> java.util.concurrent.CompletableFuture.runAsync(Runnable runnable)

ComputableFuture.runAsync accepts Runnable functional interface and return a ComputableFuture which doesn’t have value

import java.util.concurrent.CompletableFuture;
import java.util.concurrent.ExecutionException;
import org.junit.Test; 
 
 public class runAsyncDemo {
     @Test
      public void runAsync() throws InterruptedException, ExecutionException {
           CompletableFuture future = CompletableFuture.runAsync(() -> System.out.println("runAsync method doesn not return any value"));
           System.out.println(future.get());
   }
}

Output
runAsync method does not return any value
null

How to use Java Lambda expression to create thread via Runnable function


Lambda expressions are introduced in Java 8. It represents one method interface called functional interface.
In this tutorial, we will see how to create a new Thread in Java using Lambda expression.

public class LambdaThreadDemo {
public static void main(String[] args) {
 
    // Implementing Runnable using old way
     Runnable runnable = new Runnable() {

     @Override
      public void run() {
            System.out.println("Old Thread name : "+ Thread.currentThread().getName());
         }
       };
    Thread thread1 = new Thread(runnable);
 
    // Implementing Runnable using Lambda Expression
     Runnable runnable_new = () -> { System.out.println("New Thread name : "+ Thread.currentThread().getName());
        };
     Thread thread_new = new Thread(runnable_new);
 
    // Start Threads
    thread1.start();
    thread_new.start();
   }
}

Output
Old Thread name : Thread-0
New Thread name : Thread-1

This Keyword in Java

HOME


This keyword refers to current object in a method or constructor. The most common use of this keyword is to eliminate the confusion between class variables and parameters of same name.

this can also be used to:

  • Invoke current class instance variable
  • Invoke current class method
  • Invoke current class constructor
  • Pass as an argument in the method call
  • Pass as an argument in the constructor call
  • Return the current class object

Invoke current class instance variable

Here, this keywords can be used to refer or invoke the current class instance variable. Suppose the class variables and parameters share the same name, then this ambiguity can be resolved by the use of this keyword.

public class Employee {
     String name;
     String EmpId;
     Employee(String name, String EmpId) {
           name = name;
           EmpId = EmpId;
      }
      void display() {
            System.out.println(name + " " + EmpId);
      }
      public static void main(String[] args) {
            Employee E1 = new Employee("Vibha", "IT0047");
            Employee E2 = new Employee("Abha", "IT0045");
            E1.display();
            E2.display();
     }
}

Output
null null 
null null

The solution to the problem where both class instance variables and parameters have same name can be resolved with the help of this keyword as shown below.

public class Employee {
     String name;
     String EmpId;
 
     Employee(String name, String EmpId) {
         this.name = name;
         this.EmpId = EmpId;
     }
 
      void display() {
          System.out.println(name + " " + EmpId);
      }
 
       public static void main(String[] args) {
             Employee E1 = new Employee("Vibha", "IT0047");
             Employee E2 = new Employee("Abha", "IT0045");
             E1.display();
             E2.display();
    }
}

Output
Vibha IT0047
Abha IT0045

Invoke current class method

The current class method invoked by using this keyword. Here, both display1() and this.display1() means the same.

public class ThisInvokeCurrentClassMethod {
 
    void display1() {
         System.out.println("This is display 1 method");
     }
 
     void display2() {
           System.out.println("This is display 2 method");
           display1();
           this.display1();
     }
 
     public static void main(String[] args) {
           ThisInvokeCurrentClassMethod obj1 = new ThisInvokeCurrentClassMethod();
           obj1.display2(); 
     }
}
 
Output
This is display 2 method
This is display 1 method

Invoke current class constructor

The current class constructor can be invoked by using this keyword. This is used to reuse the constructor.

public class ThisInvokeCurrentConstructor {
     ThisInvokeCurrentConstructor() {
           System.out.println("This is display method");
     }
 
     ThisInvokeCurrentConstructor(int x) {
         this();
         System.out.println("Value of X :" + x);
     }
 
     public static void main(String[] args) {
        ThisInvokeCurrentConstructor obj = new ThisInvokeCurrentConstructor(12);
    }
}
 
Output
This is display method
Value of X :12

How to create first Selenium WebDriver Script using Java

We assume here that Selenium WebDriver is download and installed with Eclipse. If not, please refer this link

In this tutorial, we will see how to create a simple Selenium WebDriver script using JAVA. The most important thing is that JAVA, Eclipse and Selenium WebDriver are already install in the machine. If not, then please refer the link – How to Download & Install Selenium WebDriver.

To create our first Selenium WebDriver Script, we have to create a Java Project, Package and Class in Eclipse.

1. Create a Java Project “AutomationSuite” – Click File ->New ->Other ->Project ->Java Project. Click Next.

  • Provide Package Name – here I have provided AutomationSuite 
  • JRE – Use an execution environment JRE: JavaSE-1.8 (This is the version of Java on your machine)
  • Project Layout – Create separate folders for source and class files

ii. Create a package “SeleniumTutorial” – Right click Java Project (AutomationSuite) ->Click File ->New ->Package

iii. Create a Java Class “FirstProgram” – Right click Java Package (SeleniumTutorial) ->Click File ->New ->Class

  • Name: Name of the class (FirstProgram)
  • Modifiers – Public
  • Which method stubs would you like to create – public static void main(String[] args) and click Finish

Above displayed image explains the structure of Project in Eclipse.

Add Selenium Jar files to the Java Project


1.  Right click on AutomationSuite and click on Properties.

2.  Click on Java Build Path. Select Libraries. Click on – Add External JARs

3.  Go to the path where Selenium WebDriver JAR folder was downloaded and select 2 JAR files – client-combined-3.141.59 and client-combined-3.141.59-sources and click on Open button.

4. Similarly, go to Lib folder of Selenium file and select the entire JAR present there

5. To verify that the JAR’s are added or not, click on Referenced Libraries and will see all these JARs are present here. For more details, refer the link

Scenario:


To open appropriate URL and verify the title of the home page
Steps:
i. Open Chrome browser
ii. Go to the specified URL – http://www.google.com
iii. Verify the title and print the output of the title
iv. Close the Chrome browser

import java.util.concurrent.TimeUnit;
import org.openqa.selenium.chrome.ChromeDriver;
 
public class FirstProgram {
       
     public static void main(String[] args) {
               
 System.setProperty("webdriver.chrome.driver","C:\\Users\\vibha\\Downloads\\Drivers\\chromedriver_win32\\chromedriver.exe"");

         WebDriver driver = new ChromeDriver();
         driver.manage().timeouts().implicitlyWait(40, TimeUnit.SECONDS);
         driver.get("https://www.google.com/");
         String PageTiltle = driver.getTitle();
         System.out.println("Page Title :"+PageTiltle);
         driver.close();
     }
}

To run this program, go to Run->Run or Green Icon shown below

Constructors in Java


A constructor initializes an object when it creates. It has the same name as its class and is syntactically similar to a method. However, constructors have no explicit return type.

Every time an object is created using the new() keyword, at least one constructor is called.

ConstructorDemo demo = new ConstructorDemo();

It calls a default constructor if there is no constructor available in the class. In such case, Java compiler provides a default constructor by default. Let me explain constructor with the help of a simple program. Here I have created a class ConstructorDemo, created its constructor and then create the object demo which will in turn will call the constructor too.

//Create a Class ConstructorDemo 
public class ConstructorDemo   
{ 
   int x;
 //Create a Constructor for class ConstructorDemo 
   ConstructorDemo()
   {
                   x=24;
   }
         public static void main(String[] args) {
            
                //Create an object of class Constructor and will call the constructor
                 ConstructorDemo demo = new ConstructorDemo();
                  System.out.println("Value of x: "+demo.x);
      }
} 

Output
Value of x:24

Things to remember for a Constructor:-

  • Constructor name must be the same as its class name
  • A Constructor must have no explicit return type
  • A Java constructor cannot be abstract, static, final, and synchronized

There are two types of constructors in Java: no-arg constructor, and parameterized constructor.

No Argument Constructor – Here, constructor does not have any argument.

public class DefaultConstructorStudent {
    String Name;
     DefaultConstructorStudent()
    {
            System.out.println("Display details of Student");
       }
      public static voidmain(String[] args) {
           DefaultConstructorStudent stud = newDefaultConstructorStudent();
     }
}

Output
Display details of Student

Parameterized Constructor – A constructor that has a specific number of parameters called a parameterized constructor.

In this example, I have a parameterized constructor with two parameters Name and RollNo. While creating the objects stud1 and stud2, I have passed two arguments so that this constructor gets invoked after creation of stud1 and stud2.

public class ParameterizedStudent {
    String Name;
    int RollNo;
ParameterizedStudent(String New_Name,int New_RollNo)

     {
          Name = New_Name;
          RollNo = New_RollNo;
     }
 
   void DisplayInformation()
   {
        System.out.println("Name: "+Name+", "+"Roll_No: "+RollNo);
   }
        public staticvoid main(String[] args) {
 
            ParameterizedStudent stud1 = newParameterizedStudent("TOM",001);
            ParameterizedStudent stud2 = newParameterizedStudent("MIKE",002);
            stud1.DisplayInformation();
            stud2.DisplayInformation();              
       }
}
 
Output 
Name: TOM, Roll_No: 1
Name: MIKE, Roll_No: 2

Constructor Overloading – This is same as method overloading. Here will have more than one constructor with different parameter lists. Constructors overloaded if they have either different number or parameters, different data type of parameters or different sequence of parameters.

public class ConstructorOverloading {
      String Name;  
      int RollNo;
      int Age;

      //Constructor 1 
      ConstructorOverloading(String New_Name, int New_RollNo, int New_Age)
      {
          Name  = New_Name;
          RollNo = New_RollNo;
          Age = New_Age;
      }

      //Constructor 2
       ConstructorOverloading(int R, int A)
       { 
           RollNo = R;
           Age = A;              
       }

      //Constructor 3 
       ConstructorOverloading(String SName, int SRollNo)
       {
           Name = SName;
           RollNo =SRollNo;
       }
       voidDisplayInformation()
       {
            System.out.println("Name: "+Name+", "+"Roll_No: "+RollNo+","+"Age: "+Age);
       }

      public static void main(String[] args) {
        ConstructorOverloading stud1 = newConstructorOverloading("TOM",001, 20);
        ConstructorOverloading stud2 = newConstructorOverloading(002,21);
        ConstructorOverloading stud3 = newConstructorOverloading("MIKE",003);
        stud1.DisplayInformation();
        stud2.DisplayInformation();
        stud3.DisplayInformation();
     }
}

Output
Name: TOM, Roll_No: 1,Age: 20
Name: null, Roll_No: 2,Age: 21
Name: MIKE, Roll_No: 3,Age: 0