This tutorial will show how to ignore certain fields when serializing an object to JSON or deserializing the JSON to object using Jackson 2.x.
This is very useful when the Jackson defaults aren’t enough and we need to control exactly what gets serialized to JSON – and there are several ways to ignore properties. One of the most common way is the use of @JsonIgnore Annotation, but it has some limitations. One of the major limitation is that if it is applied to getter method only, it will ignore setter method too. So, we cannot control if we want a property to be ignored for either Serialization or Deserialization.
Moreover, when there is a requirement to ignore multiple properties, it is tedious to mention @JsonIgnore to all the properties which need to be ignored. Imagine there are 100 properties and we need to ignore 30 properties, it is tedious to mention @JsonIgnore to each properties.
To start of, add Jackson databind dependency to the project. Always add the latest dependency to your project.
<dependency>
    <groupId>com.fasterxml.jackson.core</groupId>
    <artifactId>jackson-databind</artifactId>
    <version>2.13.0</version>
</dependency>
We can ignore specific fields at the class level, using the @JsonIgnoreProperties annotation and specifying the fields by name.
Syntax
@JsonIgnoreProperties({"emailId","gender","maritalStatus"})
Sample JSON Payload
{
  "firstName" : "Vibha",
  "lastName" : "Singh",
  "age" : 30,
  "salary" : 75000.0,
  "designation" : "Manager",
  "contactNumber" : "+919999988822",
  "emailId" : "abc@test.com",
  "gender" : "female",
  "maritalStatus" : "married"
 }
We need to create POJO for above JSON. So, let us create a class called Employee. Then create the private data members corresponding to the the nodes of the JSON and the getter and setter methods of these data members.
POJO Class
@JsonIgnoreProperties({"emailId","gender","maritalStatus"})
public class Employee {

	// private variables or data members of pojo class
	private String firstName;
	private String lastName;
	private int age;
	private double salary;
	private String designation;
	private String contactNumber;
	private String emailId;
	private String gender;
	private String maritalStatus;

	// Getter and setter methods
	public String getFirstName() {
		return firstName;
	}

	public void setFirstName(String firstName) {
		this.firstName = firstName;
	}

	public String getLastName() {
		return lastName;
	}

	public void setLastName(String lastName) {
		this.lastName = lastName;
	}

	public int getAge() {
		return age;
	}

	public void setAge(int age) {
		this.age = age;
	}

	public double getSalary() {
		return salary;
	}

	public void setSalary(double salary) {
		this.salary = salary;
	}

	public String getDesignation() {
		return designation;
	}

	public void setDesignation(String designation) {
		this.designation = designation;
	}

	public String getContactNumber() {
		return contactNumber;
	}

	public void setContactNumber(String contactNumber) {
		this.contactNumber = contactNumber;
	}

	public String getEmailId() {
		return emailId;
	}

	public void setEmailId(String emailId) {
		this.emailId = emailId;
	}

	public String getGender() {
		return gender;
	}

	public void setGender(String gender) {
		this.gender = gender;
	}

	public String getMaritalStatus() {
		return maritalStatus;
	}

	public void setMaritalStatus(String maritalStatus) {
		this.maritalStatus = maritalStatus;
	}

}
Here, we have added emailId, gender and maritalStatus to @JsonIgnoreProperties as shown above.
Let us create a test where we pass values to all the nodes present in the JSON and see what happens to properties – emailId, gender and maritalStatus which are tagged as @JsonIgnoreProperties.
SerializationTest
    @Test
	public void serializationTest()  {

		// Create an object of POJO class
		Employee employee = new Employee();
		employee.setFirstName("Vibha");
		employee.setLastName("Singh");
		employee.setAge(30);
		employee.setSalary(75000);
		employee.setDesignation("Manager");
		employee.setContactNumber("+919999988822");
		employee.setEmailId("abc@test.com");
		employee.setMaritalStatus("married");
		employee.setGender("female");

		// Converting a Java class object to a JSON payload as string
		ObjectMapper mapper = new ObjectMapper();
		try {
			String employeeJson = mapper.writeValueAsString(employee);
			System.out.println(employeeJson);
			String employeePrettyJson = mapper.writerWithDefaultPrettyPrinter().writeValueAsString(employee);
			System.out.println(employeePrettyJson);
		} catch (JsonProcessingException e) {
			e.printStackTrace();
		}
}
Output
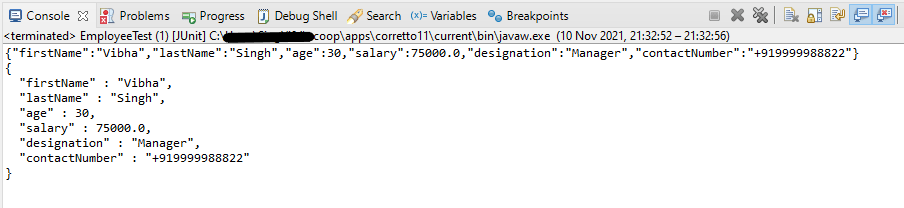
You can see that emailId, gender and maritalStatus are not present in JSON Payload.
Let us see the impact of @JsonIgnoreProperties to the setter or deserialized properties.
Deserialization Test
    @Test
	public void deserializationTest()  {

		String employeeString = "{\r\n"
				+ "  \"firstName\" : \"Deserialization\",\r\n"
				+ "  \"lastName\" : \"Test\",\r\n"
				+ "  \"age\" : 30,\r\n"
				+ "  \"salary\" : 75000.0,\r\n"
				+ "  \"designation\" : \"Manager\",\r\n"
				+ "  \"contactNumber\" : \"+919999988822\",\r\n"
				+ "  \"emailId\" : \"abc@test.com\",\r\n"
				+ "  \"gender\" : \"female\",\r\n"
				+ "  \"maritalStatus\" : \"married\"\r\n"
				+ " }";


		// Converting a JSON Payload to a JAVA Object
		ObjectMapper mapper = new ObjectMapper();
        Employee employee2 = null;

		try {
			employee2 = mapper.readValue(employeeString, Employee.class);
		} catch (JsonMappingException e) {
			e.printStackTrace();
		} catch (JsonProcessingException e) {
			e.printStackTrace();
		}

		System.out.println("First Name of employee : " + employee2.getFirstName());
		System.out.println("Last Name of employee : " + employee2.getLastName());
		System.out.println("Age of employee : " + employee2.getAge());
		System.out.println("Salary of employee : " + employee2.getSalary());
		System.out.println("Designation of employee : " + employee2.getDesignation());
		System.out.println("Contact Number of employee : " + employee2.getContactNumber());
		System.out.println("EmailId of employee : " + employee2.getEmailId());
		System.out.println("Marital Status of employee : " + employee2.getMaritalStatus());
		System.out.println("Gender of employee : " + employee2.getGender());

	}
Output

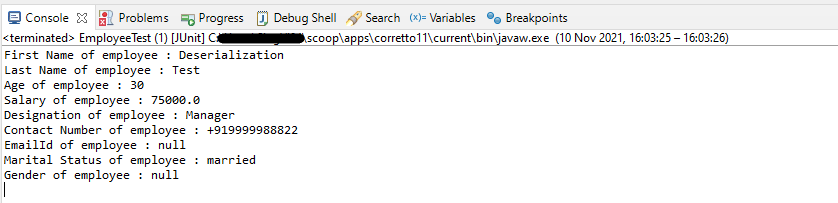
You can see that emailId, gender and maritalStatus – the values present in JSON for all of them are ignored and default values are retrieved.
POJO with allowGetters
allowGetters are enabled to allow “getters” to be used. This is commonly set to support defining “read-only” properties; ones for which there is a getter, but no matching setter: in this case, properties should be ignored for deserialization but NOT serialization. Another way to think about this setting is that setting it to `true` will “disable” ignoring of getters.
Default value is `false`, which means that getters with matching names will be ignored.
In the below example, I have defined emailId, gender and maritalStatus as allowGetters as True.
public class EmployeeTest {

	@Test
	public void serializationTest()  {

		Employee employee = new Employee();
		employee.setFirstName("Vibha");
		employee.setLastName("Singh");
		employee.setAge(30);
		employee.setSalary(75000);
		employee.setDesignation("Manager");
		employee.setContactNumber("+919999988822");
		employee.setEmailId("abc@test.com");
		employee.setMaritalStatus("married");
		employee.setGender("female");

		// Converting a Java class object to a JSON payload as string
		ObjectMapper mapper = new ObjectMapper();

        try {
			String employeePrettyJson = mapper.writerWithDefaultPrettyPrinter().writeValueAsString(employee);
			System.out.println(employeePrettyJson);
		} catch (JsonProcessingException e) {
			e.printStackTrace();
		}

	}

	@Test
	public void deserializationTest() {

		String employeeString = "{\r\n"
				+ "  \"firstName\" : \"Deserialization\",\r\n"
				+ "  \"lastName\" : \"Test\",\r\n"
				+ "  \"age\" : 30,\r\n"
				+ "  \"salary\" : 75000.0,\r\n"
				+ "  \"designation\" : \"Manager\",\r\n"
				+ "  \"contactNumber\" : \"+919999988822\",\r\n"
				+ "  \"emailId\" : \"abc@test.com\",\r\n"
				+ "  \"gender\" : \"female\",\r\n"
				+ "  \"maritalStatus\" : \"married\"\r\n"
				+ " }";


		// Converting a JSON Payload to a JAVA Object
		ObjectMapper mapper = new ObjectMapper();

		 Employee employee2 = null;

		try {
			employee2 = mapper.readValue(employeeString, Employee.class);
		} catch (JsonMappingException e) {
			e.printStackTrace();
		} catch (JsonProcessingException e) {
			e.printStackTrace();
		}

		System.out.println("First Name of employee : " + employee2.getFirstName());
		System.out.println("Last Name of employee : " + employee2.getLastName());
		System.out.println("Age of employee : " + employee2.getAge());
		System.out.println("Salary of employee : " + employee2.getSalary());
		System.out.println("Designation of employee : " + employee2.getDesignation());
		System.out.println("Contact Number of employee : " + employee2.getContactNumber());
		System.out.println("EmailId of employee : " + employee2.getEmailId());
		System.out.println("Marital Status of employee : " + employee2.getMaritalStatus());
		System.out.println("Gender of employee : " + employee2.getGender());

	}

}
Output
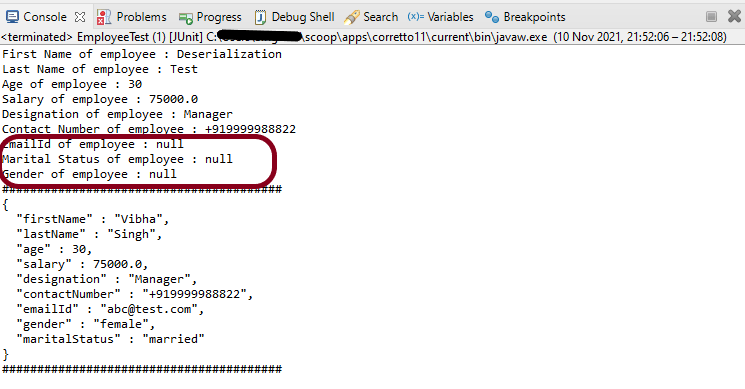
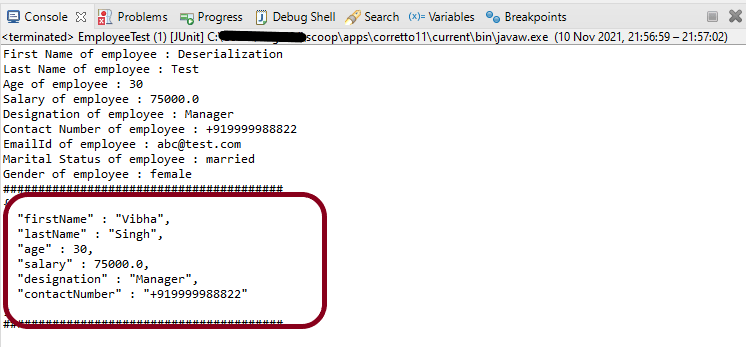
In the below image, it shows that values of emailId, gender and maritalStatus are ignored and default value is passed.
POJO with allowSetters
allowSetters – Property that can be enabled to allow “setters” to be used. This could be used to specify “write-only” properties; ones that should not be serialized out, but that may be provided in for deserialization. Another way to think about this setting is that setting it to `true` will “disable” ignoring of setters.
Default value is `false`, which means that setters with matching names will be ignored.
public class EmployeeTest {

	@Test
	public void serializationTest() {

		Employee employee = new Employee();
		employee.setFirstName("Vibha");
		employee.setLastName("Singh");
		employee.setAge(30);
		employee.setSalary(75000);
		employee.setDesignation("Manager");
		employee.setContactNumber("+919999988822");
		employee.setEmailId("abc@test.com");
		employee.setMaritalStatus("married");
		employee.setGender("female");

		// Converting a Java class object to a JSON payload as string
		ObjectMapper mapper = new ObjectMapper();
		try {
			String employeePrettyJson = mapper.writerWithDefaultPrettyPrinter().writeValueAsString(employee);
			System.out.println(employeePrettyJson);
		} catch (JsonProcessingException e) {
			e.printStackTrace();
		}
		System.out.println("########################################");
	}

	@Test
	public void deserializationTest()  {

		String employeeString = "{\r\n"
				+ "  \"firstName\" : \"Deserialization\",\r\n"
				+ "  \"lastName\" : \"Test\",\r\n"
				+ "  \"age\" : 30,\r\n"
				+ "  \"salary\" : 75000.0,\r\n"
				+ "  \"designation\" : \"Manager\",\r\n"
				+ "  \"contactNumber\" : \"+919999988822\",\r\n"
				+ "  \"emailId\" : \"abc@test.com\",\r\n"
				+ "  \"gender\" : \"female\",\r\n"
				+ "  \"maritalStatus\" : \"married\"\r\n"
				+ " }";


		// Converting a JSON Payload to a JAVA Object
		ObjectMapper mapper = new ObjectMapper();

		 Employee employee2 = null;

		try {
			employee2 = mapper.readValue(employeeString, Employee.class);
		} catch (JsonMappingException e) {
			e.printStackTrace();
		} catch (JsonProcessingException e) {
			e.printStackTrace();
		}

		System.out.println("First Name of employee : " + employee2.getFirstName());
		System.out.println("Last Name of employee : " + employee2.getLastName());
		System.out.println("Age of employee : " + employee2.getAge());
		System.out.println("Salary of employee : " + employee2.getSalary());
		System.out.println("Designation of employee : " + employee2.getDesignation());
		System.out.println("Contact Number of employee : " + employee2.getContactNumber());
		System.out.println("EmailId of employee : " + employee2.getEmailId());
		System.out.println("Marital Status of employee : " + employee2.getMaritalStatus());
		System.out.println("Gender of employee : " + employee2.getGender());

		System.out.println("########################################");

	}

}
Output
We are done! Congratulations on making it through this tutorial and hope you found it useful! Happy Learning!!