Selenium is moved from version 3 to version 4 which is quite a huge step. What does this change mean? It means that a few of the old features of Selenium 3 are depreciated in Selenium 4 as well some new features are added to it also. I’m trying to explain a few of the latest updates done in Selenium 4.
Table of Contents
- Enhanced Selenium Grid
- Simplification to open a new Windows browser and Tabs
- Relative Locators
- TakeElementScreenshot
- New additions to the Actions Class
- Deprecation of Desired Capabilities
- Chrome Dev Tools
Selenium 3 – This is the latest version of Selenium3 available.
<dependency>
    <groupId>org.seleniumhq.selenium</groupId>
    <artifactId>selenium-java</artifactId>
    <version>3.141.59</version>
</dependency>
Selenium 4 – This is the latest version of Selenium 4 Libraries that are present in the Maven Central Repository.
<dependency>
    <groupId>org.seleniumhq.selenium</groupId>
    <artifactId>selenium-java</artifactId>
    <version>4.2.1</version>
</dependency>
1. Enhanced Selenium Grid
Managing Selenium Grid is now smooth and easy as there will no longer be any need to set up and start hubs and nodes separately. The grid can be deployed in 3 modes:
Standalone – Standalone is the union of all components, and to the user’s eyes, they are executed as one. A fully functional Grid of one is available after starting it in the Standalone mode. By default, the server will be listening on http://localhost:4444, and that’s the URL you should point your RemoteWebDriver tests. The server will detect the available drivers that it can use from the System PATH.
Hub and Node – It enables the classic Hub & Node(s) setup. These roles are suitable for small and middle-sized Grids
Distributed – On Distributed mode, each component needs to be started on its own. This setup is more suitable for large Grids.
Grid will now support IPv6 addresses and one can communicate with the Grid using the HTTPS protocol. In Grid 4, the configuration files used for spinning up the grid instances can be written in TOML (Tom’s Obvious, Minimal Language) which will make it easier for humans to understand.
The new Selenium Grid comes with Docker support. It also supports advanced tools like AWS, Azure, and much more, useful in the DevOps process. Now Grid has a more user-friendly UI and contains relevant information related to the session, running, capacity, etc.
2. Simplification to open a new Windows browser and Tabs
There are a number of scenarios where you would want to open a new browser (or tab) and perform a certain set of actions in the newly opened window/tab. In Selenium 3, you have to create a new Web Driver object and then switch to the new window (or tab) using its unique WindowHandle to perform subsequent actions in that window (or tab).
Selenium 4 provides a new API new Window that lets you create a new window (or tab) and automatically switch to it. Since the new window or tab is created in the same session, it avoids creating a new WebDriver object. For switching to the new tab, pass WindowType.TAB to newWindow() method and for creating a new window, pass WindowType.WINDOW to newWindow() method.
public class NewWindowDemo {

	public static void main(String[] args) {
		System.setProperty("webdriver.chrome.driver",
				"C:\\Users\\Vibha\\Software\\chromedriver_win32_93.0.4577.15\\chromedriver.exe");
		WebDriver driver = new ChromeDriver();
		driver.manage().window().maximize();

		driver.get("https://www.bing.com/");
		System.out.println("New Page - Bing is opened");

		// Opens a new window and switches to new window
		driver.switchTo().newWindow(WindowType.WINDOW);

		// Opens duckduckgo homepage in the new opened window
		driver.navigate().to("https://www.duckduckgo.com/");

		System.out.println("New Page - DuckDuckGo is opened");

		driver.quit();
	}
}
Open a new Tab in Selenium 4
public class NewTabDemo {

	public static void main(String[] args) {

		System.setProperty("webdriver.chrome.driver",
				"C:\\Users\\Vibha\\Software\\chromedriver_win32_93.0.4577.15\\chromedriver.exe");

		WebDriver driver = new ChromeDriver();
		driver.manage().window().maximize();

		driver.get("https://www.bing.com/");
		System.out.println("New Page - Bing is opened");

		// Opens a new window and switches to new window
		driver.switchTo().newWindow(WindowType.TAB);

		// Opens duckduckgo homepage in the new opened window
		driver.navigate().to("https://www.duckduckgo.com/");

		System.out.println("New Tab is opened with DuckDuckGo");
		driver.quit();
	}
}
3. Relative Locators
Selenium 4 brings Relative Locators which are previously called as Friendly Locators. This functionality was added to help you locate elements that are nearby other elements. The Available Relative Locators are:
above
below
toLeftOf
toRightOf
near
findElement method now accepts a new method withTagName() which returns a RelativeLocator.
import static org.openqa.selenium.support.locators.RelativeLocator.with;
a) above() – Returns the WebElement, which appears above the specified element.
WebElement passwordField_above = driver.findElement(By.id("txtPassword"));
		WebElement emailAddressField_above = driver.findElement(with(By.tagName("input")).above(passwordField_above));
b) below() – Returns the WebElement, which appears below the specified element.
WebElement emailAddress_below = driver.findElement(By.id("txtUsername"));
WebElement passwordField_below = driver.findElement(with(By.tagName("input")).below(emailAddress_below));
c) toRightOf() – Target web element which is presented to the right of a specified element.
WebElement submitButton= driver.findElement(By.id("submit"));
WebElement cancelButton= driver.findElement(with(By.tagName("button"))
                                            .toLeftOf(submitButton));
d) toRightOf() – Returns the WebElement, which appears to the right of the specified element.
WebElement cancelButton= driver.findElement(By.id("cancel"));
WebElement submitButton= driver.findElement(with(By.tagName("button")).toRightOf(cancelButton));
e) near() – Returns the WebElement, which is at most 50px away from the specified element.
WebElement emailAddressLabel= driver.findElement(By.id("lbl-email"));
WebElement emailAddressField = driver.findElement(with(By.tagName("input")).near(emailAddressLabel));
4. TakeElementScreenshot
In Selenium 3, there was a provision to capture a screenshot of the entire web page. Selenium 4 onwards, there is a new option to capture screenshots of a particular WebElement. Hence, there is no need to use third-party tools like Shutterbug, Ashot, etc. (like in Selenium 3) for capturing a screenshot of WebElement.
The newly introduced method in Selenium 4 captures the screenshot of an element for the current browsing context. The screenshot returned by the WebDriver endpoint is encoded in the Base64 format.
This is how you can capture WebElement Screenshot in Selenium 4 (for Java):
import io.github.bonigarcia.wdm.WebDriverManager;
import org.apache.commons.io.FileUtils;
import org.openqa.selenium.By;
import org.openqa.selenium.OutputType;
import org.openqa.selenium.TakesScreenshot;
import org.openqa.selenium.WebDriver;
import org.openqa.selenium.WebElement;
import org.openqa.selenium.chrome.ChromeDriver;
import org.openqa.selenium.firefox.FirefoxDriver;

public class ScreenshotDemo {

	public static void main(String[] args) {
		WebDriverManager.chromedriver().setup();
		WebDriver driver = new ChromeDriver();
		driver.manage().window().maximize();
		driver.get("https://www.selenium.dev/");

		try {

			WebElement logo = driver.findElement(By.xpath("//*[@id='td-cover-block-0']/div/div/div/div/h1"));
			File source = ((TakesScreenshot) logo).getScreenshotAs(OutputType.FILE);
			FileUtils.copyFile(source, new File("./Screenshots/logo" + System.currentTimeMillis() + ".png"));
		} catch (Exception e) {
			System.out.println(e.getMessage());
		}

		System.out.println("The Screenshot is taken and saved under Screenshots folder");
		driver.quit();
	}

}
The output of the above program is
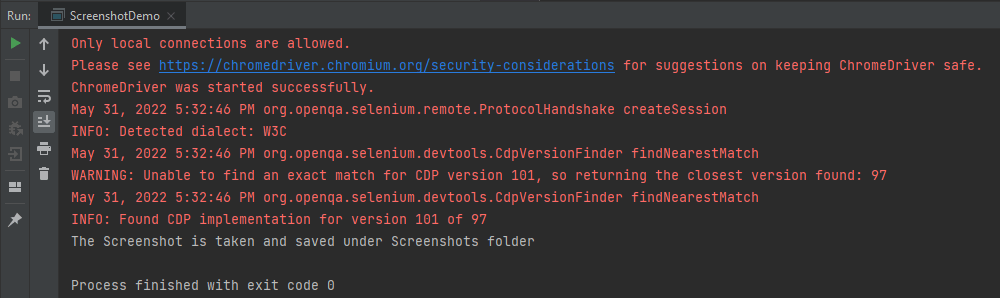
The picture will be saved in the Screenshots folder as shown below:
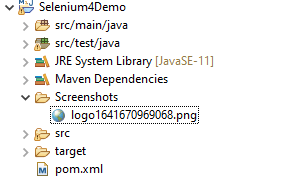
Below is the image of the screenshots.

5. New additions to the Actions Class
Actions Class in Selenium provides several methods for performing a single action or a series of actions on the WebElements present in the DOM. Mouse actions (e.g., click, double click, etc.) and Keyboard actions (e.g., keyUp, keyDown, sendKeys) are the two broad categories of Actions.
For demonstration, we will post the examples demonstrated in the Action class in the Selenium blog from Selenium 3 to Selenium 4.
With Selenium 4, new methods are added to the Actions class, which replaces the classes under the org.openqa.selenium.interactions package.
- click(WebElement) is the new method added to the Actions class and it serves as the replacement of moveToElement(onElement).click() method.
Like the method in the versions before Selenium 4, click(WebElement) is used for clicking a web element.
- doubleClick(WebElement)
This method is added to replace moveToElement(element).doubleClick(). It will perform a double-click on an element.
import io.github.bonigarcia.wdm.WebDriverManager;
import org.openqa.selenium.Alert;
import org.openqa.selenium.By;
import org.openqa.selenium.WebDriver;
import org.openqa.selenium.WebElement;
import org.openqa.selenium.chrome.ChromeDriver;
import org.openqa.selenium.interactions.Actions;

public class DoubleClick {
    public static void main(String[] args) {

        WebDriverManager.chromedriver().setup();
        WebDriver driver = new ChromeDriver();

        // Navigate to Url
        driver.get("https://demo.guru99.com/test/simple_context_menu.html");

        // Store 'doubleClickButton' button web element
        WebElement doubleClickButton = driver.findElement(By.xpath("//*[@id='authentication']/button"));
        Actions actionProvider = new Actions(driver);

        // Perform double-click action on the element
        actionProvider.doubleClick(doubleClickButton).build().perform();
        Alert alert = driver.switchTo().alert();
        System.out.println("Alert Text\n" +alert.getText());
        alert.accept();

        driver.close();
    }
}
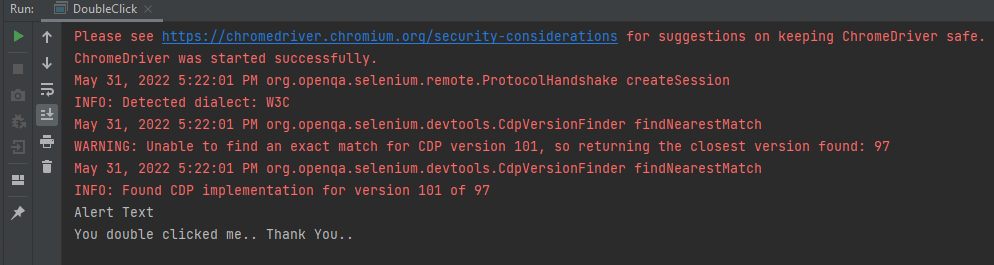
The output of the above program is
- clickAndHold(WebElement)
This method will replace the moveToElement(onElement).clickAndHold(). It is used to click on an element without releasing the click.
- contextClick(WebElement)
This method will replace moveToElement(onElement).contextClick(). It will perform the right-click operation.
- release()
This method (user for releasing the pressed mouse button) was initially a part of org.openqa.selenium.interactions.ButtonReleaseAction class. Now with the updated version of Selenium, it has been moved to the Actions class.
import io.github.bonigarcia.wdm.WebDriverManager;
import org.openqa.selenium.By;
import org.openqa.selenium.WebDriver;
import org.openqa.selenium.WebElement;
import org.openqa.selenium.chrome.ChromeDriver;
import org.openqa.selenium.interactions.Actions;
public class clickAndHold {
public static void main(String[] args) {
WebDriverManager.chromedriver().setup();
WebDriver driver = new ChromeDriver();
// Navigate to Url
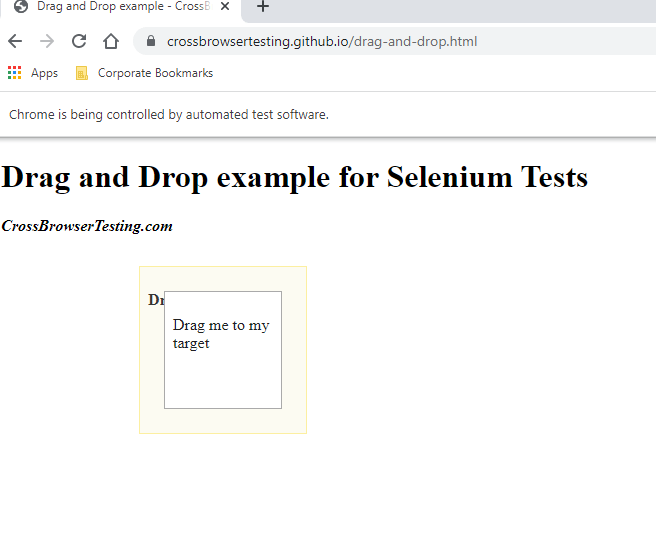
driver.get("https://crossbrowsertesting.github.io/drag-and-drop.html");
driver.manage().window().maximize();
// Find element xpath which we need to drag
WebElement from = driver.findElement(By.id("draggable"));
// Find element xpath where we need to drop
WebElement to = driver.findElement(By.id("droppable"));
Actions actionProvider = new Actions(driver);
// Perform click-and-hold action on the element
actionProvider.clickAndHold(from).build().perform();
// Move to drop Webelement
actionProvider.clickAndHold(to).build().perform();
//Release drop element
actionProvider.release(to).build().perform();
}
}
The output of the above program is
6. Deprecation of Desired Capabilities
In Selenium 3, desired Capabilities were primarily used in the test scripts to define the test environment (browser name, version, operating system) for execution on the Selenium Grid.
In Selenium 4, capabilities objects are replaced with Options. This means testers now need to create an Options object, set test requirements, and pass the object to the Driver constructor.
Listed below are the Options objects to be used going forward for defining browser-specific capabilities:
Firefox – FirefoxOptions
Chrome – ChromeOptions
Internet Explorer (IE) – InternetExplorerOptions
Microsoft Edge – EdgeOptions
Safari – SafariOptions
Below is an example of Options
import org.openqa.selenium.WebDriver;
import org.openqa.selenium.chrome.ChromeDriver;
import org.openqa.selenium.chrome.ChromeOptions;
import io.github.bonigarcia.wdm.WebDriverManager;
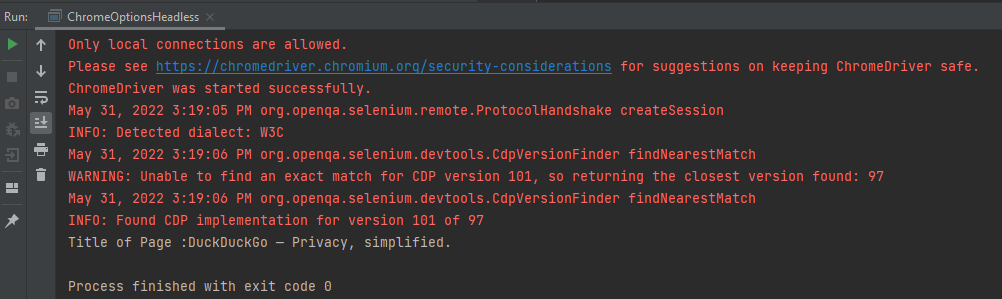
public class ChromeOptionsHeadless {
public static void main(String[] args) {
WebDriverManager.chromedriver().setup();
ChromeOptions chromeOptions = new ChromeOptions();
chromeOptions.setBrowserVersion("100");
chromeOptions.setPlatformName("Windows 10");
WebDriver driver = new ChromeDriver(chromeOptions);
driver.get("https://duckduckgo.com/");
System.out.println("Title of Page :" + driver.getTitle());
// Close the driver
driver.close();
}
}
The output of the above program is
Similarly, we can create the action class for other browsers like Firefox.
FirefoxOptions options = new FirefoxOptions();

// Create an object of WebDriver class and pass the Firefox Options object as an argument
WebDriver driver = new FirefoxDriver(options);
7. Chrome Dev Tools
In the new version of Selenium, they have made some internal changes in the API. Earlier in Selenium 3, the Chrome driver extends directly to the Remote Web Driver class. But now in Selenium 4, the Chrome driver class extends to Chromium Driver. Chromium Driver class has some predefined methods to access the dev tool.
Note: Chromium Driver extends the Remote Web driver class.
By using the API, we can perform the following operations:
- Enable Network Offline
- Enable Network Online
- Get Console Logs
- Load Insure Web Site