New version of Eclipse like Photon or Eclipse IDE 2019-06 has M2_REPO classpath variable after integrating maven plugins (m2eclipse) with Eclipse IDE, M2_REPO classpath variable gets added –> pointing to default locations (for example c:\Users\\.m2\repository) and this variable is non-modifiable. However, if we are using older version of Eclipse, then we need to add M2_REPO manually to Eclipse.
Steps to add M2_REPO
Open Eclipse IDE, select Window ->Preferences ->Java ->Classpath Variables
2. Click on New Button. Add below mentioned information:-
Name – M2_REPO
Path – Path where M2 file places in your system
Eg – C:\Users\SingVi04\.m2\repository
Note:- I have already added M2_REPO, so we can see an error message – Variable name already exists.
3. Verify that M2_REPO add – You can check new Classpath variable M2_REPO is added under BuildPath ->Classpath Variables
In the previous tutorial, we discussed about how to find the XPath of Dynamic Web Table. In this tutorial, we will see how we can get all the data from Dynamic Web Table.
What is Dynamic Table – A table where data is dynamic, i.e. Number of rows and columns are NOT fixed. Below is an example to fetch the number of rows and columns of a Dynamic Web Table.
Let us create a program to find the number of rows and columns in the table.
import org.openqa.selenium.By;
import org.openqa.selenium.WebDriver;
import org.openqa.selenium.chrome.ChromeDriver;

import java.util.List;
import java.util.concurrent.TimeUnit;

public class TableDemo {

    public static void main(String[] args) {

        System.setProperty("webdriver.chrome.driver","C:\\Users\\Vibha\\Automation\\Chrome\\chromedriver\\chromedriver.exe");

        WebDriver driver = new ChromeDriver();
        driver.get("https://www.techlistic.com/p/demo-selenium-practice.html");

        driver.manage().window().maximize();
         driver.manage().timeouts().implicitlyWait(15, TimeUnit.SECONDS);

        // To find no of columns
        List ColumnList = driver.findElements(By.xpath("//*[@id='customers']/tbody/tr/th"));
        System.out.println("No of Columns are :"+ColumnList.size());

        //To find no of Rows, first row is heading
        List RowList = driver.findElements(By.xpath("//*[@id='customers']/tbody/tr"));
        System.out.println("No of Rows are :"+RowList.size());
        driver.close();
    }

}
The output of the above program is
1. findElements command returns a list of ALL the elements matching the specified locator. 2. The count of columns is found using XPath – (“//*[@id=’customers’]/tbody/tr/th”) 3. The count of rows is found using XPath – (“//*[@id=’customers’]/tbody/tr”)
How to get all the values from a Dynamic Table
In the above table, there are 3 columns and 7 rows, and we want to get the data from each cell. First row is heading, so we want to find the data of 6 rows only.
We have created a custom xpath for table row and column, and we replace the row and column index with variables. So, that we can iterate over every table row’s td (cell) using for loop. We have used first for loop row count, which will iterate over every row. And second loop will iterate over every table data (td) of each row one by one.
import org.openqa.selenium.By;
import org.openqa.selenium.WebDriver;
import org.openqa.selenium.chrome.ChromeDriver;
import java.util.concurrent.TimeUnit;

public class DynamicTable_DataExtract {

    public static void main(String[] args) {

        System.setProperty("webdriver.chrome.driver","C:\\Users\\Vibha\\Automation\\Chrome\\chromedriver\\chromedriver.exe");

        WebDriver driver = new ChromeDriver();
        driver.get("https://www.techlistic.com/p/demo-selenium-practice.html");

        driver.manage().window().maximize();
        driver.manage().timeouts().implicitlyWait(15, TimeUnit.SECONDS);

        //Get number of rows In table.
        int Row_Count = driver.findElements(By.xpath("//*[@id='customers']/tbody/tr")).size();
        System.out.println("No of Rows are :"+Row_Count);

        //Get number of columns In table.
        int Column_Count = driver.findElements(By.xpath("//*[@id='customers']/tbody/tr/th")).size();
        System.out.println("No of Columns are :"+Column_Count);

        //divided xpath In three parts to pass Row_count and Col_count values.
        String first_part = "//*[@id='customers']/tbody/tr[";
        String second_part = "]/td[";
        String third_part = "]";


        //Used for loop for number of rows.
        for (int i=2; i<=Row_Count; i++){

            //Used for loop for number of columns.
            for(int j=1; j<=Column_Count; j++){

                //Prepared final xpath of specific cell as per values of i and j.
                String final_xpath = first_part+i+second_part+j+third_part;

                //Will retrieve value from located cell and print It.
                String Table_data = driver.findElement(By.xpath(final_xpath)).getText();
                System.out.print(Table_data +" ");
            }

            System.out.println("");
            System.out.println("---------------------------------");
        }

       driver.close();
    }
}
The output of the above program is
Congratulations on making it through this tutorial and hope you found it useful! Happy Learning!! Cheers!!
In this blog we will discuss about automating dynamic web tables using Selenium WebDriver. Table is also a type of Web Element like checkbox, Radio Button, etc.
Tableis a kind of web element, which is displayed, with the help of tag in conjunction with the <tr> tag defines the row of the table and <th> tagtag for headings which defines heading of the table.
There are 2 types of HTML table
1. Static Table – Where number of rows and columns are fixed. 2. Dynamic Table – Where number of rows and columns are not fixed.
Below table is a Dynamic table. Based on input Assignee filter, the number of rows get altered.
2) Take a note that “Element” tab is the one which displays all the HTML properties belonging to the current web page. Navigate to the “Element” tab if it is not opened by default on the launch.
3) In the screenshot, we can see the HTML code of Task web element of the table. Right click on this text and select Copy and then again click where will see options like – Copy Selector, Copy XPath, Copy full XPath.
If we divide this xpath – /html/body/div[2]/div/div[2]/div[1]/div/table/thead/tr/th[2] into three different parts it will be like this
· Part 1 – Location of the table in the webpage /html/body/div[2]/div/div[2]/div[1]/div />
· Part 2 – Table body (data) starts from here
· Part 3 – It says table row 1 and table head 2
In the below image, we can see that the highlighted tags are used to create absolute XPath – html/body/div[2]/div/div[2]/div[1]/div/table/thead/tr/th[2]
If we want to create a relative XPath, then the below image shows that find a unique identifier like id=’task-table’ and then create Relative XPath
//*[@id="task-table"]/thead/tr/th[2]
Below is an example, which will show how to fetch a particular cell data in Dynamic Web Table. We want to fetch the data from row 5 and column 3 and row 6 column 2. We have used Relative XPath as well as absolute XPath to fetch the data.
import org.openqa.selenium.By;
import org.openqa.selenium.WebDriver;
import org.openqa.selenium.chrome.ChromeDriver;
public class DynamicTable_RowData {
        public static void main(String[] args) {
 System.setProperty("webdriver.chrome.driver","C:\\Users\\Vibha\\Desktop\\Drivers\\chromedriver_win32\\chromedriver.exe");

        WebDriver driver = new ChromeDriver();
        driver.manage().window().maximize();
        driver.get("https://www.seleniumeasy.com/test/table-search-filter-demo.html");

String CellData1 = driver.findElement(By.xpath("//*[@id='task-table']/tbody/tr[5]/td[3]")).getText();
        System.out.println("Data in 5th row and 3rd column :"+CellData1);

           String CellData2 = driver.findElement(By.xpath("/html/body/div[2]/div/div[2]/div[1]/div/table/tbody/tr[6]/td[2]")).getText();
        System.out.println("Data in 6th row and 2nd column :"+CellData2);
        driver.close();
        }
}

Output
Data in 5th row and 3rd column :Holden Charles
Data in 6th row and 2nd column :Browser Issues
In my previous tutorials, we have discussed about various types of locators available in Selenium WebDriver, which are used to identify various web elements on a web page. Some of the locators widely used are Id, ClassName, Name, LinkText, PartialLinkText, XPath, CSS Selector and so on. In this blog, will study the mechanism to locate web elements on Google Chrome, Firefox and Internet Explorer.
Google Chrome
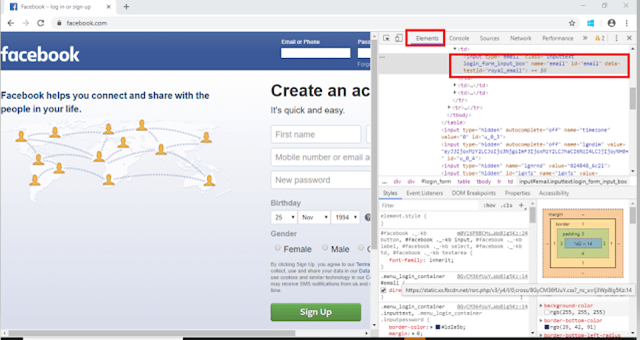
First step is to launch the Chrome Browser with desired URL. Here, we have launched Chrome browser and accessed Facebook page. I want to find the locator of Email or Phone textbox, so I will click on that textbox, right click, and click on “Inspect”.
2. Take a note that “Element” tab highlighted in the screenshot. Thus, element tab is the one, which displays all the HTML properties belonging to the current web page. Navigate to the “Element” tab if it is not open by default on the launch.
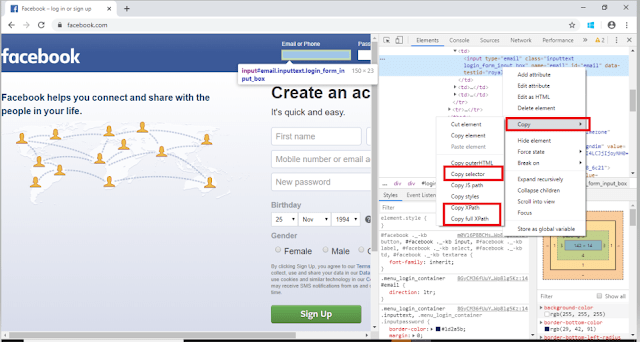
3. In the screenshot, we can see the HTML code of Email or Phone Textbox. Right click on this text and then again click on Copy where will see options like – Copy Selector, Copy XPath, Copy full XPath
Copy Selector will tell the CSS Selector path of the WebElement
#email
Copy XPath will tell the Xpath of the WebElement
//*[@id="email"]
Copy full XPath will tell the absolute path of the WebElement
The chromedriver is implement as a WebDriver remote server that instructs the browser what to do by exposing Chrome’s internal automation proxy interface.
Firefox
1. First step is to launch the Firefox Browser with desired URL, ie Facebook. I want to find the locator of Email or Phone textbox, so I will click on that textbox and right click and click on “Inspect Element (Q)”.
2. Take a note that “Inspector” tab is highlight in the screenshot. Thus, element tab is the one, which displays all the HTML properties belonging to the current web page. Navigate to the “Inspector” tab if it is not open by default on the launch.
3. In the screenshot, we can see the HTML code of Email or Phone Textbox. Right click on this text and then again click on Copy where will see options like – Copy CSS Selector, Copy XPath, Copy CSS Path
Copy CSS Path will tell the CSS path of the WebElement
Copy Selector will tell the CSS Selector path of the WebElement
#email
Copy XPath will tell the Xpath of the WebElement
//*[@id="email"]
System.setProperty("webdriver.gecko.driver","C:\\Users\\Vibha\\Desktop\\Drivers\\geckodriver-v0.26.0-win64\\geckodriver.exe");
WebDriver driver = new FirefoxDriver();
Internet Explorer
1. First step is to launch the Firefox Browser with desired URL. Here, we have launched Firefox browser and accessed Facebook page. I want to find the locator of Email or Phone textbox, so I will click on that textbox, right click, and click on “Inspect Element”.
2. Take a note that “DOM Explorer” tab is highlight in the screenshot. Thus, element tab is the one, which displays all the HTML properties belonging to the current web page. Navigate to the “DOM Explorer” tab if it is not open by default on the launch.
System.setProperty("webdriver.ie.driver","C:\\Users\\SingVi04\\Desktop\\Automation\\Drivers\\IEDriverServer_x64_3.150.1\\IEDriverServer.exe");
WebDriver driver = new InternetExplorerDriver();
We assume here that Selenium WebDriver is download and installed with Eclipse. If not, please refer this link
In this tutorial, we will see how to create a simple Selenium WebDriver script using JAVA. The most important thing is that JAVA, Eclipse and Selenium WebDriver are already install in the machine. If not, then please refer the link – How to Download & Install Selenium WebDriver.
To create our first Selenium WebDriver Script, we have to create a Java Project, Package and Class in Eclipse.
Provide Package Name – here I have provided AutomationSuite
JRE – Use an execution environment JRE: JavaSE-1.8 (This is the version of Java on your machine)
Project Layout – Create separate folders for source and class files
ii. Create a package “SeleniumTutorial” – Right click Java Project (AutomationSuite) ->Click File ->New ->Package
iii. Create a Java Class “FirstProgram” – Right click Java Package (SeleniumTutorial) ->Click File ->New ->Class
Name: Name of the class (FirstProgram)
Modifiers – Public
Which method stubs would you like to create – public static void main(String[] args) and click Finish
Above displayed image explains the structure of Project in Eclipse.
Add Selenium Jar files to the Java Project
1. Right click on AutomationSuite and click on Properties.
2. Click on Java Build Path. Select Libraries. Click on – Add External JARs
3. Go to the path where Selenium WebDriver JAR folder was downloaded and select 2 JAR files – client-combined-3.141.59 and client-combined-3.141.59-sources and click on Open button.
4. Similarly, go to Lib folder of Selenium file and select the entire JAR present there
5. To verify that the JAR’s are added or not, click on Referenced Libraries and will see all these JARs are present here. For more details, refer the link
Scenario:
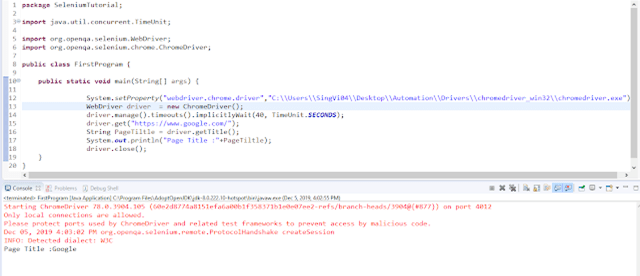
To open appropriate URL and verify the title of the home page Steps: i. Open Chrome browser ii. Go to the specified URL – http://www.google.com iii. Verify the title and print the output of the title iv. Close the Chrome browser
import java.util.concurrent.TimeUnit;
import org.openqa.selenium.chrome.ChromeDriver;

public class FirstProgram {

     public static void main(String[] args) {

 System.setProperty("webdriver.chrome.driver","C:\\Users\\vibha\\Downloads\\Drivers\\chromedriver_win32\\chromedriver.exe"");

         WebDriver driver = new ChromeDriver();
         driver.manage().timeouts().implicitlyWait(40, TimeUnit.SECONDS);
         driver.get("https://www.google.com/");
         String PageTiltle = driver.getTitle();
         System.out.println("Page Title :"+PageTiltle);
         driver.close();
     }
}
To run this program, go to Run->Run or Green Icon shown below
In this tutorial, we will get to know how we can get the option values of a dropdown using Webdriver. This can be done by using getOptions().
getOptions( ) : List– It shows all options belonging to the Select tag. It takes no parameter and returns List.
oSelect.getOptions();
Below is an example on how to use getOptions. We want to print all the options of Drop Down Month.
import java.util.List;
import java.util.concurrent.TimeUnit;
import org.openqa.selenium.By;
import org.openqa.selenium.WebElement;
import org.openqa.selenium.firefox.FirefoxDriver;
import org.openqa.selenium.support.ui.Select;

public class DropDown_Options {
      public static void main(String[] args) {
         System.setProperty(“webdriver.gecko.driver”,“C:\\Users\\vibha\\Downloads\\geckodriver-v0.24.0-win64\\geckodriver.exe”);
            FirefoxDriver driver = new FirefoxDriver();

            driver.manage().timeouts().implicitlyWait(60, TimeUnit.SECONDS);
            driver.get("https://www.facebook.com/";);

Select mselect = new Select(driver.findElement(By.id(“month”)));

            // Print all the options for the selected drop down and select one option of your choice
            // Get the size of the Select element
            List mSize = mselect.getOptions();
            int OptionSize = mSize.size();

            // Setting up the loop to print all the options
            for(int i =0; i < OptionSize ; i++)
          {

          // Storing the value of the option
           String Options = mselect.getOptions().get(i).getText();

          // Printing the stored value
           System.out.println(Options);
        }
   }
}

Output
Month
Jan
Feb
Mar
Apr
May
Jun
Jul
Aug
Sep
Oct
Nov
Dec
In the previous tutorial, we discussed what is TestNG and why it is important. This tutorial will discuss how can we download and install TestNG in Eclipse and how to use it.
Pre-Requisite
1) Eclipse should be installed and configured. Please refer to Install and Configure to set up Eclipse on your system.
Install/Setup TestNG
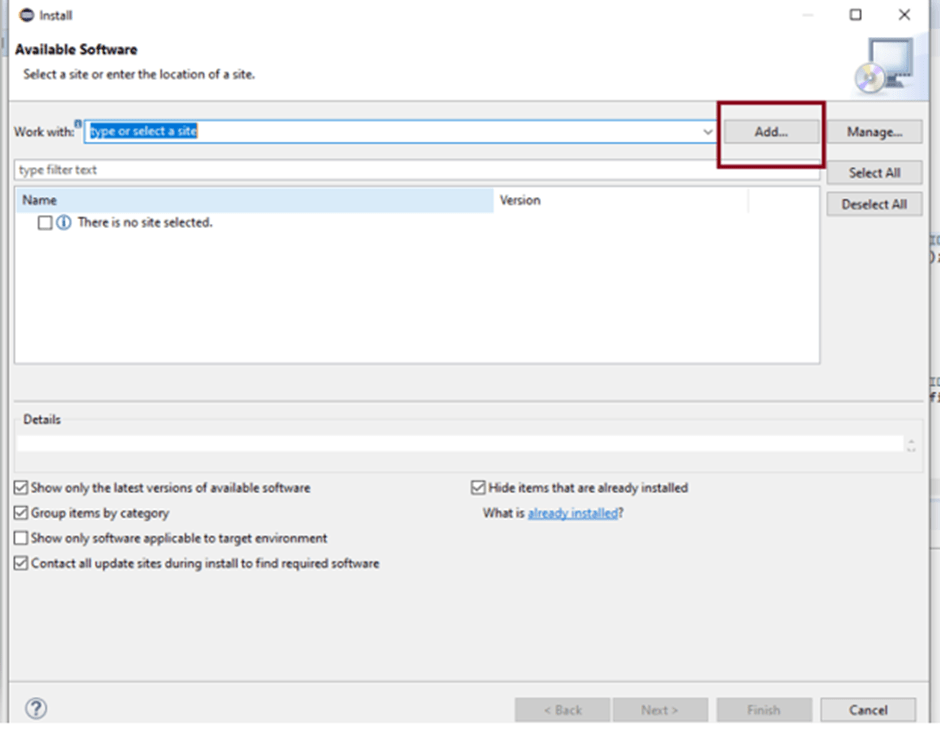
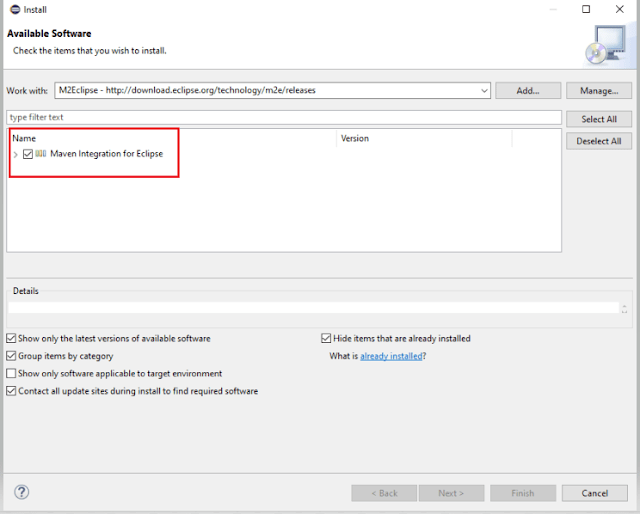
1) Launch Eclipse and go to the “Help” option present at the top and select –“Install New Software”.
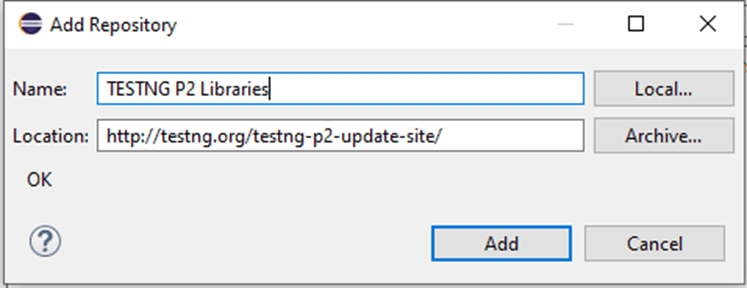
2) A dialog box will appear, click the “Add“ button.
4) This time we will see TestNG is added to Install dialog box.
5) Accept the terms and conditions and then click the “Finish“ button.
6) Once the installation is completed, you will get a message to Restart the Eclipse. Select Restartthe Eclipse
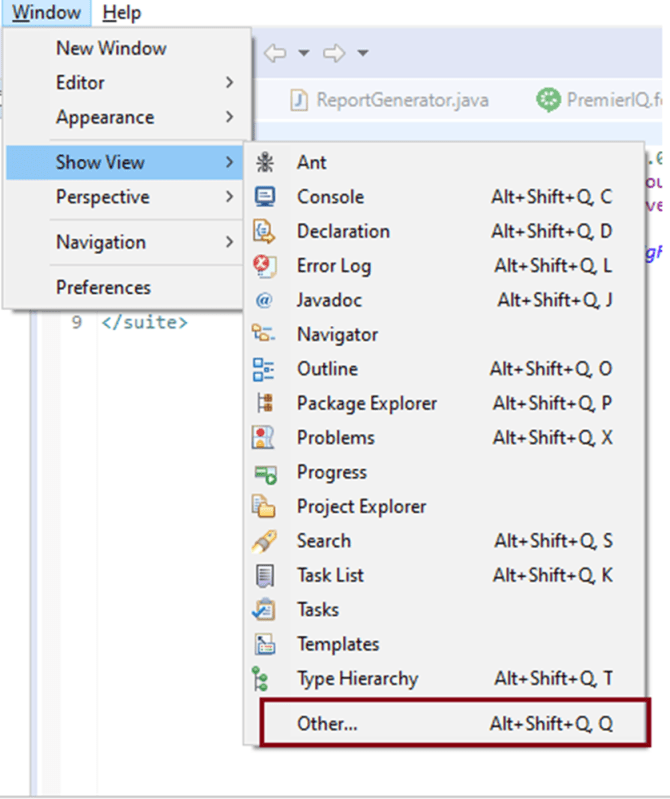
7) To verify if TestNG is installed successfully or not, go to Window, select Show View, and then Other.
8) Select Java and see, within the Java folder, you will see TestNG. This shows that TestNG is successfully installed on the machine.
Steps to follow to create a TestNG class
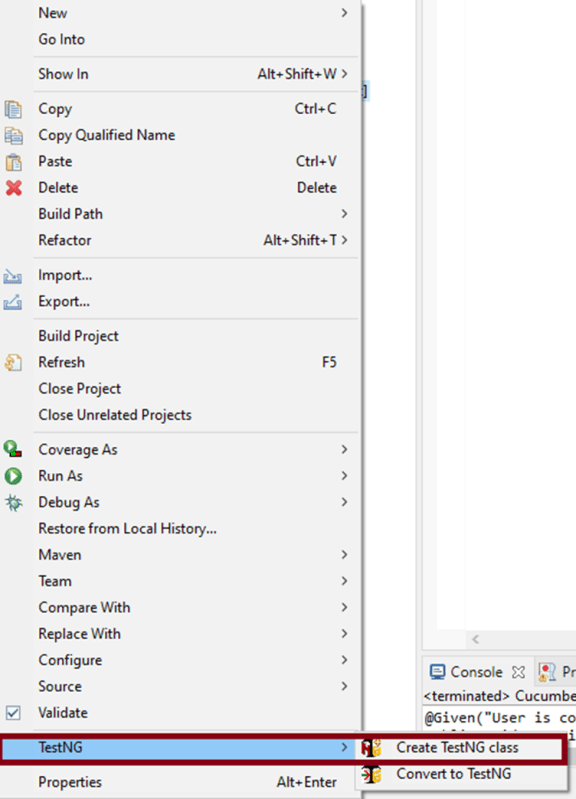
1) Create a new TestNG class. Right-click on the Folder where you want to create the TestNG class. Select TestNG and then Create the TestNG class as shown in the below image.
2) In the below image, we can see that the Source folder is the name of the folder we want to create the class, and we can mention the name of the class in the Class name. Under annotations, I have checked @BeforeTestand @AfterTest and click the Finish button.
3) We can see that the structure of the new TestNG class looks like as shown below.
4) In the below example, we want to navigate to an Amazon page and search for Hard Drive.
@BeforeTest : Launch Firefox and direct it to the Base URL
@Test : Search for HardDrive
@AfterTest : Close Firefox browser
import org.testng.annotations.Test;
import org.testng.annotations.BeforeTest;
import java.util.concurrent.TimeUnit;
import org.openqa.selenium.By;
import org.openqa.selenium.WebDriver;
import org.openqa.selenium.firefox.FirefoxDriver;
import org.testng.annotations.AfterTest;

public class TestNG_Demo {

   public WebDriver driver;

   @BeforeTest
    public void beforeTest() {

     System.setProperty("webdriver.gecko.driver","C:\\Users\\vibha\\Downloads\\geckodriver-v0.26.0-win64\\geckodriver.exe");
    driver = new FirefoxDriver();
    driver.manage().timeouts().implicitlyWait(60, TimeUnit.SECONDS);
    driver.manage().window().maximize();
    driver.get("https://www.amazon.com//");
 }

@Test
public void Validation() {
    driver.findElement(By.xpath("//*[@id='twotabsearchtextbox']")).sendKeys("hard drive");
    //XPath for search button
      driver.findElement(By.xpath("//*[@class='nav-input']")).click();
   }

@AfterTest
public void afterTest() {
    driver.quit();
  }
}
5) To execute this program, we need to Right-click and select Run as – TestNGTest.
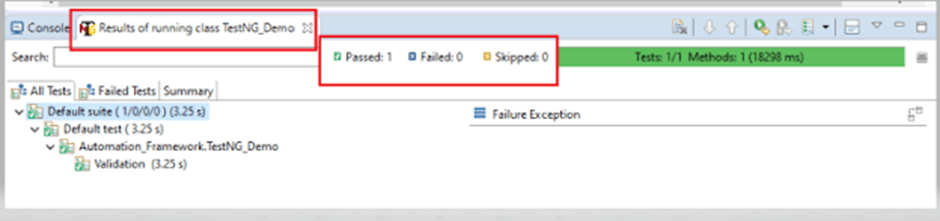
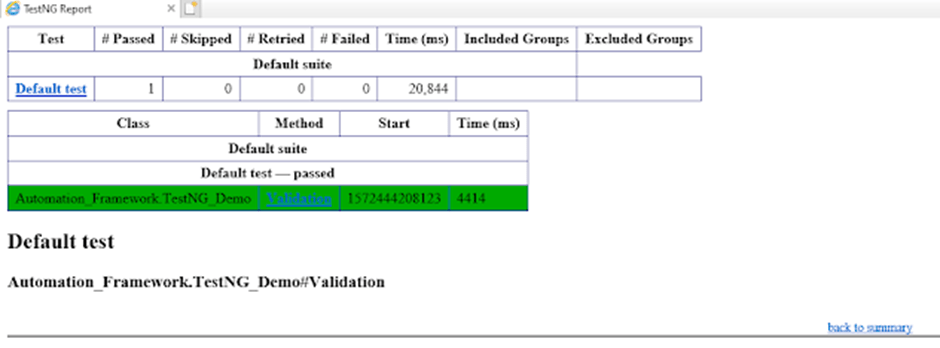
6) The result will look like something shown below. Here, we can see that Test Case Passed is 1, Failed 0, and Skipped 0.
7) As we know that TestNG also produce HTML Reports. To access the report, go to the Eclipse folder, and you can see a folder with name test-output inside the Project where we have created TestNG class. Here, it is C:\Users\vibha\Downloads\eclipse-workspace\Demo
We are done! Congratulations on making it through this tutorial and hope you found it useful! Happy Learning!!
TestNG is a testing framework inspired from JUnit and NUnit but introducing some new functionalities that make it more powerful and easier to use.
A famous programmer named as “Cedric Beust” developed TestNG. It is distribute under Apache Software License and is easily available to download. TestNG requires JDK 7 or higher.
Features of TestNG
1) Report Generation – Selenium does not support report generation. TestNG provides the ability to generate the HTML Reports.
2) Support for Annotations – It has inbuilt annotations, like @Test, @BeforeTest, @AfterTest, and soon which makes code more clean. These annotations are strongly typed, so the compiler will flag mistakes right away if any detected in the code.
3) Grouping of Test Cases – It enable user to group the test cases easily. “Groups” is one annotation of TestNG that can be use in the execution of multiple tests.
4) Set Test Execution Priority – It enable user to set execution priorities of the test cases. There is a parameter called “Priority” which is used to execute the methods in a particular order. It also allows user to run the test cases of a particular group.
Let us consider a scenario where we have created two groups such as ‘Smoke’ and ‘Regression’. If we want to execute the test cases in a ‘Regression’ group, then this can only be possible in the TestNG framework. If we want to skip the execution of a particular test case, there is a parameter called (enabled = true or false)
5) Support Data Driven Testing – It provide support to Data Driven testing using @DataProviders. The DataProvider in TestNG is another way to pass the parameters in the test function, the other one being TestNG parameters. Using DataProvider in TestNG, we can easily inject multiple values into the same test case.
6) Powerful Execution Model – TestNG does not extend any class. TestNG framework allows user to define the test cases where each test case is independent of other test cases.
7) Supports Parallel or Multi Threading Testing – It allow user to run same test cases on 2 different browsers at the same time. Parallel testing helps to reduce execution time and efforts and results in faster time to delivery.
8) Supports Logging – It also provides the logging facility for the test. For example during the execution of test case, user wants some information to be log in the console. Information could be any detail depends upon the purpose. Keeping this in mind that we are using Selenium for testing, we need the information that helps the user to understand the test steps or any failure during the test case execution. With the help of TestNG Logs, it is possible to enable logging during the Selenium test case execution.
9) Integration with other third party tools – It can be easily integrated with other tools or plugins like build tool Maven, Integrated Development Environment (Eclipse), Selenium, Cucumber and many other.
10) Integration with CI/CD tools – We can run the TestNG tests in CI/CD pipelines, like Jenkis, GitHub pipeline and soon.
There are lot more features apart from mentioned above, but I feel these are the most commonly used features in TestNG.
4. The m2e plugin will analyze the pom.xml and will configure the project and generate the Eclipse files automatically.
5. Below is the code of App.java. Run this code
package com.Selenium;

/**
 * Hello world!
 *
 */
public class App
{
    public static void main( String[] args )
    {
        System.out.println( "Hello World!" );
    }
}
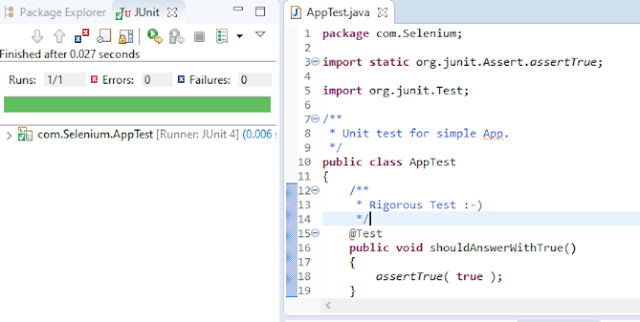
6. Below is the code of AppTest.java. Run this code
package com.Selenium;

import static org.junit.Assert.assertTrue;
import org.junit.Test;

/**
 * Unit test for simple App.
 */
public class AppTest
{
    /**
     * Rigorous Test 🙂
     */
    @Test
    public void shouldAnswerWithTrue()
    {
        assertTrue( true );
    }
}
Note:- Apache Maven Eclipse Plugins like eclipse:eclipse, eclipse:clean, etc are retired. To know more about it, please refer the link
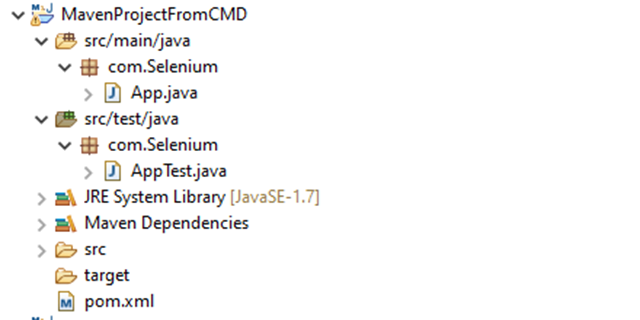
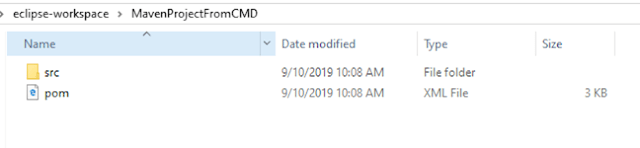
7. Structure of POM.xml
<?xml version="1.0"encoding="UTF-8"?>

<project xmlns="http://maven.apache.org/POM/4.0.0"xmlns:xsi="http://www.w3.org/2001/XMLSchema-instance"
  xsi:schemaLocation="http://maven.apache.org/POM/4.0.0 http://maven.apache.org/xsd/maven-4.0.0.xsd">
  <modelVersion>4.0.0</modelVersion>

  <groupId>com.Selenium</groupId>
  <artifactId>MavenProjectFromCMD</artifactId>
  <version>1.0-SNAPSHOT</version>

  <name>MavenProjectFromCMD</name>
  <!-- FIXME change it to the project's website -->
  <url>http://www.example.com</url>

  <properties>
    <project.build.sourceEncoding>UTF-8</project.build.sourceEncoding>
    <maven.compiler.source>1.7</maven.compiler.source>
    <maven.compiler.target>1.7</maven.compiler.target>
  </properties>

  <dependencies>
    <dependency>
      <groupId>junit</groupId>
      <artifactId>junit</artifactId>
      <version>4.11</version>
      <scope>test</scope>
    </dependency>
  </dependencies>

  <build>
    <pluginManagement><!-- lock down plugins versions to avoid using Mavendefaults (may be moved to parent pom) -->
      <plugins>
        <!-- clean lifecycle, see https://maven.apache.org/ref/current/maven-core/lifecycles.html#clean_Lifecycle -->
        <plugin>
          <artifactId>maven-clean-plugin</artifactId>
          <version>3.1.0</version>
        </plugin>

        <!-- default lifecycle, jar packaging: see https://maven.apache.org/ref/current/maven-core/default-bindings.html#Plugin_bindings_for_jar_packaging -->
        <plugin>
          <artifactId>maven-resources-plugin</artifactId>
          <version>3.0.2</version>
        </plugin>

        <plugin>
          <artifactId>maven-compiler-plugin</artifactId>
          <version>3.8.0</version>
        </plugin>

        <plugin>
          <artifactId>maven-surefire-plugin</artifactId>
          <version>2.22.1</version>
        </plugin>

        <plugin>
          <artifactId>maven-jar-plugin</artifactId>
          <version>3.0.2</version>
        </plugin>

        <plugin>
          <artifactId>maven-install-plugin</artifactId>
          <version>2.5.2</version>
        </plugin>

        <plugin>
          <artifactId>maven-deploy-plugin</artifactId>
          <version>2.8.2</version>
        </plugin>

        <!-- site lifecycle, see https://maven.apache.org/ref/current/maven-core/lifecycles.html#site_Lifecycle -->
        <plugin>
          <artifactId>maven-site-plugin</artifactId>
          <version>3.7.1</version>
        </plugin>

        <plugin>
          <artifactId>maven-project-info-reports-plugin</artifactId>
          <version>3.0.0</version>
        </plugin>
      </plugins>
    </pluginManagement>
  </build>
</project>
In the previous tutorial, we have discussed about How to install Maven on Windows. In this tutorial, we will see how to use Maven to manage a Java project – Create and update the dependencies.
1) Change current folder to the folder where we want to create the Java project
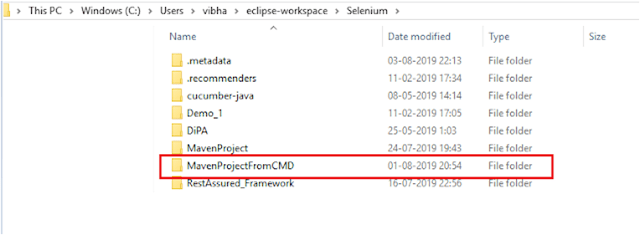
In my case I have my Eclipse Workspace mentioned at the below mentioned path
cd C:\Users\vibha\eclipse-workspace\Selenium
2) Create a Project from Maven Template
This tells Maven to generate a Java project from a Maven template.
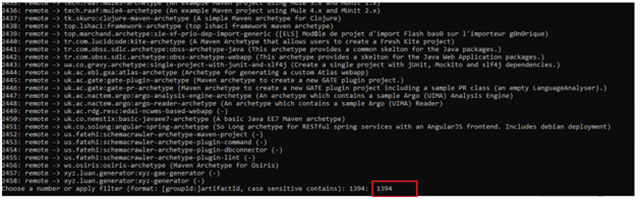
mvn archetype:generate
3) We need to mention the number as displayed on your screen in Command Prompt to proceed further. Like here, Choose a folder or apply has 1394, so I have also mentioned 1394 in command prompt.
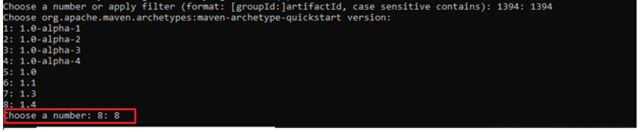
4) We need to provide again input in command prompt. This time program wants to know which version we want to use. I prefer to use the latest version. Here, it is 8, so I have selected version 8.
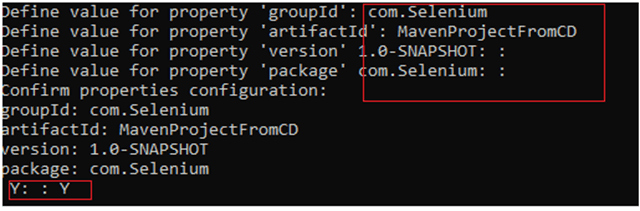
5) We need to provide 2 input here
A) Value of groupId – This serves as the group identifier of your Maven project, it should be in a form similar to Java packages, such as com.Selenium B) Value of artifactId – This serves as the group-local identifier of my Maven project like MavenProjectFromCMD C) Value of Version – The initial version of our project. The default is 1.0-SNAPSHOT D) Value of package – The name of our root package. The default is groupId we have created earlier. We will notice the INFO message about the properties. If the displayed settings are correct, then just enter Y in :: prompt.
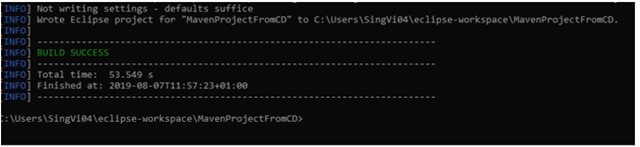
Successful Build – Below screenshot shows that the Maven Project built successfully.
6) Project Folder Creation – We can see a folder with the name of project – MavenProjectFromCMD in our Eclipse Workspace. In my case, it is