Lambda expressions are introduced in Java 8. It represents one method interface called functional interface. In this tutorial, we will see how to create a new Thread in Java using Lambda expression.
public class LambdaThreadDemo {
public static void main(String[] args) {

    // Implementing Runnable using old way
     Runnable runnable = new Runnable() {

     @Override
      public void run() {
            System.out.println("Old Thread name : "+ Thread.currentThread().getName());
         }
       };
    Thread thread1 = new Thread(runnable);

    // Implementing Runnable using Lambda Expression
     Runnable runnable_new = () -> { System.out.println("New Thread name : "+ Thread.currentThread().getName());
        };
     Thread thread_new = new Thread(runnable_new);

    // Start Threads
    thread1.start();
    thread_new.start();
   }
}

Output
Old Thread name : Thread-0
New Thread name : Thread-1
This keyword refers to current object in a method or constructor. The most common use of this keyword is to eliminate the confusion between class variables and parameters of same name.
this can also be used to:
Invoke current class instance variable
Invoke current class method
Invoke current class constructor
Pass as an argument in the method call
Pass as an argument in the constructor call
Return the current class object
Invoke current class instance variable
Here, this keywords can be used to refer or invoke the current class instance variable. Suppose the class variables and parameters share the same name, then this ambiguity can be resolved by the use of this keyword.
public class Employee {
     String name;
     String EmpId;
     Employee(String name, String EmpId) {
           name = name;
           EmpId = EmpId;
      }
      void display() {
            System.out.println(name + " " + EmpId);
      }
      public static void main(String[] args) {
            Employee E1 = new Employee("Vibha", "IT0047");
            Employee E2 = new Employee("Abha", "IT0045");
            E1.display();
            E2.display();
     }
}

Output
null null
null null
The solution to the problem where both class instance variables and parameters have same name can be resolved with the help of this keyword as shown below.
The current class method invoked by using this keyword. Here, both display1() and this.display1() means the same.
public class ThisInvokeCurrentClassMethod {

    void display1() {
         System.out.println("This is display 1 method");
     }

     void display2() {
           System.out.println("This is display 2 method");
           display1();
           this.display1();
     }

     public static void main(String[] args) {
           ThisInvokeCurrentClassMethod obj1 = new ThisInvokeCurrentClassMethod();
           obj1.display2();
     }
}

Output
This is display 2 method
This is display 1 method
This is display 1 method
Invoke current class constructor
The current class constructor can be invoked by using this keyword. This is used to reuse the constructor.
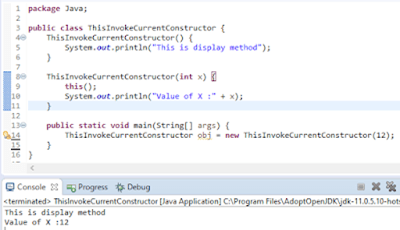
public class ThisInvokeCurrentConstructor {
     ThisInvokeCurrentConstructor() {
           System.out.println("This is display method");
     }

     ThisInvokeCurrentConstructor(int x) {
         this();
         System.out.println("Value of X :" + x);
     }

     public static void main(String[] args) {
        ThisInvokeCurrentConstructor obj = new ThisInvokeCurrentConstructor(12);
    }
}

Output
This is display method
Value of X :12
In the previous tutorial, we have discussed about How to create dependency between Selenium Test Cases using TestNG. In this tutorial, we will see how we can group test cases using TestNG. TestNG allows us to group test methods which is not present in JUnit. We can declare the methods belong to groups as well as specify groups that contain other groups. To group test cases, we need to create testng.xml.
Multiple tags are used in a sequence to build a working testNG xml like , and
1. First is tag, which holds a logical name which defines full information to TestNG reported to generate execution report. 2. Second is , which is a logical name which holds the information of test execution report like pass, fail, skip test cases and other information like total time for execution and group info 3. Third is , where TestNGDemo is the package used, and Test Class name is TestNGGroupDemo. 4. Fourth is , where “e2etest” is the name of the method we want to execute.
<?xml version = "1.0"encoding = "UTF-8"?>
<!DOCTYPE suite SYSTEM "http://testng.org/testng-1.0.dtd">
<suite name = "Suite1">
  <test name = "Test Demo">
      <groups>
         <run>
              <include name = "e2etest"/>
          </run>
        </groups>
    <classes>
          <class name = "TestNGGroupDemo"/>
     </classes>
   </test>
</suite>
To Run the TestNG program, right click on the testng.xml and select Run As-> TestNG Suite (in case of Eclipse) and Run testng.xml (in case of IntelliJ).
In below example, we have shown the syntax of how to use groups in the XML file. @Test(groups = { “e2etest”, “integerationtest” }) .
Below is the sample code.
import org.testng.annotations.Test;

public class TestNGGroupDemo {

	@Test(alwaysRun = true, groups = { "e2etest", "integerationtest" })
	public void testPrintMessage() {
		System.out.println("This method is run by both e2e and integeration test");
	}

	@Test(alwaysRun = true, groups = { "e2etest" })
	public void testE2EMessage() {
		System.out.println("This method is run by e2e test");
	}

	@Test(alwaysRun = true, groups = { "integerationtest" })
	public void testingIntegrationMessage() {
		System.out.println("This method is run by integeration test");
	}

	@Test(alwaysRun = true, groups = { "acceptancetest" })
	public void testingAcceptanceMessage() {
		System.out.println("This method is run by Acceptance test");
	}

	@Test(alwaysRun = true, groups = { "e2etest", "acceptancetest" })
	public void testE2EAndAcceptanceMessage() {
		System.out.println("This method is run by both e2e and acceptance test");
	}

	@Test(alwaysRun = true, groups = { "e2etest", "integerationtest", "acceptancetest" })
	public void testE2EAndAcceptanceAndIntegrationMessage() {
		System.out.println("This method is run by e2e, integration and acceptance test");
	}

}

Output
[RemoteTestNG] detected TestNG version 7.4.0
This method is run by e2e, integration and acceptance test
This method is run by both e2e and acceptance test
This method is run by e2e test
This method is run by both e2e and integeration test

===============================================
Suite
Total tests run: 4, Passes: 4, Failures: 0, Skips: 0
===============================================
The output of the above program is
The result will look like something shown below. Here, we can see that Test Case Passed is 4, Failed 0 and Skipped 0.
To view the report, go to the Eclipse folder and you can see a folder with name test-output inside the Project where we have created TestNG class. Here, it is C:\Users\vibha\eclipse-workspace\Demo\test-output
Groups of Groups
Groups can also include other groups. These groups are called “MetaGroups”. TestNG provides the flexibility of providing groups inside another group and running them according to your needs. Let’s create a group inside a group in our XML file.
Here, I have created a created a new group with the name ‘SuperGroup‘ and included our group “acceptancetest” into it. Then we called the newly created group (SuperGroup) for execution by including it in the run tag. The output will be like this:
<?xml version="1.0" encoding="UTF-8"?>
<!DOCTYPE suite SYSTEM "https://testng.org/testng-1.0.dtd">
<suite name="Suite">
   <test name = "Test Demo">
       <groups>
        	<define name = "SuperGroup">
   			   <include name = "acceptancetest"></include>
   		</define>
          <run>
              <include name = "SuperGroup"/>
          </run>
        </groups>
    <classes>
      <class name="TestNGGroupDemo"/>
    </classes>
  </test> <!-- Test -->
</suite> <!-- Suite -->
The output of the above program is
Lets, add another group “e2etest” to SuperGroup. In this case, we will see all the tests marked with “e2etest” and “acceptancetest“.
<?xml version="1.0" encoding="UTF-8"?>
<!DOCTYPE suite SYSTEM "https://testng.org/testng-1.0.dtd">
<suite name="Suite">
   <test name = "Test Demo">
       <groups>
        	<define name = "SuperGroup">
   			   <include name = "acceptancetest"></include>
   			    <include name = "e2etest"></include>
   		</define>
          <run>
              <include name = "SuperGroup"/>
          </run>
        </groups>
    <classes>
      <class name="TestNGGroupDemo"/>
    </classes>
  </test> <!-- Test -->
</suite> <!-- Suite -->
The output of the above program is
We are done! Congratulations on making it through this tutorial and hope you found it useful! Happy Learning!!
The previous tutorial discussed prioritizing the Test Cases using TestNG. In this tutorial, we will see how we can disable the Test Cases using TestNG.
Imagine there are 100 test cases in a Regression Test Suite. We need to execute 99 test cases in a release and do want not to execute any particular test case. But we do not want to delete that test case from the Test Suite also. In this case, TestNG has a feature that allows skipping a particular test case by setting the parameters to.
@Enabled Annotation
@Test(enabled = false)
To use two or more parameters in a single annotation, separate them with a comma:
@Test(priority = 3, enabled = false)
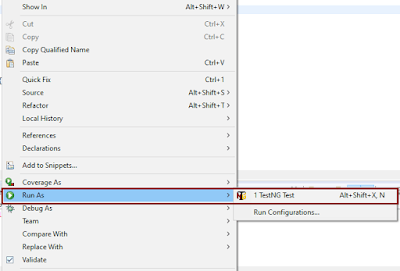
To Run the TestNG program, Right-click on the program, and select Run As TestNG Test.
Below is an example to implement the above-mentioned scenario.
import org.testng.annotations.Test;

public class TestNGDisableDemo {

    @Test(priority = 3)
     public static void FirstTest() {
           System.out.println("This is Test Case 1, but after priority Test Case 3");
     }

     @Test(priority = 4)
     public static void SecondTest() {
          System.out.println("This is Test Case 2, but after priority Test Case 4");
     }

     @Test(enabled = false)
     public static void ThirdTest() {
           System.out.println("This is Test Case 3, but now skipped");
     }

     @Test(priority = 1)
     public static void FourthTest() {
            System.out.println("This is Test Case 4, but after priority Test Case 1");
     }
}
The output of the above program is
@Ignore Annotation
There is another way of skipping the tests by using the @Ignore annotation.
TestNG lets you ignore all the @Test methods :
In a class (or)
In a particular package (or)
In a package and all of its child packages
Ignore a Test
Below is an example where we have skipped the execution of a particular test.
import org.testng.annotations.Ignore;
import org.testng.annotations.Test;

public class IgnoreDemo{

	@Test
	public void FirstTest() {

		System.out.println("This is Test Case 1");

	}

	@Test
	public void SecondTest() {

		System.out.println("This is Test Case 2");

	}

	@Ignore
	@Test
	public void ThirdTest() {

		System.out.println("This is Test Case 3");

	}

	@Test
	public void FourthTest() {

		System.out.println("This is Test Case 4");

	}

}
In the above example, we have assigned @Ignore to the third test. So, this test should be skipped while the execution.
The output of the above program is
Ignore a Class
To understand this concept, we need to create 2 test classes – IgnoreDemo and IgnoreDemo2. Imagine we want to ignore all the tests in the class, so we can use @Ignore at the class level.
IgnoreDemo
import org.testng.annotations.Ignore;
import org.testng.annotations.Test;

@Ignore
public class PriorityDemo {

	@Test
	public void FirstTest() {

		System.out.println("This is Test Case 1");

	}

	@Test
	public void SecondTest() {

		System.out.println("This is Test Case 2");

	}


	@Test
	public void ThirdTest() {

		System.out.println("This is Test Case 3");

	}

	@Test
	public void FourthTest() {

		System.out.println("This is Test Case 4");

	}

}
IgnoreDemo2
package com.example;

import org.testng.annotations.Ignore;
import org.testng.annotations.Test;


public class PriorityDemo2 {

	@Test
	public void FirstTest() {

		System.out.println("This is Test Case 1 of Class 2");

	}

	@Test
	public void SecondTest() {

		System.out.println("This is Test Case 2 of Class 2");

	}


	@Test
	public void ThirdTest() {

		System.out.println("This is Test Case 3 of Class 2");

	}

	@Test
	public void FourthTest() {

		System.out.println("This is Test Case 4 of Class 2");

	}

}
To run both the classes together, we need to create a testng.xml. The easiest way is to select both the classes and Right-Click and select TestNG -> Convert to TestNG.
testng.xml
<?xml version="1.0" encoding="UTF-8"?>
<!DOCTYPE suite SYSTEM "https://testng.org/testng-1.0.dtd">
<suite name="Suite">
  <test thread-count="5" name="Test">
    <classes>
      <class name="com.example.PriorityDemo2"/>
      <class name="com.example.PriorityDemo"/>
    </classes>
  </test> <!-- Test -->
</suite> <!-- Suite -->
Right-click on the testng.xml and select Run As -> TestNG Suite.
As we have assigned the @Ignore annotation at the class level of PriorityDemo class, it will ignore all the 4 tests present in that particular class.
The output of the above program is
We are done. Congratulations on making it through this tutorial and hope you found it useful!
In this tutorial, we will discuss GetText() method as well as the getAttribute() method in Selenium WebDriver. These methods are used extensively in automating a web application. Before going through these methods, we should know what HTML attributes are.
What are HTML attributes?
Attributes are the additional information provided by developers in HTML tags. Attributes are normally defined using “name-pair” values. Let us see, here div is the tag, and corresponding attribute with the property name is id, and the property value is nav-xshop. <div id= “nav-xshop”>
What is getAttribute() method?
The getAttribute() method is declared in the WebElement interface, and it returns the value of the web element’s attribute as a string. It fetches the value of an attribute, in HTML code whatever is present in the left side of ‘=’ is an attribute, and the value on the right side is an attribute value.
getAttibute() returns ‘null’ if there is no such attributes
getAttribute() method will return either “true” or null for attributes whose value is Boolean.
Where to use getAttribute() method?
Consider a scenario of movie ticket booking. The colour of booked and available seats in the movie theatre is different. So the same seat will have the supposed white colour for the available seat and blue for the booked seat. So, the colour attribute of the seat changes from white to blue for the same seat, which can be identified by the getAttribute() method. The snippet below shows the HTML code of the search box of the Amazon Home page
Below is an example of how the getAttribute() method can be used.
import org.openqa.selenium.By;
import org.openqa.selenium.WebDriver;
import org.openqa.selenium.WebElement;
import org.openqa.selenium.chrome.ChromeDriver;

public class GetAttributeDemo {
      public static void main(String[] args) {

            System.setProperty("webdriver.chrome.driver",
                                                "C:\\Users\\Vibha\\Desktop\\Drivers\\chromedriver_win32\\chromedriver.exe");

             WebDriver driver = new ChromeDriver();

             driver.get("https://www.amazon.com/");
             driver.manage().window().maximize();

             WebElement AmazonSearchBox = driver.findElement(By.name("field-keywords"));
             System.out.println("Name of the Email Textbox is:- " + AmazonSearchBox.getAttribute("name"));

             System.out.println("Class of the Email Textbox is:- " + AmazonSearchBox.getAttribute("class"));

             System.out.println("Value of the Email Textbox is:- " + AmazonSearchBox.getAttribute("tabindex"));

             System.out.println("Type of the Email Textbox is:- " + AmazonSearchBox.getAttribute("type"));

             System.out.println("Id of the Email Textbox is:- " + AmazonSearchBox.getAttribute("id"));

             // getAttibute() returns 'null' if there no such attribute

             System.out.println("Value of nonExistingAttribute is:- " + AmazonSearchBox.getAttribute("test"));

            driver.close();
       }

}

Output
Name of the Email Textbox is:- field-keywords
Class of the Email Textbox is:- nav-input
Value of the Email Textbox is:- 19
Type of the Email Textbox is:- text
Id of the Email Textbox is:- twotabsearchtextbox
Value of nonExistingAttribute is:- null
What is getText() method?
getText() is a method that gets us the visible (i.e. not hidden by CSS) innerText of this element, including sub-elements, without any leading or trailing white space.
Inner text is the text between the opening tags and closing tags.
This is an example of getText().
In the above example, the text “This is the example of getText” between opening and closing tags of h1 are called inner text.
The snippet below shows the HTML code of the search box of the Amazon Home page
Below is an example of how the getText() method can be used.
import java.util.concurrent.TimeUnit;

import org.openqa.selenium.By;
import org.openqa.selenium.WebDriver;
import org.openqa.selenium.chrome.ChromeDriver;

public class GetTextDemo {

      public static void main(String[] args) {
           System.setProperty("webdriver.chrome.driver",
                                                "C:\\Users\\Vibha\\Desktop\\Drivers\\chromedriver_win32\\chromedriver.exe");

            WebDriver driver = new ChromeDriver();

            driver.get("https://www.facebook.com/");
            driver.manage().window().maximize();
            driver.manage().timeouts().implicitlyWait(30, TimeUnit.SECONDS);

            String FacebookText = driver
                                    .findElement(By.xpath("//*[@id='content']/div/div/div/div/div[2]/div/div[1]/div[1]/span")).getText();
            System.out.println("Text on Facebook Site:- " + FacebookText);
         driver.close();
      }

}

Output
Text on Facebook Site:- Create an account
In the previous blog, we have discussed about executeScript() method in JavaScript. JavascriptExecutor interface comprises of executeAsyncScript() method that is called an additional final argument “arguments[arguments.lenght-1];”which is a callback function to signal that async execution has finished. We have to call from JavaScript, to tell Webdriver, that our Asynchronous execution has finished. If we do not do that, then executeAsyncScpriptwill timeout and throw a timeout exception.
Before executing AsyncScript method, we have to make sure to set the script timeout. Its default is 0. If we do not set a script timeout, our executeAsyncScript willimmediately timeout and it won’t work.
Below is the program which shows how to use executeAsyncScript() method
First will get the start time before waiting 5 seconds by using executeAsyncScript() method.
Then, will use executeAsyncScript() to wait 5 seconds.
Then, will get the current time
Will subtract (current time – start time) = passed time and print the value
import org.openqa.selenium.JavascriptExecutor;
import org.openqa.selenium.WebDriver;
import org.openqa.selenium.chrome.ChromeDriver;

public classExecuteAsycSleepBrowserDemo {
        public static void main(String[] args) {


System.setProperty("webdriver.chrome.driver","C:\\Users\\Vibha\\Desktop\\Drivers\\chromedriver_win32\\chromedriver.exe");
        WebDriver driver = newChromeDriver();

        //Create the JavascriptExecutor interface object by Type casting
        JavascriptExecutor js = (JavascriptExecutor)driver;
        driver.get("https://www.google.com/");
        driver.manage().window().maximize();

        //Declare and set start time
        long startTime = System.currentTimeMillis();

        //Call executeAsyncScript() method                       js.executeAsyncScript("window.setTimeout(arguments[arguments.length - 1], 5000);");

        //Get the difference (currentTime - startTime) it should be greater than 5000
        System.out.println("Passed time: " + (System.currentTimeMillis() - startTime));

          if ( (System.currentTimeMillis() - startTime) > 5000)
             {
                 System.out.println("Time difference must be greater than 5000 milliseconds");
             }
          driver.quit();
      }

Output
Passed time: 5040
Time difference must be greater than 5000 milliseconds
In the previous tutorial, we have discussed about JavaScript. There are some conditions where we cannot handle some problems with WebDriver only, web controls don’t react well against selenium commands. In this kind of situations, we use Javascript. JavaScriptExecutorcomes separately and also comes under the WebDriver but both do the same thing. Within the WebDriver, it is named as ExecuteScript.
JavaScriptExecutor is an interface that provides a mechanism to execute Javascript through selenium driver. It provides “executescript” & “executeAsyncScript” methods, to run JavaScript in the context of the currently selected frame or window.
ExecuteScript Method – This method executes JavaScript in the context of the currently selected frame or window in Selenium. The script used in this method runs in the body of an anonymous function (a function without a name). We can also pass complicated arguments to it.
Execute the below selenium script. In this example,
Launch the site
Fetch the domain name of the site.
Fetch the URL of the site
Fetch the title name of the sit
Then navigate to a different page – google.com
Display Alert popup
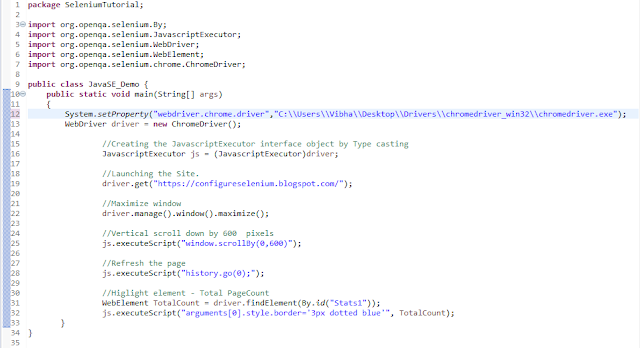
package SeleniumTutorial;
import org.openqa.selenium.JavascriptExecutor;

import org.openqa.selenium.WebDriver;

import org.openqa.selenium.chrome.ChromeDriver;

public classJavaScript_Demo {
        public static voidmain(String[] args) {
                        System.setProperty("webdriver.chrome.driver","C:\\Users\\SingVi04\\Desktop\\Drivers\\chromedriver_win32\\chromedriver.exe");

        WebDriver driver= new ChromeDriver();

        //Create the JavascriptExecutor interface object by Type casting
        JavascriptExecutor js = (JavascriptExecutor)driver;

        driver.get("https://configureselenium.blogspot.com/");

        driver.manage().window().maximize();


       //Fetching the Domain Name of the site. Tostring() change object to name.
        String DomainName = js.executeScript("return document.domain;").toString();
        System.out.println("Domain name of the site = "+DomainName);

        //Fetching the URL of the site. Tostring() change object to name
        String url = js.executeScript("return document.URL;").toString();
        System.out.println("URL of the site = "+url);

        //Method document.title fetch the Title name of the site. Tostring() change object to name
       String TitleName = js.executeScript("return document.title;").toString();
       System.out.println("Title of the page = "+TitleName);

        //Navigate to new Page i.e to generate access page. (launch new url)
        js.executeScript("window.location = 'https://www.google.com/'");
        String NewTitleName = js.executeScript("return document.title;").toString();
        System.out.println("Title of the new page = "+NewTitleName);

        //Alert
        js.executeScript("alert('Hello Everyone!');");
        driver.switchTo().alert().accept();

        driver.quit();
    }
 }
JavaScript is the preferred language inside the browser to interact with HTML dom. This means that a Browser has JavaScript implementation in it and understands the JavaScript commands. WebDriver gives you a method called Driver.executeScript which executes the JavaScript in context of the loaded browser page. There are some conditions where we cannot handle some problems with WebDriver only, web controls do not react well against selenium commands. In this kind of situations, we use Javascript. It is useful for custom synchronizations, hide or show the web elements, change values, test flash/HTML5 and so on. In order to do these, we can use Selenium’s JavascriptExecutor interface that executes JavaScript through Selenium driver.
What is JavaScriptExecutor?
JavaScriptExecutor comes separately and comes under the WebDriver but both do the same thing. Within the WebDriver, it is name as ExecuteScript. JavaScriptExecutor is an interface that provides a mechanism to execute Javascript through selenium driver. It provides “executescript” & “executeAsyncScript” methods, to run JavaScript in the context of the currently selected frame or window.
ExecuteScript Method
This method executes JavaScript in the context of the currently selected frame or window in Selenium. The script used in this method runs in the body of an anonymous function (a function without a name). We can also pass complicated arguments to it.
The script can return values. Data types returned are
In this tutorial, will find out how the Radio Buttons can be automated in Selenium WebDriver. The radio Button is also a Web Element like Checkbox.
What is Radio Button?
A radio button is a form element in HTML that allows users to select one option from a predefined set of options. Radio buttons are typically used in scenarios where only one selection is allowed at a time, such as choosing a gender, selecting a subscription plan
The below image shows the Radio Buttons before they were selected.
Below is the image of the locators of this web element.
Let’s go through the scenario below:-
1) Launch Chrome Browser 2) Maximize the current window 3) Implicitly wait for 5 sec 4) Open browser – https://demo.automationtesting.in/Register.html 5) Find the locator of all Radio Buttons 6) Find the number of Radio Buttons available 7) Print the name of the first option of the radio button 8) Select the first option of the radio button 9) Print the name of the second option of the radio button 10) Select the second option of the radio button 11) Close the browser
Detailed Explanation
1.Launch Chrome Browser
A new instance of Chrome browser is created using the specified options.
ChromeOptions options = new ChromeOptions();
WebDriver driver = new ChromeDriver(options);
This command finds all radio buttons on the page that have the attribute name =”radiooptions”. It returns a list of WebElement objects representing each radio button.
5. Get the Number of Radio Buttons
int radioSize = Radio_Options.size();
System.out.println("No Of Radio Button Options :" + radioSize);
6. Loop Through Radio Buttons
for (int i = 0; i < radioSize; i++) {
System.out.println("Name of Radio Button :"+ Radio_Options.get(i).getAttribute("Value"));
Radio_Options.get(i).click();
System.out.println("Radio Button Option "+ (i+1) +" is selected");
}
The script loops through each radio button in the list
7. Close the Browser
driver.quit();
The program for the above scenario is shown below:
import org.openqa.selenium.By;
import org.openqa.selenium.WebDriver;
import org.openqa.selenium.WebElement;
import org.openqa.selenium.chrome.ChromeDriver;
import org.openqa.selenium.chrome.ChromeOptions;
import java.time.Duration;
import java.util.List;
public class RadioButton_Demo {
public static void main(String[] args) throws InterruptedException {
// Initiate Chrome browser
ChromeOptions options = new ChromeOptions();
WebDriver driver = new ChromeDriver(options);
// Maximize the browser
driver.manage().window().maximize();
// Put an Implicit wait and launch URL
driver.manage().timeouts().implicitlyWait(Duration.ofSeconds(5));
driver.get("https://demo.automationtesting.in/Register.html");
// Find locator of all Radio Buttons
List<WebElement> Radio_Options = driver.findElements(By.xpath("//*[@name='radiooptions']"));
// Find no of Radio Buttons available and print their values
int radioSize = Radio_Options.size();
System.out.println("No Of Radio Button Options :" + radioSize);
Thread.sleep(5000);
for (int i= 0; i< radioSize; i++) {
System.out.println("Name of Radio Button :"+ Radio_Options.get(i).getAttribute("Value"));
Radio_Options.get(i).click();
System.out.println("Radio Button Option "+ (i+1) +" is selected");
}
driver.quit() ;
}
}
The output of the above program is
We use By.xpath(“//*[@name=’radiooptions’] to locate the all the options of the radio button.
We use the click() method to select the radio button.
Bootstrap is a free front-end framework for faster and easier web development
Bootstrap includes HTML and CSS based design templates for typography, forms, buttons, tables, navigation, modals, image carousels and many other, as well as optional JavaScript plugins
Bootstrap also gives you the ability to easily create responsive designs
Bootstrap is compatible with all modern browsers (Chrome, Firefox, Internet Explorer, Edge, Safari, and Opera)
What is Responsive Web Design?
Responsive web design is about creating web sites, which automatically adjust themselves to look good on all devices, from small phones to large desktops. Bootstrap dropdowns and interactive dropdowns that are dynamically position and formed using list of ul and li html tags. To know more about Bootstrap, please click here
How to get all the options of a Bootstrap dropdown
Below is an example which will explain how to get all the options of a Bootstrap dropdown.
import java.util.List;
import java.util.concurrent.TimeUnit;
import org.openqa.selenium.By;
import org.openqa.selenium.WebDriver;
import org.openqa.selenium.WebElement;
import org.openqa.selenium.chrome.ChromeDriver;
public class BootStrapDemo {
public static void main(String[] args) {
System.setProperty("webdriver.chrome.driver","C:\\Users\\Desktop\\Drivers\\chromedriver_win32\\chromedriver.exe");
WebDriver driver= new ChromeDriver();
driver.manage().window().maximize();
driver.get("https://www.seleniumeasy.com/test/");
driver.manage().timeouts().implicitlyWait(20, TimeUnit.SECONDS);
// Clicking on Bootstrap Dropdown
driver.findElement(By.xpath("//*[@id='navbar-brand-centered']/ul[1]/li[1]/a")).click();
// Get the all WebElements inside the dropdown in List
List dropdown_list = driver.findElements(By.xpath("//ul[contains(@class,'dropdown-menu')]//li//a"));
// Printing the amount of WebElements inside the list
System.out.println("The Options in the Dropdown are: " + dropdown_list.size());
// Condition to get the WebElement for list
for(int i=0; i<dropdown_list.size(); i++)
{
// Printing All the options from the dropdown
System.out.println(dropdown_list.get(i).getText());
}
}
}
Output
The Options in the Dropdown are: 29
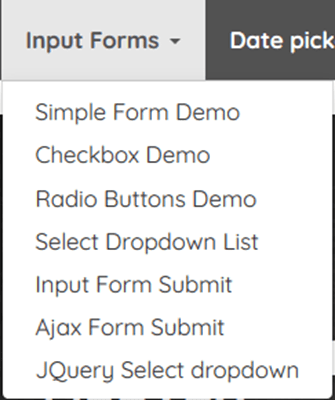
Simple Form Demo
Checkbox Demo
Radio Buttons Demo
Select Dropdown List
Input Form Submit
Ajax Form Submit
JQuery Select dropdown
Here,
1) Open a web page – https://www.seleniumeasy.com/test/ 2) Click on BootStrap DropDown – Input Forms by using (“//*[@id=’navbar-brand-centered’]/ul[1]/li[1]/a” 3) Get the all WebElements inside the dropdown in List by using (“//ul[contains(@class,’dropdown-menu’)]//li//a”) 4) Print all the options of DropDown using dropdown_list.get(i).getText()
How to select a particular option from Bootstrap dropdown
In the below example, there is a Bootstrap dropdown. I want to Check if an element – Checkbox Demo is present in the dropdown or not. If Yes, click on that option.
import java.util.List;
import java.util.concurrent.TimeUnit;
import org.openqa.selenium.By;
import org.openqa.selenium.WebDriver;
import org.openqa.selenium.WebElement;
import org.openqa.selenium.chrome.ChromeDriver;

public class BootStrapDemo {
        public static void main(String[] args) {

System.setProperty("webdriver.chrome.driver","C:\\Users\\Desktop\\Drivers\\chromedriver_win32\\chromedriver.exe");

          WebDriver driver= new ChromeDriver();
          driver.manage().window().maximize();
          driver.get("https://www.seleniumeasy.com/test/");
          driver.manage().timeouts().implicitlyWait(20, TimeUnit.SECONDS);

                // Clicking on Bootstrap Dropdown
               driver.findElement(By.xpath("//*[@id='navbar-brand-centered']/ul[1]/li[1]/a")).click();

                // Get the all WebElements inside the dropdown in List
               List dropdown_list =  driver.findElements(By.xpath("//ul[contains(@class,'dropdown-menu')]//li//a"));

              // Printing the amount of WebElements inside the list
               System.out.println("The Options in the Dropdown are: " + dropdown_list.size());

              // Condition to get the WebElement for list
              for(int i=0; i<dropdown_list.size(); i++)
              {
                   // Printing All the options from the dropdown
                   System.out.println(dropdown_list.get(i).getText());
// Checking the condition whether option in text "Checkbox Demo" is coming

          if(dropdown_list.get(i).getText().contains("Checkbox Demo"))
            {
                 // Clicking if text "Checkbox Demo" is there
                 dropdown_list.get(i).click();
              // Breaking the condition if the condition get satisfied
                 break;
          }
       }
   driver.quit();
  }
}

OutPut
The Options in the Dropdown are: 29
Simple Form Demo
Checkbox Demo
This program can be re-written by using Enhanced for loop instead of For loop.
getText() can be replaced by getAttribute(“innerHTML”)
import java.util.List;
import java.util.concurrent.TimeUnit;
import org.openqa.selenium.By;
import org.openqa.selenium.WebDriver;
import org.openqa.selenium.WebElement;
import org.openqa.selenium.chrome.ChromeDriver;

public class BootStrapDemo {
        public static void main(String[] args) {
 System.setProperty("webdriver.chrome.driver","C:\\Users\\Desktop\\Drivers\\chromedriver_win32\\chromedriver.exe");

          WebDriver driver= new ChromeDriver();
          driver.manage().window().maximize();
          driver.get("https://www.seleniumeasy.com/test/");
          driver.manage().timeouts().implicitlyWait(20, TimeUnit.SECONDS);

                // Clicking on Bootstrap Dropdown
               driver.findElement(By.xpath("//*[@id='navbar-brand-centered']/ul[1]/li[1]/a")).click();

                // Get the all WebElements inside the dropdown in List
               List dropdown_list =  driver.findElements(By.xpath("//ul[contains(@class,'dropdown-menu')]//li//a"));

              // Printing the amount of WebElements inside the list
               System.out.println("The Options in the Dropdown are: " + dropdown_list.size());

              // Condition to get the WebElement using Enhanced For loop

               for(WebElement element:dropdown_list)

              {
                   // Printing All the options from the dropdown
                   System.out.println(element.getAttribute("innerHTML"));

                  // Checking the condition whether option in text "Checkbox Demo" is coming
       if(element.getAttribute("innerHTML").contains("Checkbox Demo"))
            {
                 // Clicking if text "Checkbox Demo" is there
                 element.click();
              // Breaking the condition if the condition get satisfied
                 break;
          }
       }
   driver.quit();
  }
}