Execute JavaScript with executeAsyncScript() Method in Selenium

HOME

In the previous blog, we have discussed about executeScript() method in JavaScript. JavascriptExecutor interface comprises of executeAsyncScript() method that is called an additional final argument “arguments[arguments.lenght-1];”which is a callback function to signal that async execution has finished. We have to call from JavaScript, to tell Webdriver, that our Asynchronous execution has finished. If we do not do that, then executeAsyncScpriptwill timeout and throw a timeout exception.

Before executing AsyncScript method, we have to make sure to set the script timeout. Its default is 0. If we do not set a script timeout, our executeAsyncScript will immediately timeout and it won’t work.

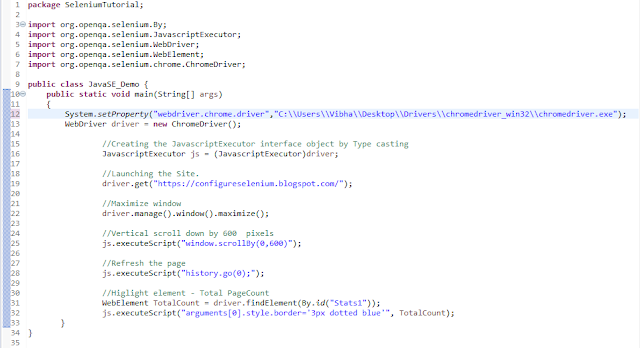
Below is the program which shows how to use executeAsyncScript() method

  1. First  will get the start time before waiting 5 seconds by using executeAsyncScript() method.
  2. Then, will use executeAsyncScript() to wait 5 seconds.
  3. Then, will get the current time
  4. Will subtract (current time – start time) = passed time and print the value
import org.openqa.selenium.JavascriptExecutor;
import org.openqa.selenium.WebDriver;
import org.openqa.selenium.chrome.ChromeDriver;
 
public classExecuteAsycSleepBrowserDemo {
        public static void main(String[] args) { 
    

System.setProperty("webdriver.chrome.driver","C:\\Users\\Vibha\\Desktop\\Drivers\\chromedriver_win32\\chromedriver.exe");
        WebDriver driver = newChromeDriver();
                                        
        //Create the JavascriptExecutor interface object by Type casting              
        JavascriptExecutor js = (JavascriptExecutor)driver;              
        driver.get("https://www.google.com/");                              
        driver.manage().window().maximize();
                        
        //Declare and set start time
        long startTime = System.currentTimeMillis();
                 
        //Call executeAsyncScript() method                       js.executeAsyncScript("window.setTimeout(arguments[arguments.length - 1], 5000);"); 
                 
        //Get the difference (currentTime - startTime) it should be greater than 5000
        System.out.println("Passed time: " + (System.currentTimeMillis() - startTime));
                        
          if ( (System.currentTimeMillis() - startTime) > 5000)
             {
                 System.out.println("Time difference must be greater than 5000 milliseconds");
             }
          driver.quit();      
      }

Output
Passed time: 5040
Time difference must be greater than 5000 milliseconds

Execute JavaScript with executeScript() Method in Selenium

HOME

In the previous tutorial, we have discussed about JavaScript. There are some conditions where we cannot handle some problems with WebDriver only, web controls don’t react well against selenium commands. In this kind of situations, we use Javascript. JavaScriptExecutor comes separately and also comes under the WebDriver but both do the same thing. Within the WebDriver, it is named as ExecuteScript.

JavaScriptExecutor is an interface that provides a mechanism to execute Javascript through selenium driver. It provides “executescript” & “executeAsyncScript” methods, to run JavaScript in the context of the currently selected frame or window.

ExecuteScript Method – This method executes JavaScript in the context of the currently selected frame or window in Selenium. The script used in this method runs in the body of an anonymous function (a function without a name). We can also pass complicated arguments to it. 

Execute the below selenium script. In this example,

  • Launch the site
  • Fetch the domain name of the site.
  • Fetch the URL of the site
  • Fetch the title name of the sit
  • Then navigate to a different page – google.com
  • Display Alert popup                                                                        
package SeleniumTutorial;
import org.openqa.selenium.JavascriptExecutor;
 
import org.openqa.selenium.WebDriver;
 
import org.openqa.selenium.chrome.ChromeDriver;
 
public classJavaScript_Demo {
        public static voidmain(String[] args) {
                        System.setProperty("webdriver.chrome.driver","C:\\Users\\SingVi04\\Desktop\\Drivers\\chromedriver_win32\\chromedriver.exe");
 
        WebDriver driver= new ChromeDriver();
                                        
        //Create the JavascriptExecutor interface object by Type casting                
        JavascriptExecutor js = (JavascriptExecutor)driver;             
 
        driver.get("https://configureselenium.blogspot.com/");
 
        driver.manage().window().maximize();
  
 
       //Fetching the Domain Name of the site. Tostring() change object to name.                
        String DomainName = js.executeScript("return document.domain;").toString();                 
        System.out.println("Domain name of the site = "+DomainName);                                        
                        
        //Fetching the URL of the site. Tostring() change object to name          
        String url = js.executeScript("return document.URL;").toString();                
        System.out.println("URL of the site = "+url);                                      
                        
        //Method document.title fetch the Title name of the site. Tostring() change object to name          
       String TitleName = js.executeScript("return document.title;").toString();                        
       System.out.println("Title of the page = "+TitleName);                                  
                
        //Navigate to new Page i.e to generate access page. (launch new url)             
        js.executeScript("window.location = 'https://www.google.com/'");
        String NewTitleName = js.executeScript("return document.title;").toString();                      
        System.out.println("Title of the new page = "+NewTitleName);    
 
        //Alert
        js.executeScript("alert('Hello Everyone!');");
        driver.switchTo().alert().accept();
      
        driver.quit();
    }           
 }

JavaScript and JavaScriptExecutor in Selenium


What is JavaScript?
 

JavaScript is the preferred language inside the browser to interact with HTML dom. This means that a Browser has JavaScript implementation in it and understands the JavaScript commands.
WebDriver gives you a method called Driver.executeScript which executes the JavaScript in context of the loaded browser page. There are some conditions where we cannot handle some problems with WebDriver only, web controls do not react well against selenium commands. In this kind of situations, we use Javascript. It is useful for custom synchronizations, hide or show the web elements, change values, test flash/HTML5 and so on. In order to do these, we can use Selenium’s JavascriptExecutor interface that executes JavaScript through Selenium driver.

What is JavaScriptExecutor?

JavaScriptExecutor comes separately and comes under the WebDriver but both do the same thing. Within the WebDriver, it is name as ExecuteScript. JavaScriptExecutor is an interface that provides a mechanism to execute Javascript through selenium driver. It provides “executescript” & “executeAsyncScript” methods, to run JavaScript in the context of the currently selected frame or window.

ExecuteScript Method

This method executes JavaScript in the context of the currently selected frame or window in Selenium. The script used in this method runs in the body of an anonymous function (a function without a name). We can also pass complicated arguments to it.

The script can return values. Data types returned are 

  • Boolean 
  • Long 
  • String 
  • List 
  • WebElement 
JavascriptExecutor js = (JavascriptExecutor) driver;  
js.executeScript(Script,Arguments);

Script – This JavaScript needs to execute.

Arguments – It is the arguments to the script. It is optional

Below is an example, which shows how executeScript method can be use. In this example, 

  1. Launch the site
  2. Scroll down by 600 pixel
  3. Refresh the page
  4. Highlight a particular element
import org.openqa.selenium.By;
import org.openqa.selenium.JavascriptExecutor;
import org.openqa.selenium.WebDriver;
import org.openqa.selenium.WebElement;
import org.openqa.selenium.chrome.ChromeDriver;
 
public class JavaSE_Demo {
        public static void main(String[] args){        

System.setProperty("webdriver.chrome.driver","C:\\Users\\Vibha\\Desktop\\Drivers\\chromedriver_win32\\chromedriver.exe");
        WebDriver driver= new ChromeDriver();                         
 
        //Create the JavascriptExecutor interface object by Type casting              
         JavascriptExecutor js = (JavascriptExecutor)driver;                   
         driver.get("https://configureselenium.blogspot.com/");     
         driver.manage().window().maximize();               

         //Vertical scroll down by 600  pixels             
          js.executeScript("window.scrollBy(0,600)");                           
 
         //Refresh the page
          js.executeScript("history.go(0);");
                       
          //Higlight element - Total PageCount
          WebElement TotalCount= driver.findElement(By.id("Stats1"));
          js.executeScript("arguments[0].style.border='3px dotted blue'", TotalCount);                     
      }                          
}

How to enter text-using JavaScriptexecutor (Without Sendkeys)

import org.openqa.selenium.JavascriptExecutor;
import org.openqa.selenium.WebDriver;
import org.openqa.selenium.chrome.ChromeDriver;
 
public class JavaScript_EnterText {
        public static void main(String[] args) {
        System.setProperty("webdriver.chrome.driver","C:\\Users\\Vibha\\Desktop\\Drivers\\chromedriver_win32\\chromedriver.exe");
        WebDriver driver = newChromeDriver();
                                        
         //Creating the JavascriptExecutor interface object by Type casting              
          JavascriptExecutor js = (JavascriptExecutor)driver;              
                                        
          //Launching the Site.         
          driver.get("https://www.google.com/");                      
                     
          //Maximize window            
          driver.manage().window().maximize();       
                        
          js.executeScript("document.getElementsByName('q')[0].value = 'Selenium Introduction';");
   } 
}   

How to automate Radio Button in Selenium WebDriver

HOME

Let’s go through the scenario below:-

1) Launch Chrome Browser
2) Maximize the current window
3) Implicitly wait for 5 sec
4) Open browser – https://demo.automationtesting.in/Register.html
5) Find the locator of all Radio Buttons
6) Find the number of Radio Buttons available
7) Print the name of the first option of the radio button
8) Select the first option of the radio button
9) Print the name of the second option of the radio button
10) Select the second option of the radio button
11) Close the browser

    ChromeOptions options = new ChromeOptions();
    WebDriver driver = new ChromeDriver(options);
    
    driver.manage().window().maximize();
    
    driver.manage().timeouts().implicitlyWait(Duration.ofSeconds(5));
    driver.get("https://demo.automationtesting.in/Register.html");
    
    List<WebElement> Radio_Options = driver.findElements(By.xpath("//*[@name='radiooptions']"));
    
    int radioSize = Radio_Options.size();
    System.out.println("No Of Radio Button Options :" + radioSize);
    
    for (int i = 0; i < radioSize; i++) {
        System.out.println("Name of Radio Button :"+ Radio_Options.get(i).getAttribute("Value"));
        Radio_Options.get(i).click();
        System.out.println("Radio Button Option "+ (i+1) +" is selected");
    }
    
    driver.quit();
    

    import org.openqa.selenium.By;
    import org.openqa.selenium.WebDriver;
    import org.openqa.selenium.WebElement;
    import org.openqa.selenium.chrome.ChromeDriver;
    import org.openqa.selenium.chrome.ChromeOptions;
    
    import java.time.Duration;
    import java.util.List;
    
    public class RadioButton_Demo {
    
        public static void main(String[] args) throws InterruptedException {
    
            // Initiate Chrome browser
            ChromeOptions options = new ChromeOptions();
            WebDriver driver = new ChromeDriver(options);
    
            // Maximize the browser
            driver.manage().window().maximize();
    
            // Put an Implicit wait and launch URL
            driver.manage().timeouts().implicitlyWait(Duration.ofSeconds(5));
            driver.get("https://demo.automationtesting.in/Register.html");
    
            // Find locator of all Radio Buttons
            List<WebElement> Radio_Options = driver.findElements(By.xpath("//*[@name='radiooptions']"));
    
            // Find no of Radio Buttons available and print their values
            int radioSize = Radio_Options.size();
            System.out.println("No Of Radio Button Options :" + radioSize);
    
            Thread.sleep(5000);
    
            for (int i= 0; i< radioSize; i++) {
                System.out.println("Name of Radio Button :"+ Radio_Options.get(i).getAttribute("Value"));
                Radio_Options.get(i).click();
                System.out.println("Radio Button Option "+ (i+1) +" is selected");
            }
            driver.quit()  ;
        }
    }
    

    How to automate BootStrap DropDown using Selenium WebDriver

     
    In the previous post, we have already seen How to Handle Dropdowns in Selenium WebDriver . In this post, we will see how to handle Bootstrap Dropdown using Selenium WebDriver.
     
    What is Bootstrap?
     
    • Bootstrap is a free front-end framework for faster and easier web development
    • Bootstrap includes HTML and CSS based design templates for typography, forms, buttons, tables, navigation, modals, image carousels and many other, as well as optional JavaScript plugins
    • Bootstrap also gives you the ability to easily create responsive designs
    • Bootstrap is compatible with all modern browsers (Chrome, Firefox, Internet Explorer, Edge, Safari, and Opera)

    What is Responsive Web Design?

    Responsive web design is about creating web sites, which automatically adjust themselves to look good on all devices, from small phones to large desktops.
    Bootstrap dropdowns and interactive dropdowns that are dynamically position and formed using list of ul and li html tags. To know more about Bootstrap, please click here

    How to get all the options of a Bootstrap dropdown


    Below is an example which will explain how to get all the options of a Bootstrap dropdown.

    import java.util.List;
    import java.util.concurrent.TimeUnit;
    import org.openqa.selenium.By;
    import org.openqa.selenium.WebDriver;
    import org.openqa.selenium.WebElement;
     
    import org.openqa.selenium.chrome.ChromeDriver;
    public class BootStrapDemo {
            public static void main(String[] args) {
     System.setProperty("webdriver.chrome.driver","C:\\Users\\Desktop\\Drivers\\chromedriver_win32\\chromedriver.exe");
    
              WebDriver driver= new ChromeDriver();
              driver.manage().window().maximize();
              driver.get("https://www.seleniumeasy.com/test/");
              driver.manage().timeouts().implicitlyWait(20, TimeUnit.SECONDS);
    
                    // Clicking on Bootstrap Dropdown
                   driver.findElement(By.xpath("//*[@id='navbar-brand-centered']/ul[1]/li[1]/a")).click(); 
    
                    // Get the all WebElements inside the dropdown in List  
                   List dropdown_list =  driver.findElements(By.xpath("//ul[contains(@class,'dropdown-menu')]//li//a"));
    
                  // Printing the amount of WebElements inside the list
                   System.out.println("The Options in the Dropdown are: " + dropdown_list.size());
    
                  // Condition to get the WebElement for list
                  for(int i=0; i<dropdown_list.size(); i++)
                  {
                       // Printing All the options from the dropdown
                       System.out.println(dropdown_list.get(i).getText());
                }                                                                                       
          }
    }
    
    Output
    The Options in the Dropdown are: 29
    Simple Form Demo
    Checkbox Demo
    Radio Buttons Demo
    Select Dropdown List
    Input Form Submit
    Ajax Form Submit
    JQuery Select dropdown


    Here,

    1) Open a web page – https://www.seleniumeasy.com/test/
    2) Click on BootStrap DropDown – Input Forms by using (“//*[@id=’navbar-brand-centered’]/ul[1]/li[1]/a”
    3) Get the all WebElements inside the dropdown in List  by using
    (“//ul[contains(@class,’dropdown-menu’)]//li//a”)
    4) Print all the options of DropDown using dropdown_list.get(i).getText()

    How to select a particular option from Bootstrap dropdown

    In the below example, there is a Bootstrap dropdown. I want to
    Check if an element – Checkbox Demo is present in the dropdown or not.
    If Yes, click on that option.

    import java.util.List;
    import java.util.concurrent.TimeUnit;
    import org.openqa.selenium.By;
    import org.openqa.selenium.WebDriver;
    import org.openqa.selenium.WebElement;
    import org.openqa.selenium.chrome.ChromeDriver;
     
    public class BootStrapDemo {
            public static void main(String[] args) {
    
    System.setProperty("webdriver.chrome.driver","C:\\Users\\Desktop\\Drivers\\chromedriver_win32\\chromedriver.exe");
    
              WebDriver driver= new ChromeDriver();
              driver.manage().window().maximize();
              driver.get("https://www.seleniumeasy.com/test/");
              driver.manage().timeouts().implicitlyWait(20, TimeUnit.SECONDS);
     
                    // Clicking on Bootstrap Dropdown
                   driver.findElement(By.xpath("//*[@id='navbar-brand-centered']/ul[1]/li[1]/a")).click(); 
     
                    // Get the all WebElements inside the dropdown in List  
                   List dropdown_list =  driver.findElements(By.xpath("//ul[contains(@class,'dropdown-menu')]//li//a"));
     
                  // Printing the amount of WebElements inside the list
                   System.out.println("The Options in the Dropdown are: " + dropdown_list.size());
     
                  // Condition to get the WebElement for list
                  for(int i=0; i<dropdown_list.size(); i++)
                  {
                       // Printing All the options from the dropdown
                       System.out.println(dropdown_list.get(i).getText());                 
    // Checking the condition whether option in text "Checkbox Demo" is coming
     
              if(dropdown_list.get(i).getText().contains("Checkbox Demo"))
                {
                     // Clicking if text "Checkbox Demo" is there
                     dropdown_list.get(i).click();
                  // Breaking the condition if the condition get satisfied
                     break;
              }
           }
       driver.quit();            
      }
    }
    
    OutPut
    The Options in the Dropdown are: 29
    Simple Form Demo
    Checkbox Demo
    

    This program can be re-written by using Enhanced for loop instead of For loop.

    getText() can be replaced by getAttribute(“innerHTML”)

    import java.util.List;
    import java.util.concurrent.TimeUnit;
    import org.openqa.selenium.By;
    import org.openqa.selenium.WebDriver;
    import org.openqa.selenium.WebElement;
    import org.openqa.selenium.chrome.ChromeDriver;
     
    public class BootStrapDemo {
            public static void main(String[] args) {
     System.setProperty("webdriver.chrome.driver","C:\\Users\\Desktop\\Drivers\\chromedriver_win32\\chromedriver.exe");
    
              WebDriver driver= new ChromeDriver();
              driver.manage().window().maximize();
              driver.get("https://www.seleniumeasy.com/test/");
              driver.manage().timeouts().implicitlyWait(20, TimeUnit.SECONDS);
     
                    // Clicking on Bootstrap Dropdown
                   driver.findElement(By.xpath("//*[@id='navbar-brand-centered']/ul[1]/li[1]/a")).click(); 
     
                    // Get the all WebElements inside the dropdown in List  
                   List dropdown_list =  driver.findElements(By.xpath("//ul[contains(@class,'dropdown-menu')]//li//a"));
     
                  // Printing the amount of WebElements inside the list
                   System.out.println("The Options in the Dropdown are: " + dropdown_list.size());
     
                  // Condition to get the WebElement using Enhanced For loop
     
                   for(WebElement element:dropdown_list)
     
                  {
                       // Printing All the options from the dropdown
                       System.out.println(element.getAttribute("innerHTML"));             
     
                      // Checking the condition whether option in text "Checkbox Demo" is coming
           if(element.getAttribute("innerHTML").contains("Checkbox Demo")) 
                {
                     // Clicking if text "Checkbox Demo" is there
                     element.click();
                  // Breaking the condition if the condition get satisfied
                     break;
              }
           }
       driver.quit();            
      }
    }


    Maven – How to add M2_REPO classpath variable to Eclipse

    New version of Eclipse like Photon or Eclipse IDE 2019-06 has M2_REPO classpath variable after integrating maven plugins (m2eclipse) with Eclipse IDE, M2_REPO classpath variable gets added –> pointing to default locations (for example c:\Users\\.m2\repository) and this variable is non-modifiable. However, if we are using older version of Eclipse, then we need to add M2_REPO manually to Eclipse.

    Steps to add M2_REPO

    1. Open Eclipse IDE, select Window ->Preferences ->Java ->Classpath Variables

    2. Click on New Button. Add below mentioned information:-

    Name – M2_REPO

    Path – Path where M2 file places in your system

    Eg – C:\Users\SingVi04\.m2\repository

    Note:- I have already added M2_REPO, so we can see an error message – Variable name already exists.

    3. Verify that M2_REPO add – You can check new Classpath variable M2_REPO is added under BuildPath ->Classpath Variables

    How to get all the values from a Dynamic Table in Selenium WebDriver

    
    import org.openqa.selenium.By;
    import org.openqa.selenium.WebDriver;
    import org.openqa.selenium.chrome.ChromeDriver;
    
    import java.util.List;
    import java.util.concurrent.TimeUnit;
    
    public class TableDemo {
    
        public static void main(String[] args) {
    
            System.setProperty("webdriver.chrome.driver","C:\\Users\\Vibha\\Automation\\Chrome\\chromedriver\\chromedriver.exe");
    
            WebDriver driver = new ChromeDriver();
            driver.get("https://www.techlistic.com/p/demo-selenium-practice.html");
    
            driver.manage().window().maximize();
             driver.manage().timeouts().implicitlyWait(15, TimeUnit.SECONDS);
    
            // To find no of columns
            List ColumnList = driver.findElements(By.xpath("//*[@id='customers']/tbody/tr/th"));
            System.out.println("No of Columns are :"+ColumnList.size());
    
            //To find no of Rows, first row is heading
            List RowList = driver.findElements(By.xpath("//*[@id='customers']/tbody/tr"));
            System.out.println("No of Rows are :"+RowList.size());
            driver.close();
        }
    
    }


    1. findElements command returns a list of ALL the elements matching the specified locator.
    2. The count of columns is found using XPath – (“//*[@id=’customers’]/tbody/tr/th”)
    3. The count of rows is found using XPath – (“//*[@id=’customers’]/tbody/tr”)

    How to get all the values from a Dynamic Table

    In the above table, there are 3 columns and 7 rows, and we want to get the data from each cell. First row is heading, so we want to find the data of 6 rows only.

      import org.openqa.selenium.By;
      import org.openqa.selenium.WebDriver;
      import org.openqa.selenium.chrome.ChromeDriver;
      import java.util.concurrent.TimeUnit;
      
      public class DynamicTable_DataExtract {
      
          public static void main(String[] args) {
      
              System.setProperty("webdriver.chrome.driver","C:\\Users\\Vibha\\Automation\\Chrome\\chromedriver\\chromedriver.exe");
      
              WebDriver driver = new ChromeDriver();
              driver.get("https://www.techlistic.com/p/demo-selenium-practice.html");
      
              driver.manage().window().maximize();
              driver.manage().timeouts().implicitlyWait(15, TimeUnit.SECONDS);
      
              //Get number of rows In table.
              int Row_Count = driver.findElements(By.xpath("//*[@id='customers']/tbody/tr")).size();
              System.out.println("No of Rows are :"+Row_Count);
      
              //Get number of columns In table.
              int Column_Count = driver.findElements(By.xpath("//*[@id='customers']/tbody/tr/th")).size();
              System.out.println("No of Columns are :"+Column_Count);
      
              //divided xpath In three parts to pass Row_count and Col_count values.
              String first_part = "//*[@id='customers']/tbody/tr[";
              String second_part = "]/td[";
              String third_part = "]";
      
      
              //Used for loop for number of rows.
              for (int i=2; i<=Row_Count; i++){
      
                  //Used for loop for number of columns.
                  for(int j=1; j<=Column_Count; j++){
      
                      //Prepared final xpath of specific cell as per values of i and j.
                      String final_xpath = first_part+i+second_part+j+third_part;
      
                      //Will retrieve value from located cell and print It.
                      String Table_data = driver.findElement(By.xpath(final_xpath)).getText();
                      System.out.print(Table_data +" ");
                  }
      
                  System.out.println("");
                  System.out.println("---------------------------------");
              }
      
             driver.close();
          }
      }
      

      How to handle Dynamic Web Tables using Selenium WebDriver


      In this blog we will discuss about automating dynamic web tables using Selenium WebDriver. Table is also a type of Web Element like checkbox, Radio Button, etc.

      Table is a kind of web element, which is displayed, with the help of  tag in conjunction with the <tr> tag defines the row of the table and <th> tag tag for headings which defines heading of the table.

      There are 2 types of HTML table

      1. Static Table – Where number of rows and columns are fixed.
      2. Dynamic Table – Where number of rows and columns are not fixed.

      Below table is a Dynamic table. Based on input Assignee filter, the number of rows get altered. 

      How to locate Web Table Elements

      1) Open Chrome browser and go to – https://www.seleniumeasy.com/test/table-search-filter-demo.html

      2) Take a note that “Element” tab is the one which displays all the HTML properties belonging to the current web page. Navigate to the “Element” tab if it is not opened by default on the launch.

      3) In the screenshot, we can see the HTML code of Task web element of the table. Right click on this text and select Copy and then again click where will see options like – Copy Selector, Copy XPath, Copy full XPath.

      Copy XPath
      //*[@id="task-table"]/thead/tr/th[2]
      
      Copy full XPath
      /html/body/div[2]/div/div[2]/div[1]/div/table/thead/tr/th[2]
      
      Copy Selector
      #task-table > thead > tr > th:nth-child(2)


      How to find full XPath of Web Table

      If we divide this xpath  – /html/body/div[2]/div/div[2]/div[1]/div/table/thead/tr/th[2] into three different parts it will be like this

      ·         Part 1 – Location of the table in the webpage /html/body/div[2]/div/div[2]/div[1]/div />

      ·         Part 2 – Table body (data) starts from here

      ·         Part 3 – It says table row 1 and table head 2

      In the below image, we can see that the highlighted tags are used to create absolute XPath – html/body/div[2]/div/div[2]/div[1]/div/table/thead/tr/th[2]

      If we want to create a relative XPath, then the below image shows that find a unique identifier like id=’task-table’ and then create Relative XPath

      //*[@id="task-table"]/thead/tr/th[2]
      

      Below is an example, which will show how to fetch a particular cell data in Dynamic Web Table. We want to fetch the data from row 5 and column 3 and row 6  column 2. We have used Relative XPath as well as absolute XPath to fetch the data.

      import org.openqa.selenium.By;
      import org.openqa.selenium.WebDriver;
      import org.openqa.selenium.chrome.ChromeDriver;
      public class DynamicTable_RowData {
              public static void main(String[] args) {
       System.setProperty("webdriver.chrome.driver","C:\\Users\\Vibha\\Desktop\\Drivers\\chromedriver_win32\\chromedriver.exe");
      
              WebDriver driver = new ChromeDriver();      
              driver.manage().window().maximize();
              driver.get("https://www.seleniumeasy.com/test/table-search-filter-demo.html");           
              
      String CellData1 = driver.findElement(By.xpath("//*[@id='task-table']/tbody/tr[5]/td[3]")).getText();
              System.out.println("Data in 5th row and 3rd column :"+CellData1);
      
                 String CellData2 = driver.findElement(By.xpath("/html/body/div[2]/div/div[2]/div[1]/div/table/tbody/tr[6]/td[2]")).getText();
              System.out.println("Data in 6th row and 2nd column :"+CellData2);
              driver.close();
              }
      }
      
      Output
      Data in 5th row and 3rd column :Holden Charles
      Data in 6th row and 2nd column :Browser Issues
      

      How to Locate Elements in Chrome, Firefox and IE Browsers for creating Selenium Scripts

      HOME

      In my previous tutorials, we have discussed about various types of locators available in Selenium WebDriver, which are used to identify various web elements on a web page. Some of the locators widely used are Id, ClassName, Name, LinkText, PartialLinkText, XPath, CSS Selector and so on. In this blog, will study the mechanism to locate web elements on Google Chrome, Firefox and Internet Explorer.

      Google Chrome

      1. First step is to launch the Chrome Browser with desired URL. Here, we have launched Chrome browser and accessed Facebook page. I want to find the locator of Email or Phone textbox, so I will click on that textbox, right click, and click on “Inspect”.

      2. Take a note that “Element” tab highlighted in the screenshot. Thus, element tab is the one, which displays all the HTML properties belonging to the current web page. Navigate to the “Element” tab if it is not open by default on the launch.

      3.  In the screenshot, we can see the HTML code of Email or Phone Textbox. Right click on this text and then again click on Copy where will see options like – Copy Selector, Copy XPath, Copy full XPath

      Copy Selector will tell the CSS Selector path of the WebElement

      #email
      

      Copy XPath will tell the Xpath of the WebElement

      //*[@id="email"]
      

      Copy full XPath will tell the absolute path of the WebElement

      /html/body/div[1]/div[2]/div/div/div/div/div[2]/form/table/tbody/tr[2]/td[1]/input
      

      Firstly, we should instantiate a Chrome/Chromium session by doing the following:

      import org.openqa.selenium.WebDriver;
      import org.openqa.selenium.chrome.ChromeDriver;
               
      WebDriver driver = new ChromeDriver();
      

      Set the path to the chromedriver

      executableSystem.setProperty("webdriver.chrome.driver","C:\\Users\\Vibha\\Desktop\\Automation\\Drivers\\chromedriver_win32\\chromedriver.exe");
      

      The chromedriver is implement as a WebDriver remote server that instructs the browser what to do by exposing Chrome’s internal automation proxy interface.

      Firefox

      1.   First step is to launch the Firefox Browser with desired URL, ie Facebook. I want to find the locator of Email or Phone textbox, so I will click on that textbox and right click and click on “Inspect Element (Q)”.

      2.  Take a note that “Inspector” tab is highlight in the screenshot. Thus, element tab is the one, which displays all the HTML properties belonging to the current web page. Navigate to the “Inspector” tab if it is not open by default on the launch.  

      3. In the screenshot, we can see the HTML code of Email or Phone Textbox. Right click on this text and then again click on Copy where will see options like – Copy CSS Selector, Copy XPath, Copy CSS Path

      Copy CSS Path will tell the CSS path of the WebElement

      html#facebook body.fbIndex.UIPage_LoggedOut._-kb._605a.b_c3pyn-ahh.gecko.win.x1.Locale_en_GB.cores-gte4._19_u.hasAXNavMenubar div#u_0_e._li div#pagelet_bluebar div#blueBarDOMInspector div._53jh div.loggedout_menubar_container div.clearfix.loggedout_menubar div.menu_login_container.rfloat._ohf form#login_form table tbody tr td input#email.inputtext.login_form_input_box
      

      Copy Selector will tell the CSS Selector path of the WebElement

      #email
      

      Copy XPath will tell the Xpath of the WebElement

      //*[@id="email"]
      
      System.setProperty("webdriver.gecko.driver","C:\\Users\\Vibha\\Desktop\\Drivers\\geckodriver-v0.26.0-win64\\geckodriver.exe");
      WebDriver driver = new FirefoxDriver();
      

      Internet Explorer

            1.   First step is to launch the Firefox Browser with desired URL. Here, we have launched Firefox browser and accessed Facebook page. I want to find the locator of Email or Phone textbox, so I will click on that textbox, right click, and click on “Inspect Element”.

            2.   Take a note that “DOM Explorer” tab is highlight in the screenshot. Thus, element tab is the one, which displays all the HTML properties belonging to the current web page. Navigate to the “DOM Explorer” tab if it is not open by default on the launch.

      System.setProperty("webdriver.ie.driver","C:\\Users\\SingVi04\\Desktop\\Automation\\Drivers\\IEDriverServer_x64_3.150.1\\IEDriverServer.exe"); 
      WebDriver driver = new InternetExplorerDriver();


      How to create first Selenium WebDriver Script using Java

      We assume here that Selenium WebDriver is download and installed with Eclipse. If not, please refer this link

      In this tutorial, we will see how to create a simple Selenium WebDriver script using JAVA. The most important thing is that JAVA, Eclipse and Selenium WebDriver are already install in the machine. If not, then please refer the link – How to Download & Install Selenium WebDriver.

      To create our first Selenium WebDriver Script, we have to create a Java Project, Package and Class in Eclipse.

      1. Create a Java Project “AutomationSuite” – Click File ->New ->Other ->Project ->Java Project. Click Next.

      • Provide Package Name – here I have provided AutomationSuite 
      • JRE – Use an execution environment JRE: JavaSE-1.8 (This is the version of Java on your machine)
      • Project Layout – Create separate folders for source and class files

      ii. Create a package “SeleniumTutorial” – Right click Java Project (AutomationSuite) ->Click File ->New ->Package

      iii. Create a Java Class “FirstProgram” – Right click Java Package (SeleniumTutorial) ->Click File ->New ->Class

      • Name: Name of the class (FirstProgram)
      • Modifiers – Public
      • Which method stubs would you like to create – public static void main(String[] args) and click Finish

      Above displayed image explains the structure of Project in Eclipse.

      Add Selenium Jar files to the Java Project


      1.  Right click on AutomationSuite and click on Properties.

      2.  Click on Java Build Path. Select Libraries. Click on – Add External JARs

      3.  Go to the path where Selenium WebDriver JAR folder was downloaded and select 2 JAR files – client-combined-3.141.59 and client-combined-3.141.59-sources and click on Open button.

      4. Similarly, go to Lib folder of Selenium file and select the entire JAR present there

      5. To verify that the JAR’s are added or not, click on Referenced Libraries and will see all these JARs are present here. For more details, refer the link

      Scenario:


      To open appropriate URL and verify the title of the home page
      Steps:
      i. Open Chrome browser
      ii. Go to the specified URL – http://www.google.com
      iii. Verify the title and print the output of the title
      iv. Close the Chrome browser

      import java.util.concurrent.TimeUnit;
      import org.openqa.selenium.chrome.ChromeDriver;
       
      public class FirstProgram {
             
           public static void main(String[] args) {
                     
       System.setProperty("webdriver.chrome.driver","C:\\Users\\vibha\\Downloads\\Drivers\\chromedriver_win32\\chromedriver.exe"");
      
               WebDriver driver = new ChromeDriver();
               driver.manage().timeouts().implicitlyWait(40, TimeUnit.SECONDS);
               driver.get("https://www.google.com/");
               String PageTiltle = driver.getTitle();
               System.out.println("Page Title :"+PageTiltle);
               driver.close();
           }
      }
      

      To run this program, go to Run->Run or Green Icon shown below