In Automation, it is advisable to take screenshots of failed test cases for further analysis and proof of failure. Selenium provides the capability to take screenshot. But, before we see how to capture Screenshot in Selenium, we need to add a dependency in the Maven project.
Recently Selenium has done some changes in recent version so if you are using Selenium 3.6.0 then you need to add below jar to project or if you are using then you can provide below dependency in project.
To capture a screenshot in Selenium, we can make use of an interface, called TakesScreenshot. This method indicates the driver, that it can capture a screenshot and store it in different ways
TakesScreenshot ts = (TakesScreenshot) driver;
In order to capture screenshot and store it in a particular location, there is a method called “getScreenshotAs“, where OutputType defines the output type for a screenshot.
In the previous tutorial, we have discussed about How to create dependency between Selenium Test Cases using TestNG. In this tutorial, we will see how we can group test cases using TestNG. TestNG allows us to group test methods which is not present in JUnit. We can declare the methods belong to groups as well as specify groups that contain other groups. To group test cases, we need to create testng.xml.
Multiple tags are used in a sequence to build a working testNG xml like , and
1. First is tag, which holds a logical name which defines full information to TestNG reported to generate execution report. 2. Second is , which is a logical name which holds the information of test execution report like pass, fail, skip test cases and other information like total time for execution and group info 3. Third is , where TestNGDemo is the package used, and Test Class name is TestNGGroupDemo. 4. Fourth is , where “e2etest” is the name of the method we want to execute.
<?xml version = "1.0"encoding = "UTF-8"?>
<!DOCTYPE suite SYSTEM "http://testng.org/testng-1.0.dtd">
<suite name = "Suite1">
  <test name = "Test Demo">
      <groups>
         <run>
              <include name = "e2etest"/>
          </run>
        </groups>
    <classes>
          <class name = "TestNGGroupDemo"/>
     </classes>
   </test>
</suite>
To Run the TestNG program, right click on the testng.xml and select Run As-> TestNG Suite (in case of Eclipse) and Run testng.xml (in case of IntelliJ).
In below example, we have shown the syntax of how to use groups in the XML file. @Test(groups = { “e2etest”, “integerationtest” }) .
Below is the sample code.
import org.testng.annotations.Test;

public class TestNGGroupDemo {

	@Test(alwaysRun = true, groups = { "e2etest", "integerationtest" })
	public void testPrintMessage() {
		System.out.println("This method is run by both e2e and integeration test");
	}

	@Test(alwaysRun = true, groups = { "e2etest" })
	public void testE2EMessage() {
		System.out.println("This method is run by e2e test");
	}

	@Test(alwaysRun = true, groups = { "integerationtest" })
	public void testingIntegrationMessage() {
		System.out.println("This method is run by integeration test");
	}

	@Test(alwaysRun = true, groups = { "acceptancetest" })
	public void testingAcceptanceMessage() {
		System.out.println("This method is run by Acceptance test");
	}

	@Test(alwaysRun = true, groups = { "e2etest", "acceptancetest" })
	public void testE2EAndAcceptanceMessage() {
		System.out.println("This method is run by both e2e and acceptance test");
	}

	@Test(alwaysRun = true, groups = { "e2etest", "integerationtest", "acceptancetest" })
	public void testE2EAndAcceptanceAndIntegrationMessage() {
		System.out.println("This method is run by e2e, integration and acceptance test");
	}

}

Output
[RemoteTestNG] detected TestNG version 7.4.0
This method is run by e2e, integration and acceptance test
This method is run by both e2e and acceptance test
This method is run by e2e test
This method is run by both e2e and integeration test

===============================================
Suite
Total tests run: 4, Passes: 4, Failures: 0, Skips: 0
===============================================
The output of the above program is
The result will look like something shown below. Here, we can see that Test Case Passed is 4, Failed 0 and Skipped 0.
To view the report, go to the Eclipse folder and you can see a folder with name test-output inside the Project where we have created TestNG class. Here, it is C:\Users\vibha\eclipse-workspace\Demo\test-output
Groups of Groups
Groups can also include other groups. These groups are called “MetaGroups”. TestNG provides the flexibility of providing groups inside another group and running them according to your needs. Let’s create a group inside a group in our XML file.
Here, I have created a created a new group with the name ‘SuperGroup‘ and included our group “acceptancetest” into it. Then we called the newly created group (SuperGroup) for execution by including it in the run tag. The output will be like this:
<?xml version="1.0" encoding="UTF-8"?>
<!DOCTYPE suite SYSTEM "https://testng.org/testng-1.0.dtd">
<suite name="Suite">
   <test name = "Test Demo">
       <groups>
        	<define name = "SuperGroup">
   			   <include name = "acceptancetest"></include>
   		</define>
          <run>
              <include name = "SuperGroup"/>
          </run>
        </groups>
    <classes>
      <class name="TestNGGroupDemo"/>
    </classes>
  </test> <!-- Test -->
</suite> <!-- Suite -->
The output of the above program is
Lets, add another group “e2etest” to SuperGroup. In this case, we will see all the tests marked with “e2etest” and “acceptancetest“.
<?xml version="1.0" encoding="UTF-8"?>
<!DOCTYPE suite SYSTEM "https://testng.org/testng-1.0.dtd">
<suite name="Suite">
   <test name = "Test Demo">
       <groups>
        	<define name = "SuperGroup">
   			   <include name = "acceptancetest"></include>
   			    <include name = "e2etest"></include>
   		</define>
          <run>
              <include name = "SuperGroup"/>
          </run>
        </groups>
    <classes>
      <class name="TestNGGroupDemo"/>
    </classes>
  </test> <!-- Test -->
</suite> <!-- Suite -->
The output of the above program is
We are done! Congratulations on making it through this tutorial and hope you found it useful! Happy Learning!!
As the software development process changes from waterfall to Agile methodology, it becomes essential to use automation for testing. The reason is now there are frequent productions, so to perform regression testing, it is advisable to use automation. Automation testing means using an automation tool to execute the test scripts. This reduces human intervention, which results in avoiding any human error as well as reduces the test execution time. Automation testing is preferable for those test scripts which are executed repeatedly and execution is time-consuming. Saying this, one should keep in mind that we can’t automate everything. The ideal scenario is to automate that part whose ROI (Return on Investment) is higher in terms of automation.
What is Selenium??
Firstly, Selenium is not a single automation tool like QTP, but it is basically a suite of software or a set of JAR files to automate web browsers across various browsers. Selenium is used by many companies, but a few to mention are Netflix, Google, HubSpot, Fitbit, and more.
Selenium Packages
Selenium IDE (Integrated Development Environment) – It is an add-on feature on Mozilla Firefox and Chrome. It is a playback and recording tool. You don’t need to know any language for using this tool.
Selenium RC (Selenium 1.0) – RC means Remote Control. Selenium RC was the main Selenium project for a long time before the WebDriver/Selenium merge brought up Selenium 2, the newest and more powerful tool. Selenium RC is a tool that allows you to write automated web application UI tests in any programming language against any HTTP website using any mainstream enabled JavaScript enabled browser.
Selenium Grid – Grid supports parallel execution, which means multiple test scripts can be executed at the same time on multiple browsers. Selenium Grid supports distributed test execution. So, it will speed up the test execution.
Selenium Grid follows Hub-node architecture. The Hub knows the configuration of each node connected to it. When the Hub receives the information that a test needs to be run along with browser and OS information, then it checks for the available node with the same combination and sends the Selenium command to that node.
Selenium WebDriver – This is the latest version of Selenium. In WebDriver, web elements are identified on a web browser and then actions are performed on these web elements. Selenium WebDriver supports the testing of dynamic pages where web elements change without reloading the page. WebDriver overcomes the problem of single host origin policy which is present in RC. There is a website that is using Selenium to run an asynchronous job in their flask webapp. For more detail, you can refer the website – ExamDeewana.
What is a Single Host Origin Policy ??
This is an important aspect of the web application security model. As per this policy, a web browser allows scripts present on the first web page to access the data on the second web page, provided both the web pages have the same origin, which means the URI scheme, hostname, and port number are the same.
Why Selenium??
We know that there are a lot of automation tools in the market like QTP, RFT (Rational Functional Tester), and so on, then why Selenium is so famous.
1) Open Source – Selenium is an open-source tool, which means no associated cost of licensing. So, it is very cost-effective in the terms of automating the testing.
2) Supports multiple languages, browsers, and Operating systems – Selenium supports multiple languages like Python, Pearl, Ruby, .Net, Java, C#, and PHP. You do need not to know multiple languages to start using Selenium. You should be proficient in any one of the above-mentioned languages and good to go. One of the most important features is that you do need not create the test script in the same language in which the web application is created. Suppose a web application is developed using JavaScript, but we can use any of the above mentioned languages to create Selenium test cases. Selenium supports a range of browsers like Google Chrome, IE, Mozilla, Opera, Microsoft Edge, Safari, and Html Driver. It also supports different operating systems such as Windows, MAC, Linux, Android, iOS.
3) Supports Parallel and Cross Browser Testing – Selenium supports parallel test execution. That means we can open multiple browsers at the same time and execute the test cases. This decrease the execution time significantly. Selenium supports Cross browser test execution. This refers to the fact that we can open different browsers like IE and Chrome and execute the same test cases or different test cases at the same time. This increases the coverage of test execution
4) Supports Integration with DevOps, and Continuous Integration flow – Selenium can be easily integrated with various third-party tools like Jenkins, Maven, TestNG, JUnit, and Git.
4.1Jenkins – Jenkins is a continuous integration tool and can be integrated with Selenium. Jenkins is used for automatic test execution. That means whenever there is any change in software, Jenkins allows you to run the tests every time and deploy the changes to a new environment when the tests pass. Jenkins is also used for scheduling the tests to run at a specific time. 4.2 Maven – Maven is a build management tool, based on the concept of Page Object Model (POM). It is used to define the structure of the project, dependencies, and build and test management. POM.xml file contains information about the version of web driver. It automatically downloads the necessary files from the repository to the local repository. 4.3TestNG – TestNG is an open-source automation testing framework. It helps to group and prioritize the test scripts and support data parameterization and reporting features. 4.4Git– Git is an open-source version control system. It allows committing the work locally and then syncing the local copy of the repository with a copy of the server.
5) Framework Compatibility – Selenium supports various test automation frameworks like Data Driven, Keyword, or Hybrid. Users can select any type of framework depending on the project requirement. Selenium has lots of methods to locate the elements in a webpage such as DOM, CSS, XPath, and so on. It can also be used to test web applications that use JavaScript and AJAX technologies.
6) Supports mobile Testing – Selenium doesn’t perform mobile testing. But it supports mobile testing with the help of additional software like Selendroid and Appium. This software is based on Selenium, so anyone who is well-versed in selenium can apply the same principles for mobile app testing.
7) Supports Database Testing – Selenium WebDriver in itself can’t perform Database Testing, but this can be done by using WebDriver with JDBC (“Java Database Connectivity”) API. The API lets the user connect and interact with the data source and fetch the data with the help of automated queries.
8) System Compatibility – Internet Explorer(IE) and Google Chrome support both 32-bit and 64-bit versions, where you can download and use them based on your system requirement.
9) Selenium 4.0 – In Selenium 4.0, all the vendors like Google, Apple, Microsoft, and Firefox have their own drivers to work on Selenium. Selenium 4.0 supports Selenium Grid and Selenium WebDriver and stops using Selenium RC directly. Selenium Core is completely removed from the latest version of Selenium 3.0.
Like any other tool, Selenium also has some limitations, such as:-
1) Programming knowledge is needed – Selenium does not support codeless test automation. Testers need to know any one of the programming languages which are supported by selenium.
2) No Image Comparison – Selenium doesn’t support image comparison. To perform image comparison, selenium needs to be integrated with a third-party tool called – Sikuli
3) No Official Customer Service Support – It’s an open-source tool, so there is no official customer support team to address your issues. You can get support from tutorials, chat rooms, and online support, but not from product creators.
4) No Reporting facility – The lack of automation of report generation is one of the biggest disadvantages. But, there are third-party tools that overcome this problem like TestNG, JUnit, Extent Library, and Allure.
Architecture
WebDriver talks to a browser through a driver. Communication is two-way: WebDriver passes commands to the browser through the driver and receives information back via the same route. The driver is specific to the browser, such as ChromeDriver for Google’s Chrome/Chromium, GeckoDriver for Mozilla’s Firefox, etc. The driver runs on the same system as the browser.
In this tutorial, we will discuss how Selenium automation Tool can downloaded and installed on Window operating system
How to Download and Configure Selenium WebDriver
Java 11 is installed on the machine
Install the Latest Version of Eclipse
Install Selenium WebDriver
Download Third Party Browser Drivers like Mozilla GeckoDriver
1. Java 11 Installation in Windows 10
Verify that Java is installed on your machine or not. If not, then refer to this link to install Java 11 in Windows 10.
2. Download and Install Eclipse IDE
Eclipse IDE is a software that allows you to write your programs and test scripts in multiple programming languages (with Java being the most popular one). Verify that Eclipse is installed on your machine. If not, then follow this link to get the instructions to install Eclipse
3. Download Selenium WebDriver
Go to Selenium’s Official site – https://www.selenium.dev/downloads/. Scroll down to Selenium Client & WebDriver Language Bindings. We can see there are different languages of download links. We are using Selenium with Java, so will click on the Download link next to Java.
2. Selenium WebDriver JARs download in zip format.
3. Unzip the Selenium folder. It will have these files.
4. Install/Configure Selenium Webdriver
1. Open Eclipse IDE. Click on WorkBench. Once Eclipse IDE opens, go to File -> New -> Java Project
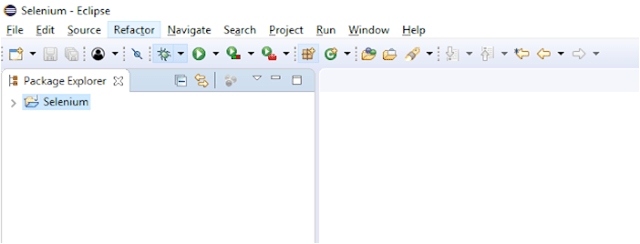
2. Create a Java project with the name – Selenium. You can give any name and click on the “Finish” button.
3. A Java class is created with the name Selenium, and it looks like this:-
5. Add Selenium JAR files to Eclipse IDE
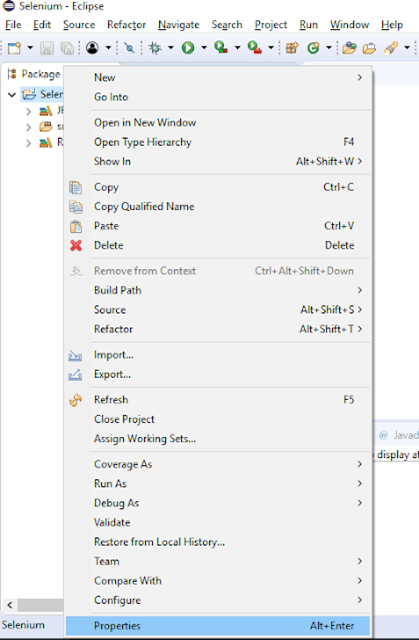
1. Right-click on Selenium and click on Properties
2. Click on Java Build Path. Select Libraries. Click on – Add External JARs. Add your all external jars such as selenium jars under the class path, not module path
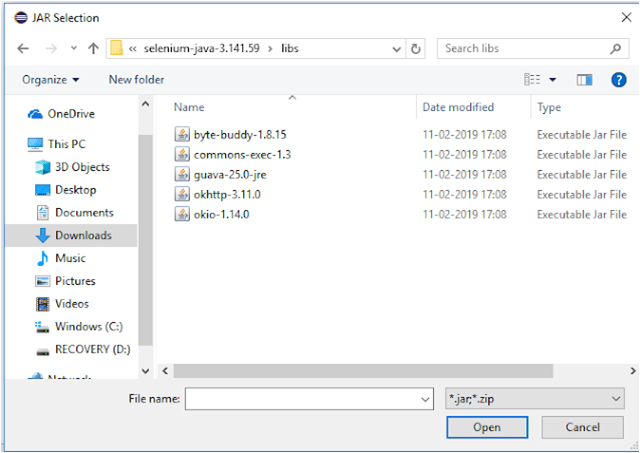
3. Go to the path where the Selenium WebDriver JAR folder was downloaded and select these 2 JAR files and click on the Open button.
4. Similarly, go to the Lib folder of the Selenium file and select the entire JAR present there.
5. Java Build Path looks like as shown in the below image.
6. Click on Referenced Libraries and will see all these JARs are present here.
6. Download Third Party Browser Drivers
Go to the Selenium Official site. Scroll down and go to Third Party Drivers, Bindings, and Plugins. We need to download the browser drivers which we want to use like Google Chrome Driver, Mozilla Firefox, and so on.


