Assertions are used to perform various kinds of validations in the tests and help us to decide whether the test has passed or failed.
In the below example, we have 3 assertions, but if the first assertion fails, then the test fails without checking for the rest of the two assertions.
  @Test
   public void verifyHardAssertion() {

      // Given
      given()

              // When
              .when()
              .get("https://reqres.in/api/users/2")

              // Then
              .then()

              // To verify the response body
              .body("data.email", equalTo("janet.weaver@reqres12.in"))
              .body("data.first_name", equalTo("Janet1"))
              .body("data.last_name", equalTo("Weaver"));

    }
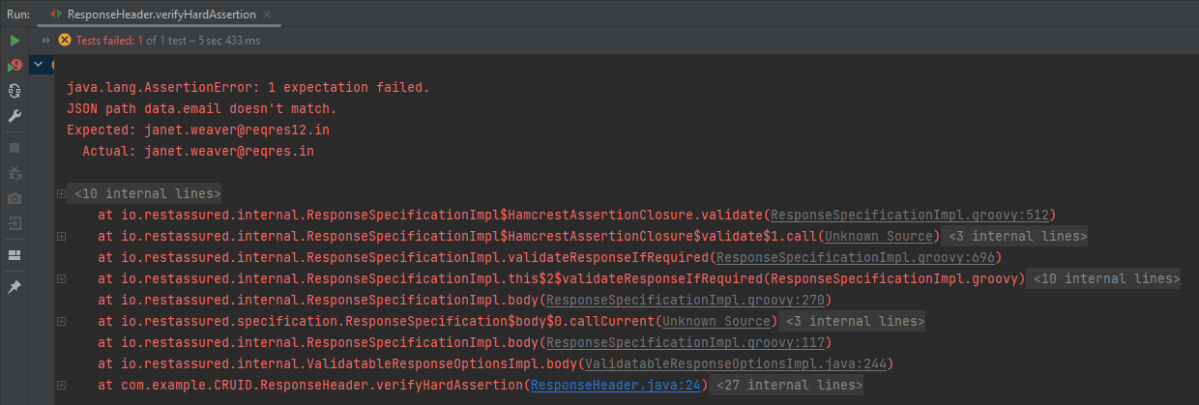
The output of the above program is
In the above example, email as well as first_name has incorrect data. But the assertion has checked email and as it has the incorrect data, it has failed the test without even checking for the rest two assertions.
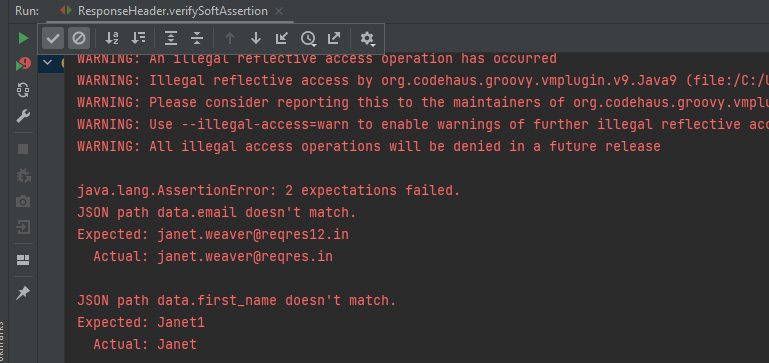
In the below example, the assertion will check all 3 and will print all the error messages. In .body() you need to specify all assertions separated by comma. The below code will validate all 3 assertions and then fail the test.
 @Test
  public void verifySoftAssertion() {

      // Given
      given()

              // When
              .when()
              .get("https://reqres.in/api/users/2")

              // Then
              .then()

              // To verify the response body
              .body("data.email", equalTo("janet.weaver@reqres12.in"),
                        "data.first_name", equalTo("Janet1"),
                        "data.last_name", equalTo("Weaver"));

    }
}
The output of the above program is
Congratulations on making it through this tutorial and hope you found it useful! Happy Learning!!
We can verify JSON response headers in Rest Assured. This is achieved with the help of the header method. Every response obtained from the server may contain zero or more headers that provide metadata about the response.
import org.junit.Test;
import static io.restassured.RestAssured.given;
import static org.hamcrest.CoreMatchers.containsString;

public class ResponseHeader {

    @Test
    public void verifyResponseHeader() {

      // Given
      given()

              // When
              .when()
              .get("https://reqres.in/api/users/2")

              // Then
              .then()
              .statusCode(200).statusLine("HTTP/1.1 200 OK")
              .log().all()
              .header("Content-Type" , "application/json; charset=utf-8")
              .header("Content-Encoding" , "gzip")
              .header("Server" , containsString("cloudflare"));

    }
}
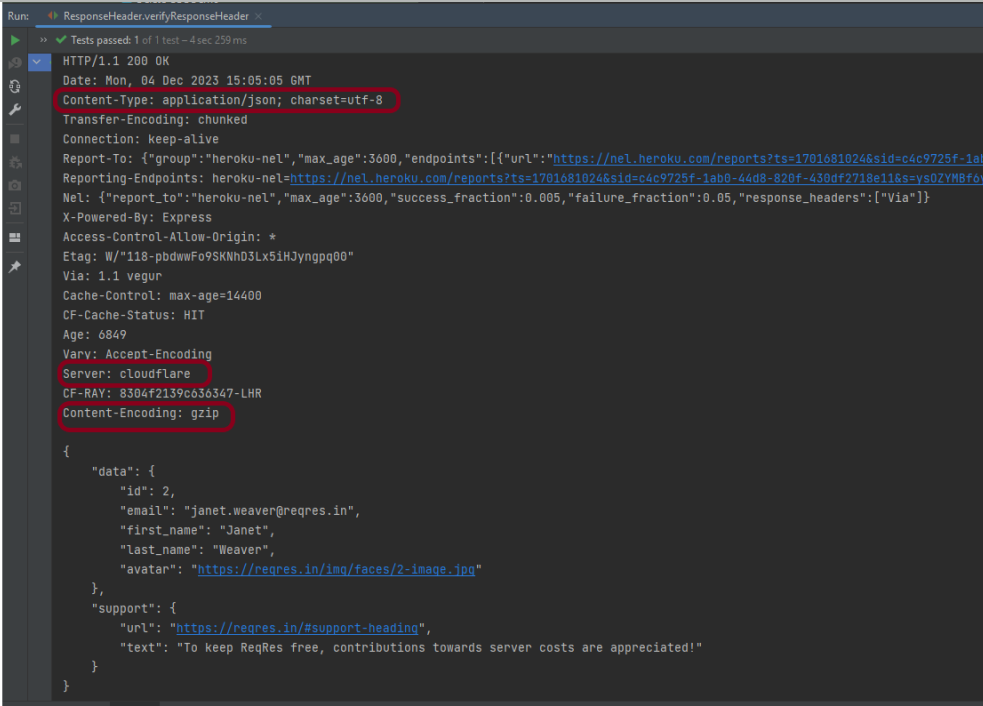
The output of the above program is
In the above example, we can verify the Content-Type, Server, and Content-Encoding using the header.
REST Assured provides a convenient way to retrieve and assert response time. Rest Assured provides a method to get response time in milliseconds by default or the time unit we want. We can also validate if the response time is less than, greater than, or in between the expected values as well.
Interface ResponseOptions
This interface contains four methods:-
getTime() – The response time in milliseconds (or -1 if no response time could be measured)
getTimeIn(TimeUnit timeunit) – The response time in the given time unit (or -1 if no response time could be measured)
time() – The response time in milliseconds (or -1 if no response time could be measured)
timeIn( TimeUnit timeunit ) – The response time in the given time unit (or -1 if no response time could be measured)
Technically, getTime() and time() both are the same, and getTimeIn() and timeIn() both are the same.
Below is an example.
import io.restassured.RestAssured;
import io.restassured.response.Response;
import io.restassured.specification.RequestSpecification;
import org.junit.Test;
import java.util.concurrent.TimeUnit;

public class ResponseTime {


    @Test
    public void getResponseTime() {

        RequestSpecification  requestSpecification = RestAssured.given();

        // Calling GET method
        Response response = requestSpecification.get("https://reqres.in/api/users/2");

        // Let's print response body.
        String resString = response.prettyPrint();
        System.out.println("Response Details : " + resString);

        //Get Response Time
        System.out.println("Response Time in milliseconds: " + response.getTime());

        System.out.println("Response Time in seconds: " + response.getTimeIn(TimeUnit.SECONDS));

        System.out.println("Response Time in milliseconds: " + response.time());

        System.out.println("Response Time in seconds: " + response.timeIn(TimeUnit.SECONDS));

    }

    }
The output of the above program is
Interface ValidatableResponseOptions
This interface has overloaded time() methods that accept Matcher.
time(Matcher matcher) – Validate that the response time (in milliseconds) matches the supplied matcher.
import org.hamcrest.Matchers;
import org.junit.Test;
import static io.restassured.RestAssured.given;

public class ResponseTime {

    @Test
    public void verifyResponseTime() {

        // Given
        given()

                // When
                .when()
                .get("https://reqres.in/api/users/2")

                // Then
                .then()
                .statusCode(200).statusLine("HTTP/1.1 200 OK")

                // Asserting response time is less than 2000 milliseconds
                .time(Matchers.lessThan(3000L));

    }
}
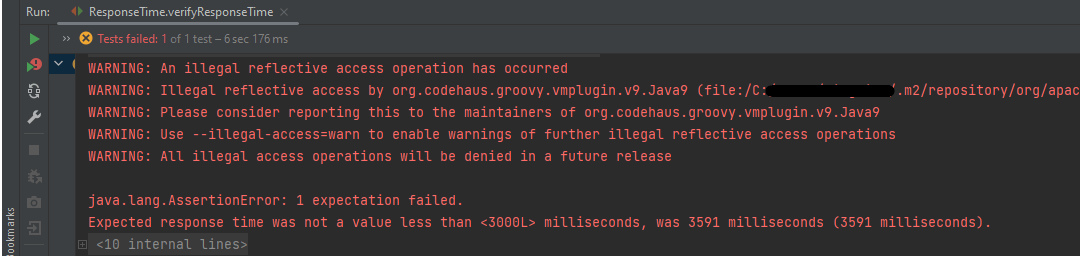
The output of the above program is
In the above example, we can see that the time taken by the request to provide the response is 3591 ms, which is greater than 3000 ms, so the test failed.
Similarly, we can use greaterthan() method too.
    @Test
    public void verifyGreaterResponseTime() {

        // Given
        given()

                // When
                .when()
                .get("https://reqres.in/api/users/2")

                // Then
                .then()
                .statusCode(200).statusLine("HTTP/1.1 200 OK")

                // Asserting response time is greater than 3000 milliseconds
                .time(Matchers.greaterThan(2000L));
    }
The output of the above program is
If you want to verify the time range, it can also be done using the Matchers. Below is an example of the same.
    @Test
    public void verifyResponseTimeRange() {

        // Given
        given()

                // When
                .when()
                .get("https://reqres.in/api/users/2")

                // Then
                .then()
                .statusCode(200).statusLine("HTTP/1.1 200 OK")

                // Asserting response time is greater than 1000 milliseconds and less than 2000 milliseconds
                .time(Matchers.both(Matchers.greaterThanOrEqualTo(1000L)).and(Matchers.lessThanOrEqualTo(2000L)));
    }
The output of the above program is
In the above example, the response time is 2550 ms, which does not fall in the range of 1000-2000 ms. So, the test is failed.
We are done! Congratulations on making it through this tutorial and hope you found it useful! Happy Learning!!
This tutorial explains how to use JAXB (Java Architecture for XML Binding) to convert Java Objects to XML documents.
JAXB provides a fast and convenient way to marshal (write) Java Objects into XML and un-marshal (read) XML into Java Objects. It supports a binding framework that maps XML elements and attributes to Java fields and properties using Java annotations.
With Java releases lower than Java 11, JAXB was part of the JVM and you could use it directly without defining additional libraries.
As of Java 11, JAXB is not part of the JRE anymore, and you need to configure the relevant libraries via your dependency management system, for example, either Maven or Gradle.
Configure the Java compiler level to be at least 11 and add the JAXB dependencies to your pom file.
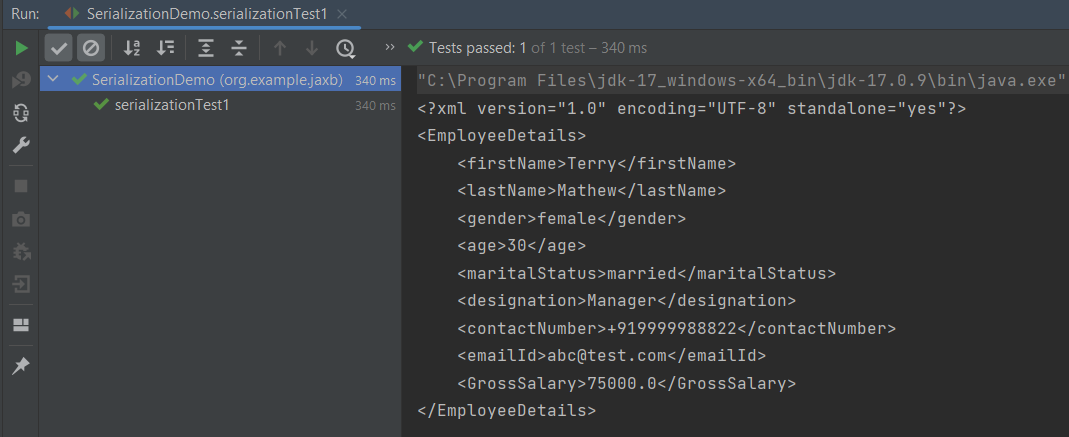
When we run the code above, we may check the console output to verify that we have successfully converted Java object to XML:
By default, the Marshaller uses UTF-8 encoding when generating XML data.
The javax.xml.bind.JAXBContext class provides a client’s entry point to JAXB API. By default, JAXB does not format the XML document. This saves space and prevents that any white-space may accidentally be interpreted as significant.
To have JAXB format the output, we simply set the Marshaller.JAXB_FORMATTED_OUTPUT property to true on the Marshaller. The marshal method uses an object and an output file where to store the generated XML as parameters.
You can see that we have used JAXB Annotations like @XMLRootElement are changed from Employee to EmployeeDetails.
@XMLElement has set the element name to GrossSalary from Salary.
The below example is the short way of writing the same test and saving XML. We need to add a constructor in the POJO class so that we can set the values to the variables through the Constructor.
import jakarta.xml.bind.annotation.*;

@XmlRootElement(name = "EmployeeDetails")
@XmlAccessorType(XmlAccessType.FIELD)

//Define the order in which the fields are written in XML
@XmlType(propOrder = { "firstName", "lastName", "gender", "age", "maritalStatus", "designation", "contactNumber",
        "emailId", "salary" })

public class Employee {

    private String firstName;
    private String lastName;
    private int age;

    @XmlElement(name = "GrossSalary")
    private double salary;
    private String designation;
    private String contactNumber;
    private String emailId;
    private String gender;
    private String maritalStatus;

    public Employee() {
        super();

    }

    public Employee(String firstName, String lastName, int age, double salary, String designation, String contactNumber,
                    String emailId, String gender, String maritalStatus) {

        this.firstName = firstName;
        this.lastName = lastName;
        this.age = age;


        this.salary = salary;

        this.designation = designation;
        this.contactNumber = contactNumber;
        this.emailId = emailId;
        this.gender = gender;
        this.maritalStatus = maritalStatus;
    }

    // Getter and setter methods
    public String getFirstName() {
        return firstName;
    }

    public void setFirstName(String firstName) {
        this.firstName = firstName;
    }

    public String getLastName() {
        return lastName;
    }

    public void setLastName(String lastName) {
        this.lastName = lastName;
    }

    public int getAge() {
        return age;
    }

    public void setAge(int age) {
        this.age = age;
    }

    public double getSalary() {
        return salary;
    }

    public void setSalary(double salary) {
        this.salary = salary;
    }

    public String getDesignation() {
        return designation;
    }

    public void setDesignation(String designation) {
        this.designation = designation;
    }

    public String getContactNumber() {
        return contactNumber;
    }

    public void setContactNumber(String contactNumber) {
        this.contactNumber = contactNumber;
    }

    public String getEmailId() {
        return emailId;
    }

    public void setEmailId(String emailId) {
        this.emailId = emailId;
    }

    public String getGender() {
        return gender;
    }

    public void setGender(String gender) {
        this.gender = gender;
    }

    public String getMaritalStatus() {
        return maritalStatus;
    }

    public void setMaritalStatus(String maritalStatus) {
        this.maritalStatus = maritalStatus;
    }

    @Override
    public String toString() {
        return "Employee [FirstName=" + firstName + ", LastName=" + lastName + ", Age=" + age + ", Salary=" + salary
                + ", Designation=" + designation + ", ContactNumber=" + contactNumber + ", EmailId=" + emailId
                + ", Gender=" + gender + ", MaritalStatus=" + maritalStatus + "]";
    }
}
The below JAXB example for XML marshalling convert Java objects into an XML.
import jakarta.xml.bind.JAXBContext;
import jakarta.xml.bind.JAXBException;
import jakarta.xml.bind.Marshaller;
import jakarta.xml.bind.PropertyException;
import org.junit.Test;
import java.io.File;
import java.io.StringWriter;

public class SerializationDemo {


    @Test
    public void serializationTest2() {

        try {

            Employee employee = new Employee("Thomas", "Pawsey", 35, 100000, "Director", "+919999988822","Test@test.com", "married", "female");

            // Create JAXB Context
            JAXBContext context = JAXBContext.newInstance(Employee.class);

            // Create Marshaller
            Marshaller jaxbMarshaller = context.createMarshaller();

            // Required formatting
            jaxbMarshaller.setProperty(Marshaller.JAXB_FORMATTED_OUTPUT, Boolean.TRUE);

            // Write XML to StringWriter
            StringWriter writer = new StringWriter();
            jaxbMarshaller.marshal(employee, writer);

            // Convert XML to String
            String xmlContent = writer.toString();
            System.out.println(xmlContent);

            // Save the file
            String userDir = System.getProperty("user.dir");
            jaxbMarshaller.marshal(employee, new File(userDir + "\\src\\test\\resources\\JAXB_XML.xml"));
            System.out.println("File is saved");

        } catch (PropertyException e) {
            e.printStackTrace();

        } catch (JAXBException e) {
            e.printStackTrace();
        }
    }
}
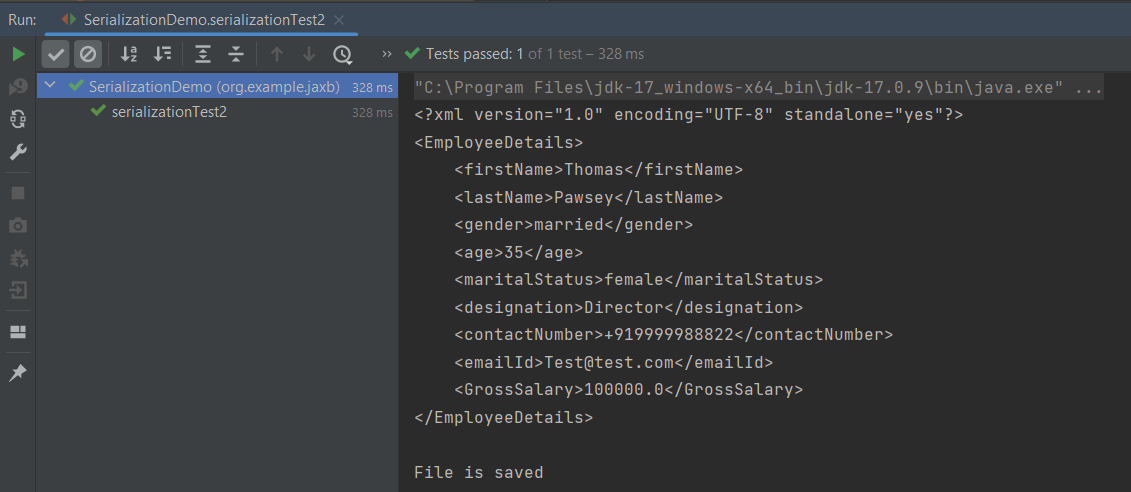
When we run the code above, we may check the console output to verify that we have successfully converted Java object to XML:
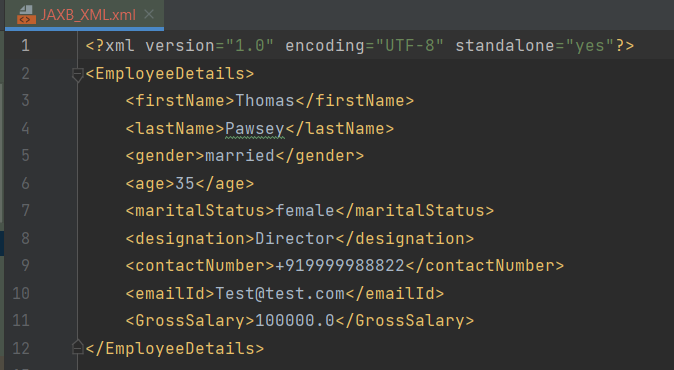
The XML is saved under src/test/resources. To see this file, after the execution of the test, you need to refresh the project.
Similarly, we can unmarshal an XML to Java Objects in the next tutorial.
We are done! Congratulations on making it through this tutorial and hope you found it useful! Happy Learning!!
The Jackson XML module adds some additional support for XML-specific features, just like JSON has some additional features. These annotations allow us to control the XML namespace and local name for elements, including the root element, whether a field is rendered in an element or as plain text, whether the content of an element is rendered in a CData wrapper, and whether a collection should use a wrapper element or not.
We need to add Jackson XML dependency to the project.
It is used to define the name of the root element used for the root-level object when serialized, which normally uses the name of the type (class). This can only adjust the Namespace and Local name – since the root element can never be serialized as an attribute.
Jackson allows us to read the contents of an XML file and deserialize the XML back into a Java object. In our example, we will read an XML document containing details about an Employee, and use Jackson to extract this data and use it to create Java objects containing the same information.
First, let us create an XML document matching our class to read from.
Create deserialize.xml with the following contents:
Deserialization – It is the reverse of serializing. In this process, we will read the Serialized byte stream from the file and convert it back into the Class instance representation. Here, we are converting a XML to an Employee class object.
Simple deserialized program
Let us add a deserializeFromXML() function to deserialize the XML file above into a Java object:
import com.fasterxml.jackson.core.exc.StreamReadException;
import com.fasterxml.jackson.databind.DatabindException;
import com.fasterxml.jackson.dataformat.xml.XmlMapper;
import org.example.simple.Employee;
import org.junit.Test;
import java.io.File;
import java.io.IOException;
public class DeserializeXMLTest {
@Test
public void deserializeFromXML() {
XmlMapper xmlMapper = new XmlMapper();
String userDir = System.getProperty("user.dir");
// Converting Employee XML to Employee class object
try {
Employee emp = xmlMapper.readValue(new File(userDir + "\\src\\test\\resources\\XMLExample.xml"),
Employee.class);
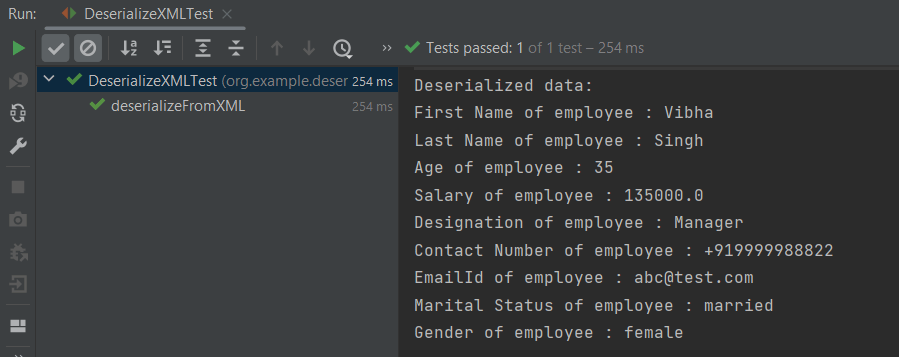
System.out.println("Deserialized data: ");
System.out.println("First Name of employee : " + emp.getFirstName());
System.out.println("Last Name of employee : " + emp.getLastName());
System.out.println("Age of employee : " + emp.getAge());
System.out.println("Salary of employee : " + emp.getSalary());
System.out.println("Designation of employee : " + emp.getDesignation());
System.out.println("Contact Number of employee : " + emp.getContactNumber());
System.out.println("EmailId of employee : " + emp.getEmailId());
System.out.println("Marital Status of employee : " + emp.getMaritalStatus());
System.out.println("Gender of employee : " + emp.getGender());
} catch (StreamReadException e) {
e.printStackTrace();
} catch (DatabindException e) {
e.printStackTrace();
} catch (IOException e) {
e.printStackTrace();
}
}
}
The output of the above program is shown below:
Manipulating Nested Elements in XML
Let us enhance our XML file to add nested elements and loops, and modify our code to deserialize the following updated structure.
The previous tutorials have explained the conversion of Java Objects to JSON payload and vice versa, i.e. conversion of JSON payload to Java Objects using Jackson API.
This tutorial explains parsing the XML document to Java objects using Jackson API.
To parse the above XML, we will use the Jackson library. Use the latest Jackson Library.
We will create an XML from POJO and vice versa now, which is generally called serialization and deserialization using Jackson APIs.
XmlMapper is a subclass of ObjectMapperwhich is used in JSON serialization. However, it adds some XML-specific tweaks to the parent class.
XmlMapper xmlMapper = new XmlMapper();
We can now look at how to use it to do the actual serialization. Let’s create a Java class first:
Below is the sample code of the Employee table, which contains the data members needed for Employee XML and their corresponding getter and setter methods.
public class Employee {
// Data members of POJO class
private String firstName;
private String lastName;
private int age;
private double salary;
private String designation;
private String contactNumber;
private String emailId;
private String gender;
private String maritalStatus;
// Getter and setter methods
public String getFirstName() {
return firstName;
}
public void setFirstName(String firstName) {
this.firstName = firstName;
}
public String getLastName() {
return lastName;
}
public void setLastName(String lastName) {
this.lastName = lastName;
}
public int getAge() {
return age;
}
public void setAge(int age) {
this.age = age;
}
public double getSalary() {
return salary;
}
public void setSalary(double salary) {
this.salary = salary;
}
public String getDesignation() {
return designation;
}
public void setDesignation(String designation) {
this.designation = designation;
}
public String getContactNumber() {
return contactNumber;
}
public void setContactNumber(String contactNumber) {
this.contactNumber = contactNumber;
}
public String getEmailId() {
return emailId;
}
public void setEmailId(String emailId) {
this.emailId = emailId;
}
public String getGender() {
return gender;
}
public void setGender(String gender) {
this.gender = gender;
}
public String getMaritalStatus() {
return maritalStatus;
}
public void setMaritalStatus(String maritalStatus) {
this.maritalStatus = maritalStatus;
}
}
Here, I have added JUnit4 dependency for the @Test annotation.
Writing XML is done using the various writeValue() methods that Jackson exposes.
import com.fasterxml.jackson.core.JsonProcessingException;
import com.fasterxml.jackson.dataformat.xml.XmlMapper;
import org.junit.Test;
public class EmployeeXMLTest {
@Test
public void serializationTest() {
// Create an object of POJO class
Employee employee = new Employee();
employee.setFirstName("Vibha");
employee.setLastName("Singh");
employee.setAge(35);
employee.setSalary(135000);
employee.setDesignation("Manager");
employee.setContactNumber("+919999988822");
employee.setEmailId("abc@test.com");
employee.setMaritalStatus("married");
employee.setGender("female");
// Converting a Java class object to XML
XmlMapper xmlMapper = new XmlMapper();
try {
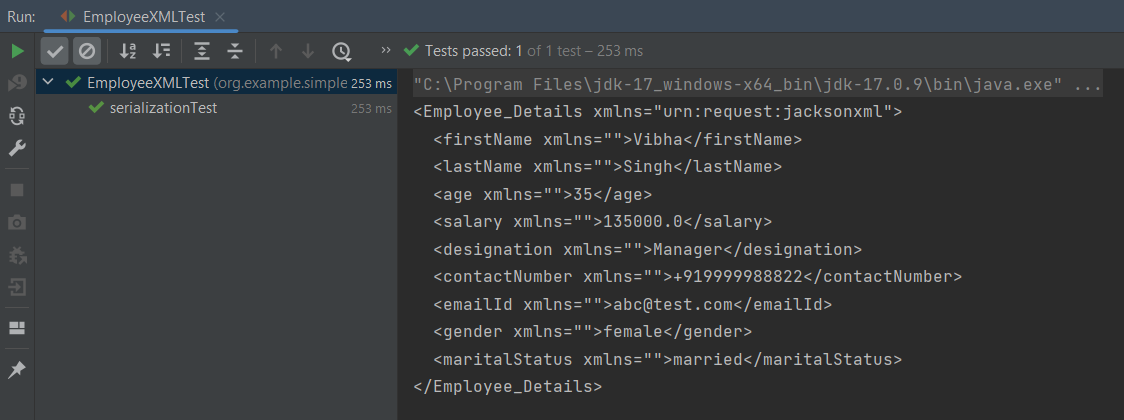
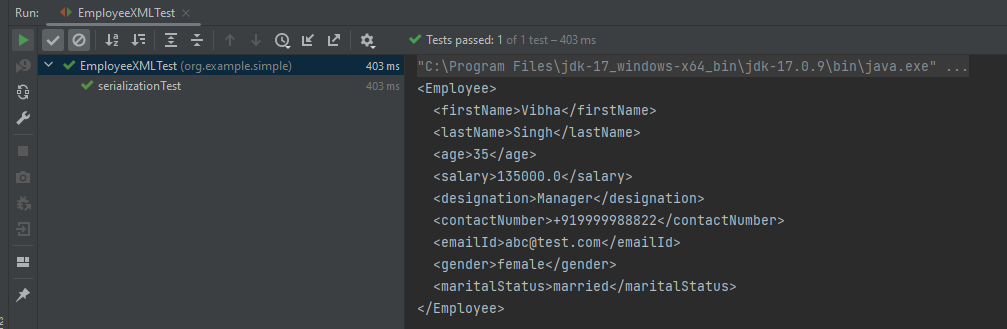
String employeeXml = xmlMapper.writerWithDefaultPrettyPrinter().writeValueAsString(employee);
System.out.println(employeeXml);
} catch (JsonProcessingException e) {
e.printStackTrace();
}
}
}
Here, In this new structure, we have introduced a nested nameelement as well as contactdetails element which is further nested to emergencyDetailselements. With our current code, we cannot extract or create the new nested section. So, along with creating a POJO class for Employees, will create a POJO class for name, contactDetails, and emergencyDetails.
Employees
public class Employees {

	Name name;
	ContactDetails contactdetails;

	private int age;
	private double salary;
	private String designation;
	private String emailId;
	private String gender;
	private String maritalStatus;

	// Getter and setter methods
	public Name getName() {
		return name;
	}

	public void setName(Name name) {
		this.name = name;
	}

	public ContactDetails getContactdetails() {
		return contactdetails;
	}

	public void setContactdetails(ContactDetails contactdetails) {
		this.contactdetails = contactdetails;
	}

	public int getAge() {
		return age;
	}

	public void setAge(int age) {
		this.age = age;
	}

	public double getSalary() {
		return salary;
	}

	public void setSalary(double salary) {
		this.salary = salary;
	}

	public String getDesignation() {
		return designation;
	}

	public void setDesignation(String designation) {
		this.designation = designation;
	}

	public String getEmailId() {
		return emailId;
	}

	public void setEmailId(String emailId) {
		this.emailId = emailId;
	}

	public String getGender() {
		return gender;
	}

	public void setGender(String gender) {
		this.gender = gender;
	}

	public String getMaritalStatus() {
		return maritalStatus;
	}

	public void setMaritalStatus(String maritalStatus) {
		this.maritalStatus = maritalStatus;
	}

}
Name
public class Name {

	private String firtsname;
	private String middlename;
	private String lastname;

	public String getFirtsname() {
		return firtsname;
	}

	public void setFirtsname(String firtsname) {
		this.firtsname = firtsname;
	}

	public String getMiddlename() {
		return middlename;
	}

	public void setMiddlename(String middlename) {
		this.middlename = middlename;
	}

	public String getLastname() {
		return lastname;
	}

	public void setLastname(String lastname) {
		this.lastname = lastname;
	}

}
ContactDetails-As you can see that EmergencyDetails element which contains emergency_no1, emergency_no2, and emergency_no3 are nested within ContactDetails, so we have created a separate POJO class for EmergencyDetails.
public class ContactDetails {

	private String deskNumber;
	private String mobileNumber;

	EmergencyDetails emergencyDetails;

	public EmergencyDetails getEmergencyDetails() {
		return emergencyDetails;
	}

	public void setEmergencyDetails(EmergencyDetails emergencyDetails) {
		this.emergencyDetails = emergencyDetails;
	}

	public String getDeskNumber() {
		return deskNumber;
	}

	public void setDeskNumber(String deskNumber) {
		this.deskNumber = deskNumber;
	}

	public String getMobileNumber() {
		return mobileNumber;
	}

	public void setMobileNumber(String mobileNumber) {
		this.mobileNumber = mobileNumber;
	}

}
EmergencyDetails
public class EmergencyDetails {

	private String emergency_no1;
	private String emergency_no2;
	private String emergency_no3;

	public String getEmergency_no1() {
		return emergency_no1;
	}

	public void setEmergency_no1(String emergency_no1) {
		this.emergency_no1 = emergency_no1;
	}

	public String getEmergency_no2() {
		return emergency_no2;
	}

	public void setEmergency_no2(String emergency_no2) {
		this.emergency_no2 = emergency_no2;
	}

	public String getEmergency_no3() {
		return emergency_no3;
	}

	public void setEmergency_no3(String emergency_no3) {
		this.emergency_no3 = emergency_no3;
	}

}
Next, we create our serializeToXML() method:
import com.fasterxml.jackson.core.JsonProcessingException;
import com.fasterxml.jackson.core.exc.StreamWriteException;
import com.fasterxml.jackson.databind.DatabindException;
import com.fasterxml.jackson.dataformat.xml.XmlMapper;
import org.junit.Test;
import java.io.File;
import java.io.IOException;
public class ComplexEmployeeXMLTest {
@Test
public void serializationXML() {
Employees employee = new Employees();
Name empname = new Name();
empname.setFirtsname("John");
empname.setMiddlename("Dave");
empname.setLastname("William");
employee.setName(empname);
employee.setAge(35);
employee.setSalary(1355000);
employee.setDesignation("Manager");
ContactDetails contdetails = new ContactDetails();
contdetails.setDeskNumber("00-428507");
contdetails.setMobileNumber("+917823561231");
EmergencyDetails emergency = new EmergencyDetails();
emergency.setEmergency_no1("+91 1212898920");
emergency.setEmergency_no2("+91 9997722123");
emergency.setEmergency_no3("+91 8023881245");
contdetails.setEmergencyDetails(emergency);
employee.setContactdetails(contdetails);
employee.setEmailId("abc@test.com");
employee.setMaritalStatus("married");
employee.setGender("female");
XmlMapper xmlMapper = new XmlMapper();
try {
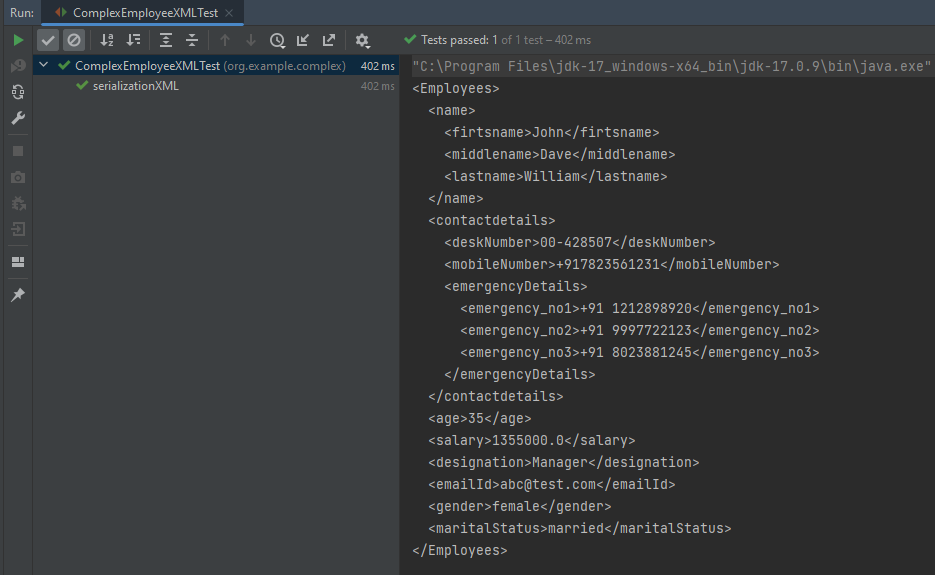
String employeeXml = xmlMapper.writerWithDefaultPrettyPrinter().writeValueAsString(employee);
System.out.println(employeeXml);
} catch (JsonProcessingException e) {
e.printStackTrace();
}
//To save the XML in a file and place under the project
String userDir = System.getProperty("user.dir");
try {
xmlMapper.writerWithDefaultPrettyPrinter()
.writeValue(new File(userDir + "\\src\\test\\resources\\NestedXMLExample.xml"), employee);
} catch (StreamWriteException e) {
e.printStackTrace();
} catch (DatabindException e) {
e.printStackTrace();
} catch (IOException e) {
e.printStackTrace();
}
}
}
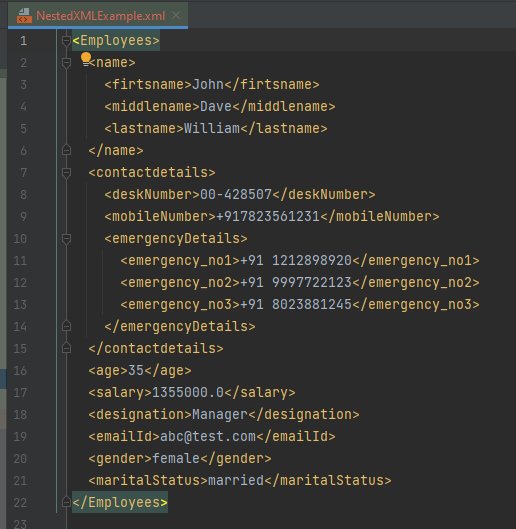
The output of the above program is
The file is saved under src/test/resources as NestedXMLExample.
Open the xml file and it contains the XML Request Body.
There is another way to do the same job of converting Java Object to a complex XML, but which looks more sophisticated and less a number of lines of code.
I’ll use the same complex XML structure.
In this method, we will create a default constructor as well as a parametrized Constructor to pass the arguments for each POJO Class.
Employees
public class Employees {

	Name name;
	ContactDetails contactdetails;

	private int age;
	private double salary;
	private String designation;
	private String emailId;
	private String gender;
	private String maritalStatus;

	public Employees() {
		super();
	}

	public Employees(Name name, ContactDetails contactdetails, int age, double salary, String designation,
			String emailId, String gender, String maritalStatus) {

		this.name = name;
		this.contactdetails = contactdetails;
		this.age = age;
		this.salary = salary;
		this.designation = designation;
		this.emailId = emailId;
		this.gender = gender;
		this.maritalStatus = maritalStatus;
	}

	// Getter and setter methods
	public Name getName() {
		return name;
	}

	public void setName(Name name) {
		this.name = name;
	}

	public ContactDetails getContactdetails() {
		return contactdetails;
	}

	public void setContactdetails(ContactDetails contactdetails) {
		this.contactdetails = contactdetails;
	}

	public int getAge() {
		return age;
	}

	public void setAge(int age) {
		this.age = age;
	}

	public double getSalary() {
		return salary;
	}

	public void setSalary(double salary) {
		this.salary = salary;
	}

	public String getDesignation() {
		return designation;
	}

	public void setDesignation(String designation) {
		this.designation = designation;
	}

	public String getEmailId() {
		return emailId;
	}

	public void setEmailId(String emailId) {
		this.emailId = emailId;
	}

	public String getGender() {
		return gender;
	}

	public void setGender(String gender) {
		this.gender = gender;
	}

	public String getMaritalStatus() {
		return maritalStatus;
	}

	public void setMaritalStatus(String maritalStatus) {
		this.maritalStatus = maritalStatus;
	}

}
Name
public class Name {

	private String firtsname;
	private String middlename;
	private String lastname;

	public Name() {
		super();
	}

	public Name(String firtsname, String middlename, String lastname) {
		super();
		this.firtsname = firtsname;
		this.middlename = middlename;
		this.lastname = lastname;
	}

	public String getFirtsname() {
		return firtsname;
	}

	public void setFirtsname(String firtsname) {
		this.firtsname = firtsname;
	}

	public String getMiddlename() {
		return middlename;
	}

	public void setMiddlename(String middlename) {
		this.middlename = middlename;
	}

	public String getLastname() {
		return lastname;
	}

	public void setLastname(String lastname) {
		this.lastname = lastname;
	}
}
ContactDetails
public class ContactDetails {

	private String deskNumber;
	private String mobileNumber;
	EmergencyDetails emergencyDetails;

	public ContactDetails() {
		super();
	}

	public ContactDetails(String deskNumber, String mobileNumber, EmergencyDetails emergencyDetails) {
		super();
		this.deskNumber = deskNumber;
		this.mobileNumber = mobileNumber;
		this.emergencyDetails = emergencyDetails;
	}

	public EmergencyDetails getEmergencyDetails() {
		return emergencyDetails;
	}

	public void setEmergencyDetails(EmergencyDetails emergencyDetails) {
		this.emergencyDetails = emergencyDetails;
	}

	public String getDeskNumber() {
		return deskNumber;
	}

	public void setDeskNumber(String deskNumber) {
		this.deskNumber = deskNumber;
	}

	public String getMobileNumber() {
		return mobileNumber;
	}

	public void setMobileNumber(String mobileNumber) {
		this.mobileNumber = mobileNumber;
	}
}
EmergencyDetails
public class EmergencyDetails {

	private String emergency_no1;
	private String emergency_no2;
	private String emergency_no3;

	public EmergencyDetails() {
		super();
	}

	public EmergencyDetails(String emergency_no1, String emergency_no2, String emergency_no3) {
		super();
		this.emergency_no1 = emergency_no1;
		this.emergency_no2 = emergency_no2;
		this.emergency_no3 = emergency_no3;
	}

	public String getEmergency_no1() {
		return emergency_no1;
	}

	public void setEmergency_no1(String emergency_no1) {
		this.emergency_no1 = emergency_no1;
	}

	public String getEmergency_no2() {
		return emergency_no2;
	}

	public void setEmergency_no2(String emergency_no2) {
		this.emergency_no2 = emergency_no2;
	}

	public String getEmergency_no3() {
		return emergency_no3;
	}

	public void setEmergency_no3(String emergency_no3) {
		this.emergency_no3 = emergency_no3;
	}
}
Now, let us create a Serialization Test.
import com.fasterxml.jackson.core.JsonProcessingException;
import com.fasterxml.jackson.dataformat.xml.XmlMapper;
import org.junit.Test;

import java.io.File;
import java.io.FileWriter;
import java.io.IOException;

public class XmlSerializationDemo2 {
    @Test
    public void serializationTest() {

        try {

            EmergencyDetails emergency = new EmergencyDetails("+91 894132345", "+91 8888221102", "+91 7223156288");
            ContactDetails contdetails = new ContactDetails("00-428507", "+917823561231", emergency);
            Name empname = new Name("Trina", "Sophia", "William");

            // Converting a Java class object to a XML
            XmlMapper xmlMapper = new XmlMapper();

            String xmlString = xmlMapper.writerWithDefaultPrettyPrinter().writeValueAsString(new Employees(empname,
                    contdetails, 35, 1450000.00, "Director", "trina@test.com", "female", "married"));
            System.out.println(xmlString);

            // write XML string to file
            String userDir = System.getProperty("user.dir");
            File xmlOutput = new File(userDir + "\\src\\test\\resources\\XMLExample.xml");
            FileWriter fileWriter = new FileWriter(xmlOutput);
            fileWriter.write(xmlString);
            fileWriter.close();

        } catch (JsonProcessingException e) {
            e.printStackTrace();
        } catch (IOException e) {
            e.printStackTrace();
        }
    }
}
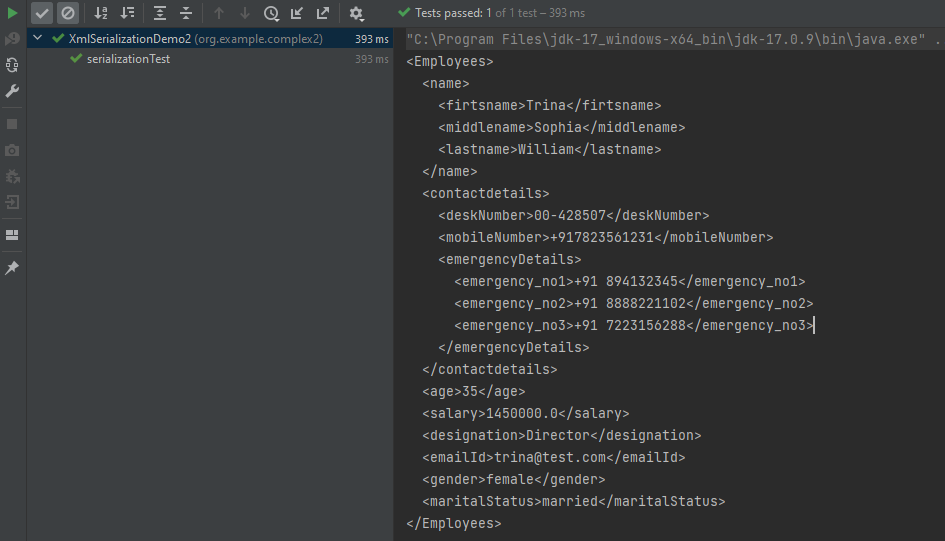
The output of the above program is
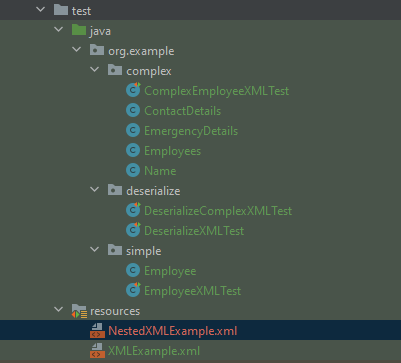
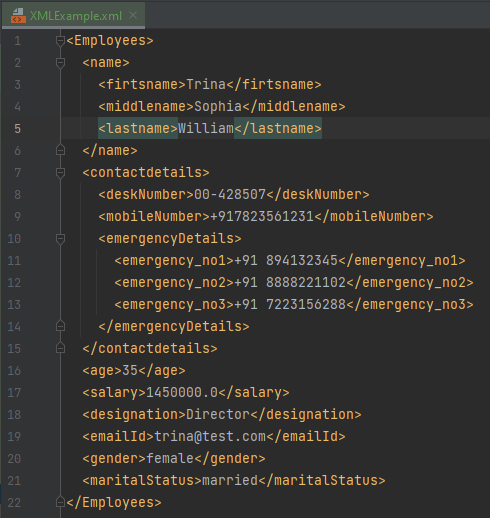
The newly created XML file is saved under src/test/resources as shown in the below image.
Open the xml file and it contains the XML Request Body.
We have successfully serialized our Java object into XML and written it into an XML file.
In our serializationTest() function, we create an XmlMapper object, which is a child class to the ObjectMapper class used in JSON serialization. This class converts our Java Object into an XML output that we can now write to a file.
Spring Boot is an open-source micro framework maintained by a company called Pivotal. It provides Java developers with a platform to get started with an auto-configurable production-grade Spring application. With it, developers can get started quickly without losing time on preparing and configuring their Spring application.
What is Cucumber?
A cucumber is a software tool that supports behavior-driven development (BDD). Cucumber can be defined as a testing framework, driven by plain English. It serves as documentation, automated tests, and development aid – all in one.
Dependency List
Springboot – 2.5.2
Cucumber – 6.10.4
Java 11
JUnit – 4.13.2
Maven – 3.8.1
RestAssured – 4.3.3
JUnit Vintage Engine (To run the tests through command line)
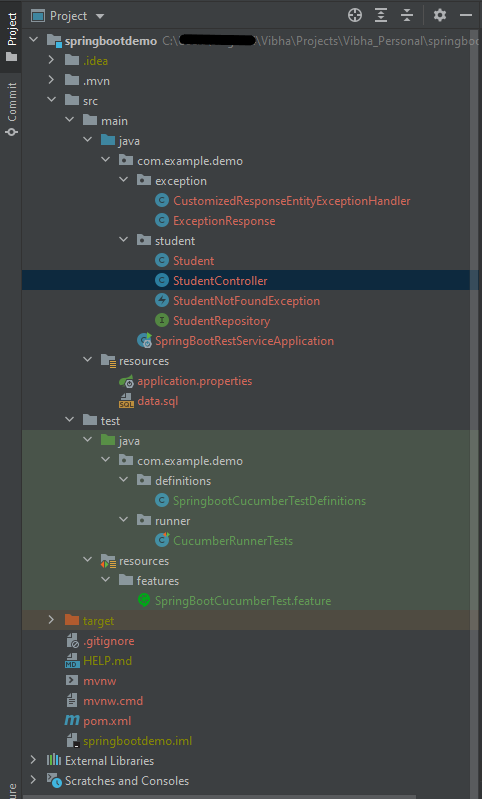
Below is the structure of a SpringBoot application project.
Below are various Java classes present in a SpringBoot REST Application.
SpringBootRestServiceApplication.java – The Spring Boot Application class is generated with Spring Initializer. This class acts as the launching point for the application.
pom.xml – This contains all the dependencies needed to build this project.
Student.java – This is JPA Entity for Student class
StudentRepository.java – This is JPA Repository for Student. This is created using Spring Data JpaRepository.
StudentController.java – Spring Rest Controller exposing all services on the student resource.
CustomizedExceptionHandler.java – This implements global exception handling and customizes the responses based on the exception type.
ErrorDetails.java – Response Bean to use when exceptions are thrown from API.
StudentNotFoundException.java – Exception thrown from resources when the student is not found.
data.sql – Data is loaded from data.sql into the Student table. Spring Boot would execute this script after the tables are created from the entities.
application.properties – Spring Boot automatically loads the application.properties whenever it starts up. You can de-reference values from the property file in the Java code through the environment.
We need the below files to create a SpringBoot Application.
Student.java
import javax.persistence.Entity;
import javax.persistence.GeneratedValue;
import javax.persistence.Id;
import javax.validation.constraints.NotBlank;
import javax.validation.constraints.NotNull;
import javax.validation.constraints.Size;

@Entity
public class Student {
    @Id
    @GeneratedValue
    private Long id;

    @NotNull
    @Size(min = 4, message = "Name should have atleast 4 characters")
    private String name;

    @NotBlank(message = "passportNumber is mandatory")
    private String passportNumber;

    public Student() {
        super();
    }

    public Student(Long id, String name, String passportNumber) {
        super();
        this.id = id;
        this.name = name;
        this.passportNumber = passportNumber;
    }

    public Long getId() {
        return id;
    }

    public void setId(Long id) {
        this.id = id;
    }

    public String getName() {
        return name;
    }

    public void setName(String name) {
        this.name = name;
    }

    public String getPassportNumber() {
        return passportNumber;
    }

    public void setPassportNumber(String passportNumber) {
        this.passportNumber = passportNumber;
    }
}
import org.springframework.boot.SpringApplication;
import org.springframework.boot.autoconfigure.SpringBootApplication;

@SpringBootApplication
public class SpringBootRestServiceApplication {

    public static void main(String[] args) {

        SpringApplication.run(SpringBootRestServiceApplication.class, args);
    }

}
application.properties
spring.jpa.defer-datasource-initialization=true
data.sql
insert into student values(10001,'Annie', 'E1234567');
insert into student values(10002,'John', 'A1234568');
insert into student values(10003,'David','C1232268');
Test Automation Framework Implementation
Step 1 – Add SpringbootTest, Rest-Assured, and Cucumber dependencies to the project
To Test a SpringBoot Application, we are using SpringBoot Test, JUnit, Cucumber, and Rest Assured. Below mentioned dependencies are added in POM.xml
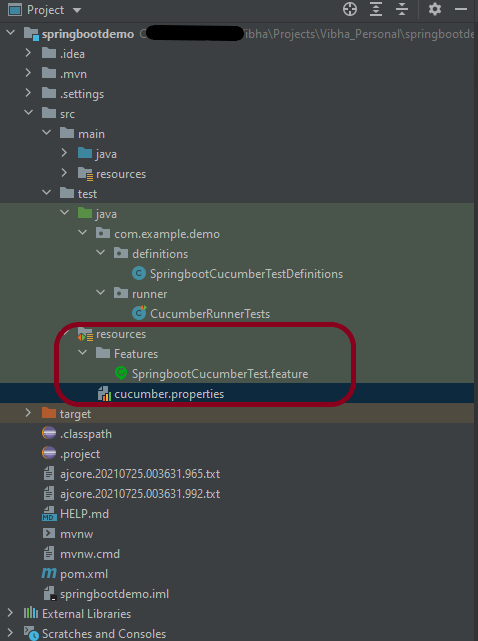
Step 2 – Create a directory src/test/resources and create a feature file under src/test/resources
By default, the Maven project has src/test/java directory only. Create a new directory under src/test with the name of resources. Create a folder name as Features within src/test/resources directory.
Create a feature file to test the Springboot application.
Below is a sample feature file.
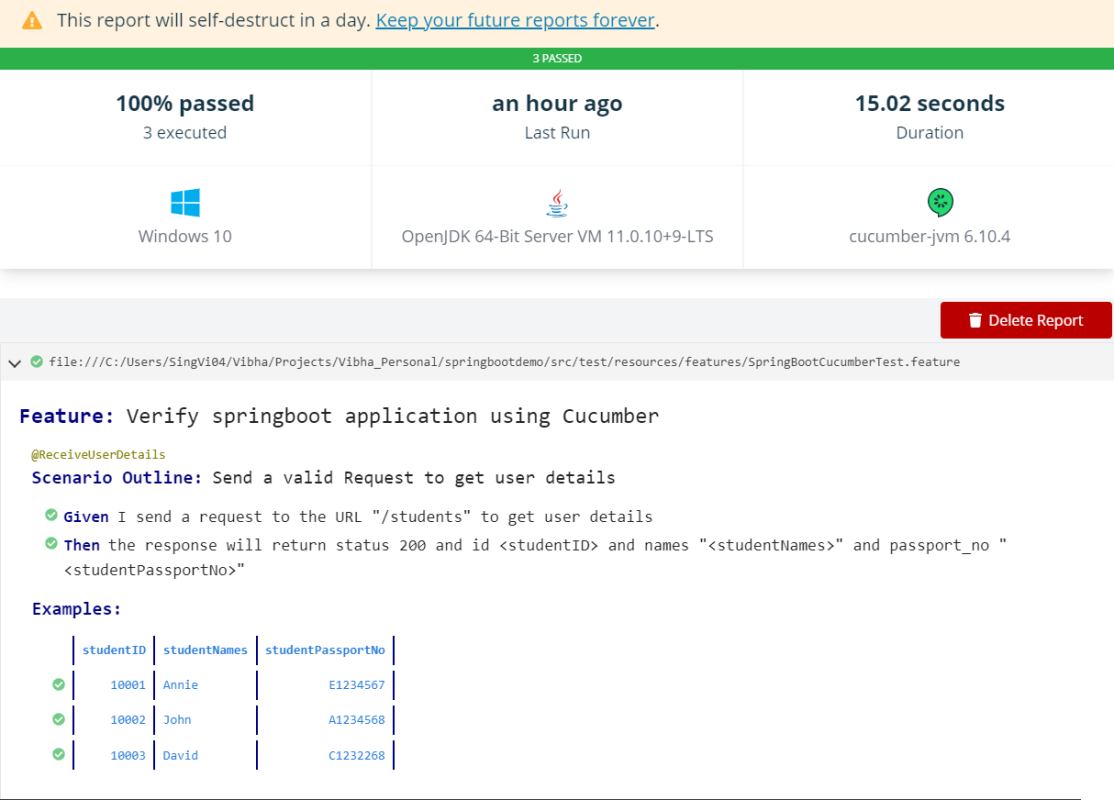
Feature: Verify springboot application using Cucumber

@ReceiveUserDetails
Scenario Outline: Send a valid Request to get user details
Given I send a request to the URL "/students" to get user details
Then the response will return status 200 and id <studentID> and names "<studentNames>" and passport_no "<studentPassportNo>"

Examples:
|studentID    |studentNames  |studentPassportNo|
|10001        |Annie         |E1234567         |
|10002        |John          |A1234568         |
|10003        |David         |C1232268         |
Step 3 – Create the Step Definition class or Glue Code for the Test Scenariounder src/test/java
The corresponding step definition file of the above feature file is shown below.
import io.cucumber.java.en.Given;
import io.cucumber.java.en.Then;
import io.cucumber.spring.CucumberContextConfiguration;
import io.restassured.RestAssured;
import io.restassured.http.ContentType;
import io.restassured.response.ValidatableResponse;
import io.restassured.specification.RequestSpecification;
import org.springframework.boot.test.context.SpringBootTest;
import org.springframework.boot.web.server.LocalServerPort;
import static io.restassured.RestAssured.given;
import static org.hamcrest.Matchers.*;

@CucumberContextConfiguration
@SpringBootTest(webEnvironment = SpringBootTest.WebEnvironment.RANDOM_PORT)
public class SpringbootCucumberTestDefinitions {

    private final static String BASE_URI = "http://localhost";

    @LocalServerPort
    private int port;

    private ValidatableResponse validatableResponse;

    private void configureRestAssured() {
        RestAssured.baseURI = BASE_URI;
        RestAssured.port = port;
    }

    protected RequestSpecification requestSpecification() {
        configureRestAssured();
        return given();
    }

    @Given("I send a request to the URL {string} to get user details")
    public void iSendARequest(String endpoint) throws Throwable {
        validatableResponse = requestSpecification().contentType(ContentType.JSON)
                .when().get(endpoint).then();
        System.out.println("RESPONSE :"+validatableResponse.extract().asString());
    }

    @Then("the response will return status {int} and id {int} and names {string} and passport_no {string}")
    public void extractResponse(int status, int id, String studentName,String passportNo) {
        validatableResponse.assertThat().statusCode(equalTo(status))
                .body("id",hasItem(id)).body(containsString(studentName))
                .body(containsString(passportNo));

    }

}
The @CucumberContextConfiguration annotation tells Cucumber to use this class as the test context configuration for Spring. It is imported from:-
With the @SpringBootTest annotation, Spring Boot provides a convenient way to start up an application context to be used in a test. It is imported from package:-
By default, @SpringBootTest does not start the webEnvironment to refine further how your tests run. It has several options: MOCK(default), RANDOM_PORT, DEFINED_PORT, NONE.
RANDOM_PORT loads a WebServerApplicationContext and provides a real web environment. The embedded server is started and listens on a random port. LocalServerPort is imported from package:-
The assertions are imported from the Hamcrest package:-
import static org.hamcrest.Matchers.*;
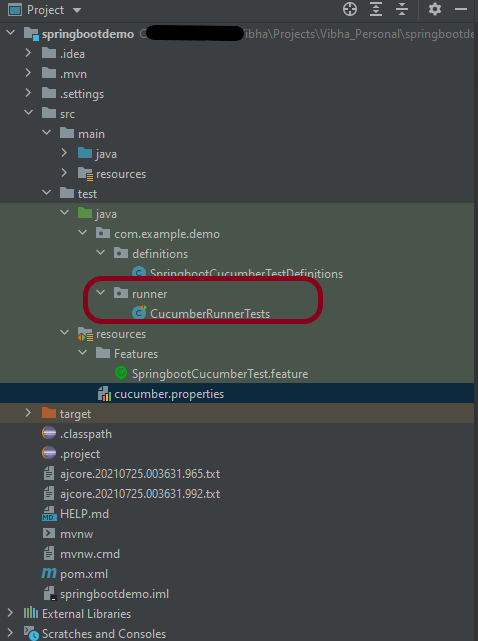
Step 4 – Create a Cucumber Runner classunder src/test/java
A runner will help us to run the feature file and act as an interlink between the feature file and StepDefinition Class. To know more about Runner, refer to this link. The TestRunner should be created within the directory src/test/java.
import org.junit.runner.RunWith;
import io.cucumber.junit.Cucumber;
import io.cucumber.junit.CucumberOptions;

@RunWith(Cucumber.class)
@CucumberOptions(plugin = "pretty", features = {"src/test/resources/Features"}, glue = { "com.example.demo.definitions"})

public class CucumberRunnerTests {
}
The @CucumberOptionsannotation is responsible for pointing to the right feature package, configuring the plugin for a better reporting of tests in the console output, and specifying the package where extra glue classes may be found. We use it to load configurations and classes that are shared between tests.
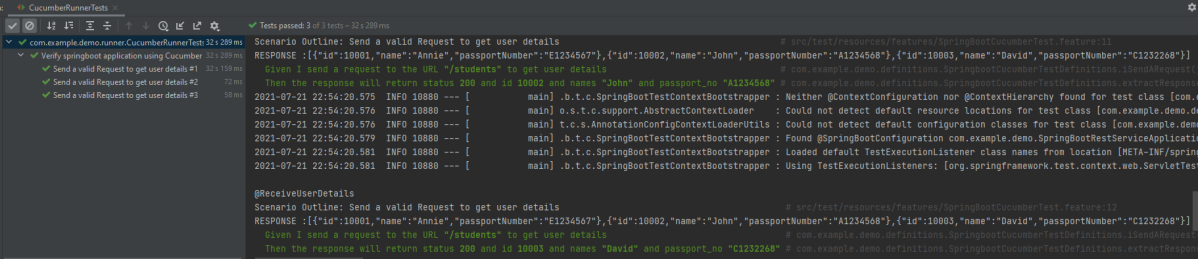
Step 5 – Run the tests from JUnit
You can execute the test script by right-clicking onTestRunner class -> Run As JUnit in Eclipse.
In case you are using IntelliJ, select “Run CucumberRunnerTests“.
SpringBootTest creates an application context containing all the objects we need for the Integration Testing It, starts the embedded server, creates a web environment, and then enables methods to do Integration testing.
The output of the above program is
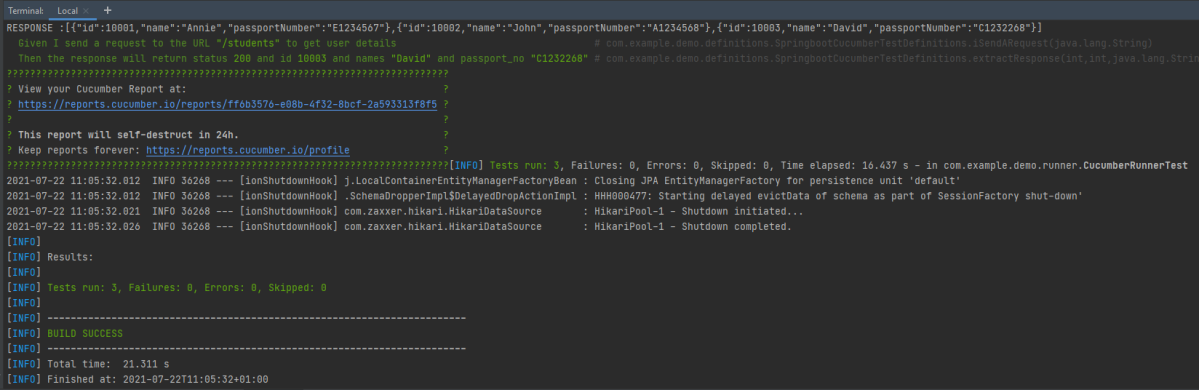
Step 6 – Run the tests from the Command Line
To run the tests from the command line, we need to add junit-vintage-engine dependency. Starting with Spring Boot 2.4, JUnit 5’s vintage engine has been removed from the spring-boot-starter-test. If we still want to write tests using JUnit 4, we need to add the following Maven dependency:
To get Cucumber Test Reports, add cucumber.properties under src/test/resources and add the below instruction in the file. To know more about Cucumber Report Service, refer to this tutorial.
cucumber.publish.enabled=true
Below is the image of the report generated after the completion of the execution. This report can be saved on GitHub for future use.
That’s it! Congratulations on making it through this tutorial and hope you found it useful! Happy Learning!!
Serenity BDD is an open-source library that aims to make the idea of living documentation a reality.
What is Rest Assured?
Rest Assured is one of the most powerful libraries for testing RESTful API using Java language. Rest-Assured is a Java-based library that is used to test RESTful Web Services. This library behaves like a headless Client to access REST web services. The rest-Assured library also provides the ability to validate the HTTP Responses received from the server.
Prerequisite
Java 17 installed
Maven installed
Eclipse or IntelliJ installed
Dependency List
Java 17
Maven – 3.9.5
Serenity – 4.0.18
Serenity Rest Assured – 4.0.18
Rest Assured – 5.3.2
JUnit – 4.13.2
Maven Surefire Plugin – 3.1.2
Maven Failsafe Plugin – 3.1.2
Maven Compiler Plugin – 3.11.0
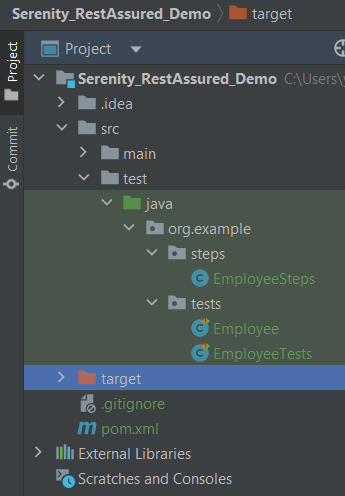
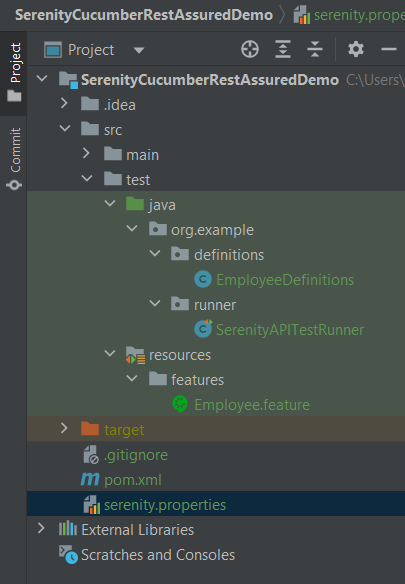
Project Structure
Implementation Steps
Step 1 – Update the Properties section in Maven pom.xml
Step 4 – Create the Test Code in src/java/testdirectory
There are 2 ways to create the same test. One approach is to have a Definition file that contains all the test code as shown below.
package org.example.tests;

import io.restassured.response.Response;
import net.serenitybdd.rest.SerenityRest;
import org.json.JSONObject;
import org.junit.Test;

import static org.hamcrest.Matchers.equalTo;

public class Employee {
    private static final String URL = "https://reqres.in/api";
    public Response response;

    int id = 2;

    @Test
    public void verifyValidUser() {

        response = SerenityRest
                .given()
                .contentType("application/json")
                .header("Content-Type", "application/json")
                .when()
                .get(URL + "/users/" + id);

        SerenityRest.restAssuredThat(response -> response.statusCode(200)
                .body("data.id", equalTo(2))
                .body("data.email", equalTo("janet.weaver@reqres.in"))
                .body("data.first_name", equalTo("Janet"))
                .body("data.last_name", equalTo("Weaver")));

    }

    @Test
    public void verifyCreateUser() {
        JSONObject data = new JSONObject();

        data.put("name", "Test");
        data.put("job", "Test Architect");

        response = SerenityRest
                .given()
                .contentType("application/json")
                .header("Content-Type", "application/json")
                .body(data.toString())
                .when()
                .post(URL + "/users");

        SerenityRest.restAssuredThat(response -> response.statusCode(201)
                .body("name", equalTo("Test"))
                .body("job", equalTo("Test Architect")));

    }

}
Another approach is that all tests are split into reusable blocks called “steps“. The main principle of the BDD approach is that we are trying to keep complexity to a high-level human-readable level. First of all, let’s create a separate package to keep our steps. It is always better to keep them separate as it shows which classes contain reusable components. It is better to make steps smaller. So let’s make separate reusable steps from our tests:
package org.example.steps;

import io.restassured.response.Response;
import net.serenitybdd.annotations.Step;
import net.serenitybdd.rest.SerenityRest;
import org.json.JSONObject;

import static org.hamcrest.Matchers.equalTo;

public class EmployeeSteps {
    private static final String URL = "https://reqres.in/api";
    public Response response;

    @Step("Search user by id {0}")
    public void sendUser(int id) {
        response = SerenityRest
                .given()
                .contentType("application/json")
                .header("Content-Type", "application/json")
                .when()
                .get(URL + "/users/" + id);

    }

    @Step("Create a new user")
    public void createUser() {

        JSONObject data = new JSONObject();

        data.put("name", "Test");
        data.put("job", "Test Architect");

        response = SerenityRest
                .given()
                .contentType("application/json")
                .header("Content-Type", "application/json")
                .body(data.toString())
                .when()
                .post(URL + "/users");

    }

    @Step("Verify the status code {0}")
    public void verifyStatusCode(int expectedStatusCode) {
        SerenityRest.restAssuredThat(response -> response.statusCode(expectedStatusCode));
    }

    @Step("Verify the user id {0}")
    public void verifyId(int expectedId) {
        SerenityRest.restAssuredThat(response -> response.body("data.id", equalTo(expectedId)));
    }

    @Step("Verify the user first name {0}")
    public void verifyFirstName(String expectedFirstName) {

        SerenityRest.restAssuredThat(response -> response.body("data.first_name", equalTo(expectedFirstName)));
    }

    @Step("Verify the user last name {0}")
    public void verifyLastName(String expectedLastName) {
        SerenityRest.restAssuredThat(response -> response.body("data.last_name", equalTo(expectedLastName)));
    }

    @Step("Verify the user email {0}")
    public void verifyEmail(String expectedEmail) {
        SerenityRest.restAssuredThat(response -> response.body("data.email", equalTo(expectedEmail)));
    }

    @Step("Verify the new user name {0}")
    public void verifyNewUserName(String expectedName) {
        SerenityRest.restAssuredThat(response -> response.body("name", equalTo(expectedName)));
    }

    @Step("Verify the new user job {0}")
    public void verifyNewUserJob(String expectedJob) {
        SerenityRest.restAssuredThat(response -> response.body("job", equalTo(expectedJob)));
    }

}
Now our steps are ready. Let’s refactor the main class with our tests:
One more important thing we added is the “@RunWith(SerenityRunner.class)” annotation on top of the class. As we have now organized our structure to meet some basic Serenity principles, we are ready to run the test using Serenity. This time (after we added the mentioned annotation) these tests will be run using the “SerenityRunner”. For that we can use exactly the same command to run our tests:
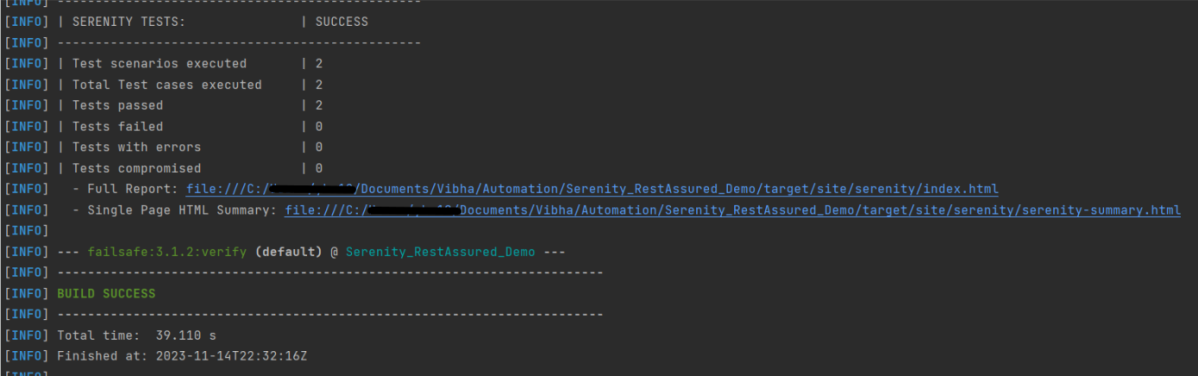
mvn clean verify
The output of the above program is
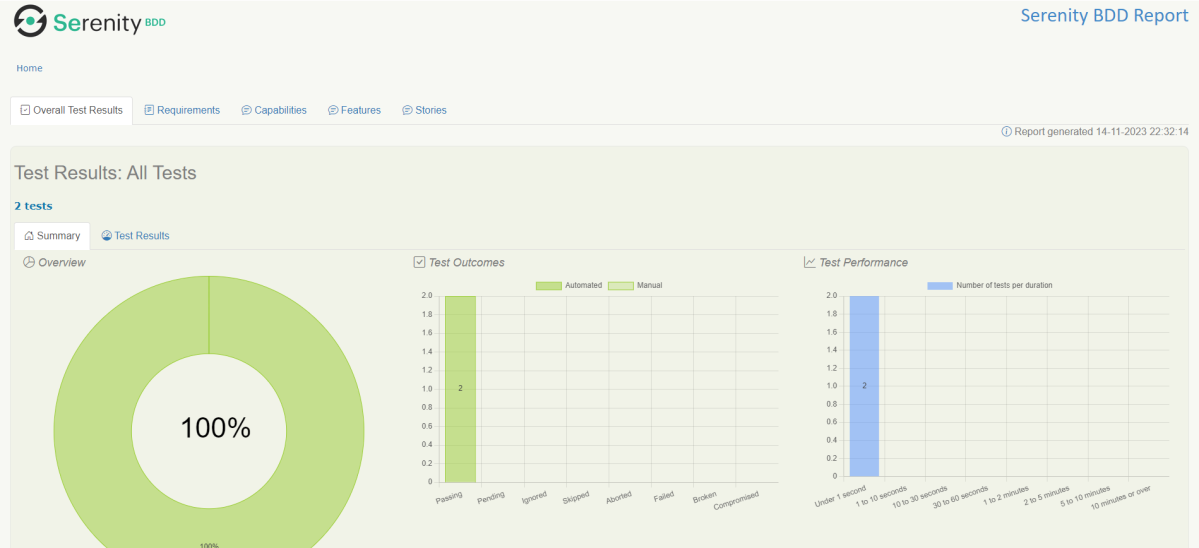
In the console, you should find printed messages for tests to start. At the same time under the target directory you can find the HTML-generated report we were talking about before:
You can open the report in any browser:
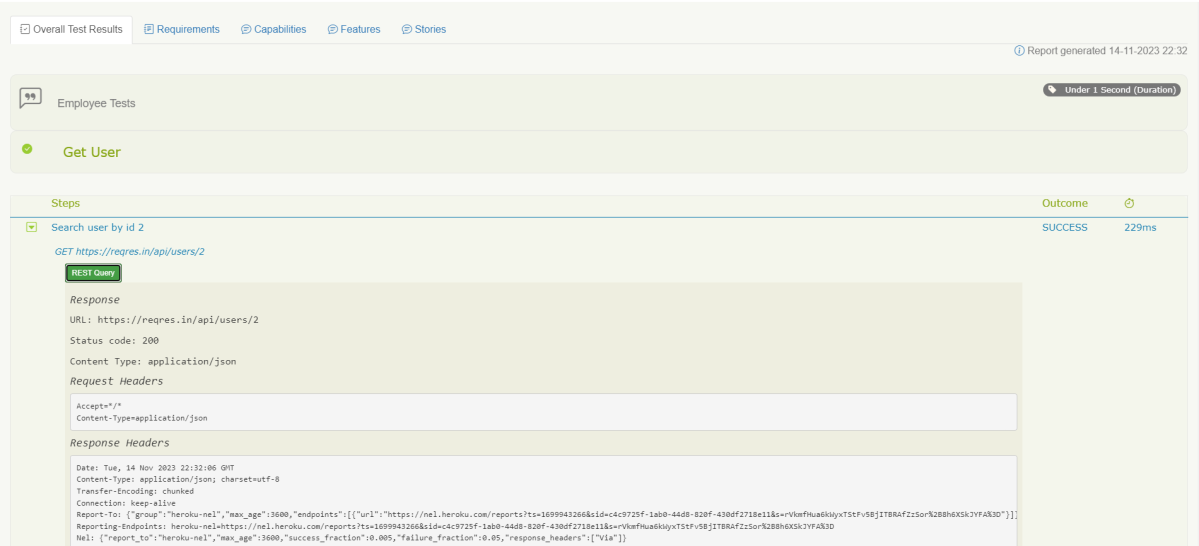
If you click on any test you should see a detailed description of the test steps:
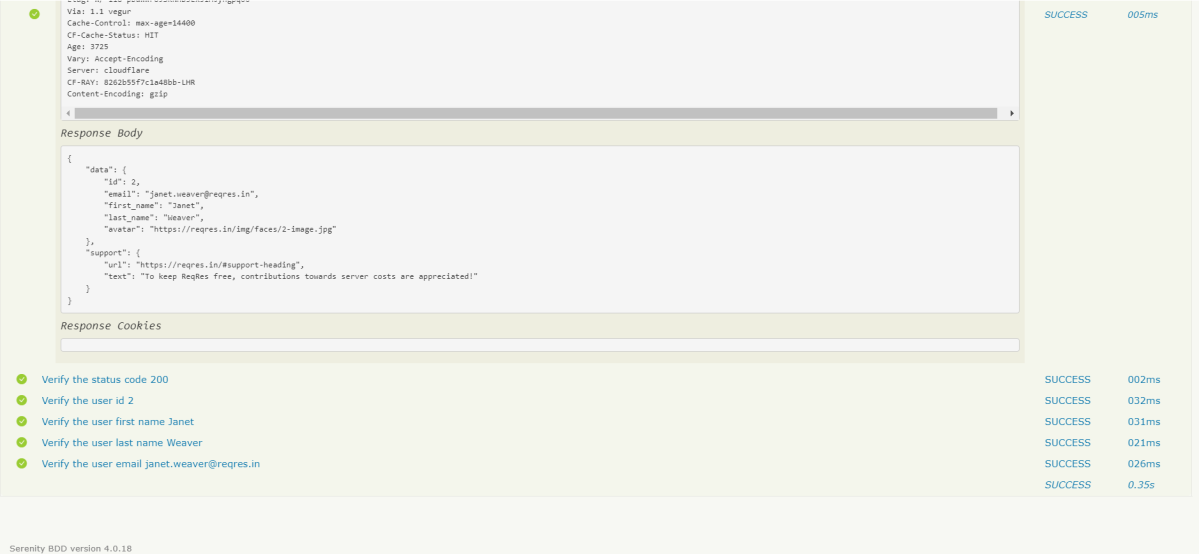
One of the most important features of the Serenity and REST Assured integration is that by using detailed reporting, you can easily validate all requests and response details even if you are not adding any logs inside tests. Like the example above, for each executed REST request you can click the button “REST Query” and get a detailed request and response description:
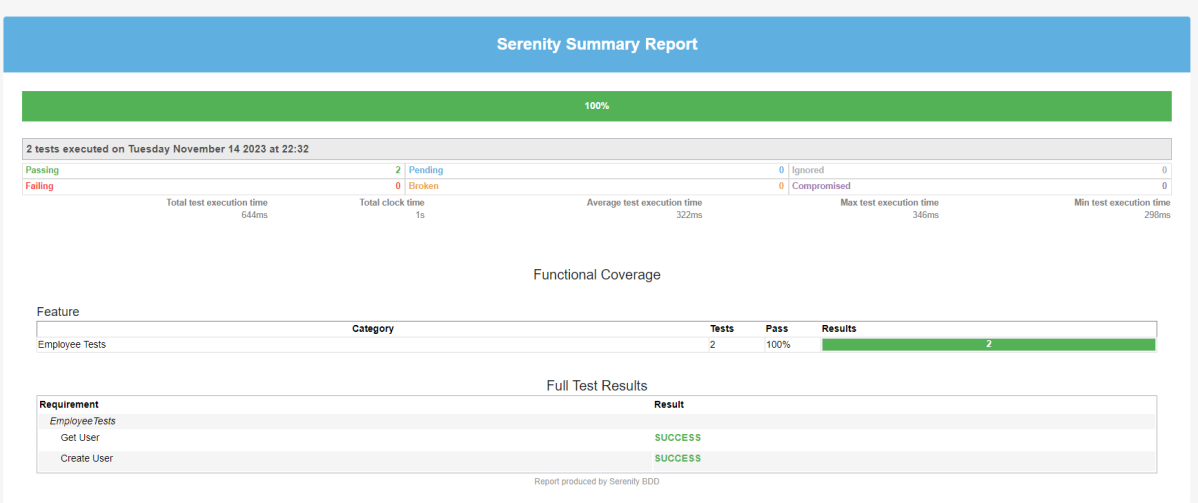
There is another very useful Serenity Report – Serenity Symmary.html
As you can see, Serenity and REST Assured provide you with a wonderful combination. REST Assured keeps API testing clean and easy to maintain, while Serenity gives you outstanding test reporting and flexibility in running and grouping your tests inside a test suite.
We are done! Congratulations on making it through this tutorial and hope you found it useful! Happy Learning!!
Serenity BDD is an open-source library that aims to make the idea of living documentation a reality.
What is Rest Assured?
Rest Assured is one of the most powerful libraries for testing RESTful API using Java language. Rest-Assured is a Java-based library that is used to test RESTful Web Services. This library behaves like a headless Client to access REST web services. The Rest-Assured library also provides the ability to validate the HTTP Responses received from the server. For e.g. we can verify the Status code, Status message, Headers, and even the Body of the response. This makes Rest-Assured a very flexible library that can be used for testing. In this post, we will learn how to write high-quality, expressive REST API tests using Rest Assured and Serenity BDD.
Prerequisite
Java 17 installed
Maven installed
Eclipse or IntelliJ installed
Dependency List:
Java 17
Maven – 3.9.5
Serenity – 4.0.18
Serenity Rest Assured – 4.0.18
Serenity Cucumber – 4.0.18
Rest Assured – 5.3.2
JUnit – 4.13.2
Maven Surefire Plugin – 3.2.1
Maven Failsafe Plugin – 3.2.1
Maven Compiler Plugin – 3.11.0
Project Structure
Implementation Steps
Step 1 – Update Properties section in Maven pom.xml
Step 4 – Create a Feature filein src/test/resources
Create a features folder within src/test/resources to create test scenarios in the Feature file. Test Scenarios are created in a Feature File which contains an overall description of a feature as well as a number of scenarios. Feature files can be placed in different locations, but you can reduce the amount of configuration you need to do with serenity if you put them in the src/test/resources/features directory. In this feature file, will send a request, and the response should be of status “200” and employee name of “Tiger Nixon”. The feature file looks something like this:
Feature: Employee Details

  @GetEmployee
  Scenario: Get the details of employee
    Given I send a request to endpoint
    Then the API should return status 200
    And Response should contains employee name "Tiger Nixon"
Step 5 – Create the Step Definition class or Glue Code
To use Rest-assured, Serenity provides class SerenityRest
import net.serenitybdd.rest.SerenityRest;
It is a Java method with an expression that is used to link it to Gherkin steps. When Cucumber executes a Gherkin step, it will look for a matching step definition to execute. These use annotations like @given, @when, and @then to match lines in the scenario to java methods
package org.example.definitions;

import io.cucumber.java.en.And;
import io.cucumber.java.en.Given;
import io.cucumber.java.en.Then;
import io.restassured.response.Response;
import net.serenitybdd.rest.SerenityRest;
import static org.hamcrest.Matchers.equalTo;

public class EmployeeDefinitions {
    private static final String URL = "http://dummy.restapiexample.com/api/v1/employee/1";
    public Response response;

    @Given("I send a request to endpoint")
    public void sendRequest()  {

        response = SerenityRest.given().contentType("application/json").header("Content-Type", "application/json")
                .when().get(URL);
    }

    @Then("the API should return status {int}")
    public void verifyResponse(int status) {
        SerenityRest.restAssuredThat(response -> response.statusCode(status));
    }

    @And("Response should contains employee name {string}")
    public void verifyResponseContent(String expectedEmployeeName) {

        SerenityRest.restAssuredThat(response -> response.body("data.employee_name", equalTo(expectedEmployeeName)));
    }
}
Step 6 – Create Serenity Test Runner
Cucumber runs the feature files via JUnit and needs a dedicated Test Runner class to run the feature files. When you run the tests with serenity, you use the CucumberWithSerenity test runner. If the feature files are not in the same package as the test runner class, you also need to use the@CucumberOptionsclass to provide the root directory where the feature files can be found. It is the starting point for JUnit to start executing the tests. TestRunner class is created undersrc/test/java. The test runner to run all of the feature files looks like this:
import org.junit.runner.RunWith;

import io.cucumber.junit.CucumberOptions;
import net.serenitybdd.cucumber.CucumberWithSerenity;

@RunWith(CucumberWithSerenity.class)
@CucumberOptions(plugin = { "pretty" }, features = "src/test/resources/features/Employee.feature", glue = {
		"org.example.definitions" })

public class SerenityAPITestRunner {

}
Step 7 – Create serenity.properties file
Serenity.properties file is created at the root level.
serenity.project.name = Rest API Testing using Serenity, Cucumber and JUnit4
Step 8 – Serenity Tests Execution
You can run the tests from SerenityAPITestRunner or from the command line by
mvn clean verify
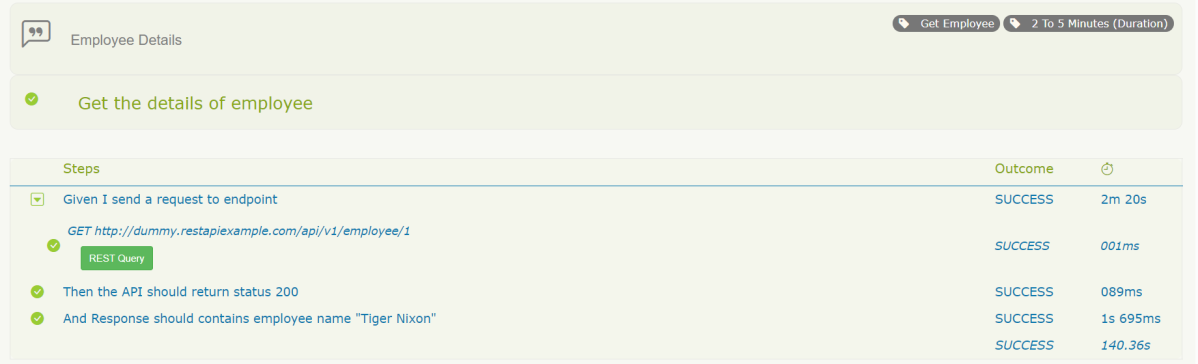
Test Execution Page looks like this as shown below image
Step 9 – Verify the Serenity Reports
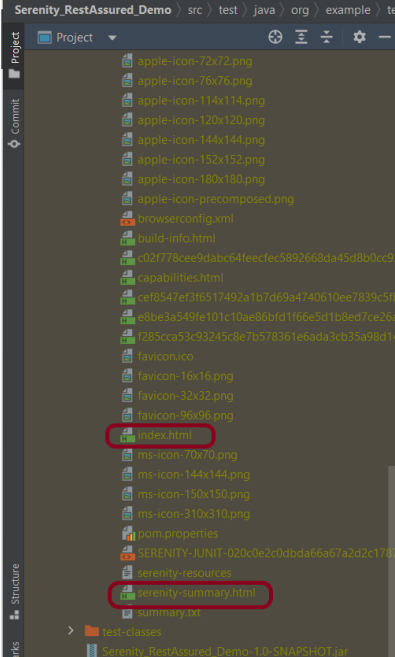
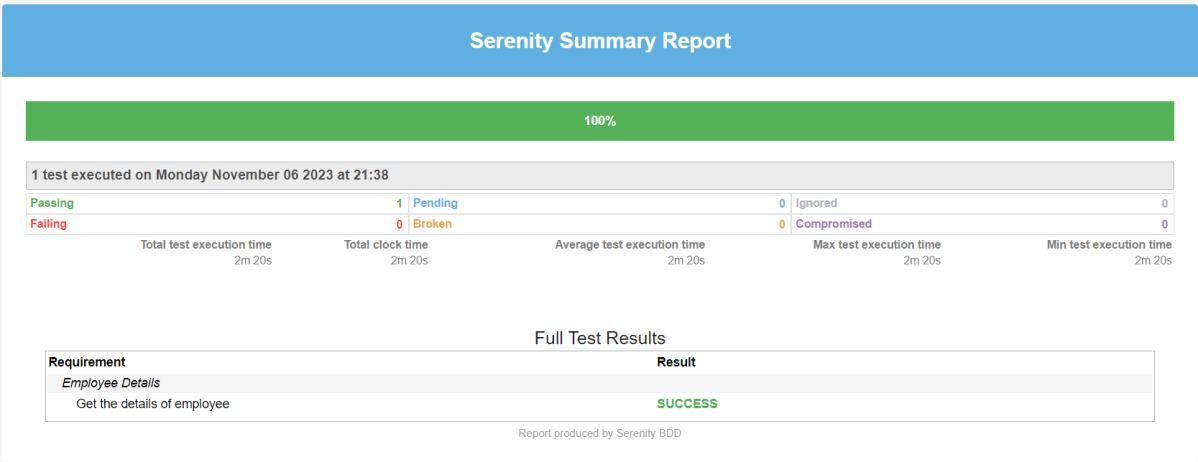
A number of reports are generated, but we are concerned about index.html and serenity-summary.html.
The report is well-formatted and contains consolidated results. Reporting is one of the major pillars of Serenity. Serenity Report not only reports on whether a test scenario passes or fails but documents what it did, in a step-by-step narrative format. The below pic illustrates the test results for our first acceptance criteria:
The test report generated by Serenity is placed under target/site/serenity/index.html.
Index.html
The first tab is called “Overall Test Results” and it provides information about test statistics. This Overall Test Result shows the Scenario Results (No Of Test Cases Pass, No Of Test Cases Failed, No of Test Cases Pending, No Of Test Cases Ignored, No Of Test Cases Skipped).
In the below pic, the report shows the test scenario steps status and time taken for each step to execute.
With the use of the REST Query button, it’s possible to display query details. Visible details:
There is also the “Requirements” tab. When we have tests as part of our code base, all test results will be organized as associated with requirements.
There is also a “Features” tab. This page lists all the features that are part of your suite. If you expand that row you’ll see the bit of narrative text that is part of the current feature file.
Serenity-Summary.html
We are done! Congratulations on making it through this tutorial and hope you found it useful! Happy Learning!!