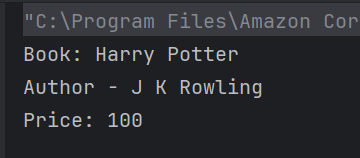
3. The code accesses the nested “store” object using jsonObject.get(“store”) and casts it to a JsonObject. It then retrieves specific fields from this “store” object.
JsonObject store = (JsonObject) jsonObject.get("store");
4. Extracts the “book” field and casts it to a String, then prints it.
String book = (String) store.get("book");
System.out.println("Book: " + book);
5. Extracts the “author” field and casts it to a String, then prints it.
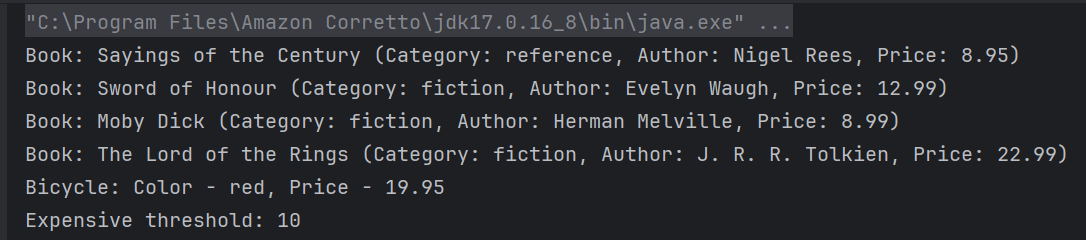
3. The code assumes that within the “store” object, there is a key “book” which corresponds to a JSON array. It retrieves this array and stores it in a JsonArray variable named books.
 // Accessing the "store" object
JsonObject store = (JsonObject) jsonObject.get("store");

// Accessing the "book" array
JsonArray books = (JsonArray) store.get("book");
4. A for-each loop iterates over each element in the books array. Each element is considered an object, and it’s cast to JsonObject named book. Within each iteration, several attributes of the book JSON object are accessed like category, author, title, price
5. The code accesses the nested “bicycle” object using jsonObject.get(“bicycle”) and casts it to a JsonObject. It then retrieves specific fields from this “bicycle” object. Extracts the “color” and “price” field and casts it to a String and BigDecimal, then prints it.
 // Accessing the "bicycle" object
 JsonObject bicycle = (JsonObject) store.get("bicycle");
String color = (String) bicycle.get("color");
BigDecimal bicyclePrice = (BigDecimal) bicycle.get("price");
System.out.println("Bicycle: Color - " + color + ", Price - " + bicyclePrice);
6. Extracts the “expensive” field and casts it to a BigDecimal, then prints it.
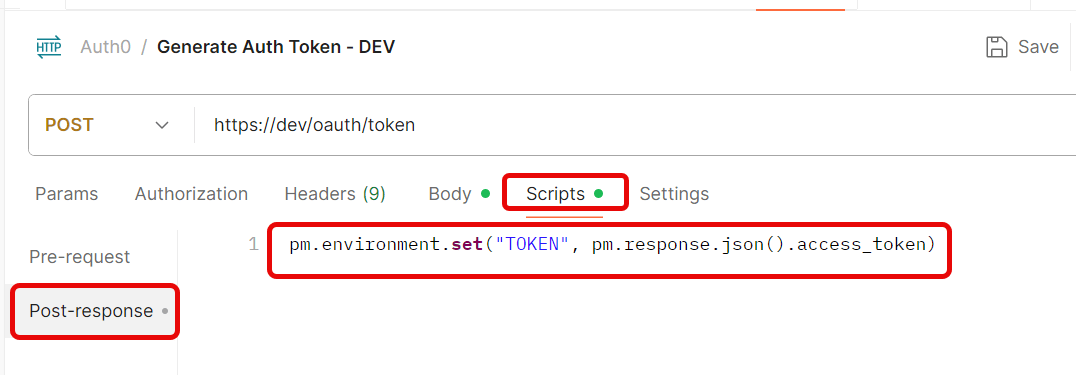
Create a new Environmentin Postman (top right → Environments → Add
Save the request.
Step 3: Use the Token in Another Request
Create a new request.
Go to the Headerstab.
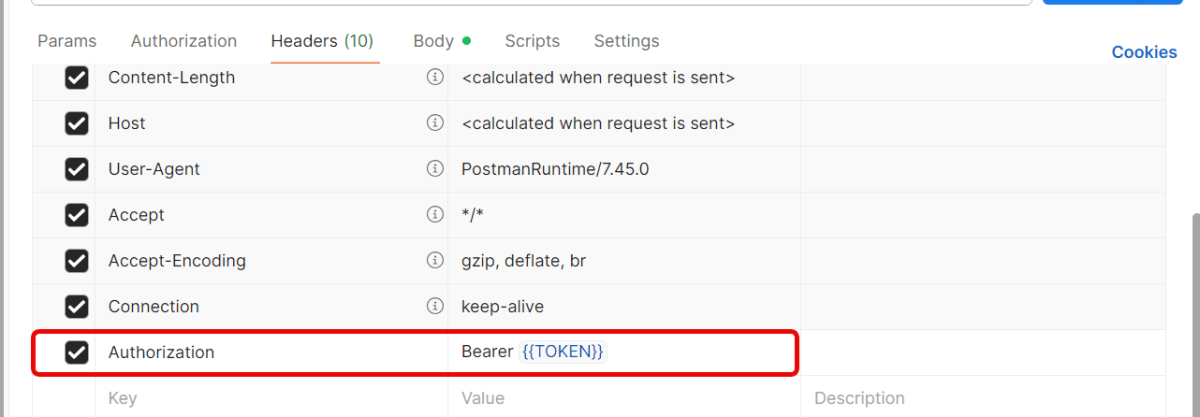
Add this header:
Key: Authorization
Value: Bearer {{Token}}
Send the request — Postman will automatically insert the token from the environment variable.
Quick Troubleshooting Checklist
1.Is the token saved correctly in environment variables? Token saved in one environment, but request uses another. Make sure you’ve selected the same environment (top-right dropdown in Postman).
2. Is the Authorization: Bearer {{Token}} header present?
3. Does the account have the correct permissions/scopes? Token is valid, but the user doesn’t have permission for that endpoint. Verify that your account has the right role/permissions.
4. Correct Content-Type is sent. Set header → Content-Type: application/json.
When you’re working with APIs, one of the most important things to understand is the Content-Type header. This header informs the API about the data type you’re sending. This is JSON, XML, or form data. It also specifies what type of response you expect back. If the Content-Type is set incorrectly, your request may fail or the server may not understand the data you’re sending.
Postman is a popular tool for testing APIs. It makes it really easy to add, update, or change headers. This includes Content-Type.
The Content-Type header in HTTP requests and responses indicates the data format. It informs the server or client about the format of the data being sent or received. Common content types include:
application/json: For JSON-formatted data.
application/xml: For XML-formatted data.
application/x-www-form-urlencoded: For URL-encoded form data.
multipart/form-data: For file uploads.
text/plain: For plain text.
text/html: Used for sending HTML data
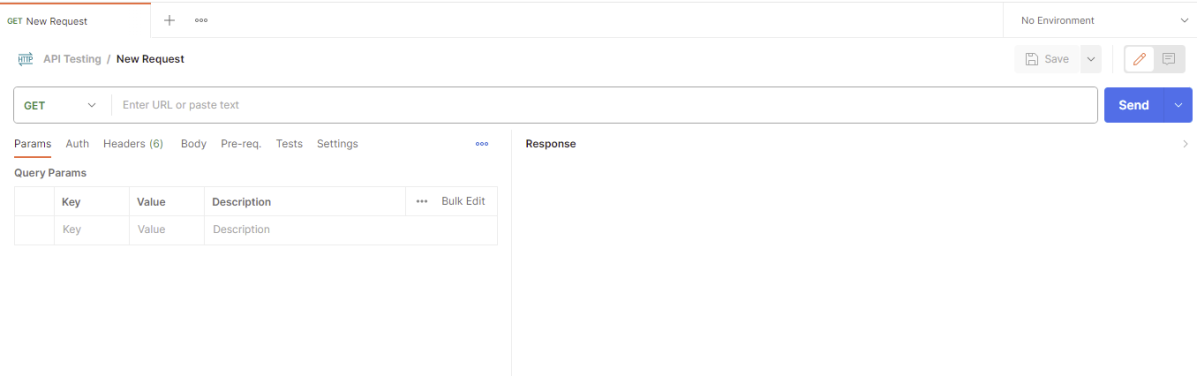
Step by Step Implementation
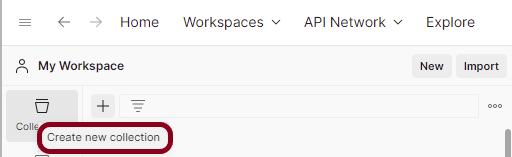
Create a Collection
Step 1: Create a Collection, click on Collections, and then click on the “+” plus button.
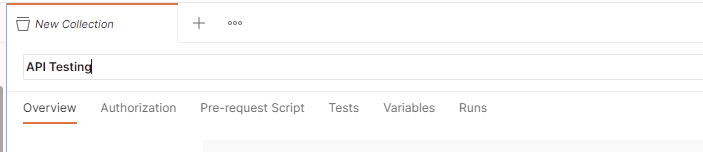
Step 2: Provide a name to the collection – “API Testing”.
Add a request to the Collection
Step 3: To create a new request, click on “Add a request”, if it is a new Collection. Otherwise, click on the 3 dots and select “Add request”.
Step 4: Once you create a new request, then you will get the following window:
Enter the details of request
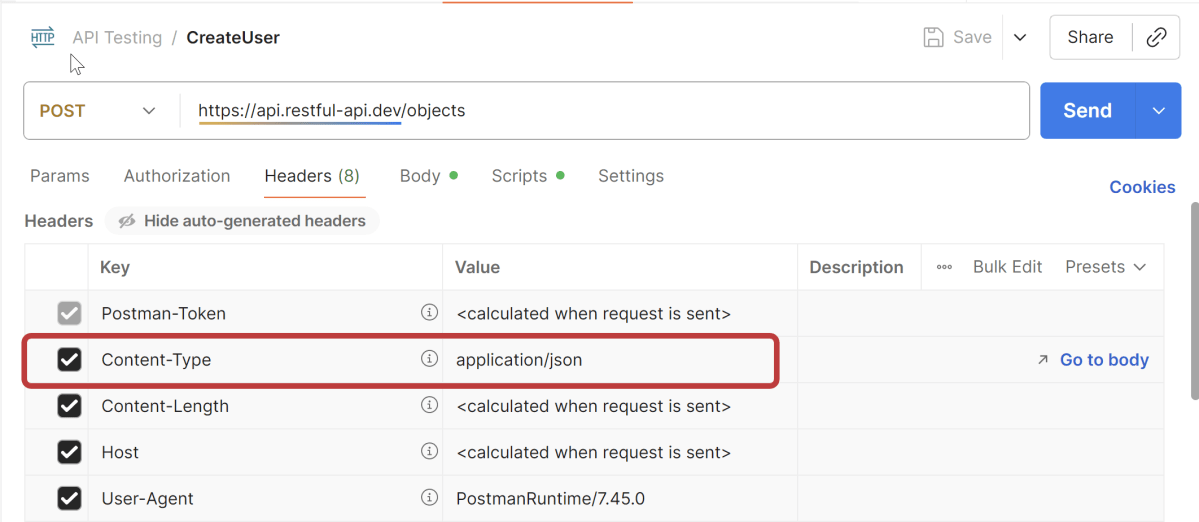
Step 5: Enter the “name” in the request. Here, the name is “Create User”.
Step 6:Enter the “URL” in the address bar.
https://api.restful-api.dev/objects
Add Headers to the request
Step 7:Enter the “Headers” in the Header tab.
In your Postman request window, navigate to the Headerstab. This tab contains all the HTTP headers that are included in your request.
Scroll through the list of headers to find the Content-Type header. If it is not listed, you can add it manually. Click on the “Key” field and type Content-Type in the field. Then, move to the “Value” field to specify the appropriate Content-Type for your request.
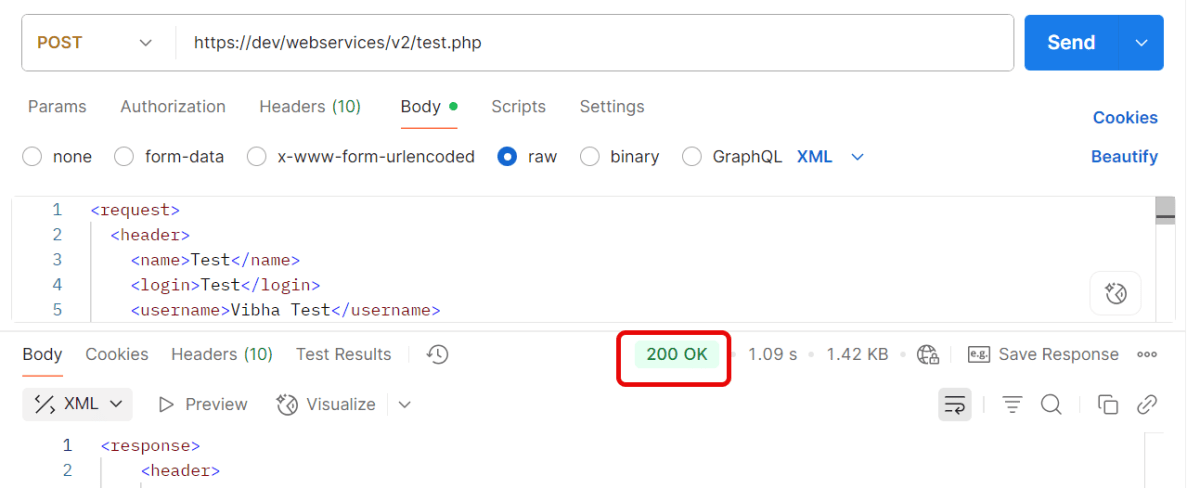
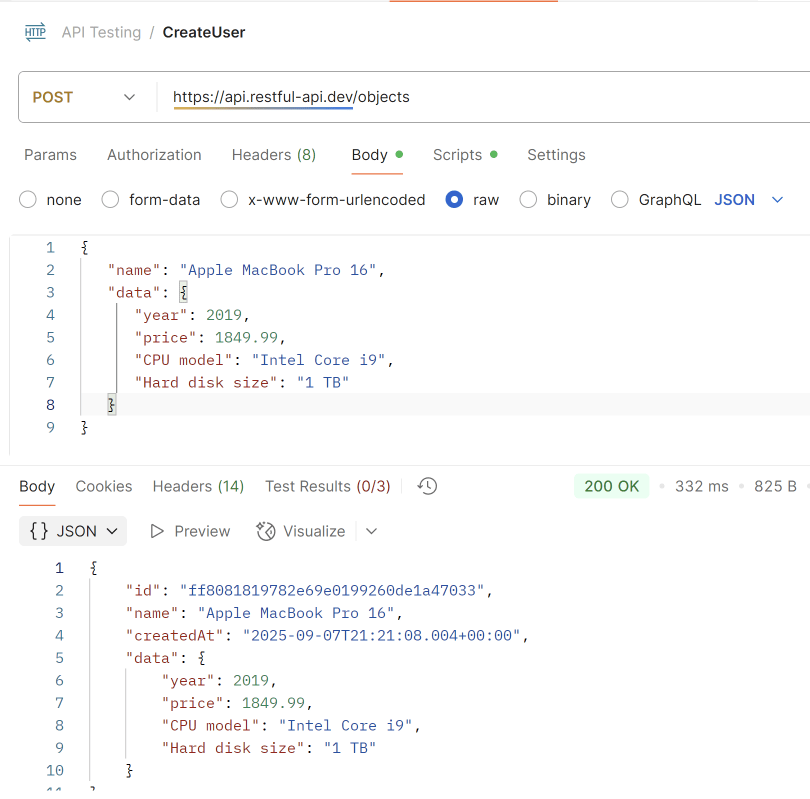
Step 9: Once you press the send button, you will get the response from the server. Make sure you have a proper internet connection; otherwise, you will not get a response.
You can check the status code. Here, we got the status code 200, which means we got a successful response to the request.
We are done! Congratulations on making it through this tutorial and hope you found it useful! Happy Learning!!
API stands for Application Programming Interface. API testing is a type of software testing that focuses on verifying the functionality, reliability, performance, and security of an Application Programming Interface (API). APIs act as intermediaries that allow different software systems to communicate with each other. Example of an API is the Twitter API. It enables developers to access and interact with Twitter’s platform programmatically. Developers can use the Twitter API to retrieve tweets. They can also post tweets and search for tweets. Additionally, they can manage user accounts and perform various other actions related to Twitter’s services.
API architecture is usually explained in terms of client and server. The application sending the request is called the client, and the application sending the response is called the server.
Advantages of API Testing
1. Independent of UI – API testing can detect issues in the early stages of development. It is independent of the GUI. This allows for timely resolution and prevents more significant problems later on.
2. Faster Execution – API tests typically take less time than functional GUI testing. GUI testing takes longer because the web components need to be polled.
3. Integration with CI/CD Pipelines – API testing can be easily automated. It can be integrated into continuous integration (CI) pipelines. This enables rapid feedback and faster release cycles.
4. Ensures Security – API testing allows for thorough security testing. It includes authentication, authorization, data encryption, and protection against common security vulnerabilities.
5. Language Independent – An API test uses XML or JSON to exchange data. These transfer modes are not language-dependent; therefore, you can use any programming language when writing automated tests for your API.
Tools for API Testing
Postman: A user-friendly tool for manual and automated API testing. It supports automation and CI/CD integration. It includes features for writing test scripts with JavaScript.
SoapUI: Ideal for SOAP and REST API testing. It allows creation of complex test scenarios including assertions and parameterization.
JMeter: It is an Open-source tool primarily used for performance testing but also supports API testing. It provides detailed reports with performance metrics.
Karate: A framework combining API testing and automation. Framework built on top of Cucumber library for BDD-style API testing.
REST Assured: A Java library for testing REST APIs. Offers a DSL (Domain-Specific Language) for writing readable and maintainable test code. It is ideal for integration into Java-based test suites.
What are the testing methods that come under API testing?
1. Unit Testing: It involves testing the smallest functional parts of the API. These include individual endpoints, services, or methods. The purpose is to ensure they work as expected. Unit tests are typically written to validate the behavior and functionality of your code in isolation.
2. Functional Testing: It ensures that the API functions as expected and meets the requirements and specifications. It verifies responses for various inputs and parameters, HTTP status code.
3. Integration Testing: It tests the interaction between different modules or services to ensure they work together as intended. It verifies that APIs properly communicate with other APIs or systems.
4. Load Testing: It evaluates the API’s performance under a specific load to determine its behavior under normal and peak conditions.
5. Stress Testing: In stress testing, the API is subjected to extreme conditions. This evaluates how it handles high traffic, large data volumes, or limited resources.
6. Fuzz Testing: Sends random or unexpected data to the API to see how it responds. Automatically generating malformed or random inputs to test the API’s robustness.
7. Security Testing: It Ensures that the API is secure and can protect data from unauthorized access or attacks. Checks for vulnerabilities such as SQL injection, XSS, and other attack vectors.
8. Usability Testing: Ensures that the API is user-friendly and its endpoints are easy to use. Reviewing API documentation and testing the ease of making requests and interpreting responses.
9. Compliance Testing: Verifies that the API adheres to specific standards, regulations, and guidelines. Ensures adherence to industry standards such as REST, SOAP, or specific compliance requirements (e.g., GDPR, HIPAA).
10. Penetration Testing: Simulates attacks on the API to identify security weaknesses. Identifies vulnerabilities that could be exploited by attackers.
11. Regression Testing: Ensures that recent changes to the API do not affect existing functionality. Running a comprehensive set of tests after a new feature is added to ensure existing functionalities are intact.
12. Interoperability Testing: It ensures compatibility between different software systems or components. It facilitates smooth communication. These systems are often built using varying technologies, platforms, or protocols.
13. End-to-End Testing:It is a process of validating the entire workflow of an application. This is done by testing how APIs interact with other components within the system. For example, Trigger the POST /order API to create an order. Validate the response (e.g., order_id is generated).
What are the major challenges faced in API testing?
1. Output verification and validation – APIs can return responses in different data formats such as JSON, XML, or plain text. Parsing and validating these formats might require additional effort.
2. Security Tokens – APIs may require various types of authentication, such as OAuth, API keys, or JWT tokens. Managing and automating the generation and use of these tokens can be complex.
3. Version Management – Testing different versions of the API can become complex. Ensuring backward compatibility is also challenging. This is especially true if multiple versions are in active use.
4. External Dependencies – When integrating with third-party APIs, several challenges can arise. These challenges relate to their availability, reliability, and version changes. Testers have little control over these factors.
5. Setting Up the Test Environment – APIs often depend on other services or databases. Setting up a fully operational test environment that mimics production can be challenging.
API stands for Application Programming Interface. APIs are mechanisms that enable two software components to communicate with each other using a set of definitions and protocols. Example of an API is the Twitter API. It enables developers to access and interact with Twitter’s platform programmatically. Developers can use the Twitter API to retrieve tweets. They can also post tweets, search for tweets, and manage user accounts. Additionally, developers can perform various other actions related to Twitter’s services.
API architecture is usually explained in terms of client and server. The application sending the request is called the client, and the application sending the response is called the server.
2. What is API Testing?
API testing is a type of software testing that focuses on verifying the functionality, reliability, performance, and security of an application programming interface (API). Since APIs don’t have a GUI, API testing is performed at the message layer of the system.
3. What are the advantages of API Testing?
1. Independent of UI – API testing can detect issues in the early stages of development. It is independent of the GUI. This allows for timely resolution and prevents more significant problems later on.
2. Faster Execution – API tests typically take less time than functional GUI testing. GUI testing takes longer because the web components need to be polled.
3. Integration with CI/CD Pipelines – API testing can be easily automated. It can be integrated into continuous integration (CI) pipelines. This enables rapid feedback and faster release cycles.
4. Ensures Security – API testing allows for thorough security testing. It includes authentication, authorization, data encryption, and protection against common security vulnerabilities.
5. Language Independent – An API test uses XML or JSON to exchange data. These transfer modes are not language-dependent; therefore, you can use any programming language when writing automated tests for your API.
4. How is API testing different from UI testing?
API Testing
UNIT Testing
API is owned by QA team
Unit testing is owned by development team
API testing primarily involves testing the functionality of APIs without knowledge of their internal implementation details, making it a form of black-box testing.
Unit Testing is white box testing. In unit testing, the tester typically has knowledge of the internal workings of the code being tested.
It tests the integration and interaction between multiple units or components, typically involving larger portions of the codebase.
Unit tests are more granular and targeted, verifying the behavior of individual functions or methods.
It often involves testing the interaction between different components, services, or systems, including external dependencies such as databases or third-party APIs.
Unit tests typically focus on testing a single unit of code in isolation from its dependencies. It uses the techniques like mocking, stubbing, dependency injection.
API Testing can be conducted in various environments, including development, staging, and production, as long as the APIs are accessible.
Unit Tests can be generally conducted within the development environment or on developers’ local machines.
5. What are the types of APIs?
SOAP APIs
These APIs use Simple Object Access Protocol. Client and server exchange messages using XML. This is a less flexible API that was more popular in the past.
RPC APIs
These APIs are called Remote Procedure Calls. In RPC communication, the client program sends a request to the server program, specifying the procedure or function to be executed and any required parameters. The server receives the request, executes the specified procedure, and sends back the result to the client.
RPC APIs can use various communication protocols for transmitting data between the client and server, including HTTP, TCP/IP, and UDP. Examples of RPC APIs include XML-RPC, JSON-RPC, gRPC, and Microsoft’s Distributed Component Object Model (DCOM).
Websocket APIs
Websocket API is another modern web API development that uses JSON objects to pass data. A WebSocket API supports two-way communication between client apps and the server. The server can send callback messages to connected clients, making it more efficient than REST API.
REST APIs
These are the most popular and flexible APIs found on the web today. The client sends requests to the server as data. The server uses this client input to start internal functions and returns output data back to the client.
GraphQL APIs
GraphQL is a query language and runtime for APIs developed by Facebook. GraphQL APIs enable clients to request only the data they need using a single endpoint and a flexible query syntax. They provide more flexibility and efficiency compared to traditional REST APIs for fetching and manipulating data.
Database APIs
These APIs provide access to databases, allowing applications to perform CRUD (Create, Read, Update, Delete) operations on data stored in the database. Examples include JDBC (Java Database Connectivity) for Java applications and SQLAlchemy for Python applications.
6. Mention a few common tools used for API testing.
1. Postman: A popular tool for designing, testing, and documenting APIs. It provides a user-friendly interface for sending requests, inspecting responses, and automating tests.
2. Swagger: A widely used tool for designing, building, and documenting RESTful APIs. It provides a visual editor for designing API contracts and generating documentation.
3. SoapUI/ReadyAPI: It is a comprehensive tool for testing SOAP and RESTful APIs. It supports various protocols, message formats, and authentication methods and provides advanced testing features such as data-driven testing and security testing.
4. JMeter: Apache JMeter is a popular open-source tool for performance testing and load testing of web applications, including APIs. While it’s primarily known for its performance testing capabilities, JMeter can also be used for API testing by sending HTTP requests and analyzing responses.
5. REST Assured: REST Assured is a Java library for testing RESTful APIs. It provides a domain-specific language (DSL) for writing expressive and readable API tests, making it popular among Java developers for automated API testing.
7. What is the difference between RESTful API and SOAP API?
Rest API
SOAP API
RESTful API follows the principles of Representational State Transfer (REST) and typically uses HTTP methods such as GET, POST, PUT, and DELETE for operations.
SOAP is a protocol with specific requirements and infrastructure. It involves strict rules for data exchange and the structure of messages.
Supports multiple data formats such as JSON, XML, HTML, and plain text. JSON is the most commonly used format due to its simplicity and ease of use with JavaScript.
Primarily uses XML to format messages. The structure of the message is heavyweight and includes elements like Envelope, Header, and Body.
Typically uses HTTP/HTTPS for communication.
Uses HTTP/HTTPS, SMTP, and other protocols.
It is faster and more scalable due to its stateless nature and caching capabilities.
It is generally slower due to the verbosity of XML and the need to process extensive SOAP headers.
Custom security features like OAuth, JWT.
Built-in security features like WS-Security for secure messaging.
Best suited for web and mobile applications where performance, scalability, and simplicity are required.
Ideal for enterprise applications that require high security, reliability, and compliance with strict protocols.
8. What is an API endpoint?
An API endpoint is a specific URL that is exposed by an API to allow applications to interact with a system by performing various operations, such as creating, reading, updating, or deleting data. Each endpoint represents a unique path to a resource or a set of resources within the system that the API provides access to.
Characteristics of API Endpoint
URL Path: A specific URL for accessing resources or performing actions in an API. Example: “https://api.example.com/users“
HTTP Methods: Different methods (GET, POST, PUT, DELETE) define actions on the endpoint.
Parameters: Endpoints can include query, path parameters, headers, and request bodies. Example: “https://api.example.com/users?page=2&limit=20“ uses query parameters to paginate the list of users.
Responses: Contain status codes and data returned by the server.
9. What are the core components of an HTTP request?
An HTTP request contains five key elements:
An action showing HTTP methods like GET, PUT, POST, and DELETE.
Uniform Resource Identifier (URI), which is the identifier for the resource on the server.
https://www.qaautomation.expert
HTTP Version, which indicates HTTP version, for example-HTTP v1.1.
Request Header, which carries metadata (as key-value pairs) for the HTTP Request message. Metadata could be a client (or browser) type, format supported by the client, format of a message body format, cache settings, and so on.
9. Mention common HTTP methods used in API testing
GET: Used to retrieve data or resources from an API.
POST: Used to create new data or resources on an API.
PUT: Used to update existing data or resources on an API.
DELETE: Used to delete data or resources from an API.
PATCH: Used to update existing data or resources on an API partially.
10. What is the difference between POST and PUT?
POST
PUT
It is used to create a new resource on the server.
It is used to update an existing resource or create one if it does not exist (depending on the context and implementation).
It is not idempotent. Making the same `POST` request multiple times can result in multiple resources being created with different identifiers.
It is Idempotent. Making the same `PUT` request multiple times will have the same effect as making it once. The resource will be created or updated to the same state.
11. What is the purpose of HTTP status codes in API testing?
The purpose of HTTP status codes in API testing is to indicate the outcome of an API request that whether the request is successfully processed, encountered an error or needs further action. Status codes are three-digit numbers included in the response message from the server to provide information about the result of the request.
HTTP status codes clearly communicate the outcome of an HTTP request. They enable clients and APIs to understand the result of their interactions without ambiguity.
1xx (100 – 199): The response is informational
2xx Success: The request was successfully received, understood, and accepted (e.g., 200 OK, 201 Created).
3xx Redirection: Further action is needed to fulfill the request (e.g., 301 Moved Permanently, 302 Found).
4xx Client Errors: The request contains incorrect syntax or cannot be fulfilled (e.g., 400 Bad Request, 401 Unauthorized).
5xx Server Errors: The server failed to fulfill a valid request (e.g., 500 Internal Server Error, 503 Service Unavailable).
12. What is the purpose of authentication in API testing?
Authentication in API testing is a critical component that ensures secure and controlled access to the API endpoints.
Authentication prevents unauthorized users or systems from accessing the API, thereby protecting sensitive data and operations. Ensures that data is only accessible to authenticated users, protecting it from unauthorized exposure.
Supports compliance with regulations that require user authentication, such as GDPR, HIPAA, and others.
13. What are some common authentication methods used in API testing?
1.Basic Authentication: This involves sending the username and password as part of the API request headers, encoded in base64 format.
Authorization: Basic dXNlcm5hbWU6cGFzc3dvcmQ=
2. Token-Based Authentication: This method issues a token to the client after successful authentication. The client then includes this token in subsequent API requests for authorization.
3. OAuth: This is a widely used authorization framework. It allows for the delegation of access rights from one entity to another. Credentials are not shared. It uses access tokens obtained via authorization servers.
4. API Keys: It is simple tokens that map to a specific user or application. It is sent as a header, query parameter, or part of the request body.
x-api-key: YOUR_API_KEY
14. What are the different types of error responses in API testing?
1. HTTP error status codes: These are standard HTTP status codes, such as 4xx and 5xx codes, that indicate errors in the API request or response. Some of the examples are
400 Bad Request: The server could not understand the request due to invalid syntax. Possible reasons include malformed request syntax, invalid request message framing, or deceptive request routing.
401 Unauthorized: The request requires user authentication. This means the request lacks valid authentication credentials for the target resource.
403 Forbidden: The server understood the request but refuses to authorize it. This is usually due to insufficient permissions.
404 Not Found: The server cannot find the requested resource. This could mean the endpoint is incorrect or the resource has been deleted.
405 Method Not Allowed: The request method is known by the server but has been disabled and cannot be used. For example, a request method is not supported by that resource.
409 Conflict: There is a conflict with the current state of the resource. This code is used in situations where the request could not be processed because of conflict in the request.
429 Too Many Requests: The user has sent too many requests in a given amount of time (“rate limiting”).
2. Custom error responses: These are custom error messages or error objects returned by the API in case of errors or exceptions. These custom responses provide meaningful and detailed information that helps users and developers understand the nature of the error, the possible cause, and potential ways to resolve it. Example: Providing guidance like “Invalid input: Email field cannot be empty” is more helpful than a vague error message.
15. What is API mocking, and why is it used in API testing?
API mocking simulates the behavior of an API endpoint during testing. It does this without actually invoking the real API. This mock API can be configured to return predefined responses for specified requests. API mocking is particularly useful in various scenarios for both development and testing purposes.
1. Independent Development: Mock APIs allow front-end developers to work independently from back-end developers. They can simulate responses from the back end before the actual API is fully developed or functional.
2. Cost Management: When dealing with third-party APIs that bill based on usage, it can be cost-effective to use mock APIs during development. This approach reduces unnecessary expenses.
3. Simulation of Edge Cases: Mocking can be used to simulate different scenarios, including error cases and rare conditions that may be complex to reproduce with the actual API.
16. How do you perform load testing on APIs?
Load testing on APIs can be performed by simulating a large number of concurrent users or requests to the API endpoint using load testing tools or frameworks. The goal is to ensure that the API remains responsive and functional under stress.
Tools such as JMeter, Gatling, and k6 are popular open source tool for load testing APIs.
Tools like LoadRunner, BlazeMeter, and NeoLoad offer advanced features and support for various protocols.
Load Testing is used to identify performance bottlenecks, such as slow database queries, resource contention, or inefficient code. Implement fixes or optimizations based on the findings and rerun load tests to verify improvements.
Integrate load testing into the continuous integration/continuous deployment (CI/CD) pipeline to run tests automatically with each release.
Generate detailed reports summarizing the test results, including metrics, observations, and insights.
17. What is API security testing, and why is it important?
API security testing is a process of carefully evaluating API endpoints to identify and remediate vulnerabilities such as fuzzy input, parameter tampering, or injection attacks.
Why is API Security Testing Important?
1.Protection of Sensitive Data: APIs often handle sensitive information (user data, payment details). Security testing ensures compliance with data protection laws (e.g., GDPR, HIPAA). This protects data integrity and avoids potential reputational damage and the loss of customer trust.
2.Ensuring Service Availability: Malicious actors can exploit vulnerabilities to launch Denial-of-Service (DoS) attacks. They can overwhelm your APIs, making them unavailable to legitimate users. Securing APIs helps prevent downtime or service interruptions caused by security incidents.
3. Improving Stakeholder Trust: Customers and partners entrust the company with their data when they interact with their APIs. Regular security testing demonstrates your commitment to data protection, strengthening business relationships, and fostering customer confidence in your services.
18. What are the common security vulnerabilities found in API?
1. Injection Attacks: Attackers insert malicious code into the requests to manipulate the APIs’ intended behavior. SQL Injection, Host-Header Injection, and Command Injection are some of the most common attacks.
2. Brute Force Attacks: These attacks involve attempting various combinations of user credentials to gain unauthorized access. XML-RPC can be easily leveraged as an entry point for attacks and can execute multiple login attempts rapidly, leading to brute-force attacks.
3. Session Management Issues:Inadequate Session Management issues can lead to Authorization vulnerabilities.
4. Cross-Site Scripting (XSS): Injecting malicious scripts into API responses that can be executed in the client’s browser. An attacker injecting JavaScript into a response that steals session cookies.
5. WSDL Exposure: If the WSDL file is exposed to the attackers, they can view detailed information about the API structure. This information includes the operations. This allows attackers to craft more targeted attacks.
6. Cross-Site Request Forgery: This attack tricks a user into unknowingly executing unwanted actions. It happens on a web application where they are authenticated. It leverages the trust that a website has in the user’s browser. This can result in unauthorized actions like changing account settings, transferring funds, or deleting data.
7. Introspection Attack: It exploits an API’s introspection endpoint to gather information about access tokens, exposing sensitive details that attackers can use to compromise security. Introspection endpoints are designed to validate and retrieve metadata about tokens, such as their scopes, expiration, and the user they represent. If improperly secured, attackers can leverage them to gain unauthorized access or manipulate token data.
19. How to perform API Security testing?
1.SQL Injection – SQL Injection attacks are successful when the database processes the unsanitized API input. Hence, testing the REST API for any SQL Injection bugs is important. Try providing SQL commands in the input like:
'or 1=1--
"and 1=1--
2. Command Injection: Various OS commands can also inject API inputs, which are then executed on the server. However, the commands for different Operating systems(Windows, Linux, etc.) would differ. For Example, Redirecting output or appending data to files.
echo "malicious" >> /var/www/html/index.html
rm file.txt; cat /etc/passwd
The shell executes rm file.txt, deleting file.txt from the system. After deleting the file, the shell executes cat /etc/passwd, displaying the contents of the /etc/passwd file in the terminal.
3. Authentication Testing – Test whether the API properly implements authentication. Try to access the endpoint without using the authentication or invalid credentials.
JWT:Ensure tokens are signed, valid, and not modifiable
Basic Authentication: Validate if credentials are encrypted.
OAuth2/OpenID Connect: Verify token management (generation, expiration, and revocation).
4. Authorization Testing – Make sure that the users can only access resources they are authorized for. Test role-based access control (RBAC) or permission-based controls.
5. Rate Limiting and Throttling – Rate Limiting is a process of limiting the number of requests that can be sent to an API within a specific time. Testing for it means verifying that all the limits are properly set and enforced on all APIs. Simulate a high volume of requests to test the API’s resilience against Distributed Denial of Service (DDoS) attacks.
6. Discovering Zombie APIs – Zombie APIs are old or unused APIs that are still active but not updated or maintained. As they are not maintained, zombie APIs can lead to security risks and can be exploited for vulnerabilities.
Common Tests to Assess Zombie APIs:
Test for data accessed by zombie APIs(user data, financial data, etc.)
Test for Authentication and Authorization.
Test for weak encryption implementation.
Test for known vulnerabilities or CVEs.
20. What is the purpose of the request and response headers in API testing?
Request and response headers in API testing are used to transmit additional information about the request or response. Request headers can be used to specify a content type, authentication, caching, language preferences, etc.
Headers like Authorization include tokens, API keys, or credentials.
Specify the desired data format for the request or response.
Control or bypass caching mechanisms.
Response headers are sent by the server to the client, containing metadata about the response and instructions for handling it.
Specify the format and encoding of the response body.
Provide caching policies for the client to optimize performance.
Inform the client about rate limits or remaining quota.
Specify which origins are allowed to access the resource.
21. What is the purpose of query parameters in API testing?
Query parameters in API testing are used to pass additional parameters in the URL of an API request. These parameters are used to customize the behavior of the API request, such as filtering, sorting, or paginating results.
Pagination – APIs use query parameters to manage large datasets by breaking them into smaller chunks (pages).
https://api.example.com/items?page=2&limit=50
It returns the second page of results with 50 items per page.
Filtering Data – Query parameters are commonly used to filter the data returned by an API.
It will display products in the “electronics” category with a price less than $1000.
22. What are the major challenges faced in API testing?
Output verification and validation – APIs can return responses in different data formats like JSON, XML, or plain text. Parsing and validating these formats might require additional effort.
Security Tokens – APIs may require various types of authentication, such as OAuth, API keys, or JWT tokens. Managing and automating the generation and use of these tokens can be complex.
Version Management – Testing different versions of the API and ensuring backward compatibility can become complex, especially if multiple versions are in active use.
External Dependencies – When integrating with third-party APIs, there can be challenges related to their availability, reliability, and version changes over which testers have little control.
Setting Up the Test Environment – APIs often depend on other services or databases. Setting up a fully operational test environment that mimics production can be challenging.
23. What are the testing methods that come under API testing?
1. Unit Testing: It involves testing the smallest functional parts of the API, such as individual endpoints, services, or methods, to ensure they work as expected. Unit tests are typically written to validate the behavior and functionality of your code in isolation.
2. Functional Testing: It ensures that the API functions as expected and meets the requirements and specifications. It verifies responses for various inputs and parameters, HTTP status code.
3. Integration Testing: It tests the interaction between different modules or services to ensure they work together as intended. It verifies that APIs properly communicate with other APIs or systems.
4. Load Testing: It evaluates the API’s performance under a specific load to determine its behavior under normal and peak conditions.
5. Stress Testing: Subjects the API to extreme conditions to evaluate how it handles high traffic, large data volumes, or limited resources.
6. Fuzz Testing: Sends random or unexpected data to the API to see how it responds. Automatically generating malformed or random inputs to test the API’s robustness.
7. Security Testing: It Ensures that the API is secure and can protect data from unauthorized access or attacks. Checks for vulnerabilities such as SQL injection, XSS, and other attack vectors.
8. Usability Testing: Ensures that the API is user-friendly and its endpoints are easy to use. Reviewing API documentation and testing the ease of making requests and interpreting responses.
9. Compliance Testing: Verifies that the API adheres to specific standards, regulations, and guidelines. Ensures adherence to industry standards such as REST, SOAP, or specific compliance requirements (e.g., GDPR, HIPAA).
10. Penetration Testing: Simulates attacks on the API to identify security weaknesses. Identifies vulnerabilities that could be exploited by attackers.
11. Regression Testing: Ensures that recent changes to the API do not affect existing functionality. Running a comprehensive set of tests after a new feature is added to ensure existing functionalities are intact.
24. Why is API testing considered as the most suitable form for Automation testing?
API testing is now preferred over GUI testing and is considered as most suitable because:
1. APIs serve as the communication layer between different software components. By testing APIs, issues can be identified early in the development process before the UI is developed.
2. APIs tend to be more stable and less prone to frequent changes compared to the user interface (UI). This stability makes API tests more reliable and less likely to break with minor updates.
3. API tests are generally faster to execute. They are quicker because API tests do not require the overhead of rendering the user interface, unlike UI tests.
4. API tests do not depend on the UI, they can be executed even when the UI is not available or under development. This independence allows for continuous testing throughout the development cycle.
5. API tests focus on the core business logic and data layer, which are crucial for the functionality of the application. This ensures that the critical components are thoroughly tested.
6. APIs are ideal candidates for automation within CI/CD pipelines. Automated API tests can be seamlessly integrated into build and deploy processes, providing rapid feedback and ensuring continuous testing.
25. What type of bugs would often found in API testing?
1. Incorrect Response Data: API returns incorrect data due to logic errors.
2. Missing or Extra Fields: Response JSON or XML missing required fields or containing unexpected fields.
3. Incorrect Status Codes: API endpoints returning incorrect HTTP status codes (e.g., 200 OK for an error condition).
4. Unexpected Behavior: API does not perform operations as expected (e.g., CRUD operations not working correctly).
5. Slow Response Times: API takes too long to respond under normal or load conditions.
6. Throughput Issues: API cannot handle expected load, leading to reduced throughput.
7. Resource Utilization: High CPU, memory, or network usage during API requests.
8. Injection Attacks: Susceptibility to SQL, NoSQL, and other forms of injection attacks.
9. Cross-Site Scripting (XSS): API responses containing unescaped data leading to XSS vulnerabilities.
10. Authentication Issues: Failure to correctly implement authentication mechanisms (e.g., missing or expired tokens not handled properly).
26. What are the principles of an API test design?
1. Understand the API Specifications: Review the API documentation to understand the endpoints, request/response formats, parameters, authentication mechanisms, status codes, and error messages.
2. Identify Test Scenarios:
Positive Tests: Test with valid inputs to ensure the API returns the expected responses.
Negative Tests: Test with invalid inputs or boundary values to ensure the API handles errors gracefully and returns appropriate error messages.
Edge Cases: Consider unusual or extreme cases, such as very large inputs, empty inputs, or special characters.
Error Scenarios: Test the API’s behavior when it encounters errors, such as network failures, timeouts, or invalid inputs.
Logging and Monitoring: Ensure that the API has proper logging and monitoring to help diagnose and troubleshoot issues.
3. Execution: Send API requests with defined parameters, methods, and data, and observe how the system behaves.
4. Verification & Reporting: Validate the response against expected results, including status codes, response data, and schema. Document test outcomes, marking them as passed, failed, or blocked based on validation results.
5. Performance and Load Testing: Test how well the API scales under load and how it performs under peak traffic conditions.
6. Security Testing: Test that the API properly handles authentication and authorization and does not expose sensitive data.
7. Cleanup: Return the environment to its pre-test state, such as deleting test data or stopping services.
27. Can API tests run in CI/CD pipeline
Yes, API tests can and should run in a Continuous Integration/Continuous Deployment (CI/CD) pipeline to ensure the quality and reliability of your software.
Implementation Steps
1. Write and Prepare the API Tests: API Tests should be written using the suitable tools like Postman, Rest Assured, JUnit and JUnit for Java and PyTest for Python language.
2. Setup CI/CD Pipeline: CI/CD platform such as Jenkins, GitHub Actions, GitLab CI, or others can be used. example GitHub Actions workflow file to run API tests using Postman and Newman:
name: API Tests

on:
  push:
    branches:
      - main
  pull_request:
    branches:
      - main

jobs:
  test:
    runs-on: ubuntu-latest

    steps:
    - name: Checkout code
      uses: actions/checkout@v2

    - name: Set up Node.js
      uses: actions/setup-node@v2
      with:
        node-version: '14'

    - name: Install Newman
      run: npm install -g newman

    - name: Run API tests with Newman
      run: newman run test.json
3. Handle Test Results: CI/CD pipeline is configured to handle and report test results. Many CI/CD tools can integrate with test reporting tools for detailed results and logs.
4. Configure Notifications or Alerts: Configure notifications (e.g., emails or Slack messages) to alert the team when tests fail. This ensures that any issues are promptly addressed.
By integrating API tests into your CI/CD pipeline, you can automatically verify the stability and reliability of your APIs with each code change.
28. What is the difference between Authentication and Authorization in API testing?
Authentication – Authentication is the process of verifying the identity of a user or system attempting to access the API. It ensures that the person or system making the API request is who they claim to be.
Example – A user logs in to a banking API using their credentials and receives a token.
Common Methods:
API Keys: A unique identifier sent with the request to validate the user or application.
Username and Password: Basic authentication.
OAuth Tokens: Access tokens issued after a successful login.
Multi-Factor Authentication (MFA): Combining two or more methods (e.g., password + OTP).
JWT (JSON Web Token): A token that securely transmits user identity
{
  "token": "eyJhbGciOiJIUzI1NiIsInR..."
}
Authorization – Authorization is the process of verifying whether an authenticated user has the necessary permissions. This process checks if they can access specific resources or perform certain actions
Example – The same user tries to transfer money to another account. The API checks if the user’s role allows this action. If the user doesn’t have sufficient permissions, the API denies the request.
Common Methods:
Role-Based Access Control (RBAC): Permissions based on user roles (e.g., Admin, User).
Policy-Based Access Control (PBAC): Custom policies to determine access rights.
Scopes in OAuth: Limit the actions that a token allows (e.g., read-only, full access).
29. Can API testing be automated? If yes, how?
Yes, API testing can be automated using tools like RestAssured, Postman, or TestNG. Test scripts can be written to send requests and validate the response. Assert the following in your tests:
1. Status Codes (e.g., 200 OK, 401 Unauthorized). 2. Response Body: Check for required fields and values. 3. Headers: Validate Content-Type, Cache-Control, etc. 4. Performance: Measure response times.
Below is an example of automated test scripts using Java with Rest Assured.
import io.restassured.http.ContentType;
import org.json.JSONObject;
import org.junit.jupiter.api.Test;
import static io.restassured.RestAssured.given;
import static org.hamcrest.Matchers.equalTo;

public class APITests {

        String BaseURL = "https://reqres.in/api";

    @Test
    public void getUser() {

        // GIVEN
        given()
                .contentType(ContentType.JSON)

                // WHEN
                .when()
                .get(BaseURL + "/users/2")

                // THEN
                .then()
                .statusCode(200)
                .body("data.first_name", equalTo("Janet"))
                .log().all();

    }

}
These tests can be run as part of CI/CD pipelines using GitLab, GitHub, Jenkins and many more.
30. What is the difference between synchronous and asynchronous APIs?
Synchronous APIs: The client waits for the server to process the request and send back a response. Request and response happen in the same thread. The client is blocked until a response is received.
Suitable for real-time, sequential tasks where the response is required immediately (e.g., login authentication). Commonly uses HTTP/HTTPS with immediate response (e.g., REST APIs).
Use Case Examples**:
  - Login authentication: The client needs the server's response before proceeding.
  - Fetching data: The client requires the result immediately to display to the user.
Asynchronous APIs: The client sends a request and continues processing without waiting for the server’s response. Request and response happen in separate threads or processes. The client continues processing while waiting for the response.
Suitable for long-running processes or tasks that do not require an immediate response (e.g., batch processing). Often uses WebSockets, Message Queues, or event-driven systems (e.g., Webhooks).
**Use Case Examples**:
  - File upload or processing: The server processes the file and sends a notification when done.
  - Notification systems: Sending push notifications to multiple devices.
Asynchronous request is where the client continues execution after initiating the request and processes the result whenever the AppServer makes it available.
The primary use case for Asynchronous HTTP is where the client polls the server for a delayed response. A common example isan AJAX chat client that pushes/pulls from both the client and the server. In this scenario, the client blocks a long period of time on the server’s socket while waiting for a new message.
Async is multi-thread, which means operations or programs can run in parallel. Sync is a single-thread, so only one operation or program will run at a time. Async is non-blocking, which means it will send multiple requests to a server.
We need to add the below mentioned dependency to pom.xml to test the async requests.
In this tutorial, we will see how can we retrieve the child nodes from an XML in Java.
What is XML?
XML stands for eXtensible Markup Language. It is a markup language much like HTML and was designed to store and transport data. XML was designed to be both human- and machine-readable. It is a flexible way to create information formats and share both the format and the data on the World Wide Web, intranets, and elsewhere.
Let’s see a simple XML.
<?xml version = "1.0"?>
<department>
    <employee id = "10001">
        <firstname>Tom</firstname>
        <lastname>Mathew</lastname>
        <salary>25000</salary>
        <age>21</age>
    </employee>

    <employee id = "20001">
        <firstname>Katherine</firstname>
        <lastname>Jason</lastname>
        <salary>15000</salary>
        <age>20</age>
    </employee>

    <employee id = "30001">
        <firstname>David</firstname>
        <lastname>Mathew</lastname>
        <salary>35000</salary>
        <age>25</age>
    </employee>

    <employee id = "40001">
        <firstname>Berry</firstname>
        <lastname>Brian</lastname>
        <salary>50000</salary>
        <age>30</age>
    </employee>
</department>
1.A File object inputFile is created, representing the XML file located at “src/test/resources/testData/test.xml”.
2. A DocumentBuilderFactory instance is created. This is a factory API that enables applications to obtain a parser that produces DOM object trees from XML documents.
4. The XML document is parsed using the DocumentBuilder instance, resulting in a Document object that represents the entire XML document.
Document doc = dBuilder.parse(inputFile);
5. The normalize method is called on the Document object to ensure that the document’s DOM tree is fully normalized, which means that it is structurally correct according to the XML specification
doc.getDocumentElement().normalize();
6. It retrieves a NodeList of all employee elements in the document and prints out the number of such elements.
7. A for loop is used to iterate over each employee node in the NodeList. For each employee node, its name and the values of its id, firstname, lastname, salary, and age child elements are printed out.
for (int temp = 0; temp < nodeList.getLength(); temp++) {
Node node = nodeList.item(temp);
System.out.println("\nCurrent Element :" + node.getNodeName());
if (node.getNodeType() == Node.ELEMENT_NODE) {
Element eElement = (Element) node;
//returns specific attribute
System.out.println("Employee Id : " + eElement.getAttribute("id"));
//returns a list of subelements of specified name
System.out.println("First Name: " + eElement.getElementsByTagName("firstname").item(0).getTextContent());
System.out.println("Last Name: " + eElement.getElementsByTagName("lastname").item(0).getTextContent());
System.out.println("Salary: " + eElement.getElementsByTagName("salary").item(0).getTextContent());
System.out.println("Age: " + eElement.getElementsByTagName("age").item(0).getTextContent());
}
8. If any exceptions occur during the parsing process (such as ParserConfigurationException, SAXException, or IOException), they are caught, and their stack traces are printed out.
The complete program is mentioned below:
import org.w3c.dom.Document;
import org.w3c.dom.Element;
import org.w3c.dom.Node;
import org.w3c.dom.NodeList;
import org.xml.sax.SAXException;
import javax.xml.parsers.DocumentBuilder;
import javax.xml.parsers.DocumentBuilderFactory;
import javax.xml.parsers.ParserConfigurationException;
import java.io.File;
import java.io.IOException;
public class XMLParser {
public static void main(String[] args) {
try {
//Create a DocumentBuilder
File inputFile = new File("src/test/resources/testData/test.xml");
System.out.println("Request :" + inputFile);
DocumentBuilderFactory dbFactory = DocumentBuilderFactory.newInstance();
DocumentBuilder dBuilder = dbFactory.newDocumentBuilder();
Document doc = dBuilder.parse(inputFile);
doc.getDocumentElement().normalize();
//Extract the root element
System.out.println("Root element :" + doc.getDocumentElement().getNodeName());
NodeList nodeList = doc.getElementsByTagName("employee");
System.out.println("Node Length :" + nodeList.getLength());
for (int temp = 0; temp < nodeList.getLength(); temp++) {

        Node node = nodeList.item(temp);
        System.out.println("\nCurrent Element :" + node.getNodeName());

        if (node.getNodeType() == Node.ELEMENT_NODE) {
            Element eElement = (Element) node;

             //returns specific attribute
              System.out.println("Employee Id : " + eElement.getAttribute("id"));

            //returns a list of subelements of specified name
             System.out.println("First Name: " + eElement.getElementsByTagName("firstname").item(0).getTextContent());
             System.out.println("Last Name: " + eElement.getElementsByTagName("lastname").item(0).getTextContent());
             System.out.println("Salary: " + eElement.getElementsByTagName("salary").item(0).getTextContent());
             System.out.println("Age: " + eElement.getElementsByTagName("age").item(0).getTextContent());

    }
}
} catch (ParserConfigurationException | SAXException | IOException e) {
e.printStackTrace();
}
}
}
The output of the above program is
Complex XML
<?xml version = "1.0"?>
<cars>
    <sportscar company = "Porsce">
        <carname type = "formula one">Porsche 718 Boxster</carname>
        <carname type = "sports car">Porsche 718 Cayman</carname>
        <carname type = "sports car">2024 Porsche Panamera</carname>
    </sportscar>

    <supercars company = "Lamborgini">
        <carname>Lamborghini Aventador</carname>
        <carname>Lamborghini Reventon</carname>
        <carname>Lamborghini Gallardo</carname>
    </supercars>

    <supercars company = "Audi">
        <carname>Audi R8</carname>
        <carname>Audi Q8</carname>
        <carname>Audi Q6 e-tron</carname>
    </supercars>
</cars>
The complete program is shown below:
package com.example.XML;

import org.w3c.dom.Document;
import org.w3c.dom.Element;
import org.w3c.dom.Node;
import org.w3c.dom.NodeList;
import org.xml.sax.SAXException;

import javax.xml.parsers.DocumentBuilder;
import javax.xml.parsers.DocumentBuilderFactory;
import javax.xml.parsers.ParserConfigurationException;
import java.io.File;
import java.io.IOException;

public class ComplexXMLParser {

    public static void main(String[] args) {

        try {

            //Create a DocumentBuilder
            File inputFile = new File("src/test/resources/testData/test4.xml");
            System.out.println("Request :" + inputFile);
            DocumentBuilderFactory dbFactory = DocumentBuilderFactory.newInstance();
            DocumentBuilder dBuilder = dbFactory.newDocumentBuilder();
            Document doc = dBuilder.parse(inputFile);
            doc.getDocumentElement().normalize();

            //Extract the root element
            System.out.println("Root element :" + doc.getDocumentElement().getNodeName());

            NodeList sportscarNodeList = doc.getElementsByTagName("sportscar");
           // System.out.println("Node Length :" + nodeList.getLength());

            for (int temp = 0; temp < sportscarNodeList.getLength(); temp++) {

                Node node = sportscarNodeList.item(temp);
                System.out.println("\nCurrent Element :" + node.getNodeName());

                if (node.getNodeType() == Node.ELEMENT_NODE) {
                    Element eElement = (Element) node;

                    //returns specific attribute
                    System.out.println("sportscar : " + eElement.getAttribute("company"));

                    NodeList sportcarNameList = eElement.getElementsByTagName("carname");

                    for (int count = 0; count < sportcarNameList.getLength(); count++) {
                        Node node1 = sportcarNameList.item(count);

                        if (node1.getNodeType() == node1.ELEMENT_NODE) {
                            Element car = (Element) node1;

                            System.out.print("\ncar type : " + car.getAttribute("type"));
                            System.out.print("\ncar name : " + car.getTextContent());

                        }
                    }
                }

            }

            System.out.println("\n====================================================");
            NodeList supercarsNodeList = doc.getElementsByTagName("supercars");
            // System.out.println("Node Length :" + nodeList.getLength());

            for (int temp = 0; temp < supercarsNodeList.getLength(); temp++) {

                Node node1 = supercarsNodeList.item(temp);
                System.out.println("\nCurrent Element :" + node1.getNodeName());

                if (node1.getNodeType() == Node.ELEMENT_NODE) {
                    Element eElement = (Element) node1;

                    //returns specific attribute
                    System.out.println("supercars : " + eElement.getAttribute("company"));

                    NodeList supercarsNameList = eElement.getElementsByTagName("carname");

                    for (int count = 0; count < supercarsNameList.getLength(); count++) {
                        Node node2 = supercarsNameList.item(count);

                        if (node1.getNodeType() == node2.ELEMENT_NODE) {
                            Element car = (Element) node2;

                            System.out.print("car name : " + car.getTextContent()+"\n");

                        }
                    }
                }

            }

        } catch (ParserConfigurationException | SAXException | IOException e) {
            e.printStackTrace();
        }
    }

}
The output of the above program is
We are done! Congratulations on making it through this tutorial and hope you found it useful! Happy Learning!!
In this tutorial, we will see how can we retrieve the child nodes from an XML in Java.
What is XML?
XML stands for eXtensible Markup Language. It is a markup language much like HTML and was designed to store and transport data. XML was designed to be both human- and machine-readable. It is a flexible way to create information formats and share both the format and the data on the World Wide Web, intranets, and elsewhere.
1.A File object inputFile is created, representing the XML file located at “src/test/resources/testData/test.xml”.
2. A DocumentBuilderFactory instance is created. This is a factory API that enables applications to obtain a parser that produces DOM object trees from XML documents.
4. The XML document is parsed using the DocumentBuilder instance, resulting in a Document object that represents the entire XML document.
Document doc = dBuilder.parse(inputFile);
5. The normalize method is called on the Document object to ensure that the document’s DOM tree is fully normalized, which means that it is structurally correct according to the XML specification
doc.getDocumentElement().normalize();
6. It retrieves a NodeList of all employee elements in the document and prints out the number of such elements.
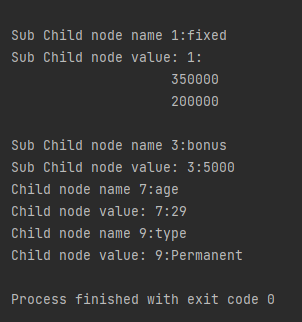
7. It iterates over each employee node in the NodeList. For each employee node, it prints out the node name and retrieves a NodeList of its child nodes.
for (int temp = 0; temp < nodeList.getLength(); temp++) {
Node node = nodeList.item(temp);
System.out.println("\nCurrent Element :" + node.getNodeName());
8. It then iterates over each child node of the employee node. If the child node is an element node (as opposed to other types of nodes like text nodes or comment nodes), it prints out the name and text content of the child node.
NodeList childNodes = node.getChildNodes();
for (int i = 0; i < childNodes.getLength(); i++) {
Node childNode = childNodes.item(i);
if (childNode.getNodeType() == Node.ELEMENT_NODE) {
System.out.println("Child node name " + i + ":" + childNode.getNodeName());
System.out.println("Child node value: " + i + ":" + childNode.getTextContent());
}
}
9. If any exceptions occur during the parsing process (such as ParserConfigurationException, SAXException, or IOException), they are caught, and their stack traces are printed out.
The complete program is mentioned below:
package com.example.XML;
import org.w3c.dom.Document;
import org.w3c.dom.Element;
import org.w3c.dom.Node;
import org.w3c.dom.NodeList;
import org.xml.sax.SAXException;
import javax.xml.parsers.DocumentBuilder;
import javax.xml.parsers.DocumentBuilderFactory;
import javax.xml.parsers.ParserConfigurationException;
import java.io.File;
import java.io.IOException;
public class ChildNodes {
public static void main(String[] args) {
try {
//Create a DocumentBuilder
File inputFile = new File("src/test/resources/testData/test1.xml");
DocumentBuilderFactory dbFactory = DocumentBuilderFactory.newInstance();
DocumentBuilder dBuilder = dbFactory.newDocumentBuilder();
Document doc = dBuilder.parse(inputFile);
doc.getDocumentElement().normalize();
//Extract the root element
System.out.println("Root element :" + doc.getDocumentElement().getNodeName());
NodeList nodeList = doc.getElementsByTagName("employee");
System.out.println("Node Length :" + nodeList.getLength());
for (int temp = 0; temp < nodeList.getLength(); temp++) {
                Node node = nodeList.item(temp);
                System.out.println("\nCurrent Element :" + node.getNodeName());
  NodeList childNodes = node.getChildNodes();
                for (int i = 0; i < childNodes.getLength(); i++) {
                    Node childNode = childNodes.item(i);
                    if (childNode.getNodeType() == Node.ELEMENT_NODE) {
                        System.out.println("Child node name " + i + ":" + childNode.getNodeName());
                        System.out.println("Child node value: " + i + ":" + childNode.getTextContent());

                    }
                }
}
} catch (ParserConfigurationException | SAXException | IOException e) {
e.printStackTrace();
}
}
}
In this tutorial, I will explain the creation of JSON Object Payload with the help of POJO (Plain Old Java Object).
What is POJO?
POJO stands for Plain Old Java Object. It is a very simple object, and it has no bounds or we can say that it has no restrictions other than the Java language specification. Also, it does not require any classpath.
A big advantage of POJO is it increases the readability and reusability of our project code and developers find it easy when understanding the code. Also, POJO is easy to write and anyone can understand them easily.
Now let’s deep dive into some technical terms about the POJO. Below are a few points about the POJO are:
A POJO should not have to extend prespecified classes.
Secondly, a POJO should not have implemented any prespecified interface.
Lastly, POJO should not contain prespecified annotations
A POJO class can follow some rules for better usability. These rules are:-
Each variable should be declared as private just to restrict direct access.
Each variable that needs to be accessed outside class may have a getter, a setter, or both methods. If the value of a field is stored after some calculations, then we must not have any setter method for that.
It Should have a default public constructor.
Can override toString(), hashcode, and equals() methods.
POJO classes are extensively used for creating JSON and XML payloads for API.
In the below example, let me create a simple JSON with some nodes which is actually a 1:1 mapping i.e. each key has a single value, and the type of values is mixed.
Let us create variables in the POJO class now for the above JSON. Now, a class name Employee will be created with the private data members as mentioned in the above JSON. Since we have created all variables as private, then there should be a way to manipulate or retrieve these data. So we create the corresponding getter and setter methods for these data members.
It is very tedious to create getter and setter methods for all the data members for big JSON strings. Every IDE gives you a shortcut to generate getter and setter methods. Here, I am using Eclipse and creating these getter and setter methods.
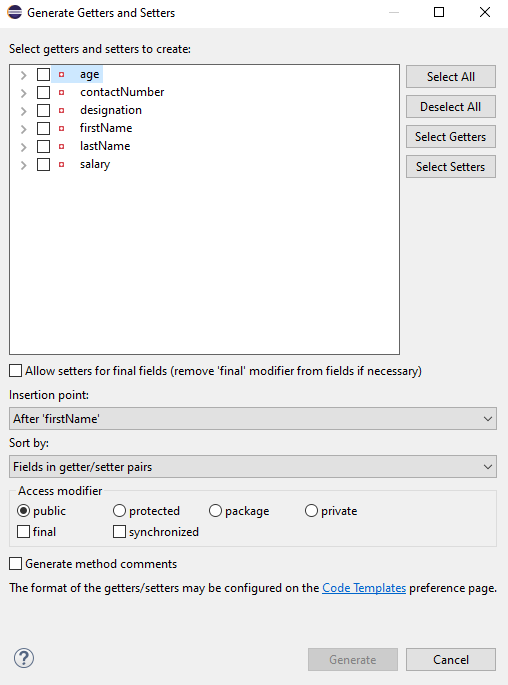
Select all the data members and Right-clickon the page. Then select Source and then select Generate Getter and Setter methods.
This opens a new screen as shown below.
You can select the data member for which you want to create the getter and setter method. I want to create the getter and setter methods for all the data members, so click on Select All and then click on the Generate Button. This will generate the getter and setter methods for all the data members.
Below is the sample code of the Employee table, which contains the data members needed for Employee JSON and their corresponding getter and setter methods.
public class Employee {

	// private variables or data members of POJO class
	private String firstName;
	private String lastName;
	private int age;
	private double salary;
	private String designation;
	private String contactNumber;
	private String emailId;

	// Getter and setter methods
	public String getFirstName() {
		return firstName;
	}

	public void setFirstName(String firstName) {
		this.firstName = firstName;
	}

	public String getLastName() {
		return lastName;
	}

	public void setLastName(String lastName) {
		this.lastName = lastName;
	}

	public int getAge() {
		return age;
	}

	public void setAge(int age) {
		this.age = age;
	}

	public double getSalary() {
		return salary;
	}

	public void setSalary(double salary) {
		this.salary = salary;
	}

	public String getDesignation() {
		return designation;
	}

	public void setDesignation(String designation) {
		this.designation = designation;
	}

	public String getContactNumber() {
		return contactNumber;
	}

	public void setContactNumber(String contactNumber) {
		this.contactNumber = contactNumber;
	}

	public String getEmailId() {
		return emailId;
	}

	public void setEmailId(String emailId) {
		this.emailId = emailId;
	}

}
Using the above POJO class, you can create any number of custom Employee objects and each object can be converted into a JSON Object and Each JSON object can be parsed into Employee POJO.
We will create a JSON object from POJO and vice versa now, which is generally called serialization and deserialization using Jackson APIs.
Serialization – Serialization is a process where you convert an Instance of a Class (Object of a class) into a Byte Stream. Here, we are converting Employee class object to JSON representation or Object
Deserialization – It is the reverse of serializing. In this process, we will read the Serialized byte stream from the file and convert it back into the Class instance representation. Here, we are converting a JSON Object to an Employee class object.
We are using Jackson API for Serialization and Deserialization. So, add the Jackson dependency to the project.
ObjectMapper provides functionality for reading and writing JSON, either to and from basic POJOs (Plain Old Java Objects), or to and from a general-purpose JSON Tree Model (JsonNode), as well as related functionality for performing conversions. It is also highly customizable to work both with different styles of JSON content and to support more advanced object concepts such as polymorphism and object identity.
Now, let us create a Test Class to show Serialization.
public class EmployeeTest {

	@Test
	public void serializationTest()  {

		Employee employee = new Employee();
		employee.setFirstName("Vibha");
		employee.setLastName("Singh");
		employee.setAge(30);
		employee.setSalary(75000);
		employee.setDesignation("Manager");

		// Converting a Java class object to a JSON payload as string
		ObjectMapper mapper = new ObjectMapper();
		String employeeJson = mapper.writeValueAsString(employee);
		String employeePrettyJson = mapper.writerWithDefaultPrettyPrinter().writeValueAsString(employee);
		System.out.println(employeeJson);
		System.out.println(employeePrettyJson);
   }
}try {
			String employeeJson = mapper.writeValueAsString(employee);
			System.out.println(employeeJson);
			String employeePrettyJson = mapper.writerWithDefaultPrettyPrinter().writeValueAsString(employee);
			System.out.println(employeePrettyJson);
		} catch (JsonProcessingException e) {
			e.printStackTrace();
		}
	}
The output of the above program is
Here, ObjectMapper from fasterxml.jackson.databind is used for Serialization.
writeValueAsString() is a method that can be used to serialize any Java value as a String.
writerWithDefaultPrettyPrinter() is used to pretty-print the JSON output. It is a Factory method for constructing ObjectWriter that will serialize objects using the default pretty printer for indentation.
I hope this has helped to clear your doubts regarding POJO and how to create JSON objects using POJO.
We are done! Congratulations on making it through this tutorial and hope you found it useful! Happy Learning!!
API stands for Application Programming Interface. It comprises a set of functions that can be accessed and executed by another software system. Thus, it serves as an interface between different software systems and establishes their interaction and data exchange. APIs can be used in various contexts, including web development, mobile app development, and software integration. For example, web APIs allow websites to interact with external services, such as third-party payment services or storing the information in a database.
What is API Testing?
API testing is a type of software testing that focuses on verifying the functionality, reliability, performance, and security of Application Programming Interfaces (APIs).
Testing the API’s functionality involves verifying that the API behaves as expected according to its specifications. This includes testing different API methods, parameters, headers, and payloads to ensure they produce the correct responses.
In the modern development world, many web applications are designed based on a three-tier architecture model. These are
Presentation Tier– User Interface (UI)
Logic Tier– Business logic is written in this tier. It is also called Business Tier. (API)
Data Tier – Here information and data are stored and retrieved from a Database. (DB) Ideally, these three layers (tiers) should not know anything about the platform, technology, and structure of each other.
We can test UI with GUI testing tools, and we can test logic tier (API) with API testing tools. The logic tier comprises all the business logic, and it has more complexity than the other tiers the test executed on this tier is called API Testing. API Testing tests the logic tier directly and checks expected functionality, reliability, performance, and security.
What is Rest API?
REST is an architectural style that uses simple HTTP calls for inter-machine communication. REST does not contain an additional messaging layer and focuses on design rules for creating statelessservices. A client can access the resource using the unique URI and a representation of the resource is returned. With each new resource representation, the client is said to transfer state. While accessing RESTful resources with HTTP protocol, the URL of the resource serves as the resource identifier, and GET, PUT, DELETE, POST and HEAD are the standard HTTP operations to be performed on that resource.
REST API Testing with Rest Assured
What is Rest Assured?
REST Assured is a Java DSL for simplifying the testing of REST-based services built on top of HTTP Builder. It supports POST, GET, PUT, DELETE, OPTIONS, PATCH, and HEAD requests and can be used to validate and verify the response of these requests.
Rest-Assured library also provides the ability to validate the HTTP Responses received from the server. For e.g. we can verify the Status code, Status message, Headers, and even the Body of the response. This makes Rest-Assured a very flexible library that can be used for testing.
REST Assured can be used to test XML as well as JSON-based web services. REST Assured can be integrated with JUnit and TestNG frameworks for writing test cases for our application.
HTTP Methods for REST API Automation Testing
REST API uses five HTTP methods to request a command:
GET: To retrieve the information at a particular URL.
PUT: To update the previous resource or create new information at a particular URL.
PATCH: For partial updates.
POST: It is used to develop a new entity. Moreover, it is also used to send information to the server, such as uploading a file, customer information, etc.
DELETE: To delete all current representations at a specific URL.
HTTP Status Codes
Status codes are the responses given by a server to a client’s request. They are classified into five categories:
1xx (100 – 199): The response is informational
2xx (200 – 299): Assures successful response
3xx (300 – 399): You are required to take further action to fulfill the request
4xx (400 – 499): There’s a bad syntax and the request cannot be completed
5xx (500 – 599): The server entirely fails to complete the request
Advantages of Rest Assured
It is an Open source Tool i.e. free.
It requires less coding compared to Apache Http Client.
Easy parsing and validation of response in JSON and XML.
The extraction of values and asserting is quite easy using inbuilt Hemcrest Matchers.
It follows BDD keywords like given(), when(), then() which makes code readable and supports clean coding. This feature is available from version 2.0.
It supports quick assertion for status code and response time.
It supports assertion to Status Code, Response Time, Headers, cookies, Content-Type, etc.
It has a powerful logging mechanism.
It can be easily integrated with other Java libraries like TestNG, JUnit as Test Framework and Extent Report, and Allure Report for reporting purposes.
It provides quite good support for different authentication mechanisms for APIs.
It can be integrated with Selenium-Java to achieve End-to-end automation.
It supports JSONPath and XmlPath which helps in parsing JSON and XML response. Rest Assured integrates both by default.
It can be used to verify JSON Schema using JSON Schema Validation library and XML schema validation
It can be integrated with Build Tools like Maven or Gradle and supports CI/CD also.
It supports multi-part form data and Spring Mock Mvc, Spring Web Test Client, Scala and Kotlin.