In this blog we will discuss about automating dynamic web tables using Selenium WebDriver. Table is also a type of Web Element like checkbox, Radio Button, etc.
Tableis a kind of web element, which is displayed, with the help of tag in conjunction with the <tr> tag defines the row of the table and <th> tagtag for headings which defines heading of the table.
There are 2 types of HTML table
1. Static Table – Where number of rows and columns are fixed. 2. Dynamic Table – Where number of rows and columns are not fixed.
Below table is a Dynamic table. Based on input Assignee filter, the number of rows get altered.
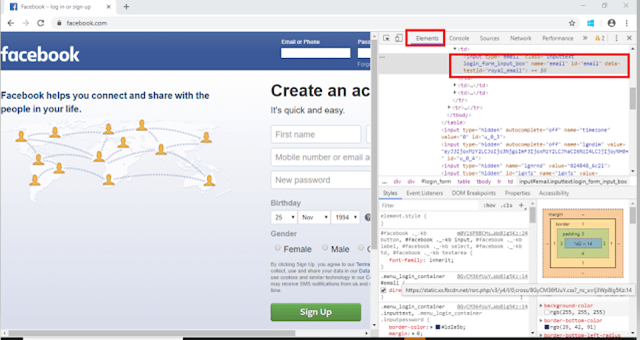
2) Take a note that “Element” tab is the one which displays all the HTML properties belonging to the current web page. Navigate to the “Element” tab if it is not opened by default on the launch.
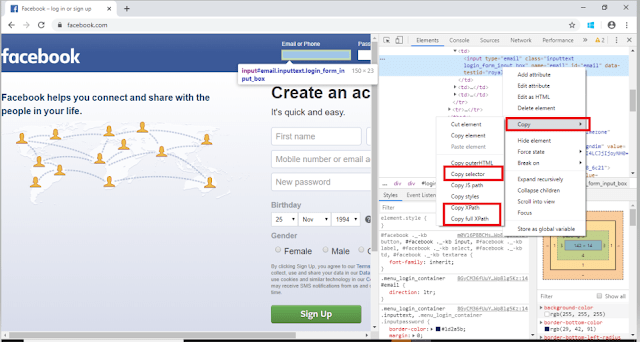
3) In the screenshot, we can see the HTML code of Task web element of the table. Right click on this text and select Copy and then again click where will see options like – Copy Selector, Copy XPath, Copy full XPath.
If we divide this xpath – /html/body/div[2]/div/div[2]/div[1]/div/table/thead/tr/th[2] into three different parts it will be like this
· Part 1 – Location of the table in the webpage /html/body/div[2]/div/div[2]/div[1]/div />
· Part 2 – Table body (data) starts from here
· Part 3 – It says table row 1 and table head 2
In the below image, we can see that the highlighted tags are used to create absolute XPath – html/body/div[2]/div/div[2]/div[1]/div/table/thead/tr/th[2]
If we want to create a relative XPath, then the below image shows that find a unique identifier like id=’task-table’ and then create Relative XPath
//*[@id="task-table"]/thead/tr/th[2]
Below is an example, which will show how to fetch a particular cell data in Dynamic Web Table. We want to fetch the data from row 5 and column 3 and row 6 column 2. We have used Relative XPath as well as absolute XPath to fetch the data.
import org.openqa.selenium.By;
import org.openqa.selenium.WebDriver;
import org.openqa.selenium.chrome.ChromeDriver;
public class DynamicTable_RowData {
        public static void main(String[] args) {
 System.setProperty("webdriver.chrome.driver","C:\\Users\\Vibha\\Desktop\\Drivers\\chromedriver_win32\\chromedriver.exe");

        WebDriver driver = new ChromeDriver();
        driver.manage().window().maximize();
        driver.get("https://www.seleniumeasy.com/test/table-search-filter-demo.html");

String CellData1 = driver.findElement(By.xpath("//*[@id='task-table']/tbody/tr[5]/td[3]")).getText();
        System.out.println("Data in 5th row and 3rd column :"+CellData1);

           String CellData2 = driver.findElement(By.xpath("/html/body/div[2]/div/div[2]/div[1]/div/table/tbody/tr[6]/td[2]")).getText();
        System.out.println("Data in 6th row and 2nd column :"+CellData2);
        driver.close();
        }
}

Output
Data in 5th row and 3rd column :Holden Charles
Data in 6th row and 2nd column :Browser Issues
In my previous tutorials, we have discussed about various types of locators available in Selenium WebDriver, which are used to identify various web elements on a web page. Some of the locators widely used are Id, ClassName, Name, LinkText, PartialLinkText, XPath, CSS Selector and so on. In this blog, will study the mechanism to locate web elements on Google Chrome, Firefox and Internet Explorer.
Google Chrome
First step is to launch the Chrome Browser with desired URL. Here, we have launched Chrome browser and accessed Facebook page. I want to find the locator of Email or Phone textbox, so I will click on that textbox, right click, and click on “Inspect”.
2. Take a note that “Element” tab highlighted in the screenshot. Thus, element tab is the one, which displays all the HTML properties belonging to the current web page. Navigate to the “Element” tab if it is not open by default on the launch.
3. In the screenshot, we can see the HTML code of Email or Phone Textbox. Right click on this text and then again click on Copy where will see options like – Copy Selector, Copy XPath, Copy full XPath
Copy Selector will tell the CSS Selector path of the WebElement
#email
Copy XPath will tell the Xpath of the WebElement
//*[@id="email"]
Copy full XPath will tell the absolute path of the WebElement
The chromedriver is implement as a WebDriver remote server that instructs the browser what to do by exposing Chrome’s internal automation proxy interface.
Firefox
1. First step is to launch the Firefox Browser with desired URL, ie Facebook. I want to find the locator of Email or Phone textbox, so I will click on that textbox and right click and click on “Inspect Element (Q)”.
2. Take a note that “Inspector” tab is highlight in the screenshot. Thus, element tab is the one, which displays all the HTML properties belonging to the current web page. Navigate to the “Inspector” tab if it is not open by default on the launch.
3. In the screenshot, we can see the HTML code of Email or Phone Textbox. Right click on this text and then again click on Copy where will see options like – Copy CSS Selector, Copy XPath, Copy CSS Path
Copy CSS Path will tell the CSS path of the WebElement
Copy Selector will tell the CSS Selector path of the WebElement
#email
Copy XPath will tell the Xpath of the WebElement
//*[@id="email"]
System.setProperty("webdriver.gecko.driver","C:\\Users\\Vibha\\Desktop\\Drivers\\geckodriver-v0.26.0-win64\\geckodriver.exe");
WebDriver driver = new FirefoxDriver();
Internet Explorer
1. First step is to launch the Firefox Browser with desired URL. Here, we have launched Firefox browser and accessed Facebook page. I want to find the locator of Email or Phone textbox, so I will click on that textbox, right click, and click on “Inspect Element”.
2. Take a note that “DOM Explorer” tab is highlight in the screenshot. Thus, element tab is the one, which displays all the HTML properties belonging to the current web page. Navigate to the “DOM Explorer” tab if it is not open by default on the launch.
System.setProperty("webdriver.ie.driver","C:\\Users\\SingVi04\\Desktop\\Automation\\Drivers\\IEDriverServer_x64_3.150.1\\IEDriverServer.exe");
WebDriver driver = new InternetExplorerDriver();
We assume here that Selenium WebDriver is download and installed with Eclipse. If not, please refer this link
In this tutorial, we will see how to create a simple Selenium WebDriver script using JAVA. The most important thing is that JAVA, Eclipse and Selenium WebDriver are already install in the machine. If not, then please refer the link – How to Download & Install Selenium WebDriver.
To create our first Selenium WebDriver Script, we have to create a Java Project, Package and Class in Eclipse.
Provide Package Name – here I have provided AutomationSuite
JRE – Use an execution environment JRE: JavaSE-1.8 (This is the version of Java on your machine)
Project Layout – Create separate folders for source and class files
ii. Create a package “SeleniumTutorial” – Right click Java Project (AutomationSuite) ->Click File ->New ->Package
iii. Create a Java Class “FirstProgram” – Right click Java Package (SeleniumTutorial) ->Click File ->New ->Class
Name: Name of the class (FirstProgram)
Modifiers – Public
Which method stubs would you like to create – public static void main(String[] args) and click Finish
Above displayed image explains the structure of Project in Eclipse.
Add Selenium Jar files to the Java Project
1. Right click on AutomationSuite and click on Properties.
2. Click on Java Build Path. Select Libraries. Click on – Add External JARs
3. Go to the path where Selenium WebDriver JAR folder was downloaded and select 2 JAR files – client-combined-3.141.59 and client-combined-3.141.59-sources and click on Open button.
4. Similarly, go to Lib folder of Selenium file and select the entire JAR present there
5. To verify that the JAR’s are added or not, click on Referenced Libraries and will see all these JARs are present here. For more details, refer the link
Scenario:
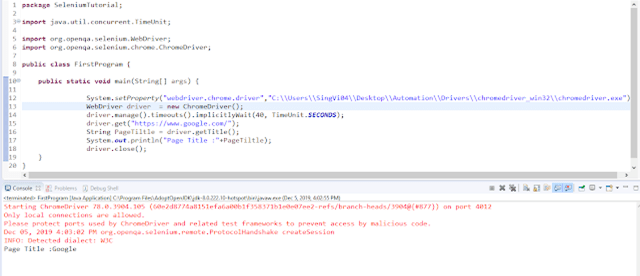
To open appropriate URL and verify the title of the home page Steps: i. Open Chrome browser ii. Go to the specified URL – http://www.google.com iii. Verify the title and print the output of the title iv. Close the Chrome browser
import java.util.concurrent.TimeUnit;
import org.openqa.selenium.chrome.ChromeDriver;

public class FirstProgram {

     public static void main(String[] args) {

 System.setProperty("webdriver.chrome.driver","C:\\Users\\vibha\\Downloads\\Drivers\\chromedriver_win32\\chromedriver.exe"");

         WebDriver driver = new ChromeDriver();
         driver.manage().timeouts().implicitlyWait(40, TimeUnit.SECONDS);
         driver.get("https://www.google.com/");
         String PageTiltle = driver.getTitle();
         System.out.println("Page Title :"+PageTiltle);
         driver.close();
     }
}
To run this program, go to Run->Run or Green Icon shown below
In this tutorial, we will get to know how we can get the option values of a dropdown using Webdriver. This can be done by using getOptions().
getOptions( ) : List– It shows all options belonging to the Select tag. It takes no parameter and returns List.
oSelect.getOptions();
Below is an example on how to use getOptions. We want to print all the options of Drop Down Month.
import java.util.List;
import java.util.concurrent.TimeUnit;
import org.openqa.selenium.By;
import org.openqa.selenium.WebElement;
import org.openqa.selenium.firefox.FirefoxDriver;
import org.openqa.selenium.support.ui.Select;

public class DropDown_Options {
      public static void main(String[] args) {
         System.setProperty(“webdriver.gecko.driver”,“C:\\Users\\vibha\\Downloads\\geckodriver-v0.24.0-win64\\geckodriver.exe”);
            FirefoxDriver driver = new FirefoxDriver();

            driver.manage().timeouts().implicitlyWait(60, TimeUnit.SECONDS);
            driver.get("https://www.facebook.com/";);

Select mselect = new Select(driver.findElement(By.id(“month”)));

            // Print all the options for the selected drop down and select one option of your choice
            // Get the size of the Select element
            List mSize = mselect.getOptions();
            int OptionSize = mSize.size();

            // Setting up the loop to print all the options
            for(int i =0; i < OptionSize ; i++)
          {

          // Storing the value of the option
           String Options = mselect.getOptions().get(i).getText();

          // Printing the stored value
           System.out.println(Options);
        }
   }
}

Output
Month
Jan
Feb
Mar
Apr
May
Jun
Jul
Aug
Sep
Oct
Nov
Dec
In this tutorial, we will see how to identify the form elements like CheckBox and Radio Button
Toggling a CheckBox or Radio Button on/off is also done using the click() method.
IsSelected – IsSelected method, let us know that the element selected or not. Assume there are two Radio Buttons/Check Boxes, one selected by default and you want to select the other one for your test. Then, we use IsSelected method. When there is a group of Radio Buttons/Check Boxes on the page then, most probably, their names are same, but values are different. Then we use the Webdriver findElements command to get the list of web elements.
Below is the working example of CheckBox.
import java.util.concurrent.TimeUnit;
import org.openqa.selenium.By;
import org.openqa.selenium.WebDriver;
import org.openqa.selenium.chrome.ChromeDriver;

public class Checkbox_Test {

      public static void main(String[] args) {
            System.setProperty("webdriver.chrome.driver","C:\\Users\\Vibha\\Desktop\\Drivers\\chromedriver_win32\\chromedriver.exe");

          WebDriver driver = new ChromeDriver();
          driver.manage().timeouts().implicitlyWait(60, TimeUnit.SECONDS);
          driver.get("https://www.seleniumeasy.com/test/basic-checkbox-demo.html");

           //Single option selection
           System.out.println("*******Single option selection *********");
           driver.findElement(By.id("isAgeSelected")).click();
           String Message = driver.findElement(By.id("txtAge")).getText();
           System.out.println("Message is :"+Message);

       // close the web browser
        driver.close();
    }
}

Output
*******Single option selection *********
Message is :Success - Check box is checked
How to click all options in the Checkbox
In the below image, there are 4 checkboxes. Initially, when checkboxes were not selected, the test mentioned on the button is – Check All and once all the options are checked, the text on button changes to – Uncheck All.
import java.util.List;
import java.util.concurrent.TimeUnit;
import org.openqa.selenium.By;
import org.openqa.selenium.WebDriver;
import org.openqa.selenium.WebElement;
import org.openqa.selenium.chrome.ChromeDriver;

public classCheckbox_Test {

     public static voidmain(String[] args) throws Exception {

 System.setProperty("webdriver.chrome.driver","C:\\Users\\Vibha\\Desktop\\Drivers\\chromedriver_win32\\chromedriver.exe");
          WebDriver driver = newChromeDriver();
          driver.manage().timeouts().implicitlyWait(60, TimeUnit.SECONDS);
          driver.get("https://www.seleniumeasy.com/test/basic-checkbox-demo.html");

          //Display the value of Button before clicking the options of checkbox
          String buttontext_beforeclick = driver.findElement(By.xpath(".//*[@id='check1']")).getAttribute("value");
          System.out.println("Text before click :"+buttontext_beforeclick);

          // Find the CheckBox by its classname
          List list = driver.findElements(By.xpath("//input[@type ='checkbox' and @class='cb1-element']") );

          // Get the number of CheckBoxes available
          int CheckBox_Size = list.size();
          System.out.println("Number of Checkbox options :"+CheckBox_Size);

          // Iterate the loop from first CheckBox to last Checkbox
          for(int i=0;i<CheckBox_Size;i++)
          {
                list.get(i).click();
           }
          String buttontext_afterclick = driver.findElement(By.xpath(".//*[@id='check1']")).getAttribute("value");
          System.out.println("Text after click :"+buttontext_afterclick);
    driver.quit();
     }
}

Output
Text before click :Check All
Number of Checkbox options :4
Text after click :Uncheck All
Similarly, below I have explained Radio Button.
import java.util.List;
import java.util.concurrent.TimeUnit;
import org.openqa.selenium.By;
import org.openqa.selenium.WebElement;
import org.openqa.selenium.firefox.FirefoxDriver;

 public class Radio_Test {

       public static void main(String[] args) {

     System.setProperty("webdriver.gecko.driver","C:\\Users\\vibha\\Downloads\\geckodriver-v0.24.0-win64\\geckodriver.exe");

          FirefoxDriver driver = new FirefoxDriver();
          driver.manage().timeouts().implicitlyWait(60, TimeUnit.SECONDS);
          driver.get("https://www.seleniumeasy.com/test/basic-radiobutton-demo.html");

          List<WebElement> Radio_Options = driver.findElements(By.name("optradio"));

          // Create a boolean variable which will hold the value (True/False)
          boolean radio_value = false;

          // This statement will return True, in case of first Radio button is selected
         radio_value = Radio_Options.get(0).isSelected();

         //Identify if Radio Button 1 is selected or not. If Button 1 is already selected, then select Button 2
         if(radio_value==true)
         {
              Radio_Options.get(1).click();
              System.out.println("Button Selected is :"+ Radio_Options.get(1).getAttribute("value"));
         }
         else
         {
               Radio_Options.get(0).click();
               System.out.println("Button Selected is :"+ Radio_Options.get(0).getAttribute("value"));
          }

          driver.findElement(By.id("buttoncheck")).click();
          String Button_Selected = driver.findElement(By.xpath("//*[@id='easycont']/div/div[2]/div[1]/div[2]/p[3]")).getText();
          System.out.println("Get Checked Value is :"+ Button_Selected);

         //Group Radio Button Selection
         driver.findElement(By.xpath(".//input[@name='gender'and @value='Female']")).click();
         driver.findElement(By.xpath(".//input[@name='ageGroup' and @value='15 - 50']")).click();
         driver.findElement(By.xpath(".//*[@id='easycont']/div/div[2]/div[2]/div[2]/button")).click();
          String Group_Radio_Message = driver.findElement(By.xpath("//*[@id='easycont']/div/div[2]/div[2]/div[2]/p[2]")).getText();

          System.out.println("Get Values are :"+Group_Radio_Message);

         // close the web browser
        driver.close();
      }
}

Output
Button Selected is :Male
Get Checked Value is :Radio button 'Male' is checked
Get Values are :Sex : Female
Age group: 15 - 50
WebElement represents HTML DOM(Document Object Model) element. Anything present on web page like alert box, text box, button- all are WebElements. When HTML loads into a web browser, it is convert into document object
WebElement in Selenium is a generic class that converts object into document object. There are a number of WebElement commands present in Selenium, but in this blog will discuss about
1) sendKeys() 2) clear() 3) Submit() 4) click()
1) SendKeys – This simulate typing into an element, which may set its value. This method accepts CharSequence as a parameter and returns nothing.
This method works fine with text entry elements like INPUT and TEXTAREA elements.
Input boxes refer to either of these two types: 1. Text Fields– text boxes that accept typed values and show them as they are. 2. Password Fields– text boxes that accept typed values but mask them as a series of special characters (commonly dots and asterisks) to avoid sensitive values to be displayed.
To enter text into the Text Fields and Password Fields, sendKeys() is the method available on the WebElement.
2) Clear – If this element is a text entry element, this will clear the value. This command does not require any parameter and return nothing.
Syntax:
clear( ) : void
Command:
email.clear();
3) Submit – This method works well/better than the click(), if the current element is a form, or an element within a form. This command does not require any parameter and return nothing.
Syntax:
submit():void
Command:
driver.findElement(By.id("u_0_2")).submit();
4) Click – This simulates the clicking of any element. This command does not require any parameter and return nothing.
The buttons can be accessed using the click() method.
Syntax:
click():void
Command:
driver.findElement(By.id("u_0_2")).click();
Let us write a small program to see the use of these commands. I have used both click() and submit commands() to show how they work, but when you try to run this program, comment any one of the part.
import java.util.concurrent.TimeUnit;
import org.openqa.selenium.By;
import org.openqa.selenium.WebDriver;
import org.openqa.selenium.WebElement;
import org.openqa.selenium.firefox.FirefoxDriver;
public class Facebook_Login {
public static void main(String[] args) {
System.setProperty("webdriver.gecko.driver","C:\\Users\\vibha\\Downloads\\geckodriver-v0.24.0-win64\\geckodriver.exe");
// Create a new instance of the Firefox driver
WebDriver driver = new FirefoxDriver();
driver.manage().timeouts().implicitlyWait(30, TimeUnit.SECONDS);
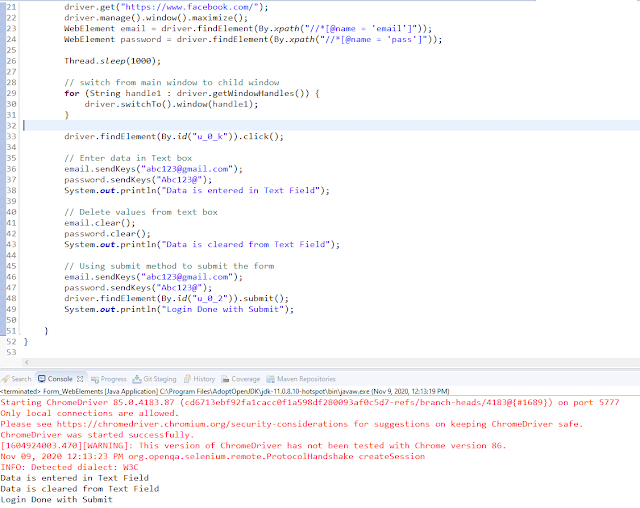
driver.get("https://www.facebook.com/");
driver.manage().window().maximize();
WebElement email = driver.findElement(By.xpath("//*[@name = 'email']"));
WebElement password = driver.findElement(By.xpath("//*[@name = 'pass']"));
Thread.sleep(1000);
// switch from main window to child window
for (String handle1 : driver.getWindowHandles()) {
driver.switchTo().window(handle1);
}
driver.findElement(By.id("u_0_k")).click();
// Enter data in Text box
email.sendKeys("abc123@gmail.com");
password.sendKeys("Abc123@");
System.out.println("Data is entered in Text Field");
// Delete values from text box
email.clear();
password.clear();
System.out.println("Data is cleared from Text Field");
// Using submit method to submit the form
email.sendKeys("abc123@gmail.com");
password.sendKeys("Abc123@");
driver.findElement(By.id("u_0_2")).submit();
System.out.println("Login Done with Submit");
}
}
Output:
Data is entered in Text Field
Data is cleared from Text Field
Login Done with Submit
Identifying the web elements in a page is required to interact with the web page. Selenium WebDriver give us FindElement and FindElements methods to locate elements on the webpage. There are multiple ways to identify uniquely a web element within the web page such as ID, Name, Class Name, LinkText, PartialLinkText, TagName, and XPath.
FindElement Command
This method locates the first web element on the current web page matching the criteria mentioned as parameters.
If the web element is not found, it will throw an exception – NoSuchElementException.
Syntax:
findElement(By arg0):WebElement - WebDriver
Command:
driver.findElement(By.xpath("Xpath location"));
How to use FindElement in Selenium
The following application is used for demo purposes:
Close the child window and move to facebook main page
Enter the emailId and password and click on Log In Button
import java.util.concurrent.TimeUnit;
import org.openqa.selenium.By;
import org.openqa.selenium.WebDriver;
import org.openqa.selenium.firefox.FirefoxDriver;
public class FindElement_Example {

         public static voidmain(String[] args){
           System.setProperty("webdriver.gecko.driver","C:\\Users\\vibha\\Downloads\\geckodriver-v0.24.0-win64\\geckodriver.exe");

         // Create a new instance of the Firefox driver
          WebDriver driver = new FirefoxDriver();

        // Set implicit wait of 60 sec for managing waits in selenium webdriver
         driver.manage().timeouts().implicitlyWait(60, TimeUnit.SECONDS);

        // Launch a new web page and load Facebook
         driver.get("https://www.facebook.com/");
         Thread.sleep(1000);

        //switch from main window to child window
        for (String handle1 : driver.getWindowHandles()) {
               driver.switchTo().window(handle1);
         }
         driver.findElement(By.id("u_0_k")).click();

         // Enter the values in Email and Password Textboxes
         driver.findElement(By.name("email")).sendKeys("abc@gmail.com");
         driver.findElement(By.id("pass")).sendKeys("abcd1234!");

         // Click on Log In Button
         driver.findElement(By.id("u_0_b")).click();
         driver.close();
    }
}
Scenario – Error
Open the web page
Close the child window and move to facebook main page
Use incorrect locator to find emailId
Execution halts and then stopped with NoSuchElementException
import java.util.concurrent.TimeUnit;
import org.openqa.selenium.By;
import org.openqa.selenium.WebDriver;
import org.openqa.selenium.firefox.FirefoxDriver;

public class FindElement_Example {

         public static void main(String[] args){
           System.setProperty("webdriver.gecko.driver","C:\\Users\\vibha\\Downloads\\geckodriver-v0.24.0-win64\\geckodriver.exe");

         // Create a new instance of the Firefox driver
          WebDriver driver = new FirefoxDriver();

         // Set implicit wait of 60 sec for managing waits in selenium webdriver
         driver.manage().timeouts().implicitlyWait(60, TimeUnit.SECONDS);

         // Launch a new web page and load Facebook
         driver.get("https://www.facebook.com/");
         Thread.sleep(1000);

         //switch from main window to child window
         for (String handle1 : driver.getWindowHandles()) {
                 driver.switchTo().window(handle1);
          }
          driver.findElement(By.id("u_0_k")).click();

         // Enter the values in Email and Password Textboxes
          driver.findElement(By.name("email")).sendKeys("abc@gmail.com");
          driver.findElement(By.id("pass")).sendKeys("abcd1234!");

          // Click on Log In Button
          driver.findElement(By.id("u_0_b")).click();
          driver.close();
      }
}
FindElements Command
This method locates all the web elements on the current web page matching the criteria mentioned as parameter.
If not found any WebElement on current page as per given element locator mechanism, it will return empty list.
Syntax
findElements (By arg0):List
Below is the example of findElements
import java.util.List;
import java.util.concurrent.TimeUnit;
import org.openqa.selenium.By;
import org.openqa.selenium.WebDriver;
import org.openqa.selenium.WebElement;
import org.openqa.selenium.firefox.FirefoxDriver;

public class FindElements_Example {
       public static void main(String[] args) {
        System.setProperty("webdriver.gecko.driver","C:\\Users\\vibha\\Downloads\\geckodriver-v0.24.0-win64\\geckodriver.exe");
            // Create a new instance of the Firefox driver
             WebDriver driver = new FirefoxDriver();

             // Set implicit wait of 60 sec for managing waits in selenium webdriver
             driver.manage().timeouts().implicitlyWait(60, TimeUnit.SECONDS);

             // Launch a new web page and load Facebook
             driver.get("https://www.facebook.com/");
             Thread.sleep(1000);

             // switch from main window to child window
             for (String handle1 : driver.getWindowHandles()) {
                    driver.switchTo().window(handle1);
             }
             driver.findElement(By.id("u_0_k")).click();
             driver.findElement(By.xpath("//*[@id='u_0_2']")).click();

             // Find all elements and store into list
              List Link_List = driver.findElements(By.id("month"));
              for (WebElement link : Link_List)

              // Print all the elements from the list
              System.out.println(link.getText());
               driver.close();
        }
}

Output
Month
Jan
Feb
Mar
Apr
May
Jun
Jul
Aug
Sep
Oct
Nov
Dec
Differences between findElement() and findElements() method:
· Return type of findElement() is a WebElement (single) while Return type of findElements() is a List (multiple).
· findElement() method will throw noSuchElementException if web element is not found in WebPage while findElements() will return an empty list and do not throw any.
We are done! Congratulations on making it through this tutorial and hope you found it useful! Happy Learning!!
WebDriver is a tool for automating web application testing, and in particular, to verify that they work as expected. WebDriver is design to provide a simpler, more concise programming interface in addition to addressing some limitations in the Selenium-RC API. Selenium-WebDriver was develop to better support dynamic web pages where elements of a page may change without the page itself being reload. WebDriver’s goal is to supply a well-designed object-oriented API that provides improved support for modern advanced web-app testing problems.
In this tutorial, we are discussing about below mentioned topics:- 1) How to access the methods of WebDriver? 2) Various Browser Commands
get()
getTitle()
getCurrentUrl()
getPageSource()
getClass()
close()
quit()
How to access the methods of WebDriver?
To access a method of WebDriver, you need to create a driver object from WebDriver and press. dot key. This will list all the methods. Here, you can see that I have used driver.get, so it will show all the methods starts with get.
Method Name – I have explained earlier about Method. A method is a block of code that is use to perform certain actions. Method runs when it is call. Method name is the name of method we are going to use.
Parameter Data Type – It is pass as an argument to the method to perform certain operation. Here, string data type is use as an argument.
Return Type – Methods can return values like getTitle() : String as string is here the return type. In the above example, return type is void means do not return anything.
Browser Commands
1) Get – This command loads a new web page in the current browser window and open the webpage mentioned as argument. It accepts string as parameter and void means returns nothing.
Syntax
get(String arg0) : void
Command
Command - driver.get(URL)
2) Get Title – This command retrieves the title of current web page. It does not accept any parameter and returns a string value.
Syntax
getTitle() : String
Command
driver.getTitle()
3) Get Current URL – This command retrieves the URL of current web page. It does not accept any parameter and returns a string value.
Syntax
getCurrentUrl() : String
Command
driver.getCurrentUrl();
4) Get Page Source – This command returns the page source of current web page. . It does not accept any parameter and returns a string value.
Syntax
getPageSource() : String
Command
driver.getPageSource();
5) Get Class – The command is use to retrieve the Class object that represents the runtime class of this object.
Syntax
getClass()
Command
driver.getClass();
6) Close – This command is use to close the current web browser, which is controlled by WebDriver. This command does not require any parameter and void means return nothing.
Syntax
close(): void
Command
driver.close()
7) Quit – This command close all the browsers opened by webDriver. This command does not require any parameter and void means return nothing.
Syntax
quit(): void
Command
driver.quit();
Now, let us write a small program to show the use of methods of WebDriver.
Launch a new Firefox browser
Open facebook.com
Get Page Title name and print
Get Page URL and print on Eclipse Console
Get Page Source (HTML Source code) and Page Source length and print Page length
Get Runtime class name of the object
Close the Browser
import java.util.concurrent.TimeUnit;

import org.openqa.selenium.WebDriver;
import org.openqa.selenium.firefox.FirefoxDriver;

public class Selenium_Browser_Commands {
    public static void main(String[] args) throws {
         System.setProperty("webdriver.gecko.driver",
                                              "C:\\Users\\Vibha\\Desktop\\SeleniumKT\\geckodriver-v0.27.0-win64\\geckodriver.exe");

             // Create a new instance of the Firefox driver
             WebDriver driver = new FirefoxDriver();
             driver.manage().window().maximize();

            // Set implicit wait of 60 seconds
             driver.manage().timeouts().implicitlyWait(60, TimeUnit.SECONDS);

            // Launch a new web page and load Facebook using Get Command
             driver.get("https://www.facebook.com/");

             // Get the Title of web page
             String PageTitle = driver.getTitle();
             System.out.println("Title of page is :"+ PageTitle);

             // Get URL of current web page
             String PageURL = driver.getCurrentUrl();
             System.out.println("URL of current page is :" + PageURL);

             // Get Source code of current web page
             String PageSource = driver.getPageSource();
             int PageSource_Length = PageSource.length();
             System.out.println("Length of page source of current page is :" + PageSource_Length);

              // Get Runtime class of this object
              Class<? extends WebDriver> className = driver.getClass();
              System.out.println("className :" + className);

              // Close the current web page
              driver.close();
        }
}

Output
Title of page is :Facebook – log in or sign up
URL of current page is :https://www.facebook.com/
Length of page source of current page is :293624
className :class org.openqa.selenium.firefox.FirefoxDriver
In the previous tutorial, I explained various locators like id, className, tagName, name, linktext, and partiallinktext present in Selenium to locate web elements on the web page. In this tutorial, I will explain about another type of locator called XPath.
In Selenium automation, if you are unable to locate a web element using id, class, name, etc, then XPath comes into the picture to locate the web element. The full form of XPath is XML Path. It is used to locate a web element on a web page using HTML DOM structure. To know more about the path, refer to my previous blog. Below is the syntax of XPath
//: select the current node. tagname: name of the tag of a particular node. @: to select attribute. Attribute: name of the attribute of the node. Value: value of the attribute
1) Basic XPath
XPath’s expression selects nodes based on ID, class, etc. from an XML web page.
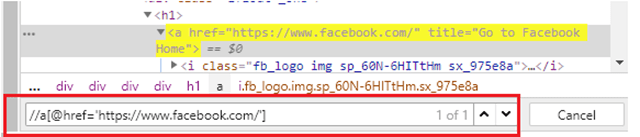
Go to http://www.facebook.com and inspect the Email or Phone textbox. How to inspect a web element on the web page is explained in the previous blog. Some of the basic examples of XPath is displayed below:
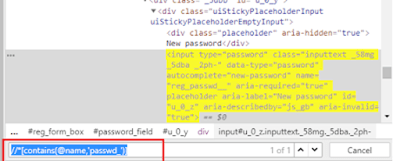
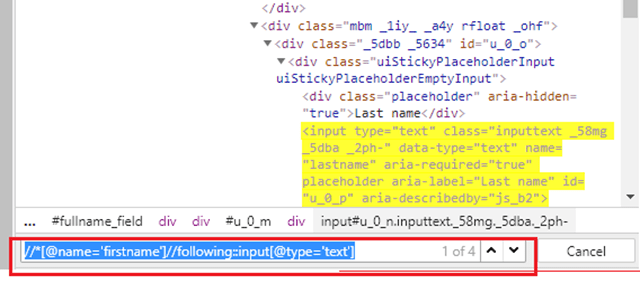
It is used if the value of any web element changes dynamically. Using this expression, you can find the element with partial text.
Syntax
By.xpath("//*[contains(@name,'passwd_')]")
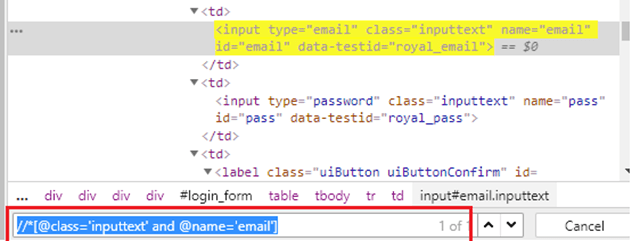
3) OR & AND
OR & AND expression uses 2 conditions to identify a web element.
In the case of OR, if any of the conditions is true, then the element will be located. Whereas in the case of AND, both the conditions should be true to locate the element.
Syntax
By.xpath("//*[@class='inputtext' or @name='email']")
Here, if you observe, class – ‘inputtext’ is same for 2 web elements, so with OR condition it will locate 2 web elements.
Syntax
By.xpath("//*[@class='inputtext' and @name='email']")
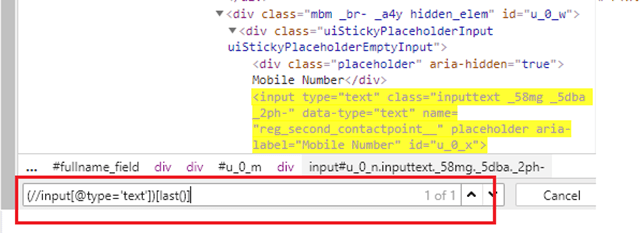
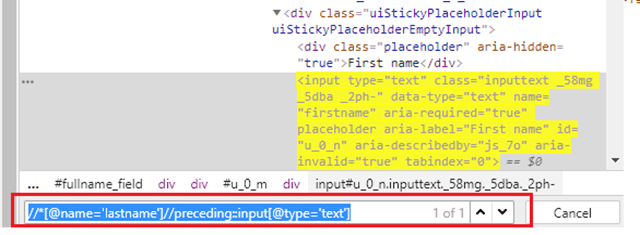
4) Start-with function
This function finds the web elements whose value changes dynamically. In the expression, we will use that value of the web element which doesn’t change. Let’s see a small example of using the start-with() function.
As the software development process changes from waterfall to Agile methodology, it becomes essential to use automation for testing. The reason is now there are frequent productions, so to perform regression testing, it is advisable to use automation. Automation testing means using an automation tool to execute the test scripts. This reduces human intervention, which results in avoiding any human error as well as reduces the test execution time. Automation testing is preferable for those test scripts which are executed repeatedly and execution is time-consuming. Saying this, one should keep in mind that we can’t automate everything. The ideal scenario is to automate that part whose ROI (Return on Investment) is higher in terms of automation.
What is Selenium??
Firstly, Selenium is not a single automation tool like QTP, but it is basically a suite of software or a set of JAR files to automate web browsers across various browsers. Selenium is used by many companies, but a few to mention are Netflix, Google, HubSpot, Fitbit, and more.
Selenium Packages
Selenium IDE (Integrated Development Environment) – It is an add-on feature on Mozilla Firefox and Chrome. It is a playback and recording tool. You don’t need to know any language for using this tool.
Selenium RC (Selenium 1.0) – RC means Remote Control. Selenium RC was the main Selenium project for a long time before the WebDriver/Selenium merge brought up Selenium 2, the newest and more powerful tool. Selenium RC is a tool that allows you to write automated web application UI tests in any programming language against any HTTP website using any mainstream enabled JavaScript enabled browser.
Selenium Grid – Grid supports parallel execution, which means multiple test scripts can be executed at the same time on multiple browsers. Selenium Grid supports distributed test execution. So, it will speed up the test execution.
Selenium Grid follows Hub-node architecture. The Hub knows the configuration of each node connected to it. When the Hub receives the information that a test needs to be run along with browser and OS information, then it checks for the available node with the same combination and sends the Selenium command to that node.
Selenium WebDriver – This is the latest version of Selenium. In WebDriver, web elements are identified on a web browser and then actions are performed on these web elements. Selenium WebDriver supports the testing of dynamic pages where web elements change without reloading the page. WebDriver overcomes the problem of single host origin policy which is present in RC. There is a website that is using Selenium to run an asynchronous job in their flask webapp. For more detail, you can refer the website – ExamDeewana.
What is a Single Host Origin Policy ??
This is an important aspect of the web application security model. As per this policy, a web browser allows scripts present on the first web page to access the data on the second web page, provided both the web pages have the same origin, which means the URI scheme, hostname, and port number are the same.
Why Selenium??
We know that there are a lot of automation tools in the market like QTP, RFT (Rational Functional Tester), and so on, then why Selenium is so famous.
1) Open Source – Selenium is an open-source tool, which means no associated cost of licensing. So, it is very cost-effective in the terms of automating the testing.
2) Supports multiple languages, browsers, and Operating systems – Selenium supports multiple languages like Python, Pearl, Ruby, .Net, Java, C#, and PHP. You do need not to know multiple languages to start using Selenium. You should be proficient in any one of the above-mentioned languages and good to go. One of the most important features is that you do need not create the test script in the same language in which the web application is created. Suppose a web application is developed using JavaScript, but we can use any of the above mentioned languages to create Selenium test cases. Selenium supports a range of browsers like Google Chrome, IE, Mozilla, Opera, Microsoft Edge, Safari, and Html Driver. It also supports different operating systems such as Windows, MAC, Linux, Android, iOS.
3) Supports Parallel and Cross Browser Testing – Selenium supports parallel test execution. That means we can open multiple browsers at the same time and execute the test cases. This decrease the execution time significantly. Selenium supports Cross browser test execution. This refers to the fact that we can open different browsers like IE and Chrome and execute the same test cases or different test cases at the same time. This increases the coverage of test execution
4) Supports Integration with DevOps, and Continuous Integration flow – Selenium can be easily integrated with various third-party tools like Jenkins, Maven, TestNG, JUnit, and Git.
4.1Jenkins – Jenkins is a continuous integration tool and can be integrated with Selenium. Jenkins is used for automatic test execution. That means whenever there is any change in software, Jenkins allows you to run the tests every time and deploy the changes to a new environment when the tests pass. Jenkins is also used for scheduling the tests to run at a specific time. 4.2 Maven – Maven is a build management tool, based on the concept of Page Object Model (POM). It is used to define the structure of the project, dependencies, and build and test management. POM.xml file contains information about the version of web driver. It automatically downloads the necessary files from the repository to the local repository. 4.3TestNG – TestNG is an open-source automation testing framework. It helps to group and prioritize the test scripts and support data parameterization and reporting features. 4.4Git– Git is an open-source version control system. It allows committing the work locally and then syncing the local copy of the repository with a copy of the server.
5) Framework Compatibility – Selenium supports various test automation frameworks like Data Driven, Keyword, or Hybrid. Users can select any type of framework depending on the project requirement. Selenium has lots of methods to locate the elements in a webpage such as DOM, CSS, XPath, and so on. It can also be used to test web applications that use JavaScript and AJAX technologies.
6) Supports mobile Testing – Selenium doesn’t perform mobile testing. But it supports mobile testing with the help of additional software like Selendroid and Appium. This software is based on Selenium, so anyone who is well-versed in selenium can apply the same principles for mobile app testing.
7) Supports Database Testing – Selenium WebDriver in itself can’t perform Database Testing, but this can be done by using WebDriver with JDBC (“Java Database Connectivity”) API. The API lets the user connect and interact with the data source and fetch the data with the help of automated queries.
8) System Compatibility – Internet Explorer(IE) and Google Chrome support both 32-bit and 64-bit versions, where you can download and use them based on your system requirement.
9) Selenium 4.0 – In Selenium 4.0, all the vendors like Google, Apple, Microsoft, and Firefox have their own drivers to work on Selenium. Selenium 4.0 supports Selenium Grid and Selenium WebDriver and stops using Selenium RC directly. Selenium Core is completely removed from the latest version of Selenium 3.0.
Like any other tool, Selenium also has some limitations, such as:-
1) Programming knowledge is needed – Selenium does not support codeless test automation. Testers need to know any one of the programming languages which are supported by selenium.
2) No Image Comparison – Selenium doesn’t support image comparison. To perform image comparison, selenium needs to be integrated with a third-party tool called – Sikuli
3) No Official Customer Service Support – It’s an open-source tool, so there is no official customer support team to address your issues. You can get support from tutorials, chat rooms, and online support, but not from product creators.
4) No Reporting facility – The lack of automation of report generation is one of the biggest disadvantages. But, there are third-party tools that overcome this problem like TestNG, JUnit, Extent Library, and Allure.
Architecture
WebDriver talks to a browser through a driver. Communication is two-way: WebDriver passes commands to the browser through the driver and receives information back via the same route. The driver is specific to the browser, such as ChromeDriver for Google’s Chrome/Chromium, GeckoDriver for Mozilla’s Firefox, etc. The driver runs on the same system as the browser.


