To compare primitives and objects we use “==” equality operator in java which is a binary operator given in the java programming language
What is equals() method in java?
The Java String class equals() method compares the two given strings based on the content of the string. If any character is not matched, it returns false. If all characters are matched, it returns true.
Difference between == and equals method in java
1. == is an operator whereas equals() is a method of Object class.
2. == operator compares reference or memory location of objects in the heap, whether they point to the same location or not. Whenever we create an object using the operator new it will create a new memory location for that object. So we use the == operator to check memory location or address of two objects are the same or not. equals() method is used to compare the state of two objects or the contents of the objects.
3. Equals method can be overridden but you can’t override behavior of “==” operator.
Below is an example which shows the use of == and equals.
public class EqualsDemo1 {

	public static void main(String[] args) {
		String str1 = new String("JAVATUTORIAL");
		String str2 = new String("JAVATUTORIAL");

		// Reference comparison
		System.out.println("Check str1 == str2 : " + (str1 == str2));

		// Content comparison
		System.out.println("Check str1.equals(str2) : " + str1.equals(str2));

		// integer-type
		System.out.println("Check Integer Type :" + (10 == 10));

		// char-type
		System.out.println("Check Char Type :" + ('a' == 'a'));
	}
}

Output
Check str1 == str2 : false
Check str1.equals(str2) : true
Check Integer Type :true
Check Char Type :true
Let us take an example where both strings have same characters and same length but in lower case.
Let us take an example where both Integer refer to the same object.
public class EqualsDemo3 {

	public static void main(String[] args) {

		Integer i = new Integer(10);
		Integer j = i;

		System.out.println("Check i == j : " + (i == j));
}

Output
Check i == j : true
Let us take an example where both Integer1 and Integer2 refer to the different objects.
public class EqualsDemo4 {

	public static void main(String[] args) {

		Integer i = new Integer(10);
		Integer j = new Integer(10);

		System.out.println("Check i == j : " + (i == j));
	}
}

Output
Check i == j : false
The throws keyword in Java is used in the signature of method to indicate that this method might throw one of the listed type of exceptions. The caller to these methods has to handle the exception using a try-catch block.
As you can see from the above syntax, we can use throws to declare multiple exceptions.
Below is an example of throws exception. Here, as you can see IOException is listed as an exception. This exception is handled by a try catch block when findFile() method is called.
public class ThrowsExample {

	public static void findFile() throws IOException {

		File file= new File("C:\\test.txt");
		FileInputStream stream = new FileInputStream(file);

	}

	public static void main(String[] args) {
		try {
			findFile();
		} catch (IOException e) {
			System.out.println(e);
		}
	}
}

Output
java.io.FileNotFoundException: C:\test.txt (The system cannot find the file specified)
When we run this program, if the file test.txt does not exist, FileInputStream throws a FileNotFoundException which extends the IOException class.
If a method does not handle exceptions, the type of exceptions that may occur within it must be specified in the throws clause so that methods further up in the call stack can handle them or specify them using throws keyword themselves.
The findFile() method specifies that an IOException can be thrown. The main() method calls this method and handles the exception if it is thrown.
In a program, if there is a chance of raising an exception then compiler always warn us about it and compulsorily we should handle that checked exception, Otherwise we will get compile time error saying unreported exception XXX must be caught or declared to be thrown. To prevent this compile time error we can handle the exception in two ways:
We have caught the exception i.e. we have handled the exception using try/catch block.
We have declared the exception i.e. specified throws keyword with the method.
Case 1 : Handle Exception Using try-catch block
In case we handle the exception, the code will be executed fine whether exception occurs during the program or not.
class Demo {
	void method() throws IOException {
		throw new IOException("IOException Occurred");
	}
}

public class TestThrowsExample2 {

	public static void main(String[] args) {
		try {
			Demo demo = new Demo();
			demo.method();
		} catch (Exception e) {
			System.out.println("Exception handled");
		}

		System.out.println("Continue the program...");
	}
}

Output
Exception handled
Continue the program...
Case 2: We declare the exception, if exception does not occur, the code will be executed fine.
class Test {
	void method() throws IOException {
		System.out.println("No Exception");
	}
}

public class TestThrowsExample3 {

	public static void main(String[] args) {
		try {
			Test test = new Test();
			test.method();
		} catch (Exception e) {
			System.out.println("Exception handled");
		}

		System.out.println("Continue the program...");
	}
}

Output
No Exception
Continue the program...
Case 3 : We declare the exception and the exception occurs, it will be thrown at runtime because throws does not handle the exception.
class TestDemo {
	void method() throws IOException {
		throw new IOException("IOException Occurred");
	}
}

public class TestThrowsExample4 {

	public static void main(String[] args) throws IOException {
		TestDemo test = new TestDemo();
		test.method();
		System.out.println("Continue the program...");

	}

}

Output
Exception in thread "main" java.io.IOException: IOException Occurred
‘Iterator’ is an interface which belongs to collection framework. It allows us to traverse the collection, access the data element and remove the data elements of the collection.
java.util package has public interface Iterator and contains three methods:
boolean hasNext(): It returns true if Iterator has more element to iterate.
Object next(): It returns the next element in the collection until the hasNext()method return true. This method throws ‘NoSuchElementException’ if there is no next element.
void remove(): It removes from the underlying collection the last element returned by this iterator (optional operation). This method can be called only once per call to next(). The behavior of an iterator is unspecified if the underlying collection is modified while the iteration is in progress in any way other than by calling this method.
forEachRemaining– Performs the given action for each remaining element until all elements have been processed or the action throws an exception. Actions are performed in the order of iteration, if that order is specified. Exceptions thrown by the action are relayed to the caller.
Below is an example of use of Iterator. The iterator() method is used to get an iterator for any collection:
public class IteratorDemo {

   public static void main(String[] args) {

		ArrayList<String> cars = new ArrayList<String>();
		cars.add("Audi");
		cars.add("BMW");
		cars.add("Ford");
		cars.add("Duster");

		// Get the iterator
		Iterator<String> it = cars.iterator();

		// Print the first item
		System.out.println("First element from list :"+it.next());

	}
}

Output
First element from list :Audi
Looping through Collection
In the below example, we are looping through the collection using hasNext() and next() methods of Iterator.
public class IteratorDemo {

	 public static void main(String[] args) {

		ArrayList<String> cars = new ArrayList<String>();
		cars.add("Audi");
		cars.add("BMW");
		cars.add("Ford");
		cars.add("Duster");

		// Get the iterator
		Iterator<String> iterator = cars.iterator();

		System.out.println("List elements : ");

		while (iterator.hasNext())
			System.out.print(iterator.next() + " ");

		System.out.println();
	}
}

Output
List elements :
Audi BMW Ford Duster
Removing elements from Collection
Iterators are designed to easily change the collections that they loop through. The remove() method can remove items from a collection while looping. In the below example, I’m deleting the items whose reminder are not 0.
public class IteratorDemo {

	 public static void main(String[] args) {

		ArrayList<Integer> numbers = new ArrayList<Integer>();
		numbers.add(20);
		numbers.add(8);
		numbers.add(10);
		numbers.add(50);

        // Get the iterator
		Iterator<Integer> it = numbers.iterator();

		System.out.println("List of Numbers : ");
		while (it.hasNext()) {

			Integer i = it.next();

			if (i / 10 == 0) {
				it.remove();
			}
		}
		System.out.println(numbers);
	}

}

Output
List of Numbers :
[20, 10, 50]
I hope you are cleared about Iterators now. Enjoy learning. Cheers!!
A HashMap stores items in “key/value”pairs, and you can access them by an index of another type (e.g. a String).
One object is used as a key (index) to another object (value). It can store different types: String keys and Integer values, or the same type, like String keys and String values. We need to import java.util.HashMap or its superclass in order to use the HashMap class and methods.
It is not an ordered collection, which means it does not return the keys and values in the same order in which they have been inserted into the HashMap.
HashMap<String, String> employeeDetail = new HashMap<String, String>();

HashMap<String, String> employeeDetail = new HashMap<>();

HashMap<String, Integer> employeeDetail = new HashMap<String, Integer>();
Add Items
Below is an example where we are adding items to HashMap by using put() method.
import java.util.HashMap;

public class HashMap_Demo {
    public static void main(String[] args) {

        /* This is how to declare HashMap of key and Value as String  */
        HashMap<String, String> employeeDetail = new HashMap<String, String>();

        // Add keys and values (Name, Designation)
        employeeDetail.put("Tim", "DBA");
        employeeDetail.put("Dong", "SDET");
        employeeDetail.put("Nisha", "BA");
        employeeDetail.put("Ulana", "Dev");

        System.out.println("Detail of Employees :" + employeeDetail);
    }

}
The output of the above program is
Below is an example where we are adding items to HashMap by using put() method.
Here, the key is String, and the Value is Integer.
import java.util.HashMap;

public class HashMap_Demo {
    public static void main(String[] args) {

        // Combination of String(key) and Integer(value)
        HashMap<String, Integer> employeeAge = new HashMap<String, Integer>();

        // Add keys and values (Name, Age)
        employeeAge.put("Tim", 25);
        employeeAge.put("Dong", 26);
        employeeAge.put("Nisha", 29);
        employeeAge.put("Ulana", 34);

        System.out.println("Age of Employees :" + employeeAge);
    }

}
The output of the above program is
Access an Item
To access a value in the HashMap, use the get() method and refer to its key:-
import java.util.HashMap;

public class HashMap_Demo {
    public static void main(String[] args) {

        // Combination of String(key) and Integer(value)
        HashMap<String, Integer> employeeAge = new HashMap<String, Integer>();

        // Add keys and values (Name, Age)
        employeeAge.put("Tim", 25);
        employeeAge.put("Dong", 26);
        employeeAge.put("Nisha", 29);
        employeeAge.put("Ulana", 34);

        System.out.println("Age of Employees :"+ employeeAge);

        // Access a value
        System.out.println("Access Value of Key Nisha :" + employeeAge.get("Nisha"));
    }
}
The output of the above program is
Remove an Item
To remove an item, use the remove() method and refer to the key:
import java.util.HashMap;

public class HashMap_Demo {
    public static void main(String[] args) {

        // Combination of String(key) and Integer(value)
        HashMap<String, Integer> employeeAge = new HashMap<String, Integer>();

        // Add keys and values (Name, Age)
        employeeAge.put("Tim", 25);
        employeeAge.put("Dong", 26);
        employeeAge.put("Nisha", 29);
        employeeAge.put("Ulana", 34);

        System.out.println("Age of Employees :" + employeeAge);

        // To remove an item, use the remove() method and refer to the key
        employeeAge.remove("Ulana");
        System.out.println("List of Employee after removing Ulana :" + employeeAge);
    }
}
The output of the above program is
To remove all items, use the clear()method:-
import java.util.HashMap;

public class HashMap_Demo {
    public static void main(String[] args) {

        // Combination of String(key) and Integer(value)
        HashMap<String, Integer> employeeAge = new HashMap<String, Integer>();

        // Add keys and values (Name, Age)
        employeeAge.put("Tim", 25);
        employeeAge.put("Dong", 26);
        employeeAge.put("Nisha", 29);
        employeeAge.put("Ulana", 34);

        System.out.println("Age of Employees :" + employeeAge);

        // To remove all items, use the clear() method:
        employeeAge.clear();
        System.out.println("List of Employes after clear:" + employeeAge);
    }
}
The output of the above program is
Checking whether HashMap is empty or not
We are using isEmpty() method of the HashMap class to perform this check.
import java.util.HashMap;

public class HashMap_Demo {
    public static void main(String[] args) {

        /* This is how to declare HashMap */
        HashMap<String, String> employeeDetail = new HashMap<String, String>();

        // Add keys and values (Name, Designation)
        employeeDetail.put("Tim", "DBA");
        employeeDetail.put("Dong", "SDET");
        employeeDetail.put("Nisha", "BA");
        employeeDetail.put("Ulana", "Dev");

        System.out.println("Detail of Employees :" + employeeDetail);

        // Checking whether HashMap is empty or not
        System.out.println("Is HashMap Empty? " + employeeDetail.isEmpty());

        // Delete all items from HasMap
        employeeDetail.clear();
        System.out.println("Is HashMap Empty now? " + employeeDetail.isEmpty());
    }
}
The output of the above program is
Check if a particular key exists in HashMap
We will be using containsKey() method of the HashMap class to perform this check. This method returns a boolean value.
import java.util.HashMap;

public class HashMap_Demo {
    public static void main(String[] args) {

        /* This is how to declare HashMap */
        HashMap<String, String> employeeDetail = new HashMap<String, String>();

        // Add keys and values (Name, Designation)
        employeeDetail.put("Tim", "DBA");
        employeeDetail.put("Dong", "SDET");
        employeeDetail.put("Nisha", "BA");
        employeeDetail.put("Ulana", "Dev");

        System.out.println("Detail of Employees :" + employeeDetail);

        // Check if a particular key exists in HashMap
        boolean flag = employeeDetail.containsKey("Nisha");
        System.out.println("Key Nisha exists in HashMap? : " + flag);

        boolean flag1 = employeeDetail.containsKey("Shawn");
        System.out.println("Key Shawn exists in HashMap? : " + flag1);
    }
}
The output of the above program is
Check if a particular value exists in HashMap
We will be using containsValue()method of the HashMap class to perform this check.
import java.util.HashMap;

public class HashMap_Demo {
    public static void main(String[] args) {

        /* This is how to declare HashMap */
        HashMap<String, String> employeeDetail = new HashMap<String, String>();

        // Add keys and values (Name, Designation)
        employeeDetail.put("Tim", "DBA");
        employeeDetail.put("Dong", "SDET");
        employeeDetail.put("Nisha", "BA");
        employeeDetail.put("Ulana", "Dev");

        System.out.println("Detail of Employees :" + employeeDetail);

        // Check if a particular value exists in HashMap
        boolean valueExists = employeeDetail.containsValue("Dev");
        System.out.println("String Dev exists in HashMap? : " + valueExists);

        boolean valueNotExists = employeeDetail.containsValue("Test");
        System.out.println("String Test exists in HashMap? : " + valueNotExists);
    }
}
The output of the above program is
We are done! Congratulations on making it through this tutorial and hope you found it useful! Happy Learning!!
In the previous tutorial, I have explained about How to add Formulas in Excel in Java. In this tutorial, I will explain How to customize the style of cells in Excel in Java using Apache POI.
I’m using Apache POI to write data to the excel file. To download and install Apache POI, refer here.
If you are using maven, then you need to add below dependency in pom.xml.
In the previous tutorial, I explained about creating a new Excel file and writing data in that new Excel file using Java. In this tutorial, I will explain How to open and update existing Excel files in Java.
I’m using Apache POI to write data to the Excel file. To download and install Apache POI, refer here.
If you are using Maven, then you need to add the below dependency in pom.xml.
To know more about various interfaces and classes for managing Excel, pleaserefer to this tutorial.
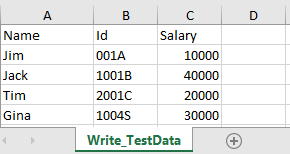
In the below example, I have an existing Excel with the name “EmployeeDetails.xlsx”.
This is Excel which I am going to update. I will add 2 rows below the last row in Excel.
Below is a complete example of updating the data in existing Excel. One thing we need to note here is that we can update the Excel file only when we close it first.
import java.io.File;
import java.io.FileInputStream;
import java.io.FileOutputStream;
import java.io.IOException;
import org.apache.poi.xssf.usermodel.XSSFCell;
import org.apache.poi.xssf.usermodel.XSSFRow;
import org.apache.poi.xssf.usermodel.XSSFSheet;
import org.apache.poi.xssf.usermodel.XSSFWorkbook;
public class ExcelFileUpdateExample {
public static void main(String[] args) {
try {
FileInputStream fis = new FileInputStream(new File("EmployeeDetails.xlsx"));
// Create object of XSSFWorkbook class
XSSFWorkbook workbook = new XSSFWorkbook(fis);
// Create object of XSSFWorkbook class
XSSFSheet sheet = workbook.getSheet("Write_TestData");
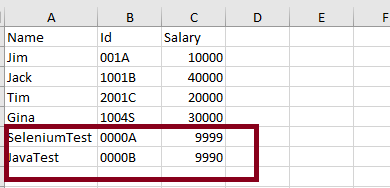
Object[][] bookData = { { "SeleniumTest", "0000A", 9999 }, { "JavaTest", "0000B", 9990 }, };
// Get last row in Sheet
int rowCount = sheet.getLastRowNum();
for (Object[] Book : bookData) {
// Create row for all the new data
XSSFRow row = sheet.createRow(++rowCount);
int columnCount = 0;
// Create new cell for each row
XSSFCell cell = row.createCell(columnCount);
for (Object field : Book) {
cell = row.createCell(columnCount++);
if (field instanceof String) {
cell.setCellValue((String) field);
} else if (field instanceof Integer) {
cell.setCellValue((Integer) field);
}
}
}
fis.close();
// Write the workbook in file system
FileOutputStream outputStream = new FileOutputStream("EmployeeDetails.xlsx");
workbook.write(outputStream);
System.out.println("Excel is updated successfully");
// Close the workbook
workbook.close();
outputStream.close();
} catch (IOException e) {
e.printStackTrace();
}
}
}
The output of the above program is
Below is the updated Excel.
Update a specific cell in the Excel file
In the below example, I will update the value in a specific cell. As you can see in the above image, I will update, 1004S to “Updated Value”. Below is the code snippet for the same.
import java.io.File;
import java.io.FileInputStream;
import java.io.FileOutputStream;
import java.io.IOException;
import org.apache.poi.ss.usermodel.CellType;
import org.apache.poi.xssf.usermodel.XSSFCell;
import org.apache.poi.xssf.usermodel.XSSFSheet;
import org.apache.poi.xssf.usermodel.XSSFWorkbook;
public class UpdateExcelDemo {
public static void main(String[] args) {
try {
// Create an object of FileInputStream class to read excel file
FileInputStream fis = new FileInputStream(new File("EmployeeDetails.xlsx"));
// Create object of XSSFWorkbook class
XSSFWorkbook workbook = new XSSFWorkbook(fis);
// Read excel sheet by sheet name
XSSFSheet sheet = workbook.getSheet("Write_TestData");
// Print data present at row 0 column 2
System.out.println(sheet.getRow(4).getCell(1).getStringCellValue());
// Get the Cell at index 3 from the above row
XSSFCell cell = sheet.getRow(4).getCell(1);

cell.setCellType(CellType.STRING);
cell.setCellValue("Updated Value");
// Write the output to the file
FileOutputStream fileOut = new FileOutputStream(new File("EmployeeDetails.xlsx"));
workbook.write(fileOut);
System.out.println("Id column in Excel is updated successfully");
fileOut.close();
// Closing the workbook
workbook.close();
} catch (IOException e) {
e.printStackTrace();
}
}
}
The output of the above program is
Below is the updated Excel.
That’s it! Well done.
Congratulations on making it through this tutorial and hope you found it useful! Happy Learning!! Cheers!!
In the previous tutorial, I explained how to download and install IntelliJ on Windows. In this tutorial, I will explain how to create a Java project in IntelliJ.
Steps to follow:
Open the IntelliJ. It will look as shown below. To create a New Project, click on the “New Project” Icon.
2. Select Project SDK as the Java version present on your system and select the option as Java. Click on the “Next”button.
3. The next screen provides options to choose Project Template as shown below. Click on the “Next” Button.
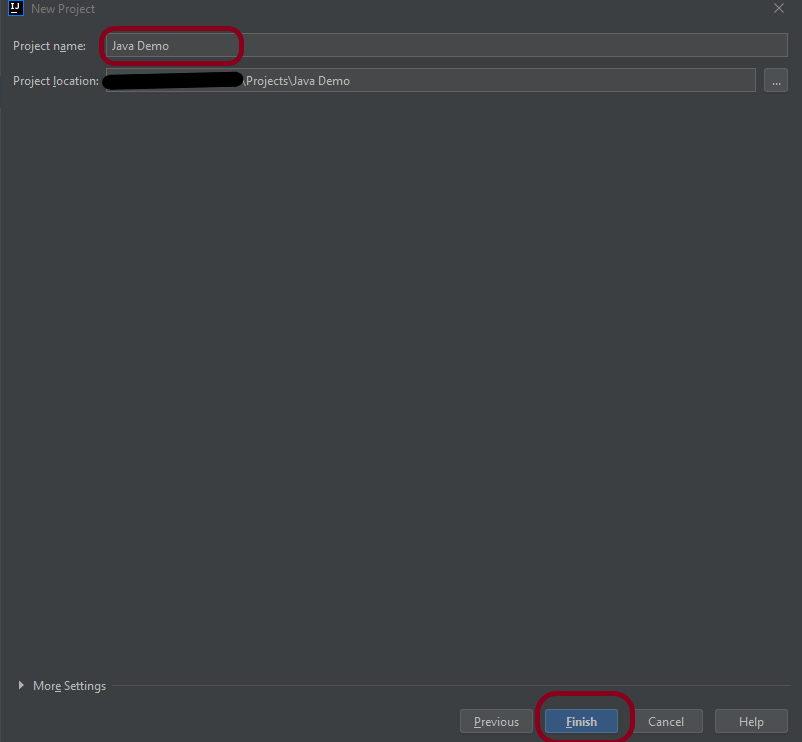
4. I have mentioned the Project Name as Java Demo and thepath where I want to save my project on my computer.
5. Click on the “Finish”Button to create the project. It will also ask to create the directory as shown below.
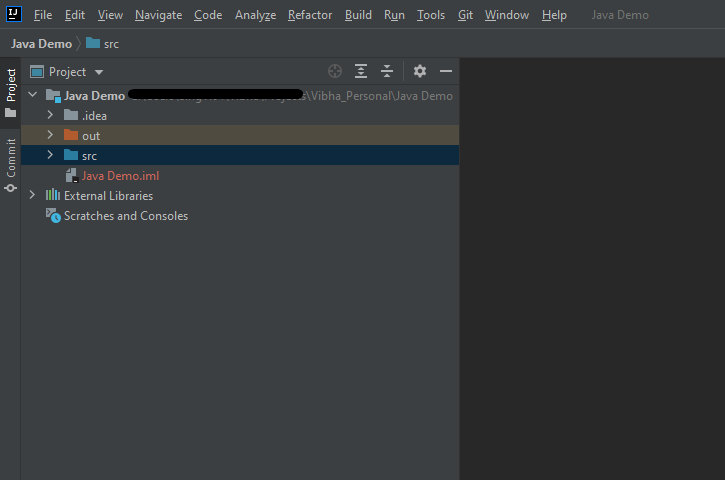
6. Clickthe “Create”button to grant permission. It will launch IDE as shown below.
Now, I have created a new Java Project named Java Demo. Let me create a new Java Class – HelloWorld.
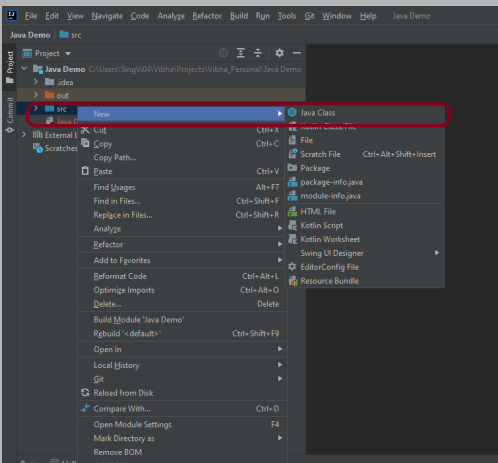
Expand the Project Hello Word and right-click on the src folder, hover on New Option, and click on Java Class Option as shown below.
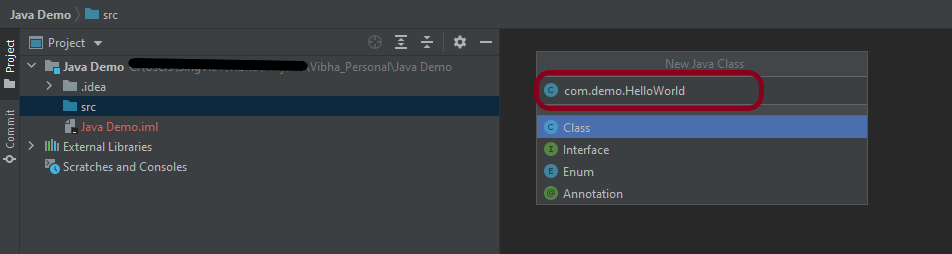
2. I have provided the Java Filename with the package as shown in the below image. Now press the Enter Key to create the packages and Java file.
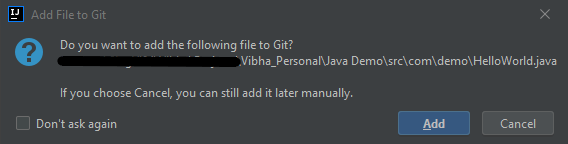
3. It will show a message to Add the File to Git. Depending on your requirement, select Add or Cancel. I don’t want to add the File to Git, so selected Cancel.
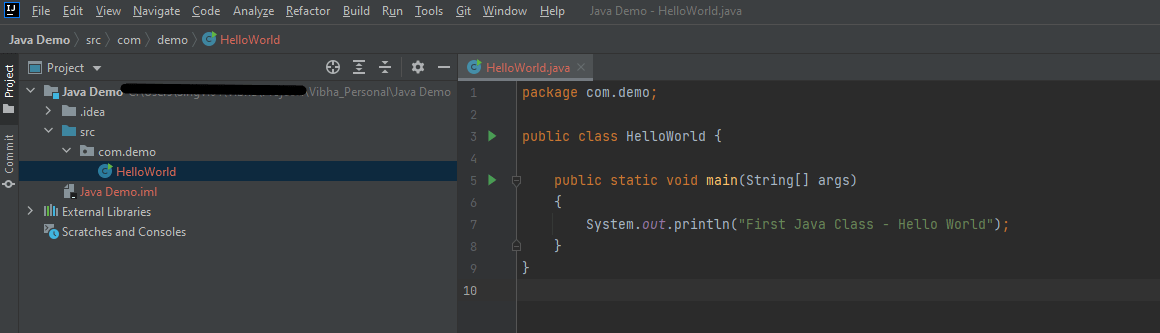
4. I have updated the “HelloWorld” class to print the first Java Class – Hello World on the console, as shown in the below image.
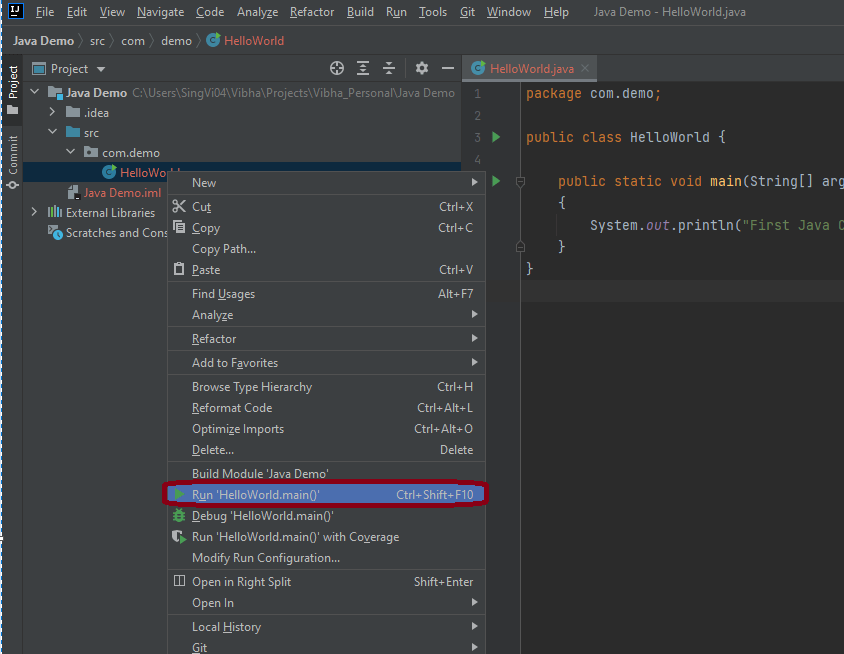
5. Now right-click on the “HelloWorld”class file and choose “Run HelloWorld.main()” Option or press Ctrl + Shift + F10to compile and execute the program as shown in thebelow image. It will also build the project.
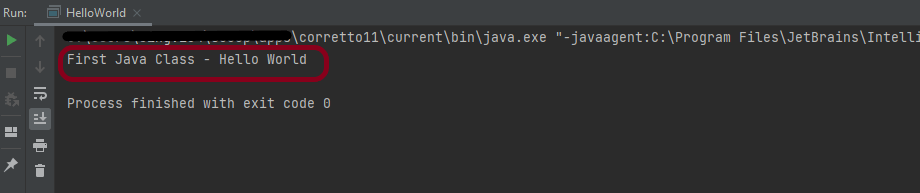
6. The final output of the program will be displayed on the console as shown below.
This is how we can create the Java Demo project to execute our first program in Java – HelloWorld.
That’s it! Congratulations on making it through this tutorial and hope you found it useful! Happy Learning!!
IntelliJ IDEA is one of the smartest IDE for Java development. It’s also the base of the official Android IDE i.e. Android Studio used for Android mobile application development. This tutorial provides all the steps required to install IntelliJ Idea on Windows 10 for Java development.
Download IntelliJ on Windows
Click this link to download IntelliJ IDEA on your machine. It will open the download page as shown below. The IntelliJ IDEA provides two different installers i.e. Ultimate and Community. The Ultimate edition is commercial version (which has trial version for 30 days post which you needs license). The Community edition can be used for free. This tutorial shows the steps required to install the Community edition.
2. Download IntelliJ by clicking on Download button and use any one of the option either .exe or .jar. Below image shows IntelliJ.exe on your machine.
Installation of IntelliJ IDEA
To start installation, double click on the idealC-2021.exe (this version can change in future).
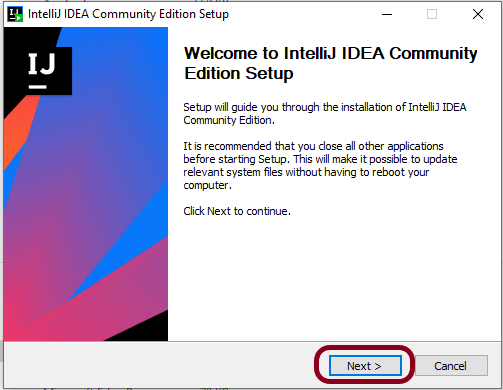
2. It will show the welcome screen as shown below. Click on the Next Button to continue with the installation.
3. It will provide options to choose the installation location as shown in below image. Make sure that you have sufficient space available on the selected drive since it will consume around 1.6 GB storage. Click on the Next Button after choosing the appropriate installation path.
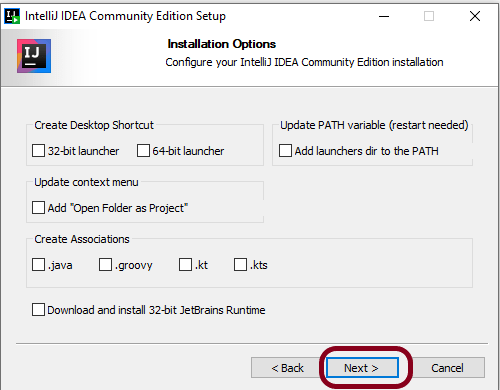
4. It will show the Installation options as shown below to configure system path, create 64-bit desktop launcher icon, Open Folder as Project, and file association for Java, Groovy, and Kotlin files. I have selected the option to create a desktop launcher icon. You may choose the options based on your requirements. Click on the Next Button after choosing the Installation Options.
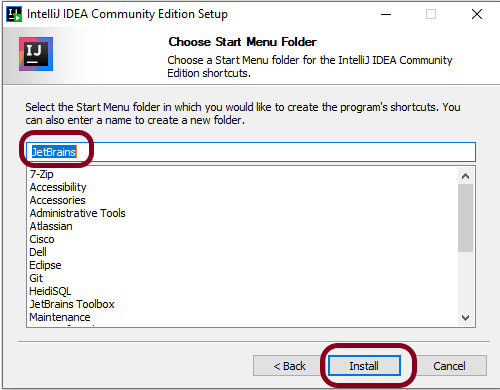
5. After choosing the Installation Options, the next screen shows options to configure the Start Menu Folder as shown below.
6. Click on the Install Button after selecting the Start Menu Folder option. It will show the installation progress as shown below.
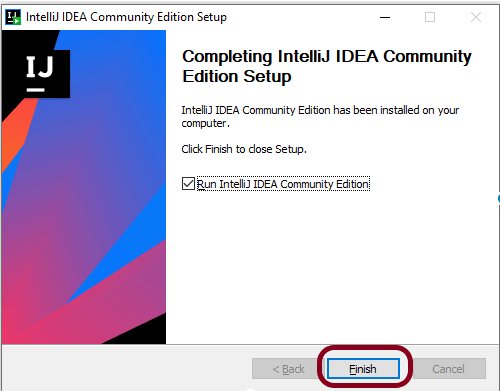
7. It will show the final screen after successfully installing IntelliJ IDEA as shown below.
8. Click on the Finish Button to close the installer. Below image shows that IntelliJ icon is placed at Desktop as we have selected in the previous step.
That’s it! We have downloaded and installed IntelliJ. Congratulations on making it through this tutorial and hope you found it useful! Happy Learning!!
In the next tutorial, I’ll explain how to create a new project in IntelliJ.
Abstract Class and Interface are used to achieve Abstraction where abstract methods are declared. We can’t instantiate Abstract Class and Interface.
Abstract Class
Interface
Abstract Class can have both abstract method and non-abstract methods.
Interface can have only abstract methods.
Abstract Class does not support multiple Inheritance.
Interface supports multiple Inheritance.
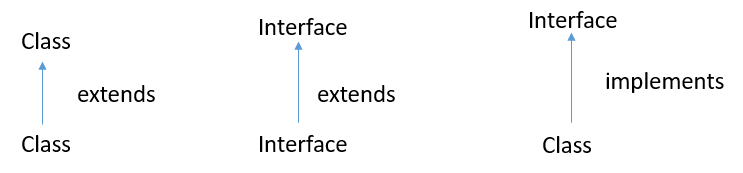
Abstract Class can be implemented by using keyword “extends”.
Interface can be implemented by using keyword “implements”.
Abstract class can provide the implementation of interface.
Interface can’t provide the implementation of abstract class.
Abstract Class can have static, non-static, final & non-final variables.
Interface can have only final & static variables.
Abstract Class can have class members as private, protected, etc.
Interface can have class members as public by default.
Example: public abstract class Shape{ public abstract void draw(); }
Example: public interface Drawable{ void draw(); }
An abstract class can extend another Java class and implement multiple Java interfaces.
An interface can extend another Java interface only.
Abstract keyword is used to declared abstract class
Interface keyword is used to declare interface.
Below is an example of Abstract Class. In the below example, there is an abstract class with abstract method. This abstract method is implemented in SubClass.
//Abstract Class
public abstract class Bank {

    // Abstract method
    abstract void getRateOfInterest();
}
SubClass
//Subclass (inherit from Bank)
public class SBI extends Bank {

    // The body of getRateOfInterest is declared here
    public void getRateOfInterest() {

        System.out.println("Interest Rate of SBI Bank :" + 5.3);

    }
}
Test Class
public class AbstractionTest {

    public static void main(String[] args) {

        Bank bank1 = new SBI();
        bank1.getRateOfInterest();

    }

}
Below is an example of Interface. In the below example, Interface has two abstract methods and the implementation of abstract methods are declared in Test Class.
public interface MyInterface {

    // Abstract methods
    public void method1();

    public void method2();
}
Test Class
public class InterfaceTest implements MyInterface {

    public void method1() {
        System.out.println("Implementation of Method 1");
    }

    public void method2() {
        System.out.println("Implementation of Method 2");
    }

    public static void main(String[] args) {
        MyInterface interTest = new InterfaceTest();
        interTest.method1();
        interTest.method2();

    }
}
In this tutorial, I’ll explain about Interfaces in Java.
What is Interface?
An interface is a group of related methods with empty bodies (abstract methods).
All the methods in Interface are public and abstract.
A class can implement more than one interface.
An interface can extends another interface or interfaces
A class that implements interface must implements all the methods in interface. To implement interface use implements keyword.
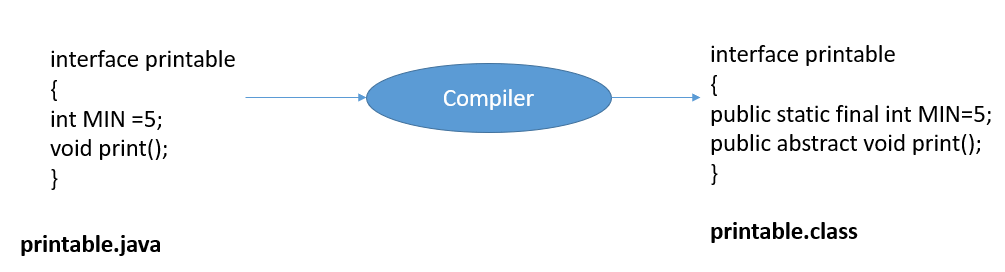
The variables declared in an interface are public, static & final by default.
Java does not support multiple inheritance in case of class, but by using interface it can achieve multiple inheritance .
Syntax of Interface
interface test {
//declare methods which are abstract by default
//declare variables which are public, static, final by default
}
Relationship between Class and Interfaces
Below is an example of implementation of Interface. I have declared a class as Interface which have two abstract methods.
public interface MyInterface {

	// Abstract methods
	public void method1();

	public void method2();
}
Interface Implementation
public class InterfaceTest implements MyInterface {

	public void method1() {
		System.out.println("Implementation of Method 1");
	}

	public void method2() {
		System.out.println("Implementation of Method 2");
	}

	public static void main(String[] args) {
		MyInterface interTest = new InterfaceTest();
		interTest.method1();
		interTest.method2();

	}
}
Output
Implementation of Method 1
Implementation of Method 2
Multiple Interface
In the below example, Interface 2 extends Interface 1 and class implements Interface 2.
Interface 1
public interface Infa1 {
	public void method1();

}
Interface 2
public interface Infa2 extends Infa1 {
	public void method2();

}
MultipleInterfaceTest Class
public class MultipleInterfaceTest implements Infa2 {

	public void method1() {
		System.out.println("Implementation of Method 1");
	}

	public void method2() {
		System.out.println("Implementation of Method 2");
	}

	public static void main(String[] args) {

		Infa2 obj = new MultipleInterfaceTest();
		obj.method1();
		obj.method2();
	}

}
Output
Implementation of Method 1
Implementation of Method 2
Multiple Inheritance
Interface supports multiple Inheritance. Here, there are two interfaces which are implemented in class MultipleInheritanceTest.
Interface 1
public interface Infa1 {
	public void method();

}
Interface 2
public interface Infa2 {
	public void method();

}
MultipleInheritanceTest Class
public class MultipleInheritanceTest implements Infa1, Infa2 {

	public void method() {
		System.out.println("Implementation of Method ");
	}


	public static void main(String[] args) {
		MultipleInheritanceTest test = new MultipleInheritanceTest();
		test.method();
	}

}