The Jackson XML module adds some additional support for XML-specific features, just like JSON has some additional features. These annotations allow us to control the XML namespace and local name for elements, including the root element, whether a field is rendered in an element or as plain text, whether the content of an element is rendered in a CData wrapper, and whether a collection should use a wrapper element or not.
We need to add Jackson XML dependency to the project.
It is used to define the name of the root element used for the root-level object when serialized, which normally uses the name of the type (class). This can only adjust the Namespace and Local name – since the root element can never be serialized as an attribute.
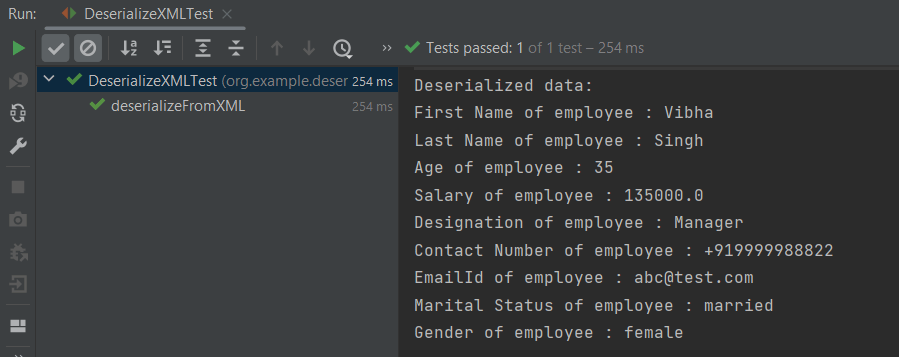
Jackson allows us to read the contents of an XML file and deserialize the XML back into a Java object. In our example, we will read an XML document containing details about an Employee, and use Jackson to extract this data and use it to create Java objects containing the same information.
First, let us create an XML document matching our class to read from.
Create deserialize.xml with the following contents:
Deserialization – It is the reverse of serializing. In this process, we will read the Serialized byte stream from the file and convert it back into the Class instance representation. Here, we are converting a XML to an Employee class object.
Simple deserialized program
Let us add a deserializeFromXML() function to deserialize the XML file above into a Java object:
import com.fasterxml.jackson.core.exc.StreamReadException;
import com.fasterxml.jackson.databind.DatabindException;
import com.fasterxml.jackson.dataformat.xml.XmlMapper;
import org.example.simple.Employee;
import org.junit.Test;
import java.io.File;
import java.io.IOException;
public class DeserializeXMLTest {
@Test
public void deserializeFromXML() {
XmlMapper xmlMapper = new XmlMapper();
String userDir = System.getProperty("user.dir");
// Converting Employee XML to Employee class object
try {
Employee emp = xmlMapper.readValue(new File(userDir + "\\src\\test\\resources\\XMLExample.xml"),
Employee.class);
System.out.println("Deserialized data: ");
System.out.println("First Name of employee : " + emp.getFirstName());
System.out.println("Last Name of employee : " + emp.getLastName());
System.out.println("Age of employee : " + emp.getAge());
System.out.println("Salary of employee : " + emp.getSalary());
System.out.println("Designation of employee : " + emp.getDesignation());
System.out.println("Contact Number of employee : " + emp.getContactNumber());
System.out.println("EmailId of employee : " + emp.getEmailId());
System.out.println("Marital Status of employee : " + emp.getMaritalStatus());
System.out.println("Gender of employee : " + emp.getGender());
} catch (StreamReadException e) {
e.printStackTrace();
} catch (DatabindException e) {
e.printStackTrace();
} catch (IOException e) {
e.printStackTrace();
}
}
}
The output of the above program is shown below:
Manipulating Nested Elements in XML
Let us enhance our XML file to add nested elements and loops, and modify our code to deserialize the following updated structure.
If we want to roll over log files based on file size and date time, we need to use SizeBasedTriggeringPolicy and TimeBasedRollingPolicy.
In the given example, the appender able to refer to the file name pattern and time-based rollover strategy using the filePattern attribute, which includes {dd-MMM}.Time-based rollover will happen every day.
Step 4 – Import log4j in the Selenium script
We need to import the log4j library in the Selenium script so that we can use it in your code. Here is an example of how to import log4j in the Selenium script:
We need to create a Logger instance in the Selenium script so that we can use it to log information. Here is an example of how to create a Logger instance:
The previous tutorials have explained the conversion of Java Objects to JSON payload and vice versa, i.e. conversion of JSON payload to Java Objects using Jackson API.
This tutorial explains parsing the XML document to Java objects using Jackson API.
To parse the above XML, we will use the Jackson library. Use the latest Jackson Library.
We will create an XML from POJO and vice versa now, which is generally called serialization and deserialization using Jackson APIs.
XmlMapper is a subclass of ObjectMapperwhich is used in JSON serialization. However, it adds some XML-specific tweaks to the parent class.
XmlMapper xmlMapper = new XmlMapper();
We can now look at how to use it to do the actual serialization. Let’s create a Java class first:
Below is the sample code of the Employee table, which contains the data members needed for Employee XML and their corresponding getter and setter methods.
public class Employee {
// Data members of POJO class
private String firstName;
private String lastName;
private int age;
private double salary;
private String designation;
private String contactNumber;
private String emailId;
private String gender;
private String maritalStatus;
// Getter and setter methods
public String getFirstName() {
return firstName;
}
public void setFirstName(String firstName) {
this.firstName = firstName;
}
public String getLastName() {
return lastName;
}
public void setLastName(String lastName) {
this.lastName = lastName;
}
public int getAge() {
return age;
}
public void setAge(int age) {
this.age = age;
}
public double getSalary() {
return salary;
}
public void setSalary(double salary) {
this.salary = salary;
}
public String getDesignation() {
return designation;
}
public void setDesignation(String designation) {
this.designation = designation;
}
public String getContactNumber() {
return contactNumber;
}
public void setContactNumber(String contactNumber) {
this.contactNumber = contactNumber;
}
public String getEmailId() {
return emailId;
}
public void setEmailId(String emailId) {
this.emailId = emailId;
}
public String getGender() {
return gender;
}
public void setGender(String gender) {
this.gender = gender;
}
public String getMaritalStatus() {
return maritalStatus;
}
public void setMaritalStatus(String maritalStatus) {
this.maritalStatus = maritalStatus;
}
}
Here, I have added JUnit4 dependency for the @Test annotation.
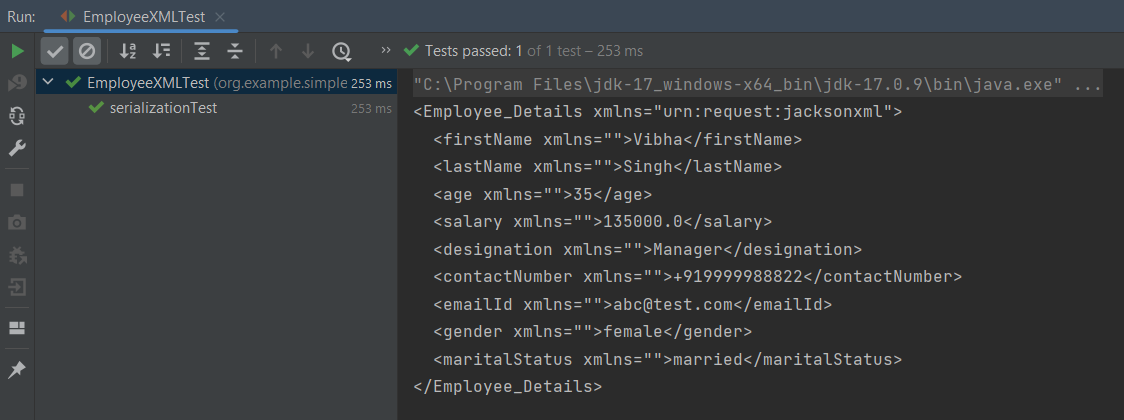
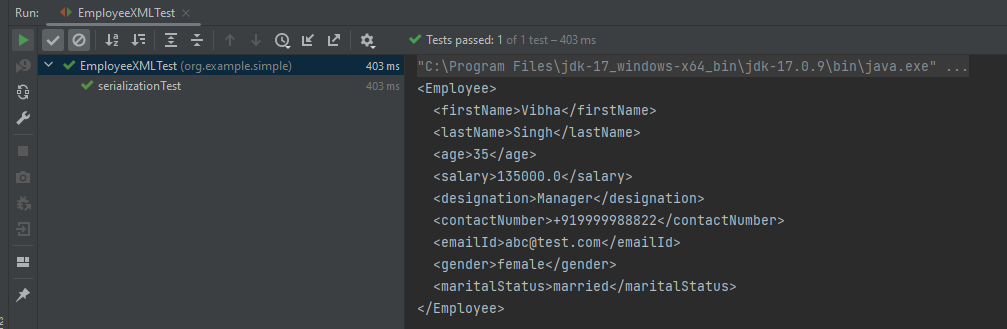
Writing XML is done using the various writeValue() methods that Jackson exposes.
import com.fasterxml.jackson.core.JsonProcessingException;
import com.fasterxml.jackson.dataformat.xml.XmlMapper;
import org.junit.Test;

public class EmployeeXMLTest {

    @Test
    public void serializationTest() {

        // Create an object of POJO class
        Employee employee = new Employee();

        employee.setFirstName("Vibha");
        employee.setLastName("Singh");
        employee.setAge(35);
        employee.setSalary(135000);
        employee.setDesignation("Manager");
        employee.setContactNumber("+919999988822");
        employee.setEmailId("abc@test.com");
        employee.setMaritalStatus("married");
        employee.setGender("female");

        // Converting a Java class object to XML
        XmlMapper xmlMapper = new XmlMapper();

        try {
            String employeeXml = xmlMapper.writerWithDefaultPrettyPrinter().writeValueAsString(employee);
            System.out.println(employeeXml);
        } catch (JsonProcessingException e) {
            e.printStackTrace();
        }

    }
}
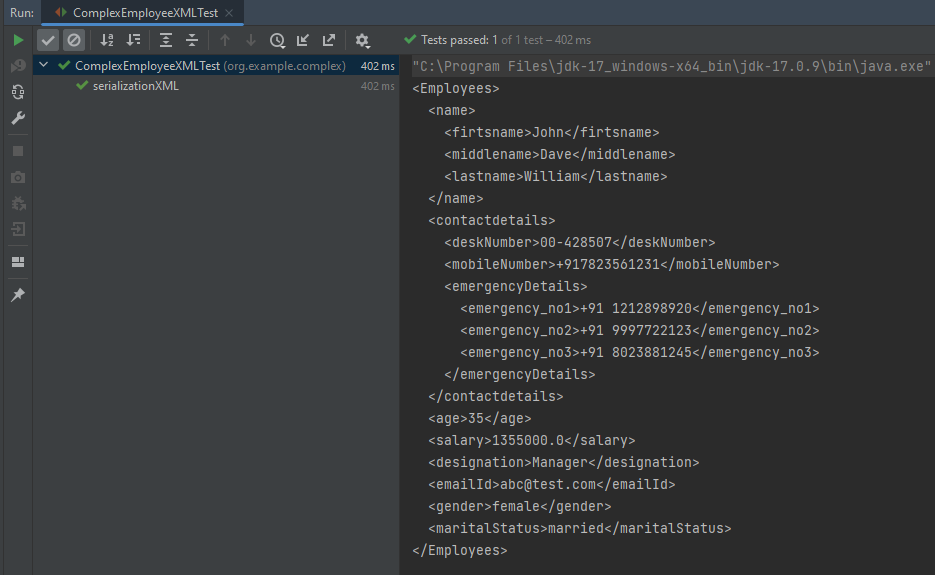
Here, In this new structure, we have introduced a nested nameelement as well as contactdetails element which is further nested to emergencyDetailselements. With our current code, we cannot extract or create the new nested section. So, along with creating a POJO class for Employees, will create a POJO class for name, contactDetails, and emergencyDetails.
Employees
public class Employees {
Name name;
ContactDetails contactdetails;
private int age;
private double salary;
private String designation;
private String emailId;
private String gender;
private String maritalStatus;
// Getter and setter methods
public Name getName() {
return name;
}
public void setName(Name name) {
this.name = name;
}
public ContactDetails getContactdetails() {
return contactdetails;
}
public void setContactdetails(ContactDetails contactdetails) {
this.contactdetails = contactdetails;
}
public int getAge() {
return age;
}
public void setAge(int age) {
this.age = age;
}
public double getSalary() {
return salary;
}
public void setSalary(double salary) {
this.salary = salary;
}
public String getDesignation() {
return designation;
}
public void setDesignation(String designation) {
this.designation = designation;
}
public String getEmailId() {
return emailId;
}
public void setEmailId(String emailId) {
this.emailId = emailId;
}
public String getGender() {
return gender;
}
public void setGender(String gender) {
this.gender = gender;
}
public String getMaritalStatus() {
return maritalStatus;
}
public void setMaritalStatus(String maritalStatus) {
this.maritalStatus = maritalStatus;
}
}
Name
public class Name {
private String firtsname;
private String middlename;
private String lastname;
public String getFirtsname() {
return firtsname;
}
public void setFirtsname(String firtsname) {
this.firtsname = firtsname;
}
public String getMiddlename() {
return middlename;
}
public void setMiddlename(String middlename) {
this.middlename = middlename;
}
public String getLastname() {
return lastname;
}
public void setLastname(String lastname) {
this.lastname = lastname;
}
}
ContactDetails-As you can see that EmergencyDetails element which contains emergency_no1, emergency_no2, and emergency_no3 are nested within ContactDetails, so we have created a separate POJO class for EmergencyDetails.
public class ContactDetails {
private String deskNumber;
private String mobileNumber;
EmergencyDetails emergencyDetails;
public EmergencyDetails getEmergencyDetails() {
return emergencyDetails;
}
public void setEmergencyDetails(EmergencyDetails emergencyDetails) {
this.emergencyDetails = emergencyDetails;
}
public String getDeskNumber() {
return deskNumber;
}
public void setDeskNumber(String deskNumber) {
this.deskNumber = deskNumber;
}
public String getMobileNumber() {
return mobileNumber;
}
public void setMobileNumber(String mobileNumber) {
this.mobileNumber = mobileNumber;
}
}
EmergencyDetails
public class EmergencyDetails {
private String emergency_no1;
private String emergency_no2;
private String emergency_no3;
public String getEmergency_no1() {
return emergency_no1;
}
public void setEmergency_no1(String emergency_no1) {
this.emergency_no1 = emergency_no1;
}
public String getEmergency_no2() {
return emergency_no2;
}
public void setEmergency_no2(String emergency_no2) {
this.emergency_no2 = emergency_no2;
}
public String getEmergency_no3() {
return emergency_no3;
}
public void setEmergency_no3(String emergency_no3) {
this.emergency_no3 = emergency_no3;
}
}
Next, we create our serializeToXML() method:
import com.fasterxml.jackson.core.JsonProcessingException;
import com.fasterxml.jackson.core.exc.StreamWriteException;
import com.fasterxml.jackson.databind.DatabindException;
import com.fasterxml.jackson.dataformat.xml.XmlMapper;
import org.junit.Test;
import java.io.File;
import java.io.IOException;
public class ComplexEmployeeXMLTest {
@Test
public void serializationXML() {
Employees employee = new Employees();
Name empname = new Name();
empname.setFirtsname("John");
empname.setMiddlename("Dave");
empname.setLastname("William");
employee.setName(empname);
employee.setAge(35);
employee.setSalary(1355000);
employee.setDesignation("Manager");
ContactDetails contdetails = new ContactDetails();
contdetails.setDeskNumber("00-428507");
contdetails.setMobileNumber("+917823561231");
EmergencyDetails emergency = new EmergencyDetails();
emergency.setEmergency_no1("+91 1212898920");
emergency.setEmergency_no2("+91 9997722123");
emergency.setEmergency_no3("+91 8023881245");
contdetails.setEmergencyDetails(emergency);
employee.setContactdetails(contdetails);
employee.setEmailId("abc@test.com");
employee.setMaritalStatus("married");
employee.setGender("female");
XmlMapper xmlMapper = new XmlMapper();
try {
String employeeXml = xmlMapper.writerWithDefaultPrettyPrinter().writeValueAsString(employee);
System.out.println(employeeXml);
} catch (JsonProcessingException e) {
e.printStackTrace();
}
//To save the XML in a file and place under the project
String userDir = System.getProperty("user.dir");
try {
xmlMapper.writerWithDefaultPrettyPrinter()
.writeValue(new File(userDir + "\\src\\test\\resources\\NestedXMLExample.xml"), employee);
} catch (StreamWriteException e) {
e.printStackTrace();
} catch (DatabindException e) {
e.printStackTrace();
} catch (IOException e) {
e.printStackTrace();
}
}
}
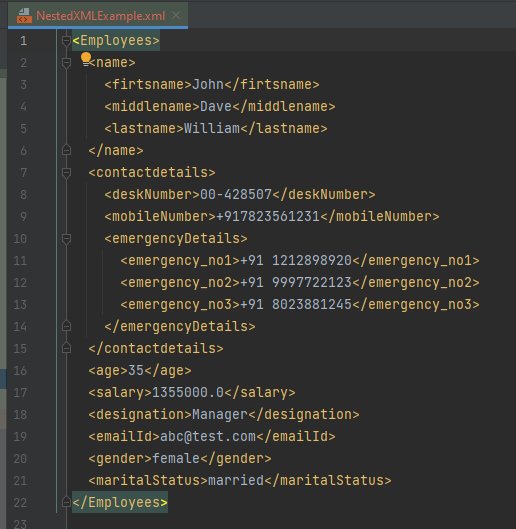
The output of the above program is
The file is saved under src/test/resources as NestedXMLExample.
Open the xml file and it contains the XML Request Body.
There is another way to do the same job of converting Java Object to a complex XML, but which looks more sophisticated and less a number of lines of code.
I’ll use the same complex XML structure.
In this method, we will create a default constructor as well as a parametrized Constructor to pass the arguments for each POJO Class.
Employees
public class Employees {
Name name;
ContactDetails contactdetails;
private int age;
private double salary;
private String designation;
private String emailId;
private String gender;
private String maritalStatus;
public Employees() {
super();
}
public Employees(Name name, ContactDetails contactdetails, int age, double salary, String designation,
String emailId, String gender, String maritalStatus) {
this.name = name;
this.contactdetails = contactdetails;
this.age = age;
this.salary = salary;
this.designation = designation;
this.emailId = emailId;
this.gender = gender;
this.maritalStatus = maritalStatus;
}
// Getter and setter methods
public Name getName() {
return name;
}
public void setName(Name name) {
this.name = name;
}
public ContactDetails getContactdetails() {
return contactdetails;
}
public void setContactdetails(ContactDetails contactdetails) {
this.contactdetails = contactdetails;
}
public int getAge() {
return age;
}
public void setAge(int age) {
this.age = age;
}
public double getSalary() {
return salary;
}
public void setSalary(double salary) {
this.salary = salary;
}
public String getDesignation() {
return designation;
}
public void setDesignation(String designation) {
this.designation = designation;
}
public String getEmailId() {
return emailId;
}
public void setEmailId(String emailId) {
this.emailId = emailId;
}
public String getGender() {
return gender;
}
public void setGender(String gender) {
this.gender = gender;
}
public String getMaritalStatus() {
return maritalStatus;
}
public void setMaritalStatus(String maritalStatus) {
this.maritalStatus = maritalStatus;
}
}
Name
public class Name {
private String firtsname;
private String middlename;
private String lastname;
public Name() {
super();
}
public Name(String firtsname, String middlename, String lastname) {
super();
this.firtsname = firtsname;
this.middlename = middlename;
this.lastname = lastname;
}
public String getFirtsname() {
return firtsname;
}
public void setFirtsname(String firtsname) {
this.firtsname = firtsname;
}
public String getMiddlename() {
return middlename;
}
public void setMiddlename(String middlename) {
this.middlename = middlename;
}
public String getLastname() {
return lastname;
}
public void setLastname(String lastname) {
this.lastname = lastname;
}
}
ContactDetails
public class ContactDetails {
private String deskNumber;
private String mobileNumber;
EmergencyDetails emergencyDetails;
public ContactDetails() {
super();
}
public ContactDetails(String deskNumber, String mobileNumber, EmergencyDetails emergencyDetails) {
super();
this.deskNumber = deskNumber;
this.mobileNumber = mobileNumber;
this.emergencyDetails = emergencyDetails;
}
public EmergencyDetails getEmergencyDetails() {
return emergencyDetails;
}
public void setEmergencyDetails(EmergencyDetails emergencyDetails) {
this.emergencyDetails = emergencyDetails;
}
public String getDeskNumber() {
return deskNumber;
}
public void setDeskNumber(String deskNumber) {
this.deskNumber = deskNumber;
}
public String getMobileNumber() {
return mobileNumber;
}
public void setMobileNumber(String mobileNumber) {
this.mobileNumber = mobileNumber;
}
}
EmergencyDetails
public class EmergencyDetails {
private String emergency_no1;
private String emergency_no2;
private String emergency_no3;
public EmergencyDetails() {
super();
}
public EmergencyDetails(String emergency_no1, String emergency_no2, String emergency_no3) {
super();
this.emergency_no1 = emergency_no1;
this.emergency_no2 = emergency_no2;
this.emergency_no3 = emergency_no3;
}
public String getEmergency_no1() {
return emergency_no1;
}
public void setEmergency_no1(String emergency_no1) {
this.emergency_no1 = emergency_no1;
}
public String getEmergency_no2() {
return emergency_no2;
}
public void setEmergency_no2(String emergency_no2) {
this.emergency_no2 = emergency_no2;
}
public String getEmergency_no3() {
return emergency_no3;
}
public void setEmergency_no3(String emergency_no3) {
this.emergency_no3 = emergency_no3;
}
}
Now, let us create a Serialization Test.
import com.fasterxml.jackson.core.JsonProcessingException;
import com.fasterxml.jackson.dataformat.xml.XmlMapper;
import org.junit.Test;
import java.io.File;
import java.io.FileWriter;
import java.io.IOException;
public class XmlSerializationDemo2 {
@Test
public void serializationTest() {
try {
EmergencyDetails emergency = new EmergencyDetails("+91 894132345", "+91 8888221102", "+91 7223156288");
ContactDetails contdetails = new ContactDetails("00-428507", "+917823561231", emergency);
Name empname = new Name("Trina", "Sophia", "William");
// Converting a Java class object to a XML
XmlMapper xmlMapper = new XmlMapper();
String xmlString = xmlMapper.writerWithDefaultPrettyPrinter().writeValueAsString(new Employees(empname,
contdetails, 35, 1450000.00, "Director", "trina@test.com", "female", "married"));
System.out.println(xmlString);
// write XML string to file
String userDir = System.getProperty("user.dir");
File xmlOutput = new File(userDir + "\\src\\test\\resources\\XMLExample.xml");
FileWriter fileWriter = new FileWriter(xmlOutput);
fileWriter.write(xmlString);
fileWriter.close();
} catch (JsonProcessingException e) {
e.printStackTrace();
} catch (IOException e) {
e.printStackTrace();
}
}
}
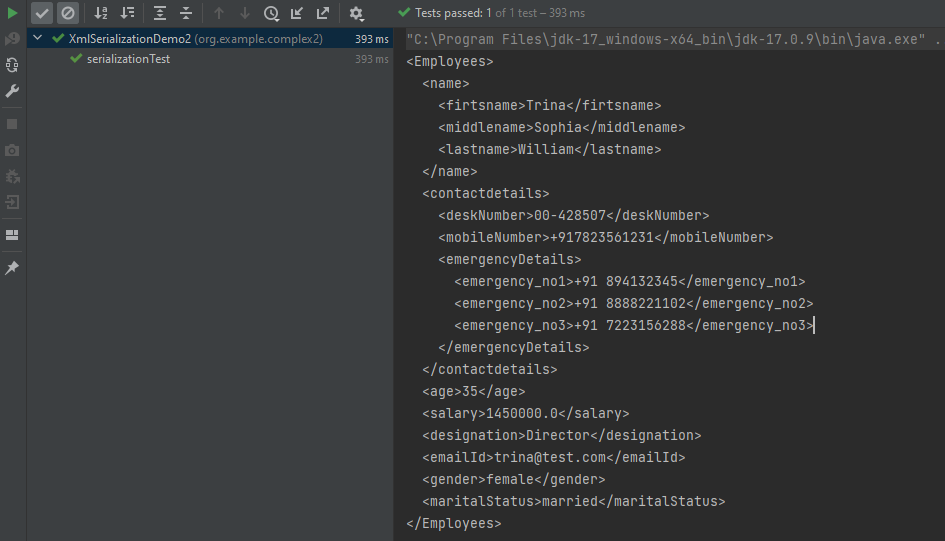
The output of the above program is
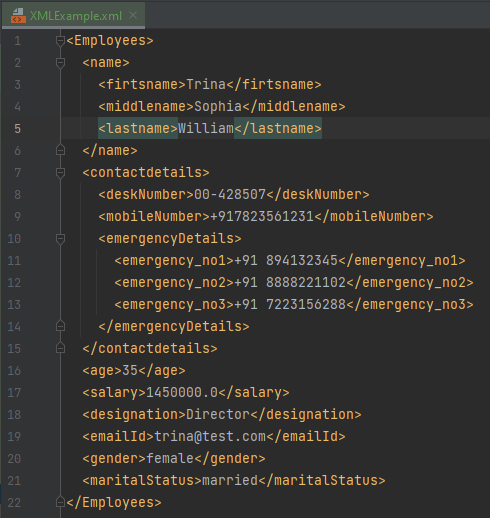
The newly created XML file is saved under src/test/resources as shown in the below image.
Open the xml file and it contains the XML Request Body.
We have successfully serialized our Java object into XML and written it into an XML file.
In our serializationTest() function, we create an XmlMapper object, which is a child class to the ObjectMapper class used in JSON serialization. This class converts our Java Object into an XML output that we can now write to a file.
In the given example, the appender is able to refer to the file name pattern and time-based rollover strategy using the filePattern attribute, which includes {dd-MMM}. Size-based rollover will happen at 1 KB. The moment the size of the application.log will be 1KB, it will split the file.
Below is a very basic XML configuration for rollover.
If we want to roll over log files based on file size and date time, then we need to use SizeBasedTriggeringPolicy and TimeBasedRollingPolicy.
Step 4 – Import log4j in the Selenium script
We need to import the log4j library in the Selenium script so that we can use it in your code. Here is an example of how to import log4j in the Selenium script:
We need to create a Logger instance in the Selenium script so that we can use it to log information. Here is an example of how to create a Logger instance:
Here is a complete code example that demonstrates how to use log4j in Selenium:
import org.apache.logging.log4j.LogManager;
import org.apache.logging.log4j.Logger;
import org.openqa.selenium.By;
import org.openqa.selenium.WebDriver;
import org.openqa.selenium.chrome.ChromeDriver;
import org.openqa.selenium.chrome.ChromeOptions;
import org.testng.Assert;
import org.testng.annotations.AfterMethod;
import org.testng.annotations.BeforeMethod;
import org.testng.annotations.Test;
import java.util.concurrent.TimeUnit;
public class Log4j_XML_Example {
WebDriver driver;
By userName = By.name("username");
By passWord = By.name("password");
By loginBtn = By.xpath("//*[@id='app']/div[1]/div/div[1]/div/div[2]/div[2]/form/div[3]/button");
By loginTitle = By.xpath("//*[@id='app']/div[1]/div/div[1]/div/div[2]/h5");
By dashboardPage = By.xpath("//*[@id='app']/div[1]/div[1]/header/div[1]/div[1]/span/h6");
// Creating a logger
private static Logger logger = LogManager.getLogger();
@BeforeMethod
public void setUp() {
logger.info("Open a Chrome Web Browser");
ChromeOptions options=new ChromeOptions();
logger.info("Make the Web Browser full screen");
options.addArguments("--start-maximized");
driver=new ChromeDriver(options);
logger.info("Wait for 10 sec");
driver.manage().timeouts().implicitlyWait(10, TimeUnit.SECONDS);
driver.get("https://opensource-demo.orangehrmlive.com/");
logger.info("Open the application");
}
@Test(description = "This test validates title of login functionality", priority = 0)
public void verifyLoginPageTitle() {
logger.info("Verify the Login page title");
String expectedTitle = driver.findElement(loginTitle).getText();
logger.info("Expected Title :" + expectedTitle);
Assert.assertTrue(expectedTitle.equalsIgnoreCase("Login"));
}
@Test(description = "This test validates successful login to Home page", priority = 1)
public void verifyloginPage() {
logger.info("Enter Username");
driver.findElement(userName).sendKeys("Admin");
logger.info("Enter Password");
driver.findElement(passWord).sendKeys("admin123");
driver.findElement(loginBtn).submit();
logger.info("New page - Dashboard is opened");
String newPageText = driver.findElement(dashboardPage).getText();
logger.info("Heading of new page :" + newPageText);
Assert.assertTrue(newPageText.contains("Dashboard"));
}
@AfterMethod
public void teardown() {
logger.info("Close the webpage");
driver.quit();
}
}
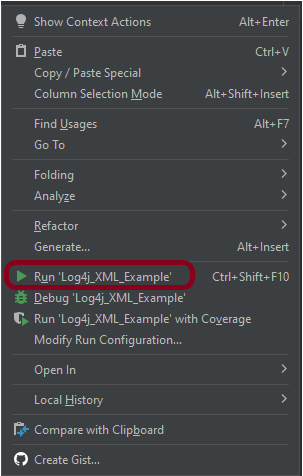
Step 7 – Execute the test
Right-click on the test and select “Run Log4j_XML_Example”.
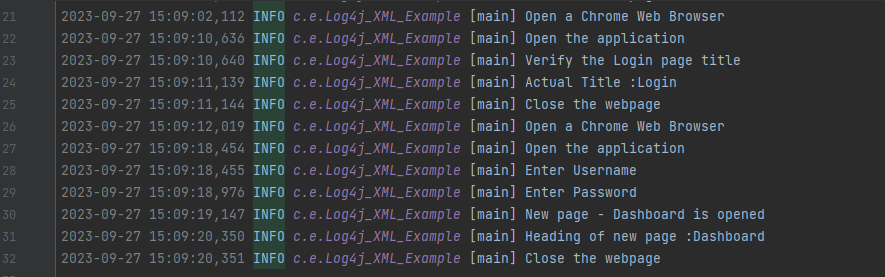
The output of the above program is
Step 8 – View the logs
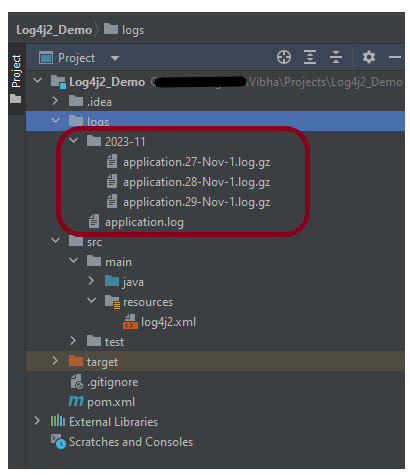
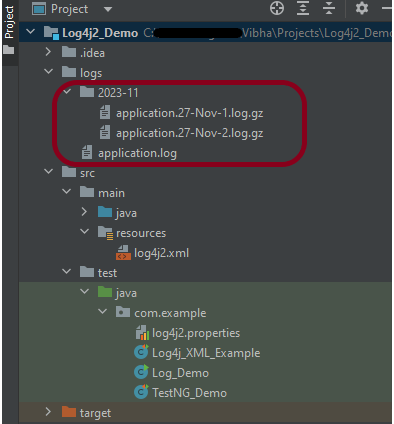
The output log file is created under folder logs that are created at the root level of the project. The file name is application.log.
application.log file created under folder – 2023-11. application.log is the current log. Other logs are older logs, but are run on the same day. They are created after reaching the maximum size.
The application.log file will look like the image shown below.
By default, it will create up to 7 archives on the same day.
We can override the default 7 archives with this DefaultRolloverStrategy
This tutorial describes how to download and install Apache POI.
Selenium does not have an inbuilt method to read data from an Excel File. However, there are various libraries in JAVA that help in reading/writing data from Excel files. Apache POI is one of the most used libraries, which provides various classes and methods to read/write data from various formats of Excel files(xls, xlsx etc).
Apache POI, where POI stands for (Poor Obfuscation Implementation) is the Java API for Microsoft Documents that offers a collection of Java libraries that helps us to read, write, and manipulate different Microsoft files such as Excel sheets, PowerPoint, and Word files.
Download Apache POI
POI 5.2.3 was the last version where we produced a set of poi-bin*.zip and poi-bin*.tgz files. We will continue to publish jars to Maven Central. If you are not using a build tool like Apache Maven or Gradle, you can still find these jars by traversing the directories at https://repo1.maven.org/maven2/org/apache/poi/. The jar files are present here. Download them from here.
Go to poi and get the latest jar file from here.
Step 1 – To download Apache POI, go to its official site, here. Click on the Download as shown in the image. This link will navigate to the page showing the latest release of Apache POI. The latest Apache POI version is 5.2.3. You can follow the same steps for any version of POI.
Step 2 – This page shows the latest Apache POI Release Artifacts. Here, you can see POI 5.0.0 is the latest one. Download any one of the Binary Distribution options. One option is .ztar.gz and another option is .zip. I have selected .zip option.
Step 3 – After clicking on the link, it navigates to another page as shown below. I have used the highlighted link to download the POI library files.
Step 4 – Once POI.zip is downloaded and extracted, this is how the folder looks like
How to add POI libraries in Eclipse?
Step 1 – Below is the Java project present in Eclipse.
Step 2 – To add POI libraries to this project, Right-click on the project, hover over the Build path, select Configure Build Path.
Step 3 – It will open the “Properties” of the project. After that, select the Librariestab. Finally, click on the Add External JARs as highlighted below.
Step 4 – Select the JARs in the parent folder of the unzipped POI files. Subsequently, click on the Openbutton to include them in the Eclipse project.
Step 5 – Next, select the JARs under the ooxml-lib folder in the unzipped POI folder as highlighted below:
Step 6 – Select the JARs under the lib folder in the unzipped POI folder as highlighted below.
Step 7 – After that, once all the POI JARs add, click on the Apply and Close button as highlighted below.
Step 8 – Once all the POI libraries successfully install in the Eclipse project, they will reflect under the Referenced Libraries folder in the left pane of the Eclipse project structure, as shown below:
How to add POI libraries to Maven Java Project
You can add the poi and poi-ooxml jar files to the Maven project by mentioning the dependencies in pom.xml.
In the previous tutorial, we got an introduction to Log4j 2. In this tutorial, we will create a Selenium project and implement logging using the Log4j2 Properties configuration.
We’ve defined the level of the root logger as DEBUG. This means that we’ll get all the log events with level DEBUG and above. We’ve also defined a name for the appender as STDOUT and LogToFile.
We want to direct the logs to the console as well as File, we assigned the Appender typeas Console and File.
We specify the pattern in which we want to print the log messages.
Step 4 – Import log4j in the Selenium script
We need to import the log4j library in the Selenium script so that we can use it in your code. Here is an example of how to import log4j in the Selenium script:
We need to create a Logger instance in the Selenium script so that we can use it to log information. Here is an example of how to create a Logger instance:
The previous tutorial explained the steps to generate ExtentReports Version for Cucumber7 with TestNG. This tutorial explains the steps needed to be followed to generate an ExtentReports Version5 for Cucumber 7 with JUnit5.
Now, let us add the extra steps needed to generate the ExtentRport Version5.
New Features in ExtentReports Version 5
Report Attachments
To add attachments, like screen images, two settings need to be added to the extent.properties. Firstly property, namedscreenshot.dir, is the directory where the attachments are stored. Secondly is screenshot.rel.path, which is the relative path from the report file to the screenshot directory.
The PDF reporter summarizes the test run results in a dashboardand other sections with the feature, scenario, and, step details. The PDF report needs to be enabled in the extent.properties file.
The original HTML Extent Reporter was deprecated in 4.1.3 and removed in 5.0.0. The HTML report available in the adapter is based on the same code base and is similar in appearance. The major changes are in the Freemarker template code which has been modified to work with the Extent Reports version 5. The HTML report needs to be enabled in the extent.properties file.
To enable the report folder name with date and\or time details, two settings need to be added to the extent.properties. These are basefolder.nameand basefolder.datetimepattern. These will be merged to create the base folder name, inside which the reports will be generated.
This feature can be used to attach images to the Spark report by setting the src attribute of the img tag to a Base64 encoded string of the image. When this feature is used, no physical file is created. There is no need to modify any step definition code to use this. To enable this, use the below settings in extent.properties, which is false by default.
extent.reporter.spark.base64imagesrc=true
Environment or System Info Properties
It is now possible to add environment or system info properties in the extent.properties or pass them in the maven command line.
#System Info
systeminfo.os=windows
systeminfo.version=10
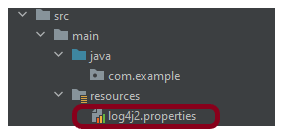
Step 2 – Create extent.properties file in src/test/resources
We need to create the extent.properties file in the src/test/resources folder for the grasshopper extent report adapter to recognize it. Using a property file for reporting is quite helpful if you want to define several different properties.
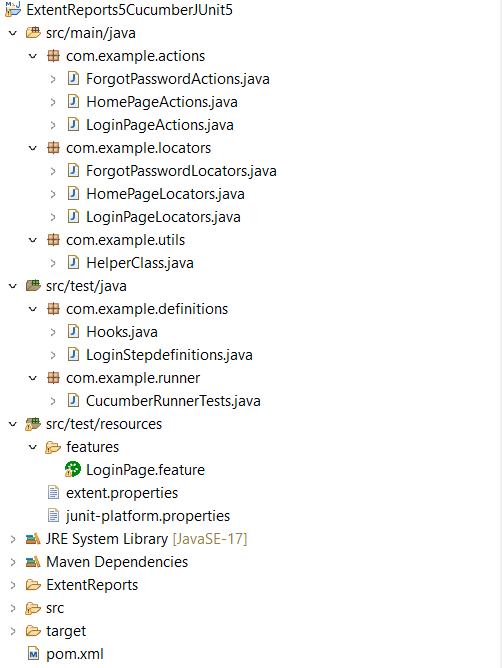
Step 3 – Create a Cucumber Test Runner class in src/test/java
Add the extent report cucumber adapter to the runner class.
import static io.cucumber.junit.platform.engine.Constants.GLUE_PROPERTY_NAME;
import static io.cucumber.junit.platform.engine.Constants.PLUGIN_PROPERTY_NAME;
import org.junit.platform.suite.api.ConfigurationParameter;
import org.junit.platform.suite.api.IncludeEngines;
import org.junit.platform.suite.api.SelectClasspathResource;
import org.junit.platform.suite.api.Suite;
@Suite
@IncludeEngines("cucumber")
@SelectClasspathResource("features")
@SelectClasspathResource("com.example")
@ConfigurationParameter(key = PLUGIN_PROPERTY_NAME, value = "com.aventstack.extentreports.cucumber.adapter.ExtentCucumberAdapter:")
@ConfigurationParameter(key = GLUE_PROPERTY_NAME, value = "com.example")
public class CucumberRunnerTests {
}
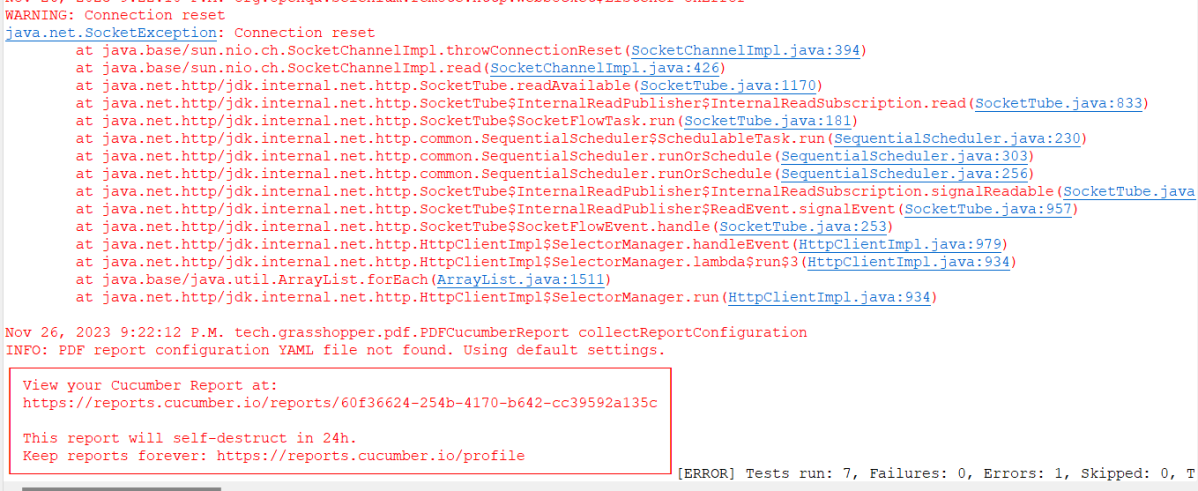
Step 4 – Execute the code
To execute the code, run the tests from the command line by using the below command
mvn clean test
The output of the above program is
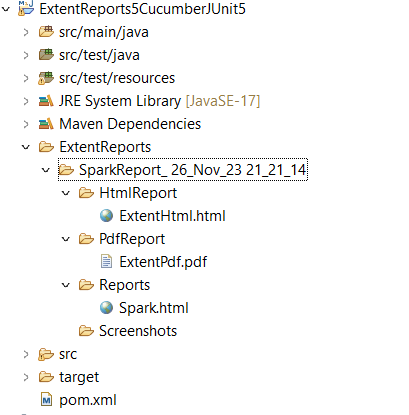
Step 5 – View ExtentReport
Refresh the project and will see a new folder – SparkReport_ which further contains 4 folders – HtmlReport, PdfReport, Reports, and Screenshots.
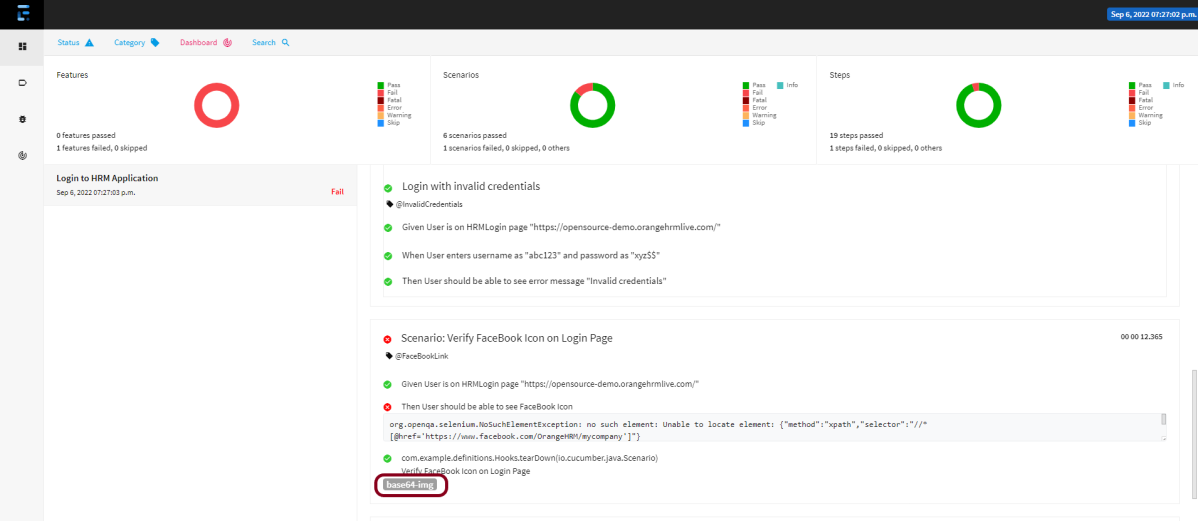
The ExtentReport will be present in the Reports folder with the name Spark.html. PDF Report is present in the PdfReport folder and HTML Report is present in the HtmlReport folder. We can see that the Screenshots folder is empty because we have used the base64imagesrc feature which resulted in no physical screenshots. The screenshots are embedded in the reports.
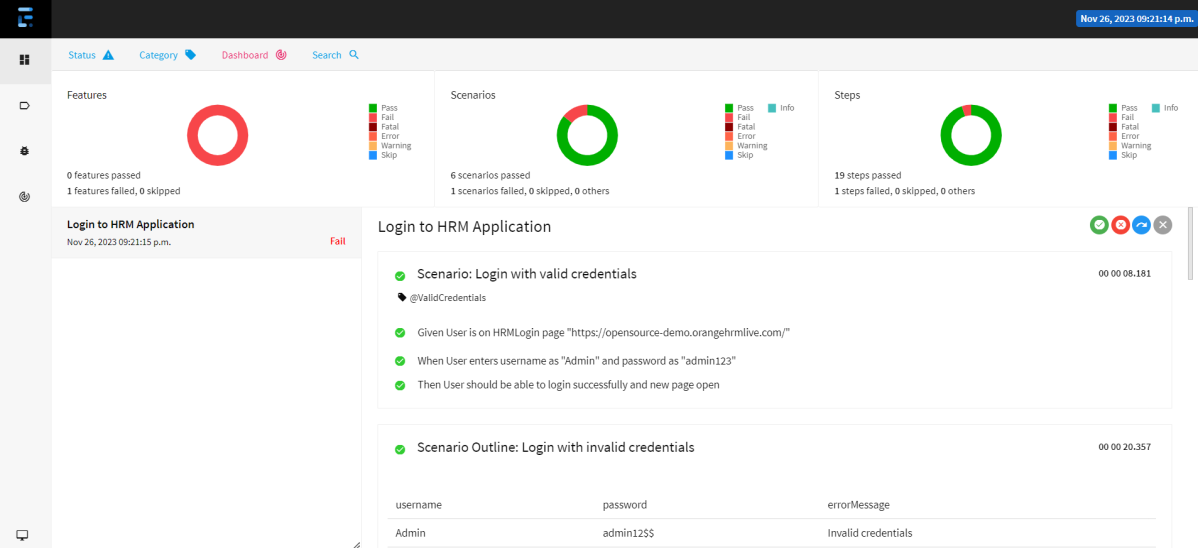
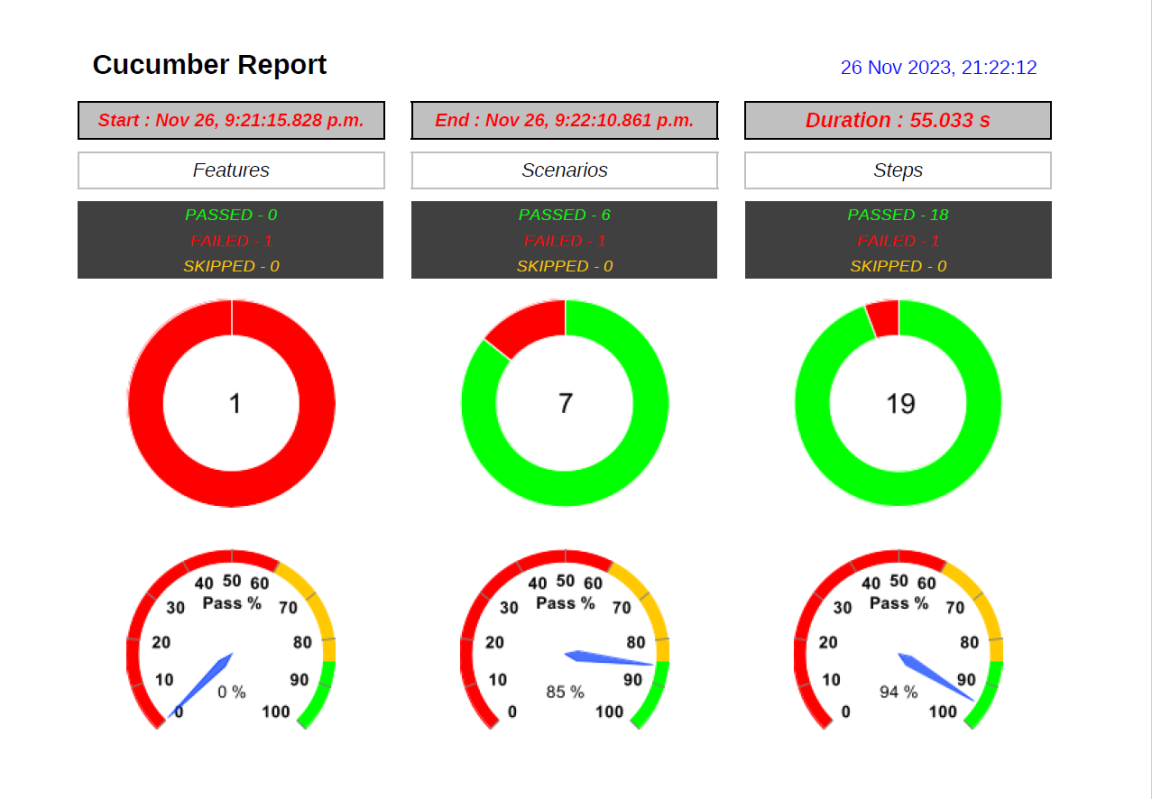
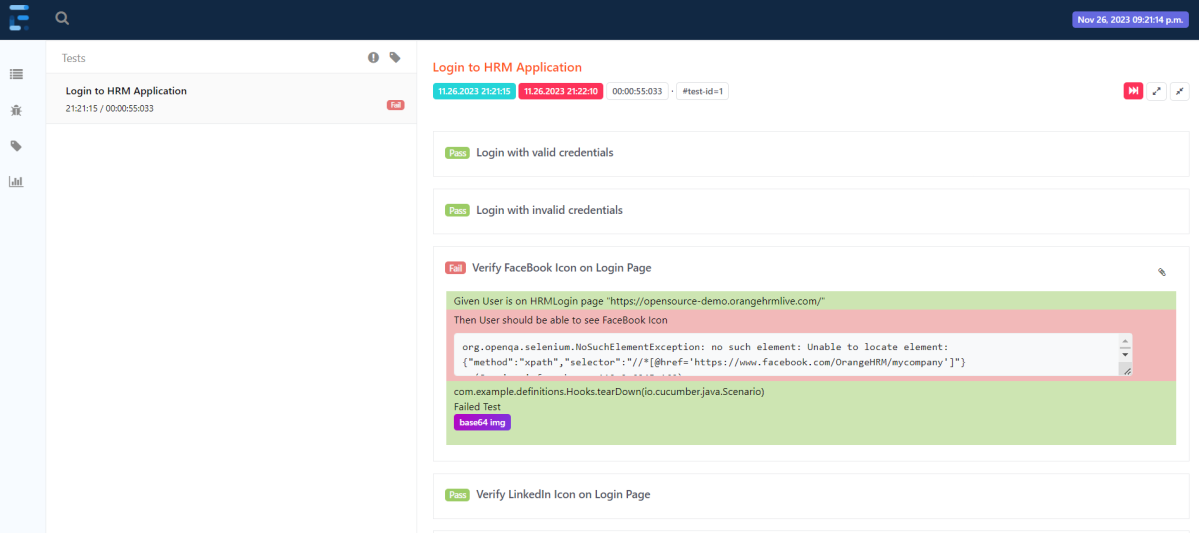
Right-click and open the ExtentHtml.html report with Web Browser. The report also has a summary section that displays the summary of the execution. The summary includes the overview of the pass/fail using a pictogram, start time, end time, and pass/fail details of features as shown in the image below.
ExtentHtml
This is the image of the Dashboard of the ExtentReport.
The failed test has a screenshot embedded in it. Double-click on base64 image and it will open the screenshot in full screen.
PDF Report
Spark Report
Right-click and open the Spark.html report with Web Browser.
Apache Log4j is a Java-based logging utility. Log4j2 is the updated version of the popular and influential log4j library. It is an open-source logging API for Java.
In the previous tutorial, we got an introduction to Log4j 2. In this tutorial, we will create a Selenium project and implement logging using Log4j2 XML configuration.
Below is a very basic XML configuration to print logs in the log file.
<Pattern>%d %p %c{1.} [%t] %m%n</Pattern>
We have used a console appender “LogToConsole” – Console tag inside the Appender tag, so the logs will be printed on the console as well as a file appender “LogToFile” – Console tag inside the Appender tag, so the logs will be saved in a file.
We can change the status to “trace”, “debug”, “info”, “warn”, “error” and “fatal” to enable the internal Log4j events, it will display many useful logs for the Log4j components.
<Configuration status="WARN">
Step 4 – Import log4j in the Selenium script
We need to import the log4j library in the Selenium script so that we can use it in your code. Here is an example of how to import log4j in the Selenium script:
We need to create a Logger instance in the Selenium script so that we can use it to log information. Here is an example of how to create a Logger instance:
Here is a complete code example that demonstrates how to use log4j in Selenium:
import io.github.bonigarcia.wdm.WebDriverManager;
import org.apache.logging.log4j.LogManager;
import org.apache.logging.log4j.Logger;
import org.openqa.selenium.By;
import org.openqa.selenium.WebDriver;
import org.openqa.selenium.chrome.ChromeDriver;
import org.openqa.selenium.chrome.ChromeOptions;
import org.testng.Assert;
import org.testng.annotations.AfterMethod;
import org.testng.annotations.BeforeMethod;
import org.testng.annotations.Test;
import java.util.concurrent.TimeUnit;
public class Log4j_XML_Example {
WebDriver driver;
By userName = By.name("username");
By passWord = By.name("password");
By loginBtn = By.xpath("//*[@id='app']/div[1]/div/div[1]/div/div[2]/div[2]/form/div[3]/button");
By loginTitle = By.xpath("//*[@id='app']/div[1]/div/div[1]/div/div[2]/h5");
By dashboardPage = By.xpath("//*[@id='app']/div[1]/div[1]/header/div[1]/div[1]/span/h6");
// Creating a logger
private static Logger logger = LogManager.getLogger();
@BeforeMethod
public void setUp() {
logger.info("Open a Chrome Web Browser");
ChromeOptions options=new ChromeOptions();
options.addArguments("--start-maximized");
driver=new ChromeDriver(options);
driver.manage().timeouts().implicitlyWait(10, TimeUnit.SECONDS);
driver.get("https://opensource-demo.orangehrmlive.com/");
logger.info("Open the application");
}
@Test(description = "This test validates title of login functionality", priority = 0)
public void verifyLoginPageTitle() {
logger.info("Verify the Login page title");
String expectedTitle = driver.findElement(loginTitle).getText();
logger.info("Actual Title :" + expectedTitle);
Assert.assertTrue(expectedTitle.equalsIgnoreCase("Login"));
}
@Test(description = "This test validates successful login to Home page", priority = 1)
public void verifyloginPage() {
logger.info("Enter Username");
driver.findElement(userName).sendKeys("Admin");
logger.info("Enter Password");
driver.findElement(passWord).sendKeys("admin123");
driver.findElement(loginBtn).submit();
logger.info("New page - Dashboard is opened");
String newPageText = driver.findElement(dashboardPage).getText();
logger.info("Heading of new page :" + newPageText);
Assert.assertTrue(newPageText.contains("Dashboard"));
}
@AfterMethod
public void teardown() {
logger.info("Close the webpage");
driver.quit();
}
}
Step 7 – Execute the test
Right-click on the test and select “Run Log4j_XML_Example”.
The output of the above program is
The log is printed as specified in the xml file. The timestamp is specified in PatternLayout. The log type is INFO. The file name is com.example.log4j_XML_Example specified in Logger name.
The output log file is created under folder logs that are created at the root level of the project. The file name is app.log.
The app.log file will look like the image shown below.
Congratulations on making it through this tutorial and hope you found it useful! Happy Learning!! Cheers!!