In this tutorial, will generate a ChainTest Report with Selenium and JUnit5. In the previous tutorial, I have explained the steps to generate ChainTest Report with Cucumber – ChainTest Report with Cucumber and TestNG. ChainTest Report is the replacement of Extent Report.
Table of Contents
- What is ChainTest Report?
- Prerequisite
- Dependency List
- Structure of Project
- Implementation
- Step 1 – Add ChainTest JUnit5 plugin dependency in Maven Project
- Step 2 – Create Pages and Test Code for the pages
- Step3 – Annotate test class with @ExtendWith(ChainTestExecutionCallback.class)
- Step 4 – Add chaintest.properties file in src/test/resources
- Step 5 – Run the tests
- Step 6 -View ChainTest Reports
- Step 7 – Run the tests through command line
What is ChainTest Report?
ChainTest is a complete reporting system, it supports a variety of sources, including email, static data, and real-time, historical analytics with ChainLP. The next-generation reporting framework ChainTest was developed for a number of test frameworks, such as Cucumber, JUnit, and TestNG.
Prerequisite
- Java 17 is installed
- Maven is installed
- Eclipse or IntelliJ is installed
Dependency List:
- Selenium – 4.28.1
- Java 17
- JUnit5 – 5.11.0-M2
- Maven – 3.9.6
- ChainTest JUnit5 – 1.0.11
Structure of Project

Implementation
Step 1 – Add ChainTest JUnit5 plugin dependency in Maven Project.
<dependency>
      <groupId>com.aventstack</groupId>
      <artifactId>chaintest-junit5</artifactId>
      <version>${chaintest.version}</version>
</dependency>
The complete pom.xml looks like as shown below:
<project xmlns="http://maven.apache.org/POM/4.0.0" xmlns:xsi="http://www.w3.org/2001/XMLSchema-instance"
  xsi:schemaLocation="http://maven.apache.org/POM/4.0.0 http://maven.apache.org/xsd/maven-4.0.0.xsd">
  <modelVersion>4.0.0</modelVersion>

  <groupId>com.example</groupId>
  <artifactId>ChainTestReport_JUnit5_Demo</artifactId>
  <version>1.0-SNAPSHOT</version>
  <packaging>jar</packaging>

  <name>ChainTestReport_JUnit5_Demo</name>
  <url>http://maven.apache.org</url>

  <properties>
    <project.build.sourceEncoding>UTF-8</project.build.sourceEncoding>
    <selenium.version>4.21.0</selenium.version>
    <chaintest.version>1.0.11</chaintest.version>
    <junit.jupiter.engine.version>5.11.0-M2</junit.jupiter.engine.version>
    <junit.jupiter.api.version>5.11.0-M2</junit.jupiter.api.version>
    <junit.jupiter.params.version>5.11.0-M2</junit.jupiter.params.version>
    <maven.compiler.plugin.version>3.13.0</maven.compiler.plugin.version>
    <maven.compiler.source.version>17</maven.compiler.source.version>
    <maven.compiler.target.version>17</maven.compiler.target.version>
    <maven.surefire.plugin.version>3.2.5</maven.surefire.plugin.version>
    <maven.compiler.source>17</maven.compiler.source>
    <maven.compiler.target>17</maven.compiler.target>
  </properties>

  <dependencies>

    <dependency>
      <groupId>org.seleniumhq.selenium</groupId>
      <artifactId>selenium-java</artifactId>
      <version>${selenium.version}</version>
    </dependency>

    <dependency>
      <groupId>org.junit.jupiter</groupId>
      <artifactId>junit-jupiter-engine</artifactId>
      <version>${junit.jupiter.engine.version}</version>
      <scope>test</scope>
    </dependency>

    <dependency>
      <groupId>org.junit.jupiter</groupId>
      <artifactId>junit-jupiter-api</artifactId>
      <version>${junit.jupiter.api.version}</version>
      <scope>test</scope>
    </dependency>

    <dependency>
      <groupId>org.junit.jupiter</groupId>
      <artifactId>junit-jupiter-params</artifactId>
      <version>${junit.jupiter.params.version}</version>
      <scope>test</scope>
    </dependency>

    <dependency>
      <groupId>com.aventstack</groupId>
      <artifactId>chaintest-junit5</artifactId>
      <version>${chaintest.version}</version>
    </dependency>

  </dependencies>

  <build>
    <plugins>

      <plugin>
        <groupId>org.apache.maven.plugins</groupId>
        <artifactId>maven-surefire-plugin</artifactId>
        <version>${maven.surefire.plugin.version}</version>

        <dependencies>
          <dependency>
            <groupId>org.junit.jupiter</groupId>
            <artifactId>junit-jupiter-engine</artifactId>
            <version>${junit.jupiter.engine.version}</version>
          </dependency>
        </dependencies>
      </plugin>
    </plugins>
  </build>

</project>
Step 2 – Create Pages and Test Code for the pages
BasePage
package com.example;

import org.openqa.selenium.WebDriver;
import org.openqa.selenium.support.PageFactory;

public class BasePage {
    public WebDriver driver;

    public BasePage(WebDriver driver) {
        this.driver = driver;
        PageFactory.initElements(driver,this);
    }

}
LoginPage
package com.example;

import org.openqa.selenium.WebDriver;
import org.openqa.selenium.WebElement;
import org.openqa.selenium.support.FindBy;

public class LoginPage extends BasePage {

    public LoginPage(WebDriver driver) {
        super(driver);

    }

    @FindBy(name = "username")
    public WebElement userName;

    @FindBy(name = "password")
    public WebElement password;

    @FindBy(xpath = "//*[@type='submit']")
    public WebElement loginBtn;

    @FindBy(xpath = "//*[@id='flash']")
    public WebElement errorMessage;

    public void login(String strUserName, String strPassword) {
        userName.sendKeys(strUserName);
        password.sendKeys(strPassword);
        loginBtn.click();
    }

    public String getErrorMessage() {
        return errorMessage.getText();
    }

}
SecurePage
package com.example;

import org.openqa.selenium.WebDriver;
import org.openqa.selenium.WebElement;
import org.openqa.selenium.support.FindBy;

public class SecurePage extends BasePage {

    public SecurePage(WebDriver driver) {
        super(driver);

    }

    @FindBy(xpath = "//*[@id='flash']")
    public WebElement securePageTitle;

    public String getSecurePageTitle() {
        return securePageTitle.getText();
    }

}
Step3 – Annotate test class with @ExtendWith(ChainTestExecutionCallback.class)
BaseTests
package com.example;

import com.aventstack.chaintest.plugins.ChainTestExecutionCallback;
import org.junit.jupiter.api.extension.ExtendWith;
import org.junit.jupiter.api.extension.TestWatcher;
import org.openqa.selenium.WebDriver;
import org.openqa.selenium.chrome.ChromeDriver;
import org.openqa.selenium.chrome.ChromeOptions;
import org.junit.jupiter.api.AfterEach;
import org.junit.jupiter.api.BeforeEach;
import java.time.Duration;

@ExtendWith(ChainTestExecutionCallback.class)
public class BaseTests implements TestWatcher {

    public static WebDriver driver;
    public final static int TIMEOUT = 10;

    @BeforeEach
    public void setup() {
        ChromeOptions options = new ChromeOptions();
        options.addArguments("--remote-allow-origins=*");
        options.addArguments("--no-sandbox");
        options.addArguments("--disable-dev-shm-usage");
        driver = new ChromeDriver(options);

        driver.manage().window().maximize();
        driver.get("https://the-internet.herokuapp.com/login");
        driver.manage().timeouts().implicitlyWait(Duration.ofSeconds(TIMEOUT));
    }

    @AfterEach
    void tearDown() {
        driver.quit();
    }

}
LoginPageTests
package com.example;

import org.junit.jupiter.api.Assertions;
import org.junit.jupiter.api.Test;

public class LoginPageTests extends BaseTests {

    String actualLoginPageTitle;
    String actualErrorMessage;
    String actualSecurePageTitle;

    @Test
    public void verifyPageTitle() {

        actualLoginPageTitle = driver.getTitle();

        // Verify Page Title - Fail
        Assertions.assertEquals("The Internet !!",actualLoginPageTitle);

    }

    @Test
    public void invalidCredentials() {

        LoginPage loginPage = new LoginPage(driver);
        loginPage.login("tomsmith", "happy!");
        actualErrorMessage = loginPage.getErrorMessage();

        // Verify Error Message
        Assertions.assertTrue(actualErrorMessage.contains("Your password is invalid!"));

    }

    @Test
    public void validLogin() {

        LoginPage loginPage = new LoginPage(driver);
        loginPage.login("tomsmith", "SuperSecretPassword!");

        SecurePage securePage = new SecurePage(driver);
        actualSecurePageTitle = securePage.getSecurePageTitle();

        // Verify Home Page
        Assertions.assertTrue(actualSecurePageTitle.contains("You logged into a secure area!"));

    }
}
Step 4 – Add chaintest.properties file in src/test/resources
Add chaintest.properties to the classpath, example: src/test/resources/chaintest.properties.
# chaintest configuration
chaintest.project.name= ChaninTest Report with Selenium and JUnit5

# storage
chaintest.storage.service.enabled=false
# [azure-blob, aws-s3]
chaintest.storage.service=azure-blob
# s3 bucket or azure container name
chaintest.storage.service.container-name=

# generators:
## chainlp
chaintest.generator.chainlp.enabled=true
chaintest.generator.chainlp.class-name=com.aventstack.chaintest.generator.ChainLPGenerator
chaintest.generator.chainlp.host.url=http://localhost/
chaintest.generator.chainlp.client.request-timeout-s=30
chaintest.generator.chainlp.client.expect-continue=false
chaintest.generator.chainlp.client.max-retries=3

## simple
chaintest.generator.simple.enabled=true
chaintest.generator.simple.document-title=chaintest
chaintest.generator.simple.class-name=com.aventstack.chaintest.generator.ChainTestSimpleGenerator
chaintest.generator.simple.output-file=target/chaintest/Index.html
chaintest.generator.simple.offline=false
chaintest.generator.simple.dark-theme=true
chaintest.generator.simple.datetime-format=yyyy-MM-dd hh:mm:ss a
chaintest.generator.simple.js=
chaintest.generator.simple.css=

## email
chaintest.generator.email.enabled=true
chaintest.generator.email.class-name=com.aventstack.chaintest.generator.ChainTestEmailGenerator
chaintest.generator.email.output-file=target/chaintest/Email.html
chaintest.generator.email.datetime-format=yyyy-MM-dd hh:mm:ss a
Step 5 – Run the tests
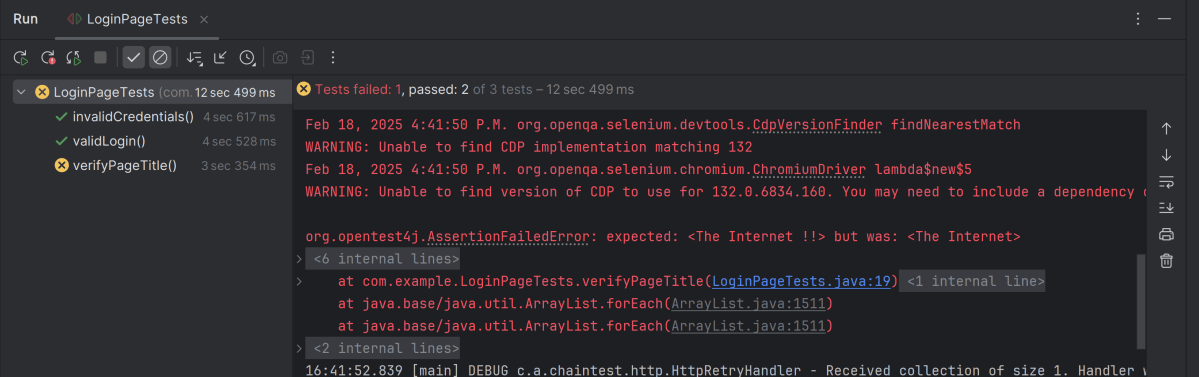
Right click on LoginPageTests and select Run ‘LoginPageTests’

The execution status looks like as shown below. There are 3 tests and 1 test will fail.
Step 6 -View ChainTest Reports
ChainTest Reports are generated in target folder – Index.html and email.html.

Index.html
Right-click and open with Web Browser.
The index.html has a summary section that displays the summary of the execution. The summary includes the overview of the pass/fail using a pictogram, start time, end time, and pass/fail details of tests as shown in the image below.

Email.html
This report contains the high level summary of the test execution.

Step 7 – Run the tests through command line
To run the tests, use the below command
mvn clean test

We are done! Congratulations on making it through this tutorial and hope you found it useful! Happy Learning!!
