The previous tutorial has explained the Integration of Selenium with TestNG and the tests are executed through either TestNG Suite or testng.xml. This tutorial explains the steps to run the TestNG Tests through the command line.
Prerequisite
- Selenium
- TestNG
- Maven
- Java 11
- Maven Compiler Plugin
- Maven Surefire Plugin
Imagine we need to run the TestNG Tests in CI/CD pipelines like Jenkins or GitLab, then we can’t right-click and select TestNG Suite or tesng.xml to run the tests. In such situations, the tests can be executed through the command line.
We need to add plugins to pom.xml to compile the test code and then run the tests. To know more about Maven Surefire Plugin for TestNG, refer to this blog.
 <build>
      <plugins>

         <!--  Compiler Plugin -->
         <plugin>
            <groupId>org.apache.maven.plugins</groupId>
            <artifactId>maven-compiler-plugin</artifactId>
            <version>3.8.1</version>
            <configuration>
               <source>11</source>
               <target>11</target>
            </configuration>
         </plugin>

         <!--  Plugin used to execute tests -->
         <plugin>
            <groupId>org.apache.maven.plugins</groupId>
            <artifactId>maven-surefire-plugin</artifactId>
            <version>3.0.0-M5</version>
            <configuration>
               <suiteXmlFiles>
                  <suiteXmlFile>testng.xml</suiteXmlFile>
               </suiteXmlFiles>
            </configuration>
         </plugin>
      </plugins>
   </build>
</project>
It is needed to add testng.xml to suiteXmlFile to start the execution of the tests.
<suiteXmlFiles>
       <suiteXmlFile>testng.xml</suiteXmlFile>
</suiteXmlFiles>
Create a sample class that has @Test methods. In the example below, we have created a class as below:
import static org.testng.Assert.assertTrue;
import static org.hamcrest.Matchers.containsString;
import static org.hamcrest.MatcherAssert.assertThat;
import org.openqa.selenium.By;
import org.openqa.selenium.WebDriver;
import org.openqa.selenium.firefox.FirefoxDriver;
import org.testng.annotations.AfterTest;
import org.testng.annotations.BeforeTest;
import org.testng.annotations.Test;

public class TestNGRunFromCommandLine {

	 WebDriver driver;

	    @BeforeTest
	    public void setUp() {
	        System.setProperty("webdriver.gecko.driver",
	                "C:\\Users\\Vibha\\Software\\geckodriver\\geckodriver.exe");

	        driver = new FirefoxDriver();
	        driver.get("https://opensource-demo.orangehrmlive.com/");

	        driver.manage().window().maximize();
	    }

	    @Test(description = "This test validates title of login functionality", priority = 0)
	    public void verifyLoginPage() {

	        String expectedTitle = driver.findElement(By.xpath("//*[@id='logInPanelHeading']")).getText();
	        System.out.println("Title :" + expectedTitle);
	        assertTrue(expectedTitle.equalsIgnoreCase("LOGIN Panel"));
	    }

	    @Test(description = "This test validates  successful login to Home page", priority = 1)
	    public void verifyHomePage() {

	        System.out.println("Username Entered");
	        driver.findElement(By.name("txtUsername")).sendKeys("Admin");

	        System.out.println("Password Entered");
	        driver.findElement(By.name("txtPassword")).sendKeys("admin123");

	        driver.findElement(By.id("btnLogin")).submit();

	        String newPageText = driver.findElement(By.xpath("//*[@id='content']/div/div[1]/h1")).getText();
	        System.out.println("newPageText :" + newPageText);
	        assertThat(newPageText, containsString("Dashboard"));
	    }

	    @AfterTest
	    public void teardown() {

	        driver.quit();
	    }
	}
The below is the testng.xml file, which will execute all the tests that are available under ‘TestNGRunFromCommandLine‘ class.
<?xml version="1.0" encoding="UTF-8"?>
<!DOCTYPE suite SYSTEM "https://testng.org/testng-1.0.dtd">
<suite name="Suite">
  <test name="Test">
    <classes>
      <class name="TestNG_Demo.TestNGRunFromCommandLine"/>
    </classes>
  </test>
</suite>
Run the tests using command line
The below commands are used to execute the ‘testng.xml’ file from the command line. First, we need to go the place where the pom.xml of the project is placed. Then use the mvn compile test to compile the code and execute the TestNG tests.
cd C:\Users\Vibha\Projects\Vibha_Personal\ParallelTestsTestNG
mvn compile test
After executing the above command, it should execute the tests that we have specified in testng.xml file. Below is the screenshot after the execution of the tests.

This execution generates various TestNG Reports. We are concerned about emailable-report.html and index.html.
Emailable-Report.html
An emailable report is a type of summary report that one can transfer to other people in the team through any medium. Click on option “emailable-report.html”. Click on the options web browser. The output reports in TestNG reporting will look like below:

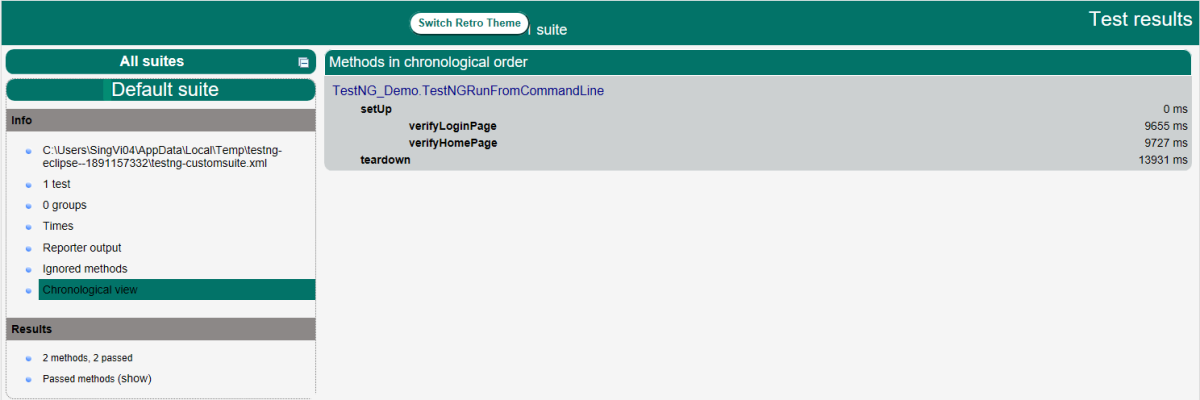
Index.html
Index report contains the index-like structure of different parts of the report, such as failed tests, test file, passed tests, etc.
Right-click on the index.html from the project directory. Select the option open with the web browser option.
The result will look like this:
Congratulations. This tutorial has explained running the tests of TestNG using Command Line. Happy Learning!!
Additional Tutorials
