In the last tutorial, I explained How to test POST JSON Object request using Java Map in Rest Assured. In this tutorial, I will create a request body using JSON Array in Rest Assured. This request body can be used for POST or PUT operations.
Table of Contents
What is JSONArray?
JSONArray represents an immutable JSON array (an ordered sequence of zero or more values). It also provides an unmodifiable list view of the values in the array.
- JSON array can store multiple value types. The values in a JSONArray can be of the following types: JsonObject, JsonArray, JsonString, JsonNumber, JsonValue.TRUE, JsonValue.FALSE, and JsonValue.NULL.
- The array index begins with 0.
- The square brackets
[ ]are used to declare the JSON array.
An API can accept a JSON Array payload as a request body. Imagine, we want to add employee details of more than one employee in the below example. In this case, we can pass multiple JSON objects within a JSON array. I have explained 2 ways to create JSON Object – map or JsonObject. Refer to any one of the tutorials to get to know about the creation of JSON Object.
To create a JSON Array, we need to add org.json Maven dependency, as shown below. The latest version can be found here.
<dependency>
    <groupId>org.json</groupId>
    <artifactId>json</artifactId>
    <version>20240303</version>
</dependency>
JSONObject is imported from the package:
import org.json.JSONObject;
JSONArray is imported from the package:
import org.json.JSONArray;
Below is an example of JSONArray.
How to create JSONArray Request Body or payload?
- Create a JSON Object and add the first employee details.
- Create another JSON Object and add second guest details.
- Create a JSONArray.
- Add both JSON Objects to JSONArray.
Below is an example of creating a request from JSONArray with multiple JSON Objects. I am using a logger just to print the JSON body in the Console.
import io.restassured.RestAssured;
import io.restassured.http.ContentType;
import org.json.JSONArray;
import org.json.JSONObject;
import org.junit.Test;
import static org.hamcrest.Matchers.equalTo;

public class Json_Demo {

    @Test
    public void passBodyAsJsonArrayDemo() {

        // JSON Object for first employee
        JSONObject data1 = new JSONObject();

        data1.put("employee_name", "ObjectTest");
        data1.put("profile_image", "test1.png");
        data1.put("employee_age", "30");
        data1.put("employee_salary", "11111");

        // JSON Object for second employee
        JSONObject data2 = new JSONObject();

        data2.put("employee_name", "MapTest");
        data2.put("profile_image", "test2.png");
        data2.put("employee_age", "20");
        data2.put("employee_salary", "99999");

        // Creating JSON array to add both JSON objects
        JSONArray array = new JSONArray();
        array.put(data1);
        array.put(data2);

        // Send the request
        RestAssured.given()
                .contentType(ContentType.JSON)
                .body(array.toString())
                .log().all()

                .when()
                .post("https://dummy.restapiexample.com/api/v1/create")

                .then()
                .assertThat().statusCode(200)
                .body("message", equalTo("Successfully! Record has been added."))
                .log().all();
    }
}
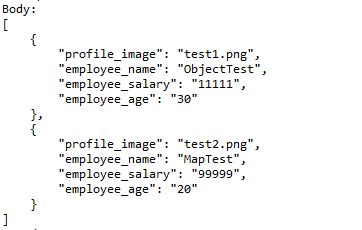
The output of the above program is
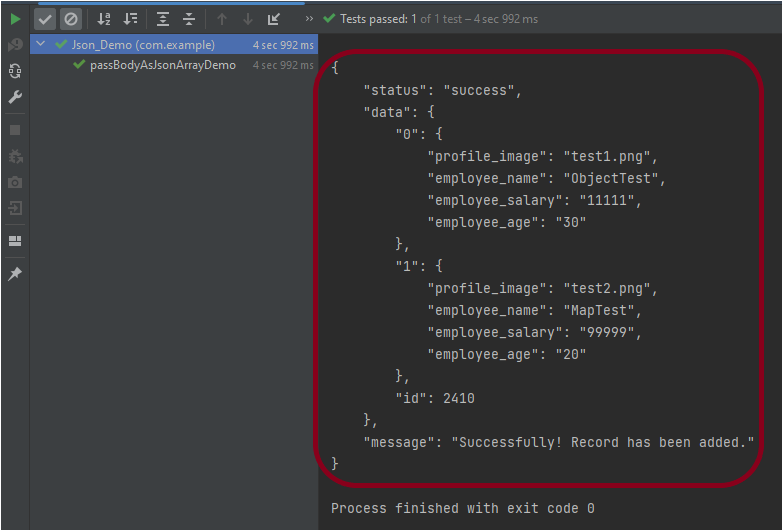
Explanation:
1. Creating JSON Objects:
Two “JSONObject” instances (‘data1‘ and ‘data2‘) are created to represent two employees. Each JSON object contains employee details such as name, profile image, age, and salary.
       // JSON Object for first employee
        JSONObject data1 = new JSONObject();

        data1.put("employee_name", "ObjectTest");
        data1.put("profile_image", "test1.png");
        data1.put("employee_age", "30");
        data1.put("employee_salary", "11111");

        // JSON Object for second employee
        JSONObject data2 = new JSONObject();

        data2.put("employee_name", "MapTest");
        data2.put("profile_image", "test2.png");
        data2.put("employee_age", "20");
        data2.put("employee_salary", "99999");
2. Creating a JSON Array:
A JSONArray instance is created, and both JSON objects (data1 and data2) are added to it.
JSONArray array = new JSONArray();
array.put(data1);
array.put(data2);
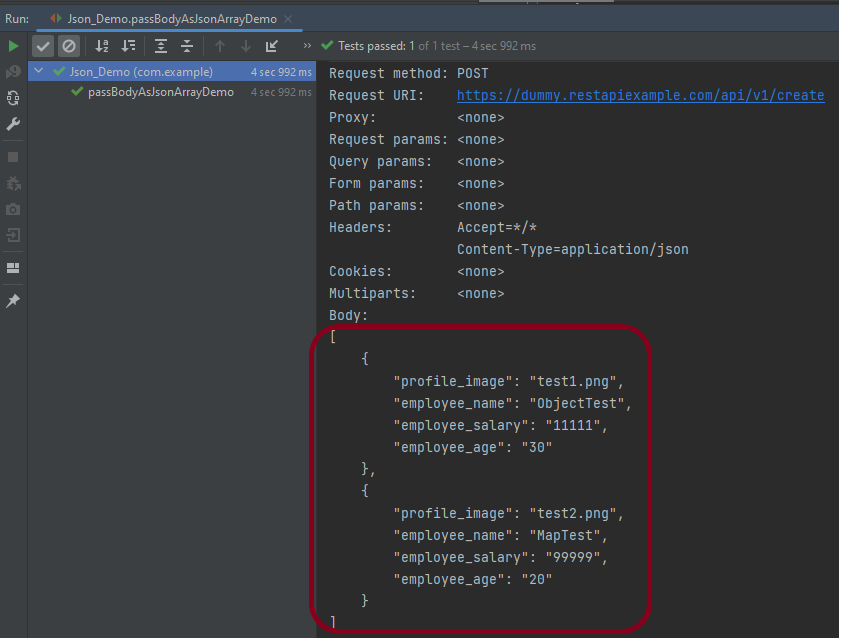
3. Sending the POST Request:
3.1 The RestAssured library constructs and sends the HTTP POST request. It sets the content type of the request to JSON.
contentType(ContentType.JSON)
3.2 Converts the JSON array into a string format and sets it as the body of the request.
.body(array.toString())
3.3 Logs all details of the request for debugging purposes.
.log().all()
4. Define the Request and Response Handling:
4.1 Sends the POST request to the specified URL.
.post("https://dummy.restapiexample.com/api/v1/create")
4.2 Asserts that the response status code is 200, indicating a successful request.
.assertThat().statusCode(200)
4.3 Asserts that the body of the response contains the specified message, confirming successful addition of records.
.body("message", equalTo("Successfully! Record has been added."))
4.4 Logs all details of the response for debugging purposes.
.log().all()
Complex JSON Array
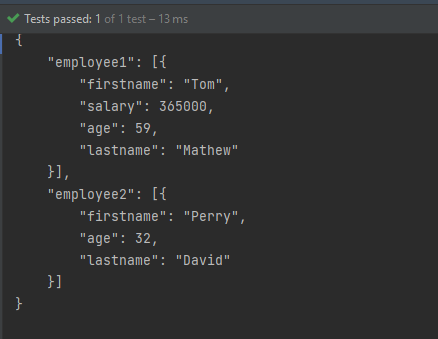
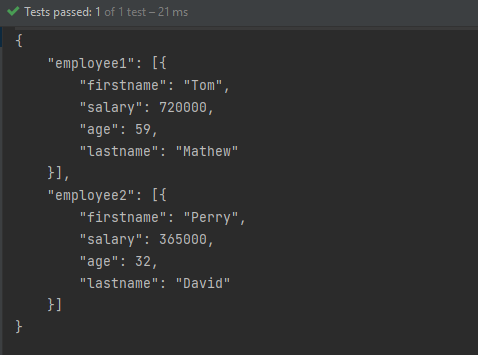
Let us see an example of a complex JSON Array. This structure represents two separate employee data sets. Each is contained within its own JSON array. The whole is encapsulated within a larger JSON object identified by keys employee1 and employee2.
{
    "employee1": [
      {
        "firstname": "Tom",
        "salary": 720000,
        "age": 59,
        "lastname": "Mathew"
     }
    ],
    "employee2": [
     {
        "firstname": "Perry",
        "salary": 365000,
        "age": 32,
        "lastname": "David"
    }
   ]
}
The above JSON Array can be created as
import org.json.JSONArray;
import org.json.JSONObject;
import org.junit.Test;

public class Json_Demo {

    @Test
    public void passBodyAsJsonArray() {

        // JSON Object for first employee
        JSONObject data1 = new JSONObject();

        data1.put("firstname", "Tom");
        data1.put("lastname", "Mathew");
        data1.put("age", 59);
        data1.put("salary", 720000);

        // JSON Object for second employee
        JSONObject data2 = new JSONObject();

        data2.put("firstname", "Perry");
        data2.put("lastname", "David");
        data2.put("age", 32);
        data1.put("salary", 365000);

        // Creating first JSON array
        JSONArray array1 = new JSONArray();
        array1.put(data1);

        // Creating second JSON array
        JSONArray array2 = new JSONArray();
        array2.put(data2);

        // Create JSON Object to add both JSONArrays
        JSONObject data3 = new JSONObject();
        data3.put("employee1", array1);
        data3.put("employee2", array2);

        System.out.println(data3.toString(4));

    }
}
The output of the above program is
Explanation:
1. JSON Objects for Employees:
Two JSONObject instances (data1 and data2) represent individual employees with attributes like firstname, lastname, age, and salary.
JSONObject data1 = new JSONObject();
data1.put("firstname", "Tom");
data1.put("lastname", "Mathew");
data1.put("age", 59);
data1.put("salary", 720000);

JSONObject data2 = new JSONObject();
data2.put("firstname", "Perry");
data2.put("lastname", "David");
data2.put("age", 32);
data2.put("salary", 365000);
2. Creating JSON Arrays:
Two JSONArray instances (array1 and array2) are created to encapsulate each employee’s JSON object.
JSONArray array1 = new JSONArray();
array1.put(data1);

JSONArray array2 = new JSONArray();
array2.put(data2);
3. Composing The JSON Structure:
A third JSONObject, data3, is created to aggregate the two JSON arrays under separate keys: employee1 and employee2.
JSONObject data3 = new JSONObject();
data3.put("employee1", array1);
data3.put("employee2", array2);
4. Output the JSON Object:
The entire composite JSON structure (data3) is printed to the console. The toString(4) method formats the output with an indentation of 4 spaces for readability.
System.out.println(data3.toString(4));
Similarly, there is another way to create this JSON Structure.
import org.json.JSONArray;
import org.json.JSONObject;
import org.junit.Test;

public class Json_Demo {

    @Test
    public void passBodyAsJsonArray1() {

        // Creating JSON array to add first JSON object
        JSONArray array1 = new JSONArray();
        array1.put(new JSONObject().put("firstname", "Tom").put("lastname", "Mathew").put("age", 59).put("salary",
                720000));

        // Creating JSON array
        JSONArray array2 = new JSONArray();
        array2.put(new JSONObject().put("firstname", "Perry").put("lastname", "David").put("age", 32).put("salary",
                365000));

        // Create JSON Object to add JSONArrays
        JSONObject data1 = new JSONObject();
        data1.put("employee1", array1);
        data1.put("employee2", array2);

        System.out.println(data1.toString(4));

    }
}
The output of the above program is
Congratulations on making it through this tutorial and hope you found it useful! Happy Learning!! Cheers!!

“JSONArray.put” is not visible in my code
LikeLike
Ohh Sorry I mistakenly add incorrect maven dependency.
LikeLike
I want to POST an array in an Object like this is my baseURI: http://localhost:3000/FamousPersonalities
and below is the JSON
{
“Males”: [
{
“firstname”: “Tom”,
“lastname”: “Cruise”,
“age”: 59
}
],
“FeMales”: [
{
“firstname”: “Lata”,
“lastname”: “Mangeshkar”,
“age”: 92
}
]
}
How can I navigate to “Males” array through baseURI what should be the path so that I can add an object in it. Please suggest and guide me.
LikeLike
Hi Rama.. if you are looking to create the JSON body as shown in the above msg, you can try this
JSONArray array1 = new JSONArray();
array1.put(new JSONObject().put(“firstname”, “Tom”).put(“lastname”, “Cruise”).put(“age”, 59));
// Creating JSON array to add second JSON object
JSONArray array2 = new JSONArray();
array2.put(new JSONObject().put(“firstname”, “Lata”).put(“lastname”, “Mangeshkar”).put(“age”, 92));
// Create JSON Object to add JSONArrays
JSONObject data1 = new JSONObject();
data1.put(“males”, array1);
data1.put(“females”, array2);
System.out.println(data1);
LikeLike
I want to POST an array in an Object like
{
“paymentUnitDetails”: [
{
“breakdownPrice”: [
{
“key”: “hotel_1_night_1_room”,
“type”: “string”,
“value”: 194578.0
}
],
“cashback”: 0,
“cashbackTIX”: 0,
“createdDate”: “2023-01-13T11:41:04.492Z”,
“currency”: “IDR”,
“orderName”: “Shakti Hotel Jakarta”,
“orderNameDetail”: “string”,
“productType”: “TIXHOTEL”,
“referenceDetailId”: 1200070925,
“totalPrice”: 177876.0
}
],
“secretKey”: “string”
}
LikeLike
serviceSetupId”: “{{servicesetup_id}}“,
“vendorPlatform”: “abc”,
“entityRef”: {
“entityId”: “urn:elli:eeee:34554545:loan:{{loan_id}}“,
“entityType”: “urn:elli:eeee:loan”
},
“scope”: {
“entityRef”: {
“entityId”: “urn:elli:eeee:34554545:loan:{{loan_id}}“,
“entityType”: “urn:elli:eeee:loan”
},
“orderServiceFor”: “LOAN”
},
“type”: “MANUAL”,
“reason”: “Manual Flow EPC2”,
“request”: {
“type”: “Qualified Fee Quote”,
“options”: {
“requesttype”: “automation”,
“autorenew”: true,
“overrideloanpurpose”: true
},
“resources”: []
}
}
can please how can we put this in request body of post method using array concept
LikeLike
You can create the request body without array as shown below:
package com.example.gson;
import org.json.JSONArray;
import org.json.JSONObject;
public class ComplexJson {
public static void main(String[] args) {
JSONObject jsonObject = new JSONObject();
JSONObject entityRef = new JSONObject();
entityRef.put(“entityId”, “urn:elli:eeee:34554545:loan:{{loan_id}}”);
entityRef.put(“entityType”, “urn:elli:eeee:loan”);
JSONObject scope = new JSONObject();
scope.put(“entityRef”, entityRef);
scope.put(“orderServiceFor”, “LOAN”);
JSONObject options = new JSONObject();
options.put(“requesttype”, “automation”);
options.put(“autorenew”, true);
options.put(“overrideloanpurpose”, true);
JSONObject request = new JSONObject();
request.put(“type”, “Qualified Fee Quote”);
request.put(“options”, options);
request.put(“resources”, new JSONArray());
jsonObject.put(“serviceSetupId”, “{{servicesetup_id}}”);
jsonObject.put(“vendorPlatform”, “abc”);
jsonObject.put(“entityRef”, entityRef);
jsonObject.put(“scope”, scope);
jsonObject.put(“type”, “MANUAL”);
jsonObject.put(“reason”, “Manual Flow EPC2”);
jsonObject.put(“request”, request);
System.out.println(jsonObject.toString(4));
}
}
LikeLike