We can perform GET as well as POST operations in JMeter. In this tutorial, we will only explain how we send POST HTTP requests in JMeter. In the previous tutorial, I explained how we can send GET request in JMeter.
Add Thread Group To add Thread Group: Right-click on the “Test Plan” and add a new thread group: Add -> Threads (Users) -> Thread Group
In the Thread Group control panel, enter Thread Properties as follows: We will take an example of row no 5
Number of Threads: 5 – Number of users connects to the target website Loop Count: 5 – Number of times to execute testing Ramp-Up Period: 5 – It tells JMeter how long to delay before starting the next user. For example, if we have 5 users and a 5 -second Ramp-Up period, then the delay between starting users would be 1 second (5 seconds /5 users).
Step 2 – Adding JMeter elements
The JMeter element used here is HTTP Request Sampler. In the HTTP Request Control Panel, the Path field indicates which URL request you want to send
2.1 Add HTTP Request Sampler To add: Right-click on Thread Group and select: Add -> Sampler -> HTTP Request
The below-mentioned are the values used in HTTP Request to perform the test
Name – HTTP POST Request Demo
Server Name or IP – reqres.in
Port –
Method – POST
Path – /api/users
2.2 Add HTTP Head Manager
The Header Manager lets you add or override HTTP request headers like can add Accept-Encoding, Accept, Cache-Control
To add: Right-click on Thread Group and select: Add -> Config Element -> HTTP Read Manager
The below-mentioned are the values used in Http Request to perform the test Content-type = application/json accept – application/json
Step 3 – Adding Listeners to Test Plan
Listeners – They show the results of the test execution. They can show results in a different format such as a tree, table, graph, or log file We are adding the View Result Tree listener
View Result Tree – View Result Tree shows the results of the user request in basic HTML format To add: Right-click on Test Plan, Add -> Listener -> View Result Tree
Aggregate Report
It is almost the same as Summary Report except Aggregate Report gives a few more parameters like, “Median”, “90% Line”, “95% Line” and “99% Line”.
To add: Right Click on Thread Group > Add > Listener > Aggregate Report
Step 4 – Save the Test Plan
To Save: Click File Select -> Save Test Plan as ->Give the name of the Test Plan. It will be saved in .jmx format.
Step 5 – Run the Test Plan
Click on the Green Triangle as shown at the top to run the test.
Step 6 – View the Execution Status
Click on View Result Tree to see the status of Run. A successful request will be of a Green colour in the Text Section.
Click on Response data and Response Header to view other information about Response.
Click on Aggregate Report Result to see the aggregated status of Run.
We are done! Congratulations on making it through this tutorial and hope you found it useful! Happy Learning!!
In the last tutorial, I explained How to test GET Request using Rest Assured. In this tutorial, I will automate a POST Request using Rest Assured. I will verify the status code, line of Status, and content of the Response. To set up a basic Rest Assured Maven Project, click here and Gradle project, click here.
Add the below-mentioned dependencies to the pom.xml. The latest dependency can be downloaded from here.
An HTTP POST method is used to create a new resource in the collection of resources. The request body is passed as a JSON/XML or in a different format. If a resource is created successfully by the endpoint or server, it returns a status code 201(Created). It also provides a Location header with a link to the newly-created resource with the 201 HTTP status. It may return 200 (OK) and 204 (No Content) status code as well, based on how the API is developed.
POST is neither safe nor idempotent. It is therefore recommended for non-idempotent resource requests. Making two identical POST requests will most result in two resources containing the same information.
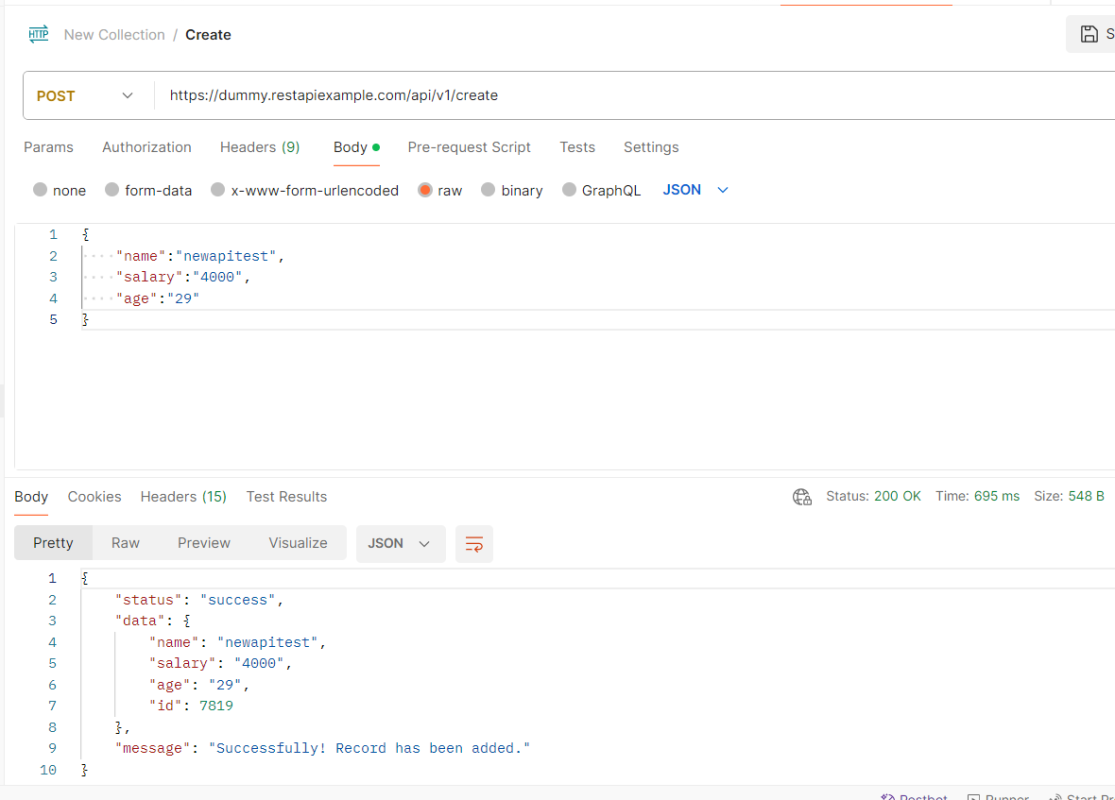
Below is an example of a Request performing POST operation in Postman.
Below are the steps to test a POST Request using Rest Assured:
Step 1 – Specify the base URL to the RESTful web service using the RestAssuredclass.
Step 2 – Every Request in the Rest-Assured library is represented by an interface called RequestSpecification. This interface allows modifying the request, like adding headers or adding authentication details. Use the RestAssuredclass to generate a RequestSpecification.
contentTypeis imported from restassured.http package:
import io.restassured.http.ContentType;
Step 4 – Pass Request Body as String.
requestSpecification.body(jsonString);
Step 5 – Send the POST request to the server. Then receive the response of the request made by REST Assured. This response contains every detail returned by hitting request i.e. response body, response headers, status code, status lines, cookies, etc. The response is imported from package:
import io.restassured.response.Response;
Step 6 – To validate a response like status code or value, we need to get the reference of type ValidatableResponse.
ValidatableResponse is an interface. A validatable response to a request made by, REST Assured. ValidatableResponse is imported from package:
PrettyPrint() – It prints the response body if possible and returns it as a string. Pretty printing is possible for content-types JSON, XML, and HTML.
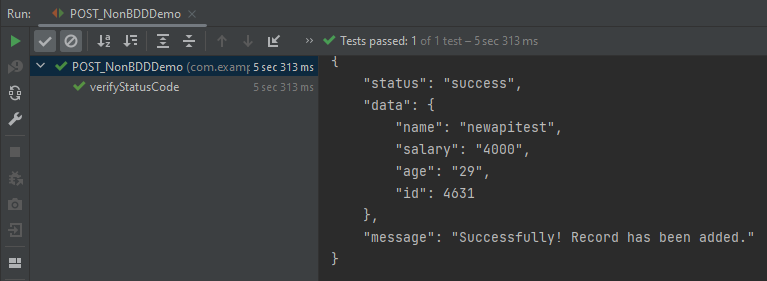
Below is the example of testing a POST request in Non-BDD format. I have used ValidatableResponse for the assertion of status. It is also used for the status line and body of the Response.
import io.restassured.RestAssured;
import io.restassured.http.ContentType;
import io.restassured.response.Response;
import io.restassured.response.ValidatableResponse;
import io.restassured.specification.RequestSpecification;
import org.junit.Test;
import static org.hamcrest.CoreMatchers.equalTo;

public class POST_NonBDDDemo {

    RequestSpecification requestSpecification;
    Response response;
    ValidatableResponse validatableResponse;

    @Test
    public void verifyStatusCode() {

        String jsonString = "{\"name\":\"newapitest\",\"salary\":\"4000\",\"age\":\"29\"}";

        RestAssured.baseURI = "https://dummy.restapiexample.com/api/v1/create";

        // Create a request specification
        requestSpecification = RestAssured.given();

        // Setting content type to specify format in which request payload will be sent.
        requestSpecification.contentType(ContentType.JSON);

        // Adding body as string
        requestSpecification.body(jsonString);

        // Calling POST method
        response = requestSpecification.post();

        // Let's print response body.
        String responseString = response.prettyPrint();

        /*
         * To perform validation on response, we need to get ValidatableResponse type of
         * response
         */
        validatableResponse = response.then();

        // Check status code
        validatableResponse.statusCode(200);

        // It will check if status line is as expected
        validatableResponse.statusLine("HTTP/1.1 200 OK");

        // Check response body - name attribute
        validatableResponse.body("data.name", equalTo("newapitest"));

        // Check response body - message attribute
        validatableResponse.body("message", equalTo("Successfully! Record has been added."));

    }
}
The below image shows the test result of the above test.
Test implemented in BDD Format
1. equalTois used for assertion, and is imported from a static hamcrest package:
import static org.hamcrest.Matchers.equalTo;
2. givenis a static import from package:
import static io.restassured.RestAssured.given;
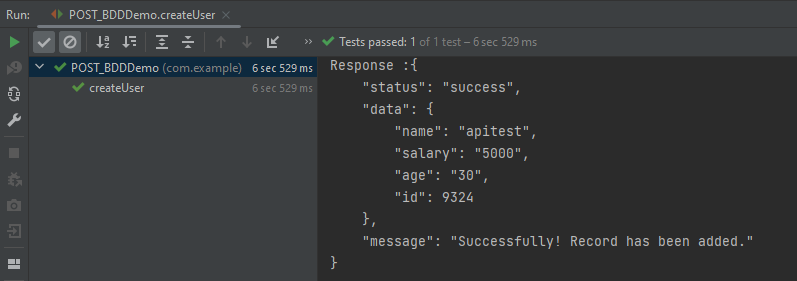
Below is an example of a BDD Test.
import io.restassured.http.ContentType;
import io.restassured.response.ValidatableResponse;
import org.junit.Test;
import static io.restassured.RestAssured.given;
import static org.hamcrest.CoreMatchers.equalTo;

public class POST_BDDDemo {

    ValidatableResponse validatableResponse;

    @Test
    public void createUser() {

        String json = "{\"name\":\"apitest\",\"salary\":\"5000\",\"age\":\"30\"}";

        // GIVEN
        validatableResponse = given()
                .baseUri("https://dummy.restapiexample.com/api")
                .contentType(ContentType.JSON)
                .body(json)

                // WHEN
                .when()
                .post("/v1/create")

                // THEN
                .then()
                .assertThat().statusCode(200).body("data.name", equalTo("apitest"))
                .body("message", equalTo("Successfully! Record has been added."));

        System.out.println("Response :" + validatableResponse.extract().asPrettyString());
    }

}
The below image shows the test result of the above test.
Explanation:
1. This string represents the JSON payload that will be sent in the body of the POST request. It includes fields like name, salary, and age.
In this tutorial, we will explain how to run tests in JMeter in non-GUI mode (Command Line mode).
Why execute tests in non-GUI mode?
The JMeterGUI’s inability to handle huge loads and excessive resource consumption risks overloading the server, which would give you inaccurate test results information. Additionally, the less load you can generate throughout your tests, the more resource-intensive the server is.
Create a Test Plan in JMeter by following the below-mentioned steps
Step 1 – Add Thread Group
Select Test Plan on the tree
Add Thread Group To add Thread Group: Right-click on the “Test Plan” and add a new thread group: Add -> Threads (Users) -> Thread Group
In the Thread Group control panel, enter Thread Properties as follows: We will take an example of row no 5
Number of Threads: 5 – Number of users connects to the target website Loop Count: 5 – Number of times to execute testing Ramp-Up Period: 5 – It tells JMeter how long to delay before starting the next user. For example, if we have 5 users and a 5 -second Ramp-Up period, then the delay between starting users would be 1 second (5 seconds /5 users).
Step 2 – Adding JMeter elements
The JMeter element used here is HTTP Request Sampler. In HTTP Request Control Panel, the Path field indicates which URL request you want to send
2.1 Add HTTP Request Sampler To add: Right-click on Thread Group and select: Add -> Sampler -> HTTP Request
The below-mentioned are the values used in HTTP Request to perform the test
Name – HTTP POST Request Demo
Server Name or IP – reqres.in
Port – Blank
Method – POST
Path – /api/users
2.2 Add HTTP Head Manager
The Header Manager lets you add or override HTTP request headers like can add Accept-Encoding, Accept, Cache-Control
To add: Right-click on Thread Group and select: Add -> Config Element -> HTTP Read Manager
The below-mentioned are the values used in Http Request to perform the test Content-type = application/json accept – application/json
Step 3 – Adding Listeners to Test Plan
Listeners – They show the results of the test execution. They can show results in a different format such as a tree, table, graph, or log file We are adding the View Result Tree listener
View Result Tree – View Result Tree shows the results of the user request in basic HTML format To add: Right-click on Test Plan, Add -> Listener -> View Result Tree
Aggregate Report
It is almost the same as Summary Report except Aggregate Report gives a few more parameters like, “Median”, “90% Line”, “95% Line” and “99% Line”.
To add: Right Click on Thread Group > Add > Listener > Aggregate Report
Step 4 – Save the Test Plan
To Save: Click File Select -> Save Test Plan as ->Give the name of the Test Plan. It will be saved in .jmx format.
The below image shows that the test is saved in Documents with the name POST_Load.jmx.
Step 5 – Run the Test Plan from Command Line
Open the command prompt and go into JMeter’s bin folder.
cd C:\Users\Vibha\Documents\apache-jmeter-5.6\apache-jmeter-5.6\bin


