In this tutorial, we will generate PDF reports using an Extent Adapter.
Step 1: Followthis article to add POM.xml, create and configure the sample project with the extent property file, and add the plugin to the Test Runner class.
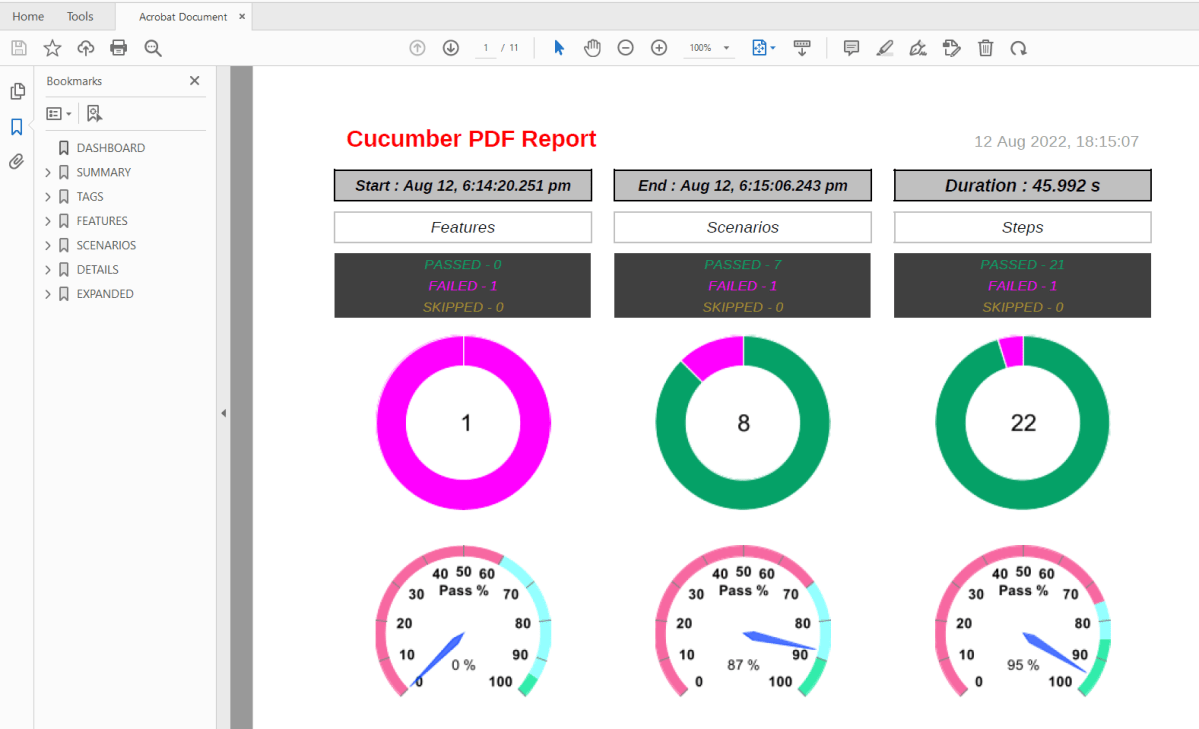
Execute the test code. The PDF report will be generated as shown below:
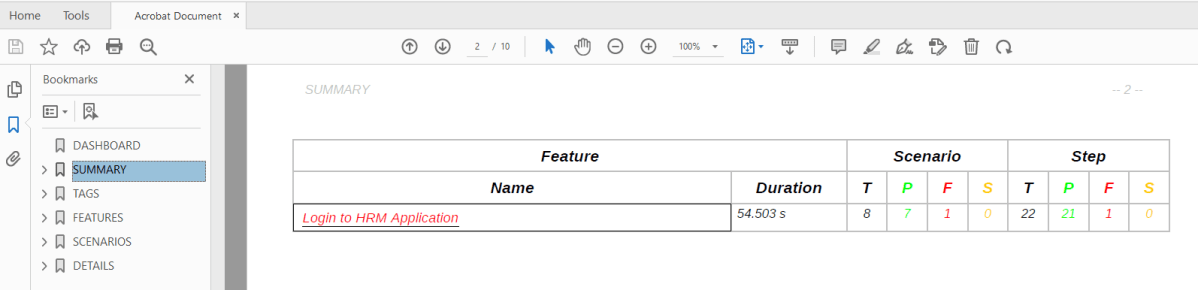
The report contains six sections – dashboard,summary, tags, features, scenarios, and detailed sections.
1. Dashboard
This section is a single-page dashboard that summarizes the test run. This contains the report title, duration, and status of breakups.
2. Summary section
This section provides an overview of the test run in terms of a feature breakdown, comprising duration, scenario count, and step count. The scenarios and steps are divided into status counts. The feature name has a link that navigates to further details in the detailed step section. This link is only present if the detailed section is enabled.
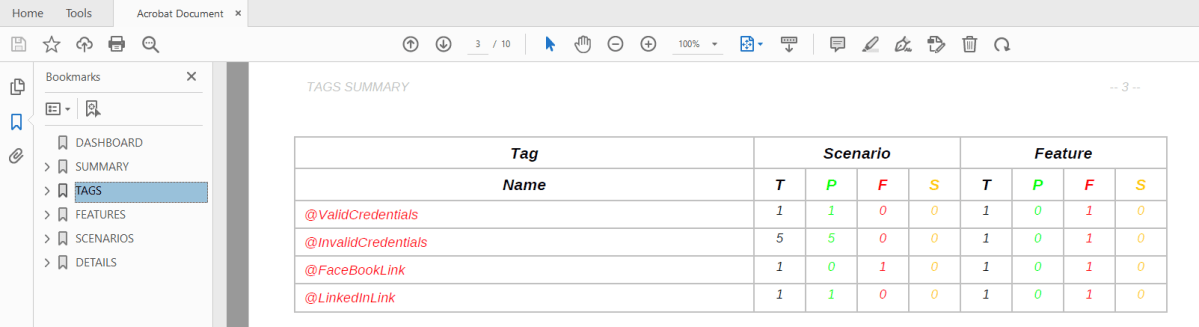
3. Tag section
This section provides an overview of the test run in terms of a tag breakdown, comprising feature count and scenario count.
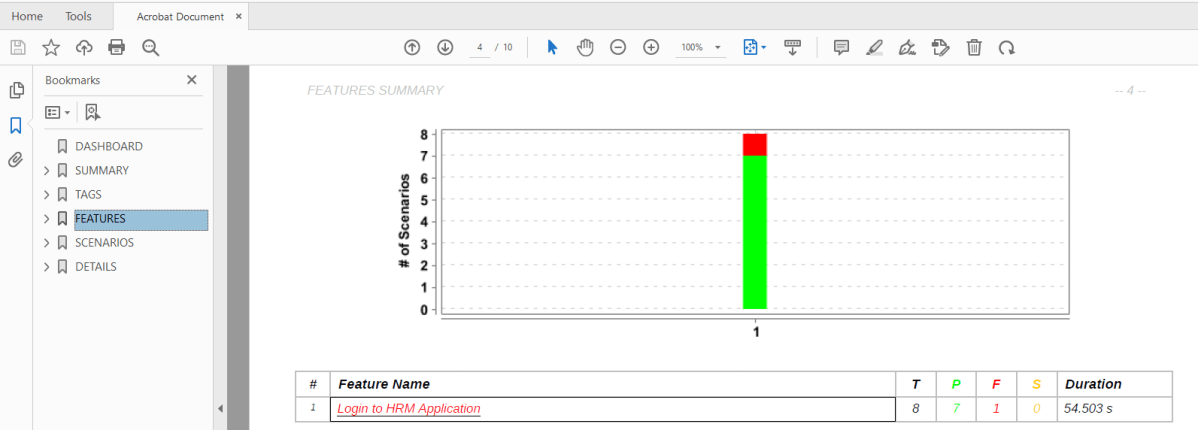
4. Feature section
This section describes the feature details with a stacked bar chart and a table of the scenario status and duration. This section display can be controlled by a configuration setting, enabled by default. The feature name has a link that navigates to further details in the detailed step section. This link is only present if the detailed section is enabled.
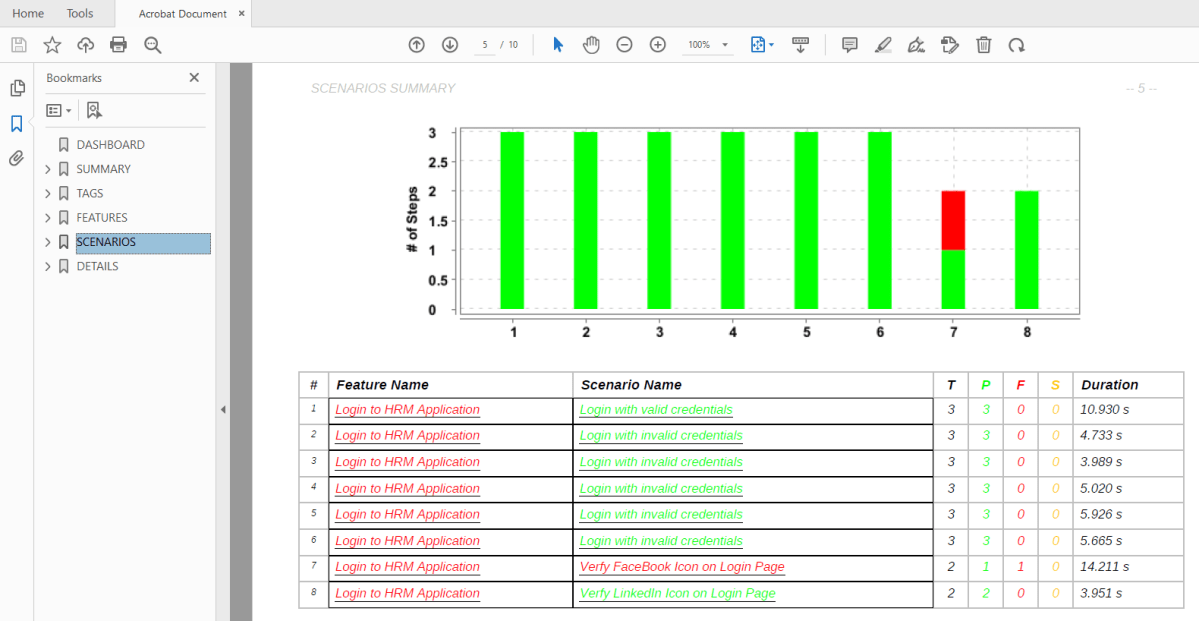
5. Scenario section
This section describes the scenario details with a stacked bar chart and a table of the step status and duration. This section display can be controlled by a configuration setting, enabled by default. The feature and scenario names have a link that navigates to further details in the detailed step section. This link is only present if the detailed section is enabled.
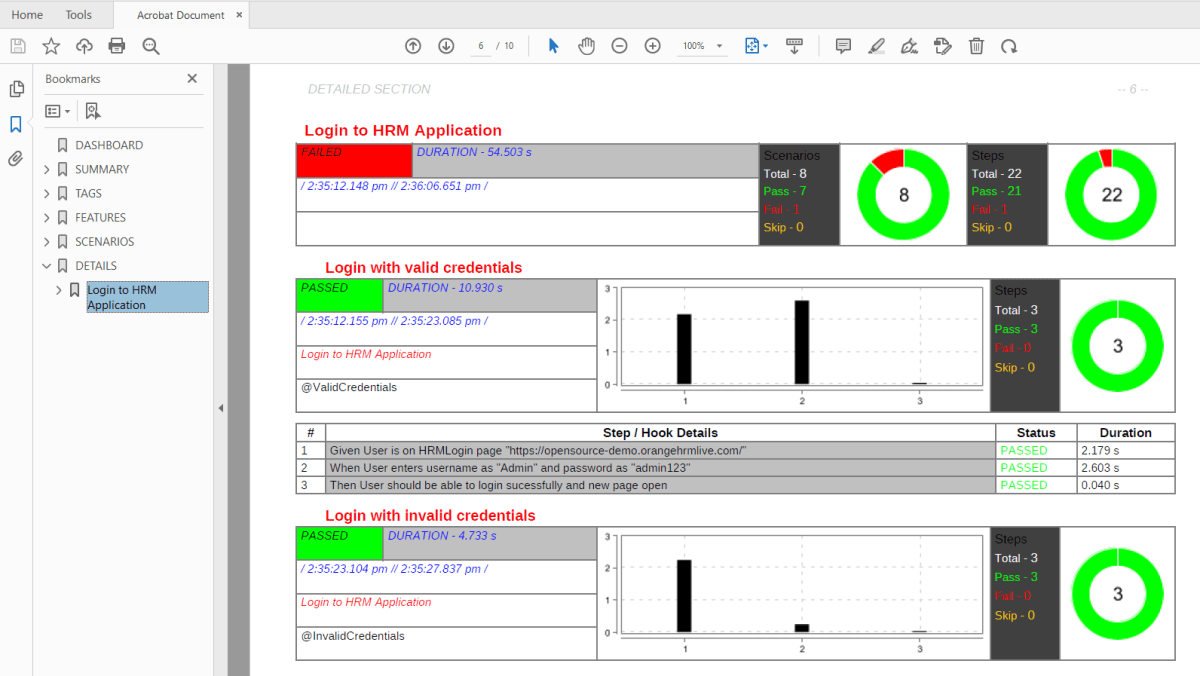
6. Detailed section
This section describes the details of individual steps and hooks, along with status and duration. This section display can be controlled by a configuration setting, enabled by default.
This section also contains screenshots of the failed images.
Customized PDF Report
The report settings can be used to toggle on and off optional report sections, and change the report title, text color for various data, background color, and other options.
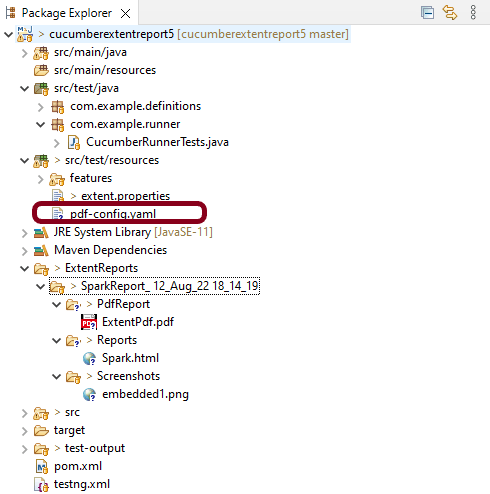
The settings are saved in a YAML file called pdf-config.yaml, which is located in the project’s src/test/resources folder. If the file is missing or no settings are specified, the default values are used. To change the default values, create a pdf-config.yaml file in the project’s src/test/resources folder that contains only the new values for the settings.
Execute the test code. Now the PDF Report will be generated as shown below:
This method of configuring report settings using a yaml properties file can be used both for the Maven plugin report generation and the ExtentReport style.
The passed, failed, and skipped colors can be set with the passColor, failColor and skipColor properties. These take in the colors in hex values (without the leading ‘#’) and are valid throughout the report.
The features, scenarios, and detailed sections can be displayed by setting the displayFeature, displayScenario and displayDetailed properties to true. The default value for these settings is true.
Screenshots are displayed as thumbnails and can be opened in the available native application. This is the default behaviour, in which the screenshot file is embedded in the PDF file. This can be toggled by the displayAttached setting. When the setting is set to false, only the thumbnail is displayed. These can also be displayed in zoomed images in a separate section by setting the displayExpanded to true and also displayAttached to false.
To know more about various settings in PDF Report, refer to this tutorial.
The previous tutorial explained the steps to generate ExtentReports for Cucumber with TestNG. We can generate ExtentReports for Cucumber with JUnit4 also. This tutorial explains the steps that need to be followed to generate an ExtentReports Version5.
Step 2: Create a feature file in src/test/resources
Below is a sample feature file.
Feature: Login to HRM Application

  @ValidCredentials
   Scenario: Login with valid credentials

    Given User is on HRMLogin page "https://opensource-demo.orangehrmlive.com/"
    When User enters username as "Admin" and password as "admin123"
    Then User should be able to login successfully and new page open

   @InvalidCredentials
   Scenario Outline: Login with invalid credentials

    Given User is on HRMLogin page "https://opensource-demo.orangehrmlive.com/"
    When User enters username as "<username>" and password as "<password>"
    Then User should be able to see error message "<errorMessage>"

  Examples:
  | username   | password  | errorMessage                      |
  |            | abc       | Username cannot be empty          |
  | admin      |           | Password cannot be empty          |
  |            |           | Username cannot be empty          |
  | admin      | Admin123  | Invalid credentials               |


  @ForgetPassword
   Scenario: Verify Forget Password Functionality

    Given User is on HRMLogin page "https://opensource-demo.orangehrmlive.com/"
    When User clicks on Forgot your password link
    Then User should be able to navigate to new page of title "Forgot Your Password?"
Step 3: Create extent.properties file in src/test/resources
We need to create the extent.properties file at the src/test/resources folder for the grasshopper extent report adapter to recognize it. Using a property file for reporting is quite helpful if you want to define several different properties.
Let’s enable spark report in an extent properties file:
We have used Page Object Model with Cucumber and TestNG.
Create a Helper class where we are initializing the web driver, initializing the web driver wait, defining the timeouts, and creating a private constructor of the class, it will declare the web driver, so whenever we create an object of this class, a new web browser is invoked. We are using a setter and getter method to get the object of Chromedriver with the help of a private constructor itself within the same class.
HelperClass
import java.time.Duration;
import org.openqa.selenium.WebDriver;
import org.openqa.selenium.chrome.ChromeDriver;
import org.openqa.selenium.support.ui.WebDriverWait;
import io.github.bonigarcia.wdm.WebDriverManager;

public class HelperClass {

	private static HelperClass helperClass;

	private static WebDriver driver;
	private static WebDriverWait wait;
    public final static int TIMEOUT = 10;

	 private HelperClass() {

			WebDriverManager.chromedriver().setup();
	    	driver = new ChromeDriver();
	        wait = new WebDriverWait(driver, Duration.ofSeconds(TIMEOUT));
	        driver.manage().timeouts().implicitlyWait(Duration.ofSeconds(TIMEOUT));
	        driver.manage().window().maximize();

	 }

    public static void openPage(String url) {
        driver.get(url);
    }

	public static WebDriver getDriver() {
		return driver;
	}

	public static void setUpDriver() {

		if (helperClass==null) {

			helperClass = new HelperClass();
		}
	}

	 public static void tearDown() {

		 if(driver!=null) {
			 driver.close();
			 driver.quit();
		 }

		 helperClass = null;
	 }
}
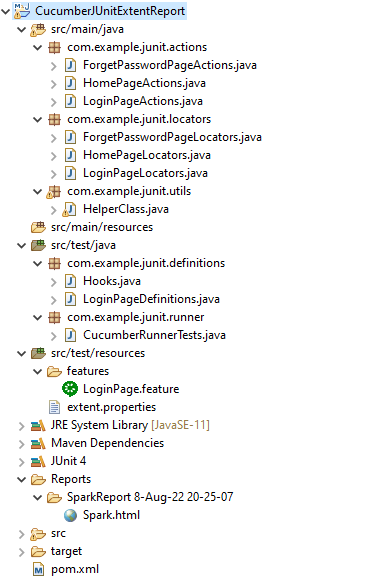
Step 5: Create Locator classes in src/main/java
Create a locator class for each page that contains the detail of the locators of all the web elements. Here, I’m creating 3 locator classes – LoginPageLocators, HomePageLocators, and ForgetPasswordPageLocators.
LoginPageLocators
import org.openqa.selenium.WebElement;
import org.openqa.selenium.support.FindBy;

public class LoginPageLocators {

	@FindBy(name = "txtUsername")
    public WebElement userName;

    @FindBy(name = "txtPassword")
    public WebElement password;

    @FindBy(id = "logInPanelHeading")
    public WebElement titleText;

    @FindBy(id = "btnLogin")
    public WebElement login;

    @FindBy(id = "spanMessage")
    public  WebElement errorMessage;

    @FindBy(xpath = "//*[@id='forgotPasswordLink']/a")
    public  WebElement forgotPasswordLink;

}
HomePageLocators
import org.openqa.selenium.WebElement;
import org.openqa.selenium.support.FindBy;

public class HomePageLocators {

	@FindBy(id = "welcome")
	public  WebElement homePageUserName;

}
ForgetPasswordPageLocators
import org.openqa.selenium.WebElement;
import org.openqa.selenium.support.FindBy;

public class ForgetPasswordPageLocators {

	@FindBy(xpath = "//*[@id='content']/div[1]/div[2]/h1")
    public WebElement forgotPasswordPageHeading;

}
Step 6: Create Action classes in src/main/java
Create the action classes for each web page. These action classes contain all the methods needed by the step definitions. In this case, I have created 3 action classes – LoginPageActions, HomePageActions, and ForgetPasswordPageActions.
LoginPageActions
In this class, the very first thing will do is to create the object of LoginPageLocators class so that we should be able to access all the PageFactory elements. Secondly, create a public constructor of LoginPageActions class.
import org.openqa.selenium.support.PageFactory;
import com.example.junit.locators.LoginPageLocators;
import com.example.junit.utils.HelperClass;

public class LoginPageActions {

	LoginPageLocators loginPageLocators = null;

    public LoginPageActions() {

    	this.loginPageLocators = new LoginPageLocators();
		PageFactory.initElements(HelperClass.getDriver(),loginPageLocators);
	}

	// Set user name in textbox
    public void setUserName(String strUserName) {
    	loginPageLocators.userName.sendKeys(strUserName);
    }

    // Set password in password textbox
    public void setPassword(String strPassword) {
    	loginPageLocators.password.sendKeys(strPassword);
    }

    // Click on login button
    public void clickLogin() {
    	loginPageLocators.login.click();
    }

    // Get the title of Login Page
    public String getLoginTitle() {
        return loginPageLocators.titleText.getText();
    }

    // Get the title of Login Page
    public String getErrorMessage() {
        return loginPageLocators.errorMessage.getText();
    }

    // Click on forgotYourPassword Link
    public void clickOnForgotPasswordLink() {
    	loginPageLocators.forgotPasswordLink.click();
    }

    public void login(String strUserName, String strPassword) {

        // Fill user name
        this.setUserName(strUserName);

        // Fill password
        this.setPassword(strPassword);

        // Click Login button
        this.clickLogin();

    }
}
HomePageActions
import org.openqa.selenium.support.PageFactory;
import com.example.junit.locators.HomePageLocators;
import com.example.junit.utils.HelperClass;

public class HomePageActions {

	HomePageLocators homePageLocators = null;

	public HomePageActions() {

		this.homePageLocators = new HomePageLocators();

		PageFactory.initElements(HelperClass.getDriver(),homePageLocators);
    }

    // Get the User name from Home Page
    public String getHomePageText() {
        return homePageLocators.homePageUserName.getText();
    }

}
ForgetPasswordPageActions
import org.openqa.selenium.support.PageFactory;
import com.example.junit.locators.ForgetPasswordPageLocators;
import com.example.junit.utils.HelperClass;

public class ForgetPasswordPageActions {

	ForgetPasswordPageLocators forgetPasswordPageLocators = null;

	public ForgetPasswordPageActions() {
		this.forgetPasswordPageLocators = new ForgetPasswordPageLocators();

		PageFactory.initElements(HelperClass.getDriver(), forgetPasswordPageLocators);
	}

	public String getHeading() {
				return forgetPasswordPageLocators.forgotPasswordPageHeading.getText();

	}
}
Step 7: Create Step Definition file in src/test/java
Create the corresponding Step Definition file of the feature file.
LoginPageDefinitions
import org.junit.Assert;
import com.example.junit.actions.ForgetPasswordPageActions;
import com.example.junit.actions.HomePageActions;
import com.example.junit.actions.LoginPageActions;
import com.example.junit.utils.HelperClass;
import io.cucumber.java.en.Given;
import io.cucumber.java.en.Then;
import io.cucumber.java.en.When;

public class LoginPageDefinitions{

	LoginPageActions objLogin = new LoginPageActions();
    HomePageActions objHomePage = new HomePageActions();
    ForgetPasswordPageActions objForgotPasswordPage = new ForgetPasswordPageActions();

    @Given("User is on HRMLogin page {string}")
    public void loginTest(String url) {

    	HelperClass.openPage(url);

    }

    @When("User enters username as {string} and password as {string}")
    public void goToHomePage(String userName, String passWord) {

        // login to application
        objLogin.login(userName, passWord);

        // go the next page

    }

    @When("User clicks on Forgot your password link")
    public void clickOnForgotPasswordLink() {

    	objLogin.clickOnForgotPasswordLink();

    }

    @Then("User should be able to login successfully and new page open")
    public void verifyLogin() {

        // Verify home page
        Assert.assertTrue(objHomePage.getHomePageText().contains("Welcome"));

    }

    @Then("User should be able to see error message {string}")
    public void verifyErrorMessage(String expectedErrorMessage) {

        // Verify home page
        Assert.assertEquals(objLogin.getErrorMessage(),expectedErrorMessage);

    }

    @Then("User should be able to navigate to new page of title {string}")
    public void verifyForgotPasswordPage(String heading) {

    	Assert.assertEquals(objForgotPasswordPage.getHeading(),heading);

    }

}
Step 8: Create Hook class in src/test/java
Create the hook class that contains the Before and After hook. @Before hook contains the method to call the setup driver which will initialize the chrome driver. This will be run before any test.
After Hook – Here will call the tearDown method.
import org.openqa.selenium.OutputType;
import org.openqa.selenium.TakesScreenshot;
import com.example.junit.utils.HelperClass;
import io.cucumber.java.After;
import io.cucumber.java.Before;
import io.cucumber.java.Scenario;

public class Hooks {

	@Before
    public static void setUp() {

       HelperClass.setUpDriver();
    }

	@After
	public static void tearDown(Scenario scenario) {

		//validate if scenario has failed
		if(scenario.isFailed()) {
			final byte[] screenshot = ((TakesScreenshot) HelperClass.getDriver()).getScreenshotAs(OutputType.BYTES);
			scenario.attach(screenshot, "image/png", scenario.getName());
		}

		HelperClass.tearDown();
	}
}
Step 9: Create a Cucumber Test Runner class in src/test/java
Add the extent report cucumber adapter to the runner class’s CucumberOption annotation. It is an important component of the configuration. It also ensures that the cucumber runner class recognizes and launches the extent report adapter for the cucumber. Please add the following text as a plugin to the CucumberOptions as described below.
This is how your runner class should look after being added to our project. Moreover, be sure to keep the colon “:” at the end.
import io.cucumber.junit.Cucumber;
import org.junit.runner.RunWith;
import io.cucumber.junit.CucumberOptions;

@RunWith(Cucumber.class)
@CucumberOptions(tags = "", features = "src/test/resources/features/LoginPage.feature", glue = "com.example.junit.definitions",
plugin = {"com.aventstack.extentreports.cucumber.adapter.ExtentCucumberAdapter:"})

public class CucumberRunnerTests {

}
Step 10: Execute the code
Right Click on the Runner class and selectRun As -> JUnit Test.
Below is the screenshot of the Console.
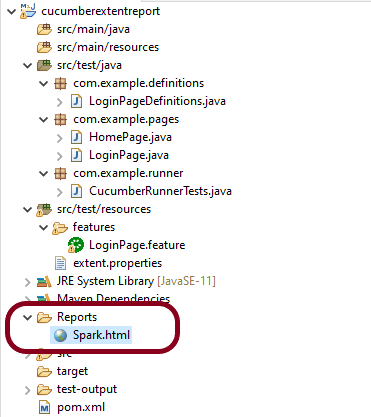
Step 11: View ExtentReport
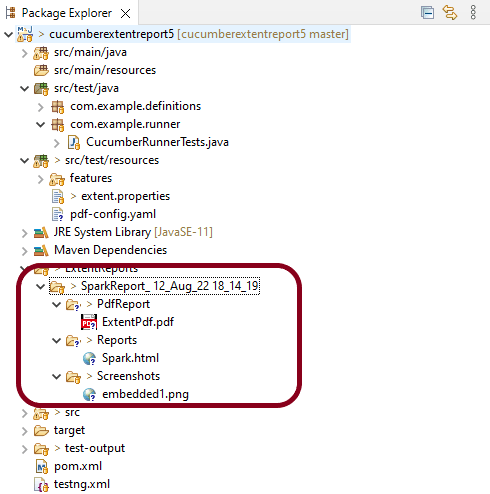
Refresh the project and will see a new folder – Report. The ExtentReport will be present in that folder with the name Spark.html.
Right-click on Spark.html and select open with Web Browser.
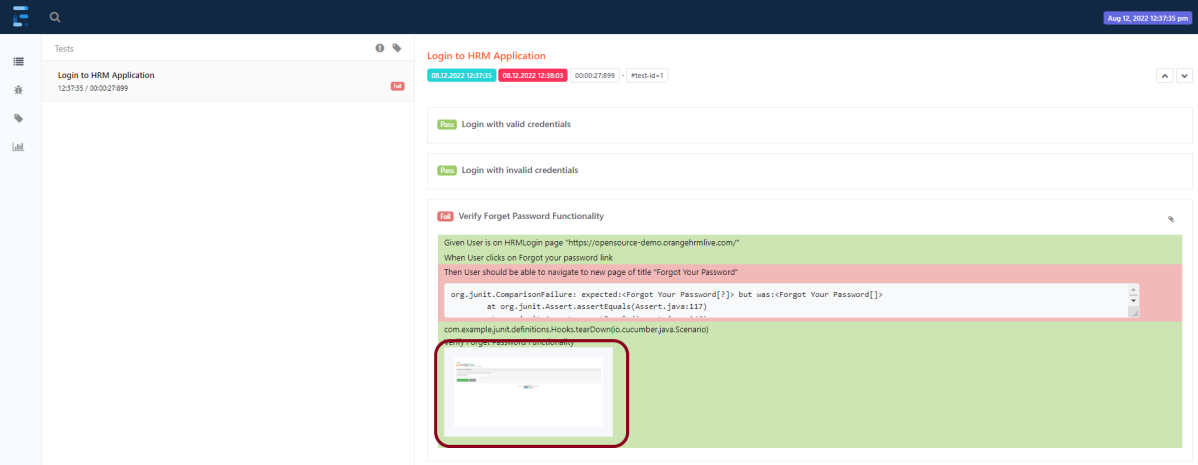
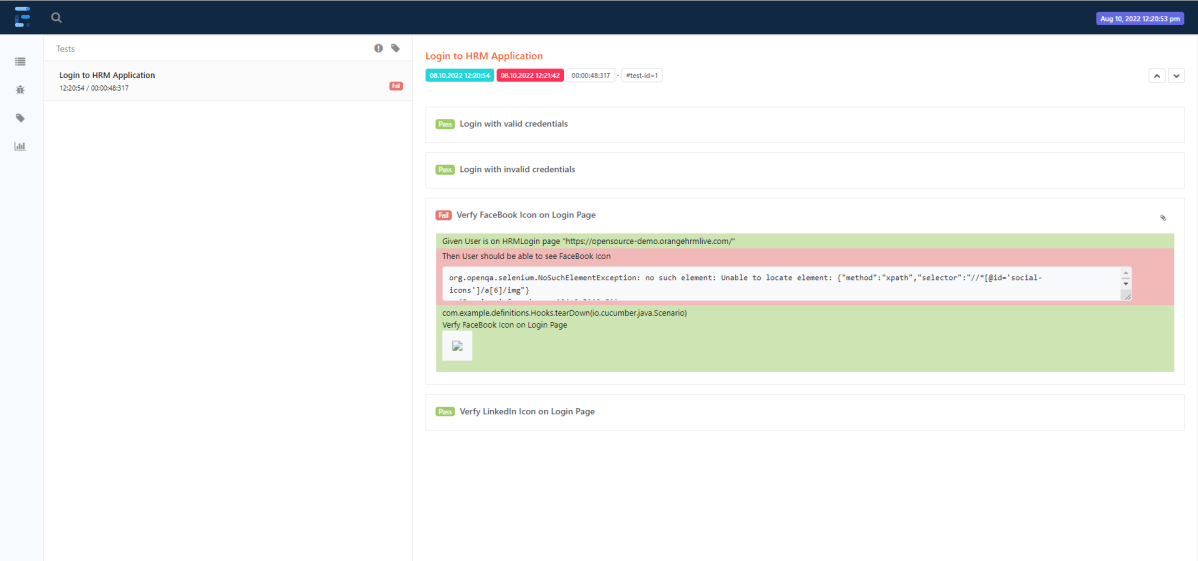
The report also has a summary section that displays the summary of the execution. The summary includes the overview of the pass/fail using a pictogram, start time, end time, and pass/fail details of features as shown in the image below.
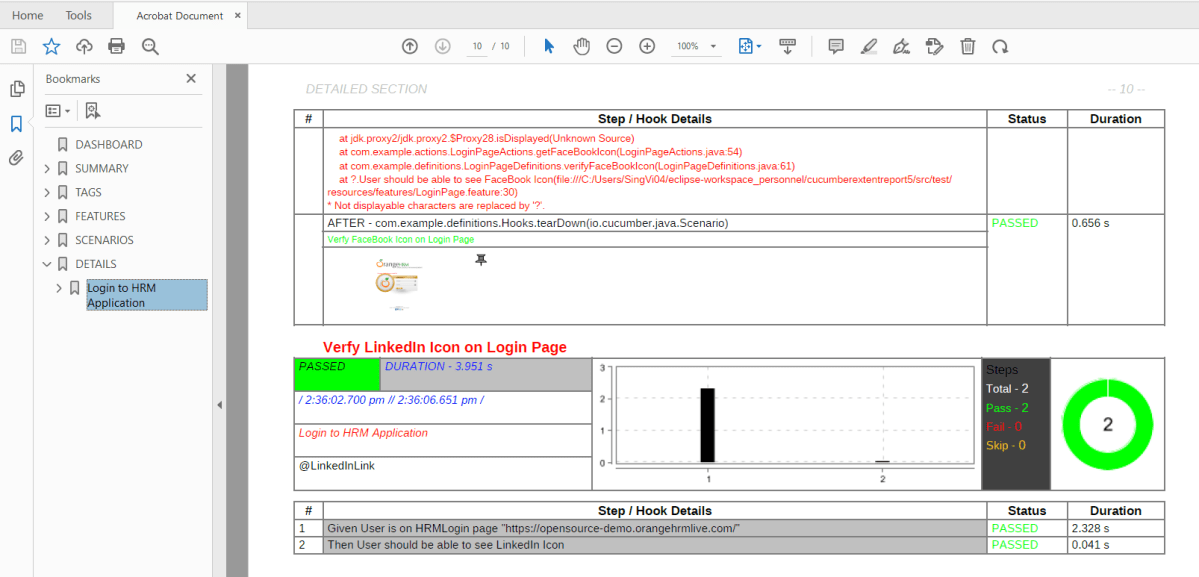
Click on the first icon present on the left side of the report. To view the details about the steps, click on the scenarios. Clicking on the scenario will expand, showing off the details of the steps of each scenario. As we can see that a screenshot is attached to the failed tests here.
Congratulation!! We are able to create an Extent Report for Cucumber and JUnit4. Happy Learning!!!
ExtentReport is a logger-style reporting library for automated tests. ExtentReports uses the logging style to add information about test sessions, such as the creation of tests, adding screenshots, assigning tags, and adding events or series of steps to sequentially indicate the flow of test steps. ExtentReports 5 is built on an open-Core. That means, both community and professional editions use the same, full-featured API with the exception of a few reporters.
Extent Report 4 onwards, there are 2 editions of Extent Report – Core and Professional.
Below is the screenshot that shows which reporters are available in Professional or Community Editions. You can also visit this page.
This tutorial explains the use of Extent Report Core Edition.
Step 2: Create a feature file in src/test/resources
Below is a sample feature file. I have also added a failed scenario in @FaceBookLink.
Feature: Login to HRM Application

   @ValidCredentials
   Scenario: Login with valid credentials

    Given User is on HRMLogin page "https://opensource-demo.orangehrmlive.com/"
    When User enters username as "Admin" and password as "admin123"
    Then User should be able to login sucessfully and new page open

   @InvalidCredentials
   Scenario Outline: Login with invalid credentials

    Given User is on HRMLogin page "https://opensource-demo.orangehrmlive.com/"
    When User enters username as "<username>" and password as "<password>"
    Then User should be able to see error message "<errorMessage>"

  Examples:
  | username   | password    | errorMessage                           |
  |                   | abc              | Username cannot be empty     |
  | admin        |                    | Password cannot be empty          |
  |                   |                    | Username cannot be empty          |
  | Admin       | admin12$$ | Invalid credentials               |
  | admin$$    | admin123   | Invalid credentials               |


  @FaceBookLink
  Scenario: Verify FaceBook Icon on Login Page

    Given User is on HRMLogin page "https://opensource-demo.orangehrmlive.com/"
    Then User should be able to see FaceBook Icon

  @LinkedInLink
  Scenario: Verify LinkedIn Icon on Login Page

    Given User is on HRMLogin page "https://opensource-demo.orangehrmlive.com/"
    Then User should be able to see LinkedIn Icon
Step 3: Create extent.properties file in src/test/resources
We need to create the extent.properties file at the src/test/resources folder for the grasshopper extent report adapter to recognize it. Using a property file for reporting is quite helpful if you want to define several different properties.
Let’s enable spark report in an extent properties file:
We have used Page Object Model with Cucumber and TestNG.
Create a Helperclass where we are initializing the web driver, initializing the web driver wait, defining the timeouts, and creating a private constructor of the class, within it will declare the web driver, so whenever we create an object of this class, a new web browser is invoked. We are using a setter and getter method to get the object of Chromedriver with the help of a private constructor itself within the same class.
HelperClass
import java.time.Duration;
import org.openqa.selenium.WebDriver;
import org.openqa.selenium.chrome.ChromeDriver;
import org.openqa.selenium.support.ui.WebDriverWait;
import io.github.bonigarcia.wdm.WebDriverManager;

public class HelperClass {

	private static HelperClass helperClass;

	private static WebDriver driver;
	private static WebDriverWait wait;
    public final static int TIMEOUT = 10;

	 private HelperClass() {

			WebDriverManager.chromedriver().setup();
	    	driver = new ChromeDriver();
	        wait = new WebDriverWait(driver, Duration.ofSeconds(TIMEOUT));
        driver.manage().timeouts().implicitlyWait(Duration.ofSeconds(TIMEOUT));
	        driver.manage().window().maximize();
	 }

    public static void openPage(String url) {
        driver.get(url);
    }


	public static WebDriver getDriver() {
		return driver;
	}

	public static void setUpDriver() {

		if (helperClass==null) {

			helperClass = new HelperClass();
		}
	}

	 public static void tearDown() {

		 if(driver!=null) {
			 driver.close();
			 driver.quit();
		 }

		 helperClass = null;
	 }

}
Step 5: Create Locator classes in src/main/java
Create a locator class for each page that contains the detail of the locators of all the web elements. Here, I’m creating 2 locator classes – LoginPageLocators and HomePageLocators.
LoginPageLocators
import org.openqa.selenium.WebElement;
import org.openqa.selenium.support.FindBy;

public class LoginPageLocators {

	@FindBy(name = "txtUsername")
    public WebElement userName;

    @FindBy(name = "txtPassword")
    public WebElement password;

    @FindBy(id = "logInPanelHeading")
    public WebElement titleText;

    @FindBy(id = "btnLogin")
    public WebElement login;

    @FindBy(id = "spanMessage")
    public  WebElement errorMessage;

    @FindBy(xpath = "//*[@id='social-icons']/a[1]/img")
    public  WebElement linkedInIcon;

    @FindBy(xpath = "//*[@id='social-icons']/a[6]/img")  //Invalid Xpath
    public  WebElement faceBookIcon;

}
HomePageLocators
import org.openqa.selenium.WebElement;
import org.openqa.selenium.support.FindBy;

public class HomePageLocators {

	@FindBy(id = "welcome")
	public  WebElement homePageUserName;
}
Step 6: Create Action classes in src/main/java
Create the action classes for each web page. These action classes contain all the methods needed by the step definitions. In this case, I have created 2 action classes – LoginPageActions and HomePageActions
LoginPageActions
In this class, the very first thing will do is to create the object of LoginPageLocators class so that we should be able to access all the PageFactory elements. Secondly, create a public constructor of LoginPageActions class
import org.openqa.selenium.support.PageFactory;
import com.example.locators.LoginPageLocators;
import com.example.utils.HelperClass;

public class LoginPageActions {

	LoginPageLocators loginPageLocators = null;

    public LoginPageActions() {

    	this.loginPageLocators = new LoginPageLocators();

		PageFactory.initElements(HelperClass.getDriver(),loginPageLocators);
	}


	// Set user name in textbox
    public void setUserName(String strUserName) {
    	loginPageLocators.userName.sendKeys(strUserName);
    }

    // Set password in password textbox
    public void setPassword(String strPassword) {
    	loginPageLocators.password.sendKeys(strPassword);
    }

    // Click on login button
    public void clickLogin() {
    	loginPageLocators.login.click();
    }

    // Get the title of Login Page
    public String getLoginTitle() {
        return loginPageLocators.titleText.getText();
    }


    // Get the title of Login Page
    public String getErrorMessage() {
        return loginPageLocators.errorMessage.getText();
    }

    // LinkedIn Icon is displayed
    public Boolean getLinkedInIcon() {

        return loginPageLocators.linkedInIcon.isDisplayed();
    }

    // FaceBook Icon is displayed
    public Boolean getFaceBookIcon() {

        return loginPageLocators.faceBookIcon.isDisplayed();
    }

    public void login(String strUserName, String strPassword) {

        // Fill user name
        this.setUserName(strUserName);

        // Fill password
        this.setPassword(strPassword);

        // Click Login button
        this.clickLogin();

    }
}
HomePageActions
import org.openqa.selenium.support.PageFactory;
import com.example.locators.HomePageLocators;
import com.example.utils.HelperClass;

public class HomePageActions {

	HomePageLocators homePageLocators = null;

	public HomePageActions() {

		this.homePageLocators = new HomePageLocators();

		PageFactory.initElements(HelperClass.getDriver(),homePageLocators);
    }


    // Get the User name from Home Page
    public String getHomePageText() {
        return homePageLocators.homePageUserName.getText();
    }

}
Step 7: Create a Step Definition file in src/test/java
Create the corresponding Step Definition file of the feature file.
LoginPageDefinitions
import org.testng.Assert;
import com.example.actions.HomePageActions;
import com.example.actions.LoginPageActions;
import com.example.utils.HelperClass;
import io.cucumber.java.en.Given;
import io.cucumber.java.en.Then;
import io.cucumber.java.en.When;

public class LoginPageDefinitions{

	LoginPageActions objLogin = new LoginPageActions();
    HomePageActions objHomePage = new HomePageActions();


    @Given("User is on HRMLogin page {string}")
    public void loginTest(String url) {

    	HelperClass.openPage(url);

    }

    @When("User enters username as {string} and password as {string}")
    public void goToHomePage(String userName, String passWord) {

        // login to application
        objLogin.login(userName, passWord);

        // go the next page

    }

    @Then("User should be able to login sucessfully and new page open")
    public void verifyLogin() {

        // Verify home page
        Assert.assertTrue(objHomePage.getHomePageText().contains("Welcome"));

    }

    @Then("User should be able to see error message {string}")
    public void verifyErrorMessage(String expectedErrorMessage) {

        // Verify home page
        Assert.assertEquals(objLogin.getErrorMessage(),expectedErrorMessage);

    }

    @Then("User should be able to see LinkedIn Icon")
    public void verifyLinkedInIcon( ) {

    	Assert.assertTrue(objLogin.getLinkedInIcon());
    }

    @Then("User should be able to see FaceBook Icon")
    public void verifyFaceBookIcon( ) {

    	Assert.assertTrue(objLogin.getFaceBookIcon());
    }

}
Step 8: Create Hook class in src/test/java
Create thehookclass that contains the Before and After hook. @Before hook contains the method to call the setup driver which will initialize the chrome driver. This will be run before any test.
After Hook – Here will call the tearDown method.
import com.example.utils.HelperClass;
import io.cucumber.java.After;
import io.cucumber.java.Before;

public class Hooks {

	@Before
    public static void setUp() {

       HelperClass.setUpDriver();
    }

	@After
	public static void tearDown() {

		HelperClass.tearDown();
	}
}
Step 9: Create a Cucumber Test Runner class in src/test/java
Add the extent report cucumber adapter to the runner class’s CucumberOption annotation. It is an important component of the configuration. It also ensures that the cucumber runner class recognizes and launches the extent report adapter for cucumber. Please add the following text as a plugin to the CucumberOptions as described below.
This is how your runner class should look after being added to our project. Moreover, be sure to keep the colon “:” at the end.
import io.cucumber.testng.AbstractTestNGCucumberTests;
import io.cucumber.testng.CucumberOptions;

@CucumberOptions(tags = "", features = "src/test/resources/features/LoginPage.feature", glue = "com.example.definitions",
                 plugin = {"com.aventstack.extentreports.cucumber.adapter.ExtentCucumberAdapter:"})

public class CucumberRunnerTests extends AbstractTestNGCucumberTests {

}
Step 10: Create the testng.xml for the project
Right-click on the project and select TestNG -> convert to TestNG.
<?xml version="1.0" encoding="UTF-8"?>
<!DOCTYPE suite SYSTEM "https://testng.org/testng-1.0.dtd">
<suite name="Suite">
  <test name="ExtentReport5 for Cucumber">

  <classes>
  <class name = "com.example.runner.CucumberRunnerTests"/>
  </classes>
  </test> <!-- Test -->
</suite> <!-- Suite -->
Step 11: Execute the code
Right-Click on the Runner class and select Run As -> TestNG Test.
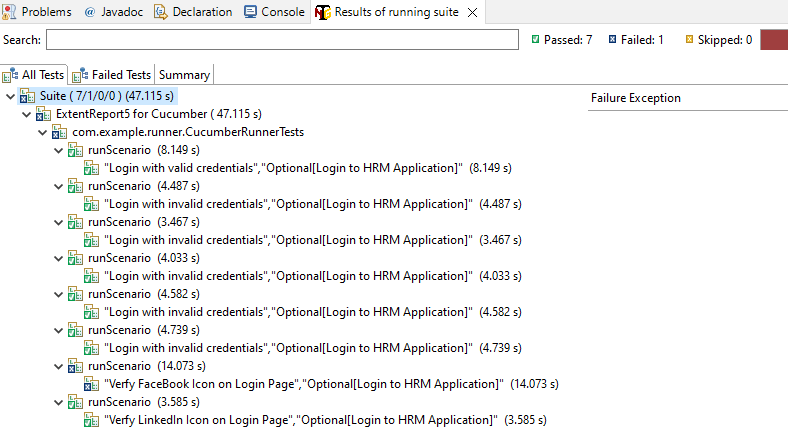
Below is the screenshot of Console. As expected, 7 tests, out of 8 are passed and 1 is failed.
Step 12: View the ExtentReport
Refresh the project and will see a new folder – Report. The ExtentReport will be present in that folder with the name Spark.html.
Right-click and open with Web Browser.
The report also has a summary section that displays the summary of the execution. The summary includes the overview of the pass/fail using a pictogram, start time, end time, and pass/fail details of features as shown in the image below.
Click on the first icon present on the left side of the report. To view the details about the steps, click on the scenarios. Clicking on the scenario will expand, showing off the details of the steps of each scenario.
Step 13: How to customize the report folder name
We learned how to generate an ExtentReport in Cucumber Junit in the previous section. The problem with the previous approach is that it will continue to override the previous report once the new report is created. Typically, we must keep a backup of all the reports generated by previous tests. To accomplish this, we must save each report with a unique report name or folder name.
It’s simple to create reports with different folder names using the Extent reporter plugin adapter. Two settings must be added to our extent. basefolder.name and basefolder.datetimepattern are properties files. The values assigned to these will be combined to form a folder name. As a result, a report will be generated within that. The basefolder.datetimepattern value must be in a valid date-time format.
The value for basefolder.name in the preceding snippet is “Report/SparkReport.” It means that the folder will be named SparkReport, and that it will create a Report folder within the project directory. You can specify the location of your folder. In the following setting, we’ve used a date and time stamp to create unique folder names by concatenating them with the report name.
So, when we run the report, it will generate at the location shown in the image below:
Congratulation!! We are able to create an Extent Report for Cucumber. Happy Learning!!!
ExtentReports is a logger-style reporting library for automated tests. ExtentReports is a library that can be used to build a customized detailed report. It can be integrated with TestNG, JUnit, etc. This report can be built in JAVA, .NET and it provides a detailed summary of each test case and each test step too in a graphical manner. Extent reports produce HTML-based documents that offer several advantages like pie charts, graphs, screenshots addition, and test summary. ExtentReports 4 is built on an open-Core.
In this class, we created a createInstance()method. Also, you need to set your ExtentReports report HTML file location.
import java.io.File;
import java.io.IOException;
import java.util.Date;
import org.apache.commons.io.FileUtils;
import org.openqa.selenium.TakesScreenshot;
import com.aventstack.extentreports.ExtentReports;
import com.aventstack.extentreports.reporter.ExtentHtmlReporter;
import com.aventstack.extentreports.reporter.configuration.Theme;
import com.example.testcases.BaseTests;
import org.openqa.selenium.OutputType;

public class ExtentManager extends BaseTests{

	private static ExtentReports extent;
	public static String screenshotName;

    public static ExtentReports createInstance(String fileName) {

    	ExtentHtmlReporter htmlReporter = new ExtentHtmlReporter(fileName);

        htmlReporter.config().setTheme(Theme.DARK);
        htmlReporter.config().setDocumentTitle(fileName);
        htmlReporter.config().setEncoding("utf-8");
        htmlReporter.config().setReportName(fileName);

        extent = new ExtentReports();
        extent.attachReporter(htmlReporter);
        extent.setSystemInfo("Release No", "22");
        extent.setSystemInfo("Environment", "QA");
        extent.setSystemInfo("Build no", "B-12673");

        return extent;
    }


	public static void captureScreenshot() {

		TakesScreenshot screenshot = (TakesScreenshot)driver;

        // Call method to capture screenshot
        File src = screenshot.getScreenshotAs(OutputType.FILE);

        try
        {
        	Date d = new Date();
    		screenshotName = d.toString().replace(":", "_").replace(" ", "_") + ".jpg";
            FileUtils.copyFile(src,new File(System.getProperty("user.dir") + "\\reports\\" + screenshotName));
            System.out.println("Successfully captured a screenshot");
       } catch (IOException e) {
           System.out.println("Exception while taking screenshot " + e.getMessage());
      }
	}
}
The ExtentHtmlReporter is used for creating an HTML file, and it accepts a file path as a parameter.
ExtentHtmlReporter htmlReporter = new ExtentHtmlReporter(fileName);
The file path represents the path in which our extent report would be generated. This is defined in ExtentListeners class.
	static Date d = new Date();
	static String fileName = "ExtentReport_" + d.toString().replace(":", "_").replace(" ", "_") + ".html";

	private static ExtentReports extent = ExtentManager.createInstance(System.getProperty("user.dir")+"\\reports\\"+fileName);
ExtentHtmlReporter is also used to customize the extent reports. It allows many configurations to be made through the config() method. Some of the configurations that can be made are described below.
We have two themes – STANDARD and DARK for customizing the look and feel of our extent reports.
htmlReporter.config().setTheme(Theme.DARK);
STANDARD Look
htmlReporter.config().setTheme(Theme.STANDARD);
captureScreenshot() is a method in ExtentTest class that attaches the captured screenshot in the Extent Report. It takes the image path where the screenshot has been captured as the parameter and attaches the screenshot to the Extent Report in Selenium.
public static void captureScreenshot() {

		TakesScreenshot screenshot = (TakesScreenshot)driver;

        // Call method to capture screenshot
        File src = screenshot.getScreenshotAs(OutputType.FILE);

        try
        {
        	Date d = new Date();
    		screenshotName = d.toString().replace(":", "_").replace(" ", "_") + ".jpg";
            FileUtils.copyFile(src,new File(System.getProperty("user.dir") + "\\reports\\" + screenshotName));
            System.out.println("Successfully captured a screenshot");
       } catch (IOException e) {
           System.out.println("Exception while taking screenshot " + e.getMessage());
      }
	}
3. Create ExtentListeners class
This class contains the action done by extent report on each step. In our tests, we implement ITestListener and use its methods. TestNG provides the @Listeners annotation, which listens to every event that occurs in a Selenium code. TestNG Listeners are activated either before the test or after the test case. It is an interface that modifies the TestNG behavior. If any event matches an event for which we want the listener to listen then it executes the code, which ultimately results in modifying the default behavior of TestNG. To know more about ITestListener, please refer to this tutorial.
I have defined actions for onTestStart(), onTestSuccess(), onTestFailure(), onTestSkipped() and onFinish() methods.
The ITestListener is an interface that has unimplemented methods by default and we can add lines of code within each method. So whenever a specific event occurs, the code written within that method will be executed.
onTestFailure() is a method in which this listener will be invoked whenever the test fails. Within this method, we shall add our code to capture screenshots whenever the test case fails on execution. The screenshot of the failed test case is also embedded in the report.
onTestSuccess() is a method that is invoked once the test execution is complete and the test has been passed. We shall add the log included in the Extent Report to mark the test case as passed within this method
This class contains the methods to initialize the browser and exit the browser after every test.
import java.time.Duration;
import org.openqa.selenium.WebDriver;
import org.openqa.selenium.support.ui.WebDriverWait;
import org.testng.annotations.AfterTest;
import org.testng.annotations.BeforeTest;
import io.github.bonigarcia.wdm.WebDriverManager;

public class BaseTests {

	public static WebDriver driver;
	public WebDriverWait wait;

	@BeforeTest
    public void setup() throws Exception {

       driver = WebDriverManager.firefoxdriver().create();
       driver.get("https://opensource-demo.orangehrmlive.com/");
       wait = new WebDriverWait(driver, Duration.ofSeconds(10));
       driver.manage().window().maximize();
    }

	@AfterTest
	 public  void closeBrowser() {

	   driver.close();

	  }
5. Create the LoginPage class
This class contains the locator of all the web elements and methods needed for the testing of the page.
package com.example.testcases;

import org.openqa.selenium.WebDriver;
import org.openqa.selenium.WebElement;
import org.openqa.selenium.support.FindBy;
import org.openqa.selenium.support.PageFactory;

public class LoginPage extends BaseTests{

    WebDriver driver;

    @FindBy(name = "txtUsername")
    WebElement userName;

    @FindBy(name = "txtPassword")
    WebElement password;

    @FindBy(id = "logInPanelHeading")
    WebElement titleText;

    @FindBy(id = "btnLogin")
    WebElement login;

    @FindBy(id="spanMessage")
    WebElement errorMessage;

    @FindBy(id="forgotPasswordLink")
    WebElement forgetPasswordLink;

    @FindBy(xpath="//*[@id='social-icons']/a[1]/img")
    WebElement linkedInIcon;

    public LoginPage(WebDriver driver) {
          this.driver = driver;

          // This initElements method will create all WebElements
          PageFactory.initElements(driver, this);
    }

    // Set user name in textbox
    public void setUserName(String strUserName) {
          userName.sendKeys(strUserName);
    }

    // Set password in password textbox
    public void setPassword(String strPassword) {
          password.sendKeys(strPassword);
    }

    // Click on login button
    public void clickLogin() {
          login.click();
    }

    // Get the title of Login Page
    public String getLoginTitle() {
          return titleText.getText();
    }

    // Get the text of forgotPasswordLink
    public String getforgotPasswordLinkText() {
          return forgetPasswordLink.getText();
    }

    // Get the errorMessage
    public String getErrorMessage() {
          return errorMessage.getText();
    }

    // Verify linkedInIcon is enabled
    public Boolean isEnabledLinkedIn() {
          return linkedInIcon.isEnabled();
    }

    public void login(String strUserName, String strPasword) {

          // Fill user name
          this.setUserName(strUserName);

          // Fill password
          this.setPassword(strPasword);

          // Click Login button
          this.clickLogin();
    }
}
6. Create the LoginTests class
This class contains all the tests. As we are using, I have assigned priority to all the tests to run the tests in a specified order.
import static org.testng.Assert.assertTrue;
import org.testng.Assert;
import org.testng.SkipException;
import org.testng.annotations.Test;

public class LoginTests extends BaseTests{

    LoginPage objLogin;

    @Test(priority = 0)
    public void verifyLoginPageTitle() {

          // Create Login Page object
          objLogin = new LoginPage(driver);

          // Verify login page text
          String loginPageTitle = objLogin.getLoginTitle();
          Assert.assertTrue(loginPageTitle.contains("LOGIN Panel"));
    }

    @Test(priority = 1)
    public void verifyforgetPasswordLink() {

    String expectedText= objLogin.getforgotPasswordLinkText();
    Assert.assertTrue(expectedText.contains("Forgot your password?"));

    }

    @Test(priority = 2)
    public void HomeTest() {

          // login to application
          objLogin.login("Admin1", "admin1234");

         String expectedError = objLogin.getErrorMessage();

          // Verify home page
          Assert.assertTrue(expectedError.contains("Username cannot be empty"));
    }

    @Test(priority = 3)
    public void verifyLinkedIn() {

        System.out.println("Actual linkedIn Text :" + objLogin.isEnabledLinkedIn());
        assertTrue(objLogin.isEnabledLinkedIn());

        System.out.println("Im in skip exception");
		throw new SkipException("Skipping this exception");
    }

}
In this example, there are 4 tests, and out of 4, 2 should pass, 1 should fail and 1 should skip.
7. Create TestNG.xml
In the TestNG.xml file, we shall add our classes and also the listener class.
<?xml version="1.0" encoding="UTF-8"?>
<!DOCTYPE suite SYSTEM "https://testng.org/testng-1.0.dtd">
<suite name="Extent Report Demo">

<listeners>
     <listener class-name ="com.example.extentlisteners.ExtentListeners"/>
  </listeners>

  <test name="Login Tests">
    <classes>
      <class name="com.example.testcases.LoginTests"/>
    </classes>
  </test> <!-- Test -->
</suite> <!-- Suite -->
8. Execute the tests from testng.xml
Right-click on testng.xml and select Run As -> TestNG Suite.
9 Test Execution Result
The test execution result can be seen in the console.
10. Extent Report Generation
Refresh the project and will see a folder with the name of the reports present in the project.
Right-click the report and open it in your choice of browser.
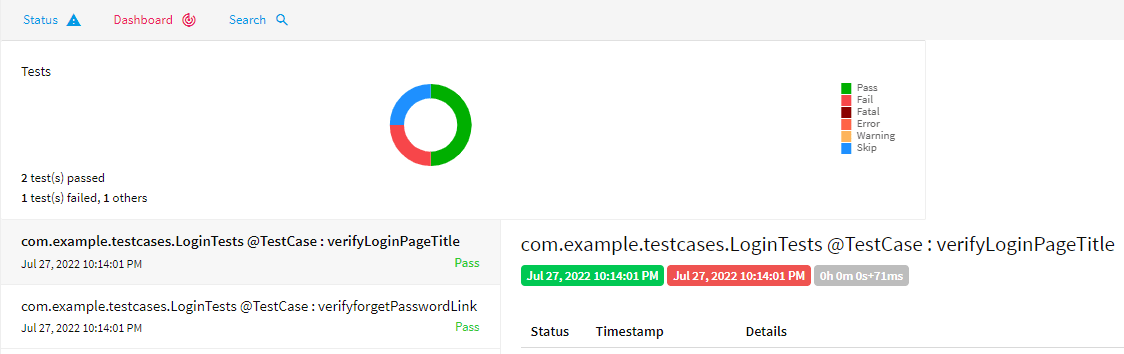
Upon opening the Extent Report, you can see the summary of the tests executed.
This is the view of the dashboard in the Extent Report. This page provides a complete view of the total number of tests executed, passed tests, failed tests, the total time taken for executing the tests, and also the classification of the tests based on the category.
Extent reports produce simple and visually appealing reports. Furthermore, the HTML-based report is simple to share with other stakeholders. Extent Reports provide greater detail, allowing testers to be more effective when it comes to quickly debugging software.
Congratulations!! We are able to generate an ExtentReport. Happy Learning!!