Playwright is a modern and powerful end-to-end testing framework developed by Microsoft, specifically designed for the automation of web applications. It supports programming languages like Java, Python, C#, and NodeJS. Playwright comes with Apache 2.0 License and is most popular with NodeJS with Javascript/Typescript.
Sending a JSON file as a payload from an external source using Playwright requires you to read the file from the local filesystem. You then include its contents in the HTTP request. In this tutorial, I will explain to pass a JSON file as a payload to the request. This is needed when the payload is static or there is minimal change in the request payload.
Node.js version 18 or higher and npm (comes with Node.js)
Windows 10+, macOS 12+, or Ubuntu 20.04+
Visual Studio for Code is already installed.
Playwright is already installed
Below is the sample JSON payload used in the request.
Here’s how you can handle them in Playwright:
1. Setup Your Playwright Testing Environment:
Verify that the Playwright installed in your project. If you haven’t yet installed it, you can use:
npm install playwright
2. Update playwright.config.ts
Playwright Test comes with a few built-in reporters for different needs and ability to provide custom reporters. We will add detail in playwright.config.ts to generate the html report, once the test execution is finished.
First, ensure your JSON file is well-structured and readable.
import { test, expect } from '@playwright/test';
const fs = require('fs');

test('Send JSON file as payload', async ({ request }) => {

  try {
    // Read and parse JSON file directly into a JavaScript object
    const jsonPayload = JSON.parse(fs.readFileSync('tests/payloads/jsonpayload.json', 'utf8'));

    console.log('JSON data parsed successfully:', jsonPayload);

    // Perform a POST request
    const postResponse = await request.post('https://jsonplaceholder.typicode.com/users', {
      headers: {
        'Content-Type': 'application/json'
      },
      data: JSON.stringify(jsonPayload)
    });

    // Check the response status code - expecting 201 if the resource creation is successful
    expect(postResponse.status()).toBe(201);

    // Parse the response data
    const postResponseBody = await postResponse.json();
    console.log('RESPONSE:', postResponseBody);

    // Validate the response properties - adapt as needed
    expect(postResponseBody).toHaveProperty('title', 'Architect');
    expect(postResponseBody).toHaveProperty('body', 'DW-BI');
    expect(postResponseBody).toHaveProperty('userId', 5);

  } catch (error) {
    if (error instanceof Error) {
      console.error('Error message:', error.message);
    } else {
      console.error('An unknown error occurred:', error);
    }
  }
});
Explanation:
1. Imports
This line imports the testand expectfunctions from Playwright’s testing library. These functions provide a structure for writing tests and asserting conditions within them.
import { test, expect } from '@playwright/test';
2. Test Definition
This defines an asynchronous test case named “Send JSON file as payload”. The test receives a request object as a parameter, which is used to perform HTTP requests.
test('Send JSON file as payload', async ({ request })
3. Read the JSON File
First, you need to read the JSON file into your script. This is typically done using the `fs` module in Node.js.
const fs = require('fs');
4. Read and Parse JSON File
The script attempts to read a JSON file located at ‘tests/payloads/jsonpayload.json’ using fs.readFileSync.
The JSON content is parsed into a JavaScript object using JSON.parse.
// Read and parse JSON file directly into a JavaScript object
const jsonPayload = JSON.parse(fs.readFileSync('tests/payloads/jsonpayload.json', 'utf8'));

console.log('JSON data parsed successfully:', jsonPayload);
5. Performing a POST Request
Sends a POST request to the specified URL. The headers include ‘Content-Type’: ‘application/json’, denoting the request body data format. The request body is the stringified version of the JSON payload.
 // Perform a POST request
    const postResponse = await request.post('https://jsonplaceholder.typicode.com/users', {
      headers: {
        'Content-Type': 'application/json'
      },
      data: JSON.stringify(jsonPayload)
    });
6. Checking the Response Status Code
Retrieve HTTP status code for response validation.
expect(postResponse.status()).toBe(201);
7. Parsing the Response Data
Parse response data into JSON format
// Parse the response data
const postResponseBody = await postResponse.json();
8. Logging the Response
This outputs the response body to the console, allowing you to see the returned JSON data.
console.log(postResponseBody);
9. Perform assertions on the response
The assertions verify that the response contains expected data. expect assertions validate certain properties in the response
The property `title` should be ‘Architect’.
The property `body` should be ‘DW-BI’.
The property `userId` should be 5.
// Validate the response properties - adapt as needed
expect(postResponseBody).toHaveProperty('title', 'Architect');
expect(postResponseBody).toHaveProperty('body', 'DW-BI');
expect(postResponseBody).toHaveProperty('userId', 5);
10. Error Handling
There’s a `try-catch` block capturing errors during file reading, request making, and response handling. The `catch` block checks if the error is an instance of `Error` to log its message.
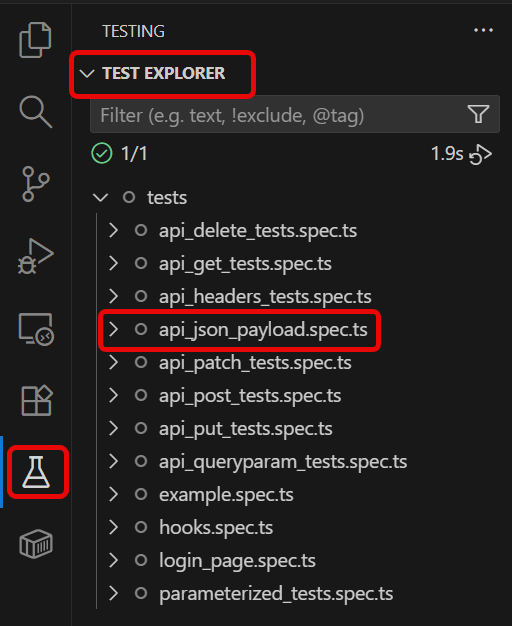
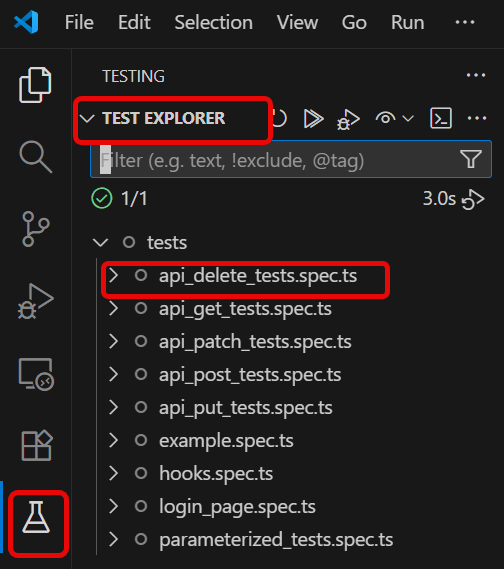
4. Execute the tests through Test Explorer View
Go to the funnel shape icon called “Testing” or “Test Explorer View”. You can run the tests from the test Explorer view too now. You can run all of the tests in all of the test specs in this directory.
You can also come in and run all of the tests in a particular specification file. Alternatively, run individual tests within a specification file. Here, I want to run the tests of api_json_payload_tests.spec.ts file.
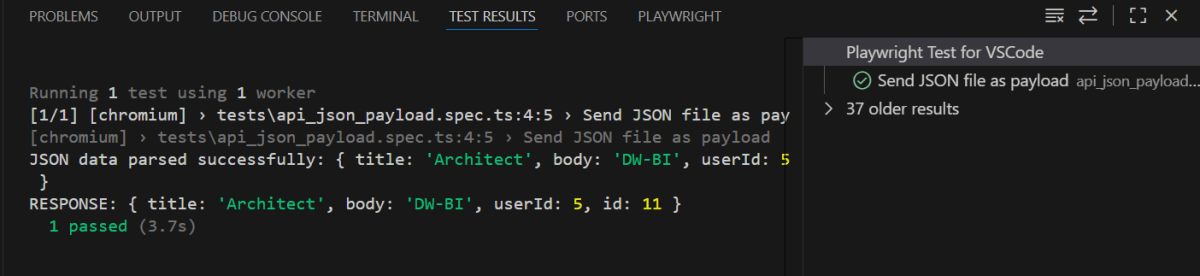
The output of the above program is
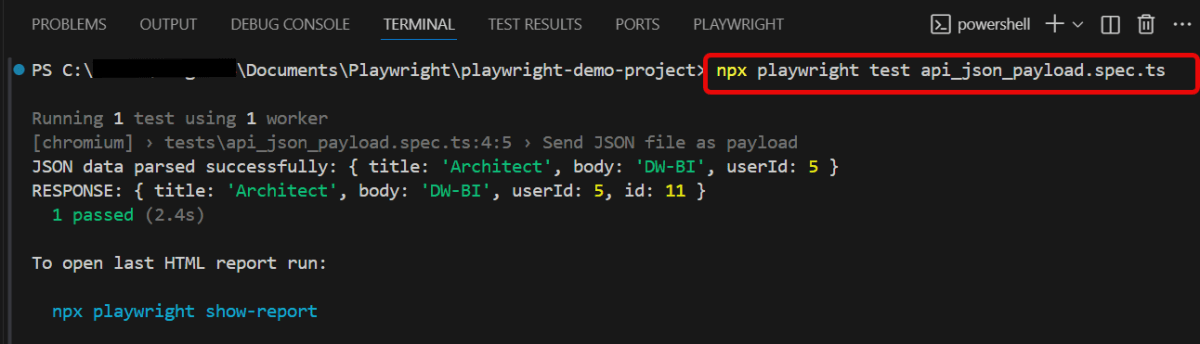
5. Execute the tests through Command Line
You can also run the tests through the command line. Go to the terminal and use the below command:-
npx playwright test api_json_payload.spec.ts
This command runs all the tests present in this file.
6. Evaluate Test Results
Analyze console outputs and assertions to validate the response data, ensuring that your API endpoints are functioning as designed.
Playwright generates a test report after the execution of the tests. This test report can be viewed by using the below command:
npx playwright show-report
The output of the above command is
The Index.html report is shown below:
Summary:
File Paths: The file paths are correctly specified relative to the execution directory or use absolute paths. Content-Type Headers: The `Content-Type` header should match the format of the data being sent (`application/json` for JSON). Network Configuration: The target endpoint should support POST requests and accept data in the given formats.
Query parameters are a way to pass information to an API flexibly and simply. They are added to the end of the API endpoint URL as a series of key-value pairs. To append query params to the end of a URL, a ‘?’ Is added followed immediately by a query parameter.
Handling HTTP query parameters in Playwright typically involves setting up your request with the desired parameters before navigating to a URL. Playwright provides methods to easily construct and use URLs with query parameters.
Verify that the Playwright installed in your project. If you haven’t yet installed it, you can use:
npm install playwright
2. Update playwright.config.ts
Playwright Test comes with a few built-in reporters for different needs and ability to provide custom reporters. We will add detail in playwright.config.ts to generate the html report, once the test execution is finished.
You can construct a URL using Node.js’s `URL` API, where you append your query parameters to a base URL.
// Define a type for the expected structure of a comment
type Comment = {
postId: number;
id: number;
name: string;
email: string;
body: string;
};
import { test, expect } from '@playwright/test';
test('API Testing - Query Params with Playwright', async ({ request }) => {
const queryParams = new URLSearchParams({ postId: '1' });
// Perform a GET request
const response = await request.get(`https://jsonplaceholder.typicode.com/comments?${queryParams.toString()}`);
// Check the response status code
expect(response.status()).toBe(200);
// Parse the response data
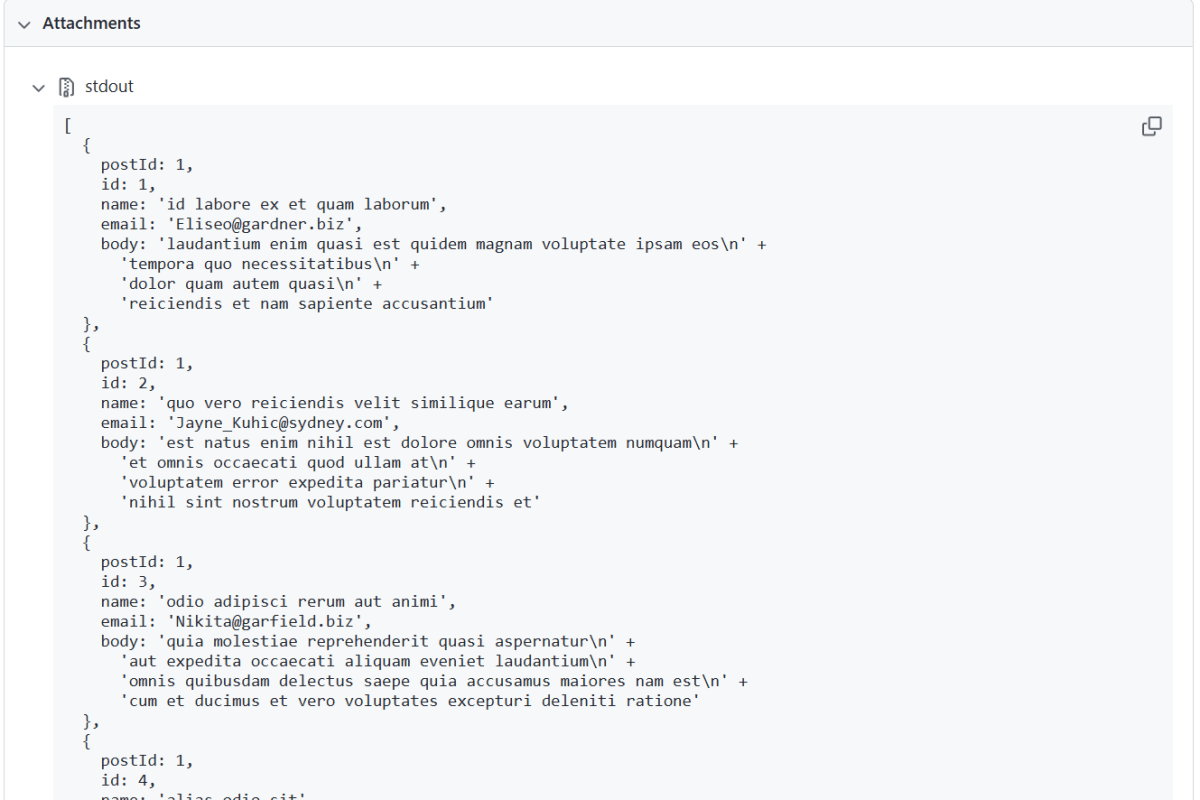
const responseBody = await response.json();
console.log(responseBody);
// Assertions based on expected response
const postIds = responseBody.map((item: Comment) => item.postId);
console.log(postIds);
// Assert that every postId in the response is '1'
expect([...new Set(postIds)]).toEqual([1]);
// Extract IDs from the response body
const ids = responseBody.map((item: Comment) => item.id);
console.log(ids);
// Expected IDs to assert against
const expectedIds = [1, 2, 3, 4, 5];
// Assert that the IDs are as expected
expect(ids).toEqual(expectedIds);
});
Explanation:
1. Type Definition
A TypeScript type Comment is defined to specify the structure of the expected response object. This includes properties like postId, id, name, email, and body.
This line imports the testand expectfunctions from Playwright’s testing library. These functions provide a structure for writing tests and asserting conditions within them.
import { test, expect } from '@playwright/test';
3. Test Definition
This defines an asynchronous test case named “Query Params with Playwright”. The test receives a `request` object as a parameter, which is used to perform HTTP requests.
Retrieve HTTP status code for response validation.
expect(response.status()).toBe(200);
7. Parsing the Response Data
Parse response data into JSON format
const responseBody = await response.json();
8. Logging the Response
This outputs the response body to the console, allowing you to see the returned JSON data.
console.log(responseBody);
9. Perform assertions on the response
The assertions verify that the response contains expected data.
The code extracts and logs postIds from each item in the `responseBody`.
An assertion ensures all postId‘s in the response are 1, corresponding to the query parameter used
Similarly, idsare extracted, logged, and compared against a predefined list of expected IDs [1, 2, 3, 4, 5].
An assertion checks that the `ids` match the expected IDs. This ensures that the response is consistent with the anticipated results when querying with postId=1
// Assertions based on expected response
  const postIds = responseBody.map((item: Comment) => item.postId);
  console.log(postIds);

  // Assert that every postId in the response is '1'
  expect([...new Set(postIds)]).toEqual([1]);

  // Extract IDs from the response body
  const ids = responseBody.map((item: Comment) => item.id);
  console.log(ids);

  // Expected IDs to assert against
  const expectedIds = [1, 2, 3, 4, 5];

  // Assert that the IDs are as expected
  expect(ids).toEqual(expectedIds);
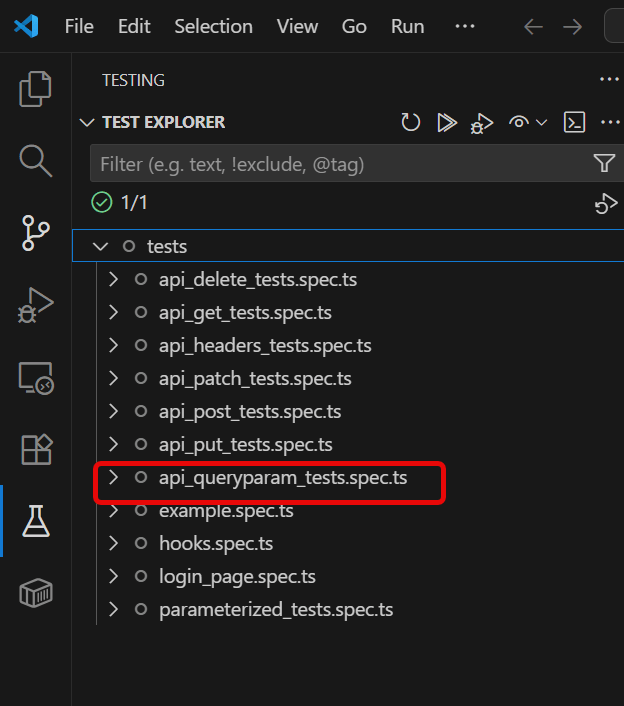
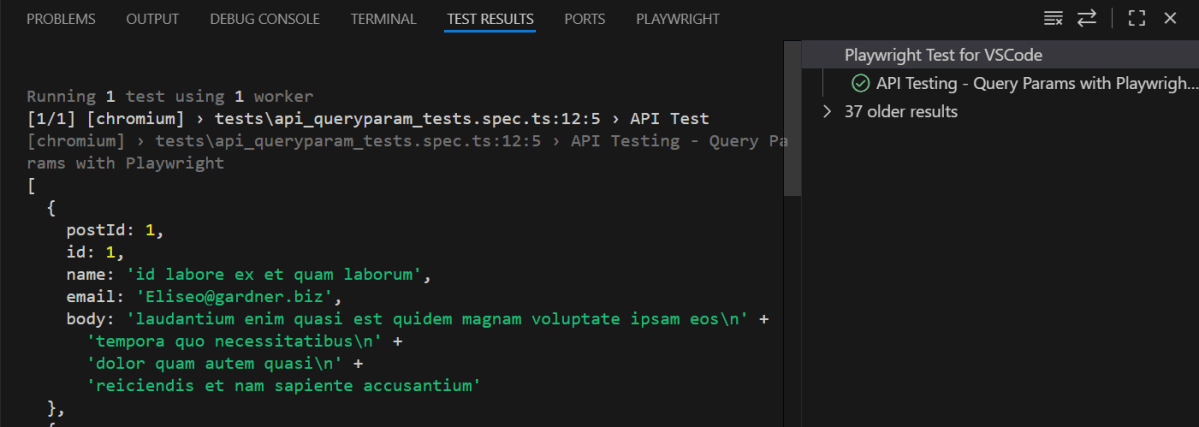
4. Execute the tests through Test Explorer View
Go to the funnel shape icon called “Testing” or “Test Explorer View”. You can run the tests from the test Explorer view too now. You can run all of the tests in all of the test specs in this directory.
You can also come in and run all of the tests in a particular specification file. Alternatively, run individual tests within a specification file. Here, I want to run the tests of api_queryparam_tests.spec.ts file.
The output of the above program is
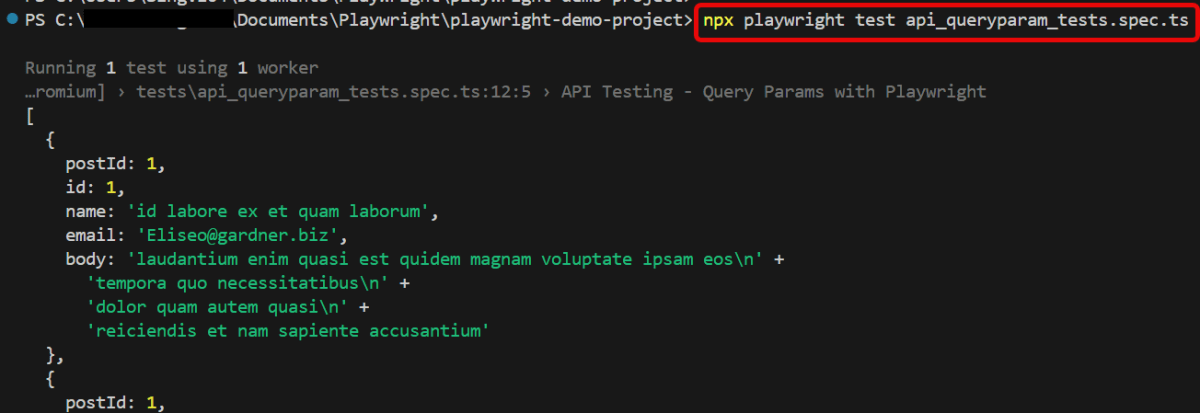
5. Execute the tests through Command Line
You can also run the tests through the command line. Go to the terminal and use the below command:-
npx playwright test api_queryparam_tests.spec.ts
This command runs all the tests present in this file.
6. Evaluate Test Results
Analyze console outputs and assertions to validate the response data, ensuring that your API endpoints are functioning as designed.
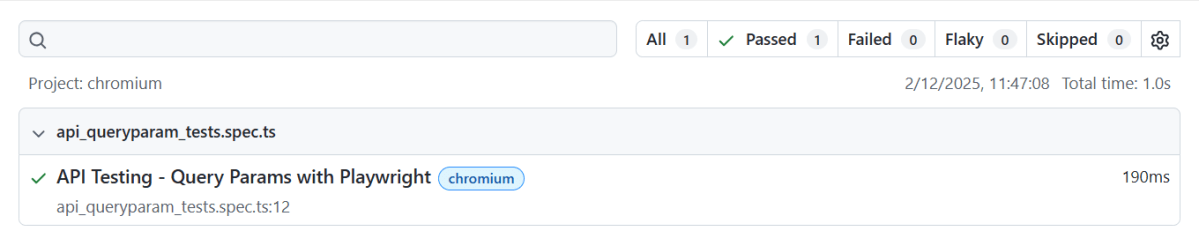
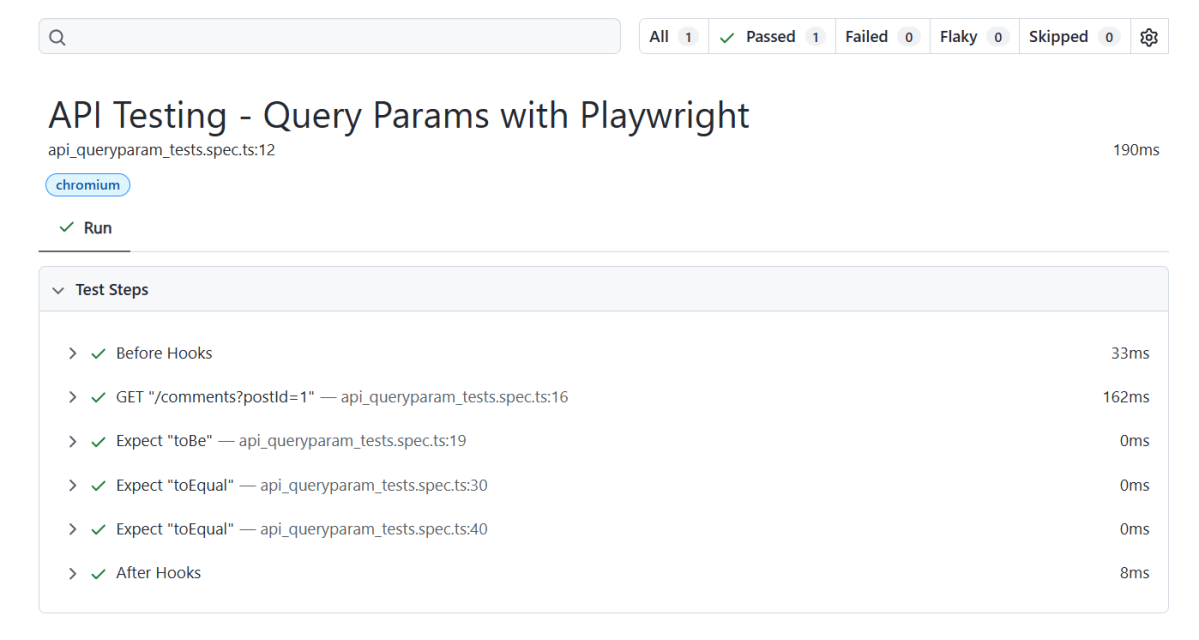
Playwright generates a test report after the execution of the tests. This test report can be viewed by using the below command:
npx playwright show-report
The output of the above command is
Below is an example of Index.html Report generated by Playwright.
A DELETE request is an HTTP method used in web development to remove a specific resource from a server. Upon a successful deletion, the server will respond with a status code like 200 OK or 204 No Content.
System Requirement
Node.js version 18 or higher and npm (comes with Node.js)
Windows 10+, macOS 12+, or Ubuntu 20.04+
Visual Studio for Code is already installed.
Playwright is already installed
3.1 Setup Your Playwright Testing Environment:
Verify that the Playwright installed in your project. If you haven’t yet installed it, you can use:
npm install playwright
3.2 Update playwright.config.ts
Playwright Test comes with a few built-in reporters for different needs and ability to provide custom reporters. We will add detail in playwright.config.ts to generate the html report, once the test execution is finished.
Here’s an example script demonstrating API testing for DELETE operation using Playwright:
import { test, expect } from '@playwright/test';

 test('API Testing - DELETE with Playwright', async ({ request }) => {

// Perform a DELETE request
const response = await request.delete('https://jsonplaceholder.typicode.com/posts/1');

     // Check the response status code
     expect(response.status()).toBe(200);

      // Parse the response data
     const responseBody = await response.json();
     console.log(responseBody);

   });
Explanation:
1. Imports
This line imports the test and expect functions from Playwright’s testing library. These functions provide a structure for writing tests and asserting conditions within them.
import { test, expect } from '@playwright/test';
2. Test Definition
This defines an asynchronous test case named “API Testing – DELETE with Playwright”. The test receives a requestobject as a parameter, which is used to perform HTTP requests.
Retrieve HTTP status code for response validation.
expect(response.status()).toBe(200);
5. Parsing the Response Data
Parse response data into JSON format
const responseBody = await response.json();
6. Logging the Response
This outputs the response body to the console, allowing you to see the returned JSON data.
console.log(responseBody);
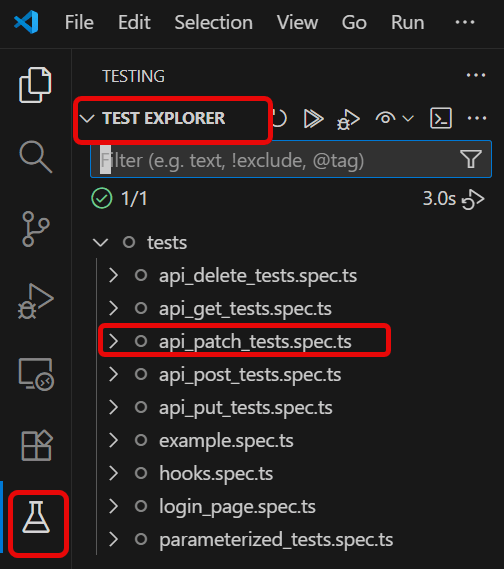
3.4 Execute the tests through Test Explorer View
Go to the funnel shape icon called “Testing” or “Test Explorer View”. You can run the tests from the test Explorer view too now. You can run all of the tests in all of the test specs in this directory.
You can also come in and run all of the tests in a particular specification file. Alternatively, run individual tests within a specification file. Here, I want to run the tests of api_delete_tests.spec.ts file.
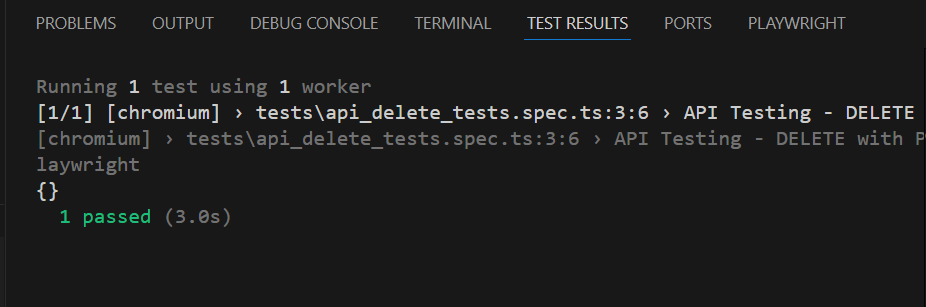
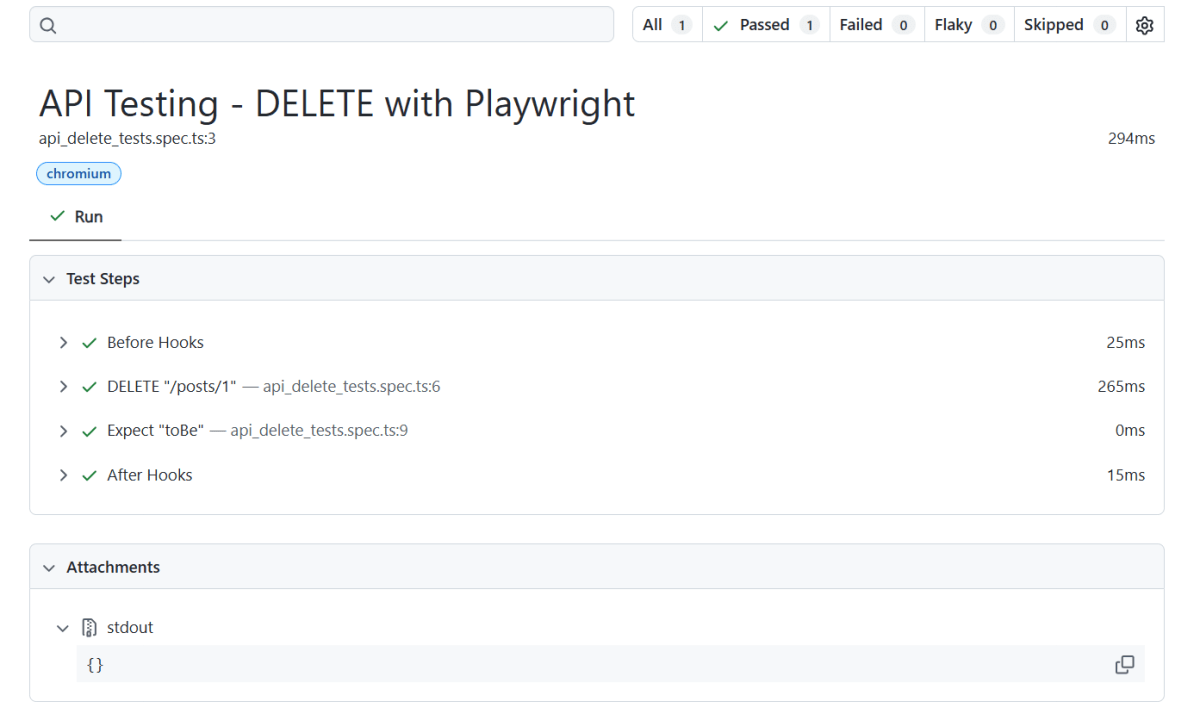
The output of the above program is
3.5 Execute the tests through Command Line
You can also run the tests through the command line. Go to the terminal and use the below command:-
npx playwright test api_delete_tests.spec.ts
This command runs all the tests present in this file.
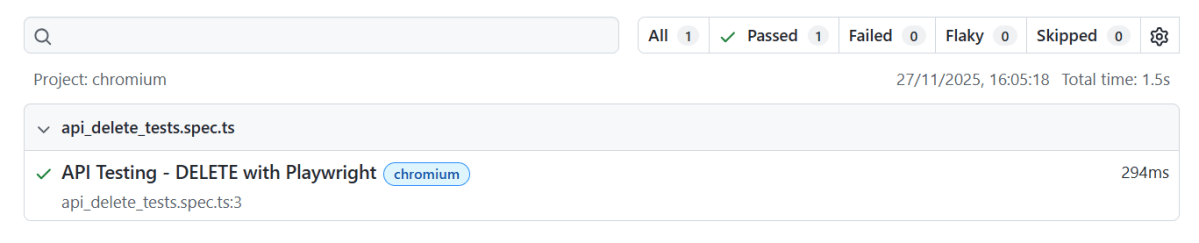
3.6 Evaluate Test Results
Analyze console outputs and assertions to validate the response data, ensuring that your API endpoints are functioning as designed.
Playwright generates a test report after the execution of the tests. This test report can be viewed by using the below command:
Node.js version 18 or higher and npm (comes with Node.js)
Windows 10+, macOS 12+, or Ubuntu 20.04+
Visual Studio for Code is already installed.
Playwright is already installed
What is PATCH Request?
A PATCH request is an HTTP method used in RESTful APIs to apply partial modifications to a resource. Unlike other methods that may require a complete representation of the resource, PATCH allows for updating only specific parts of the data.
1. Setup Your Playwright Testing Environment:
Verify that the Playwright installed in your project. If you haven’t yet installed it, you can use:
npm install playwright
2. Update playwright.config.ts
Playwright Test comes with a few built-in reporters for different needs and ability to provide custom reporters. We will add detail in playwright.config.ts to generate the html report, once the test execution is finished.
Here’s an example script demonstrating API testing for PATCH operation using Playwright:
import { test, expect } from '@playwright/test';

test('API Testing - PATCH with Playwright', async ({ request }) => {

const response = await request.get('https://jsonplaceholder.typicode.com/posts/1');

    // Check the response status code
    expect(response.status()).toBe(200);

    // Parse the response data
    const responseBody = await response.json();
    console.log(responseBody);


     // Perform a PATCH request
     const patchResponse = await request.patch('https://jsonplaceholder.typicode.com/posts/1', {
       data: {
         title: 'Manager'
       }
     });

    // Check the response status code
    expect(patchResponse.status()).toBe(200);

    // Parse the response data
    const patchResponseBody = await patchResponse.json();
    console.log(patchResponseBody);

    // Validate the response
    expect(patchResponseBody).toHaveProperty('title', 'Manager');

   });
Explanation:
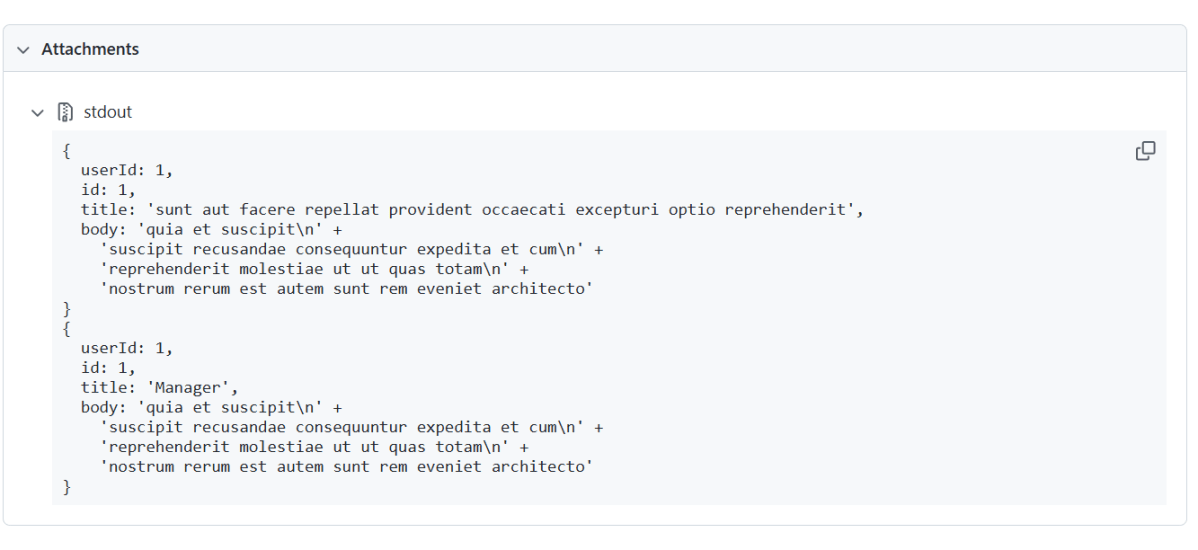
In the above example, first I have sent a GET request to see the body structure of the response. Then I sent a PATCH request to see the changes in the response body.
1. Imports
This line imports the `test` and `expect` functions from the Playwright testing module. They provide a structure for creating tests and validating outcomes.
import { test, expect } from '@playwright/test';
2. Test Definition
This defines a test case named “API Testing – PATCH with Playwright” using an asynchronous function. The requestparameter allows you to perform HTTP operations like GET, PATCH, etc.
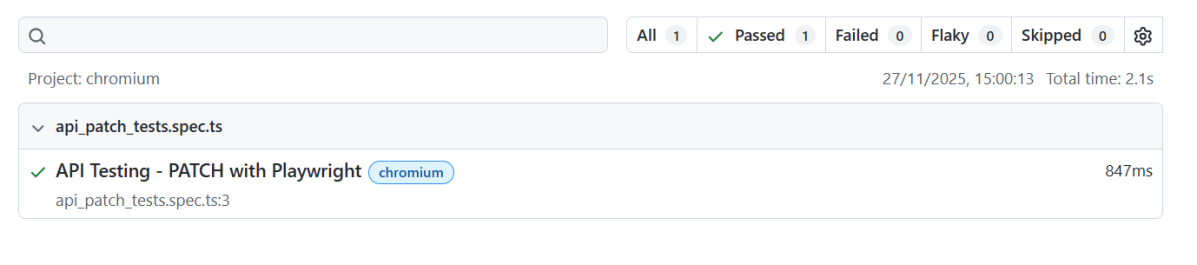
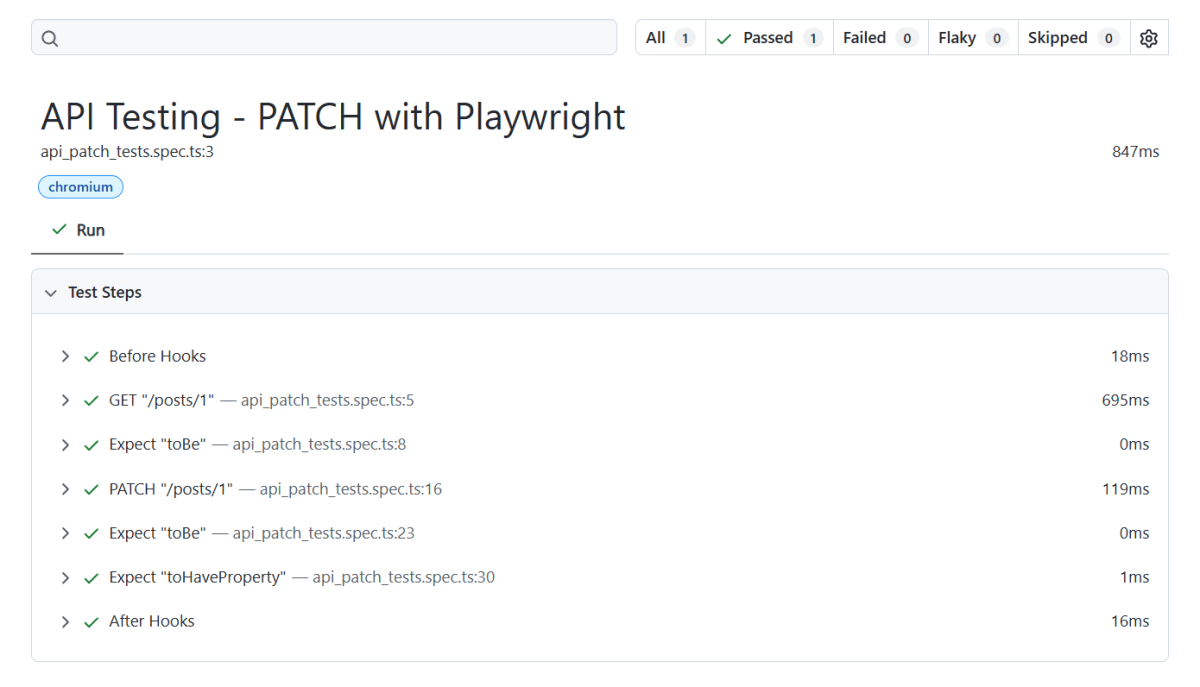
Go to the funnel shape icon called “Testing” or “Test Explorer View”. You can run the tests from the test Explorer view too now. You can run all of the tests in all of the test specs in this directory.
You can also come in and run all of the tests in a particular specification file. Alternatively, run individual tests within a specification file. Here, I want to run the tests of api_patch_tests.spec.ts file.
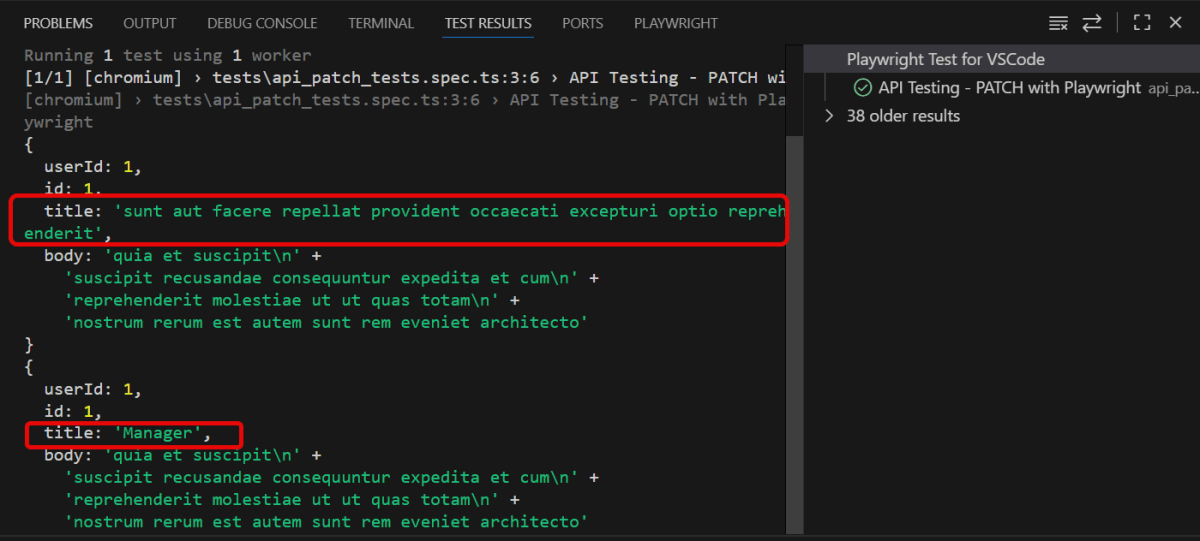
The output of the above program is
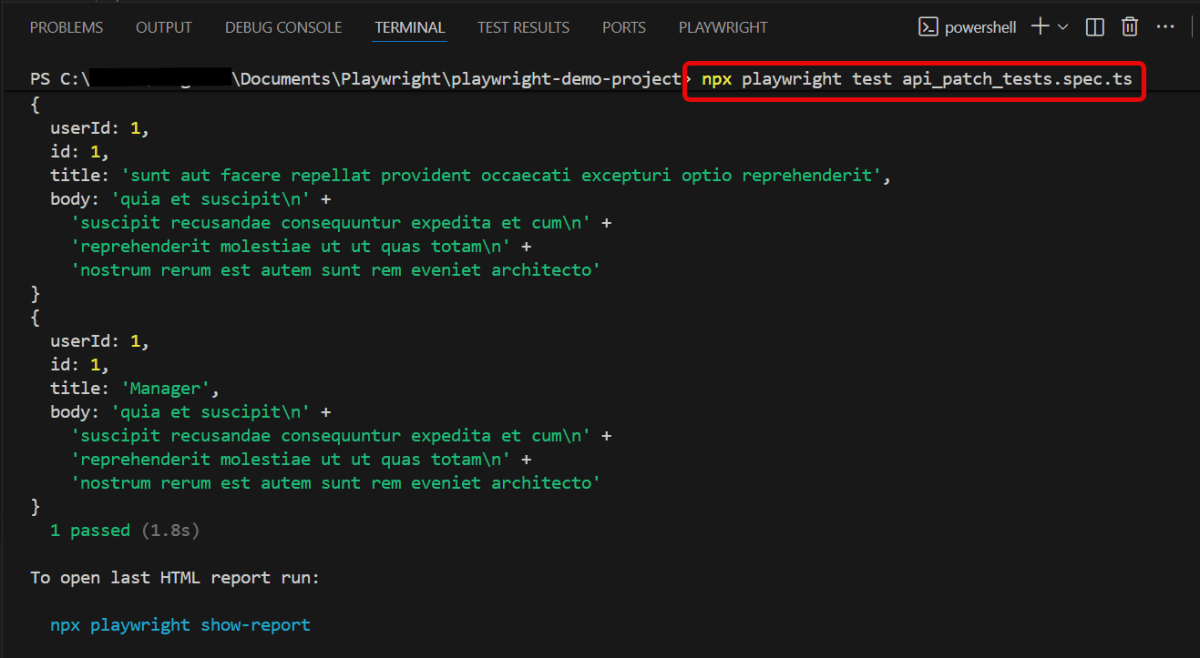
5. Execute the tests through Command Line
You can also run the tests through the command line. Go to the terminal and use the below command:-
npx playwright test api_patch_tests.spec.ts
This command runs all the tests present in this file.
6. Evaluate Test Results
Analyze console outputs and assertions to validate the response data, ensuring that your API endpoints are functioning as designed.
Playwright generates a test report after the execution of the tests. This test report can be viewed by using the below command:
Playwright can be used to get access to the REST API of the application.
In this tutorial, I will go through the steps to execute the PUT requests in Playwright.
What is PUT Request?
A PUT request is an HTTP method used to update a resource at a specified URL, or to create the resource if it does not exist. A key feature of PUT requests is idempotency. This means that multiple identical PUT requests will have the same effect as a single request.
1. Setup Your Playwright Testing Environment:
Verify that the Playwright installed in your project. If you haven’t yet installed it, you can use:
npm install playwright
2. Update playwright.config.ts
Playwright Test comes with a few built-in reporters for different needs and ability to provide custom reporters. We will add detail in playwright.config.ts to generate the html report, once the test execution is finished.
Here’s an example script demonstrating API testing for PUT operation using Playwright:
import { test, expect } from '@playwright/test';

 test('API Testing - PUT with Playwright', async ({ request }) => {

    // Perform a GET request
    const response = await request.get('https://jsonplaceholder.typicode.com/posts/1');

     // Check the response status code
     expect(response.status()).toBe(200);

     // Parse the response data
     const responseBody = await response.json();
     console.log(responseBody);

     // Perform a PUT request
     const putResponse = await request.put('https://jsonplaceholder.typicode.com/posts/1', {
       data: {
         title: 'Manager',
         body: 'Test',
         userId: 1
       }
     });

     // Check the response status code
     expect(putResponse.status()).toBe(200);

     // Parse the response data
     const putResponseBody = await putResponse.json();
     console.log(putResponseBody);

     // Validate the response
     expect(putResponseBody).toHaveProperty('title', 'Manager');
     expect(putResponseBody).toHaveProperty('body', 'Test');
     expect(putResponseBody).toHaveProperty('userId', 1);
   });
Explanation:
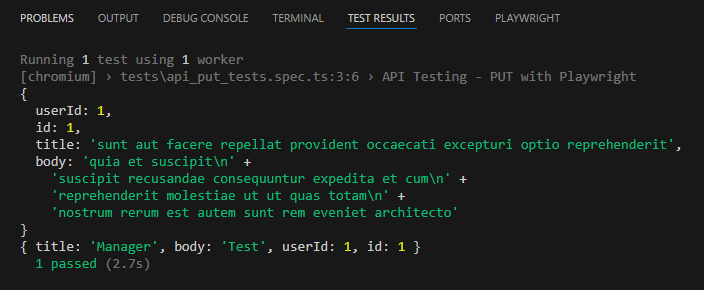
In the above example, first I have sent a GET request to see the body structure of the response. Then I sent a PUT request to see the changes in the response body.
1. Imports
This line imports the testand expectfunctions from Playwright’s testing library. These functions provide a structure for writing tests and asserting conditions within them.
import { test, expect } from '@playwright/test';
2. Test Definition
This defines an asynchronous test case named “API Testing – PUT with Playwright”. The test receives a request object as a parameter, which is used to perform HTTP requests.2.
test('API Testing - PUT with Playwright', async ({ request })
3. Performing a GET Request
 // Perform a GET request
    const response = await request.get('https://jsonplaceholder.typicode.com/posts/1');

     // Check the response status code
     expect(response.status()).toBe(200);

     // Parse the response data
     const responseBody = await response.json();
     console.log(responseBody);
4. Performing a PUT Request
Sends a PUT request to the specified URL. data transmits the body of the request.
Go to the funnel shape icon called “Testing” or “Test Explorer View”. You can run the tests from the test Explorer view too now. You can run all of the tests in all of the test specs in this directory.
You can also come in and run all of the tests in a particular specification file. Alternatively, run individual tests within a specification file. Here, I want to run the tests of api_put_tests.spec.ts file.
The output of the above program is
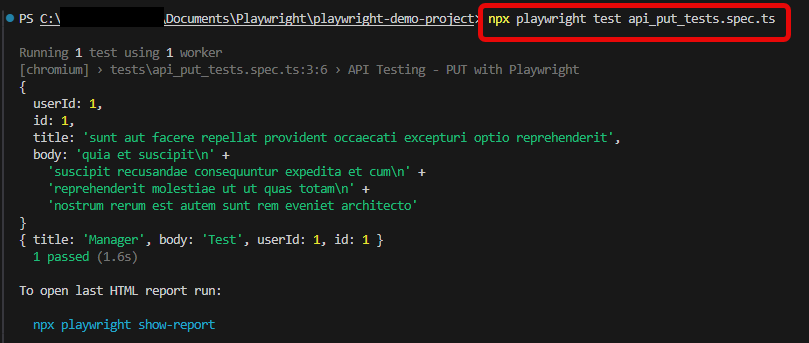
5. Execute the tests through Command Line
You can also run the tests through the command line. Go to the terminal and use the below command:-
npx playwright test api_put_tests.spec.ts
This command runs all the tests present in this file.
6. Evaluate Test Results
Analyze console outputs and assertions to validate the response data, ensuring that your API endpoints are functioning as designed.
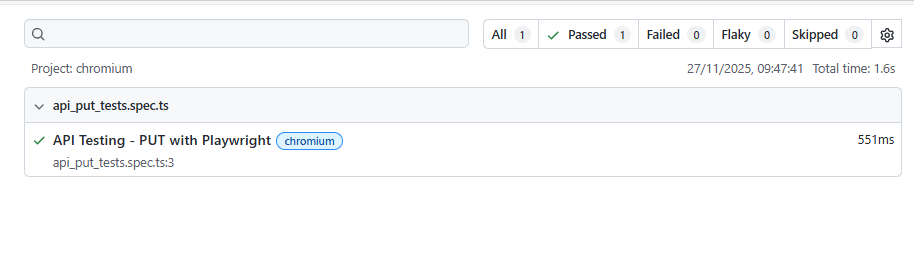
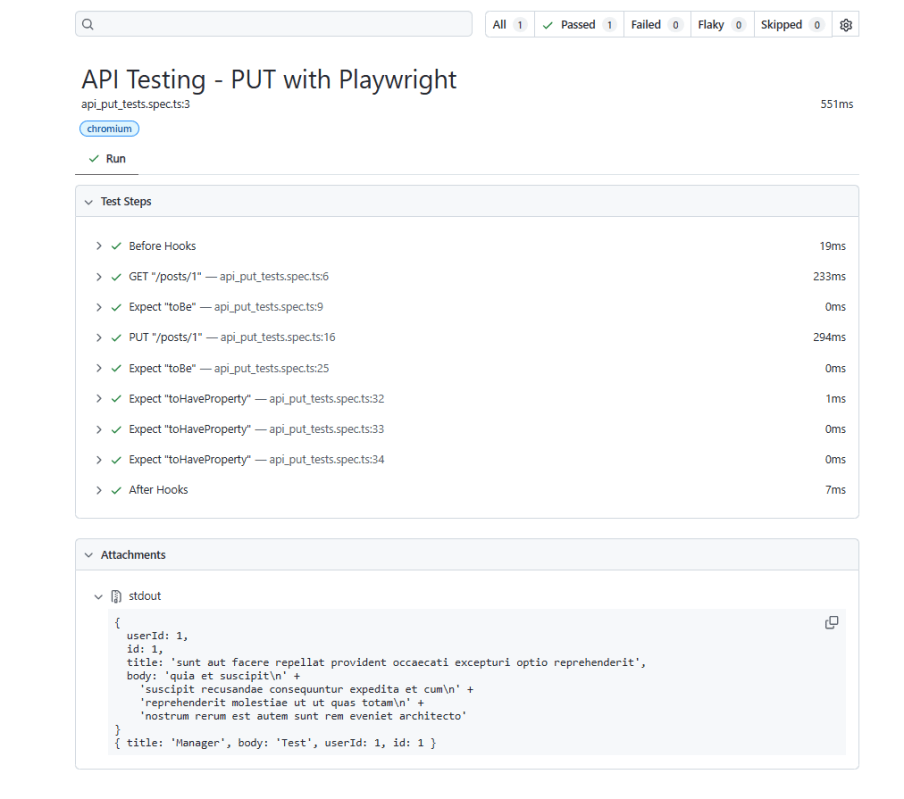
Playwright generates a test report after the execution of the tests. This test report can be viewed by using the below command:
A POST request is a type of HTTP request used to send data to a server to create or update a resource. It is one of the most common methods used in web services for communicating between a client (such as a web browser) and a server.
1. Setup Your Playwright Testing Environment:
Verify that the Playwright installed in your project. If you haven’t yet installed it, you can use:
npm install playwright
2. Update playwright.config.ts
Playwright Test comes with a few built-in reporters for different needs and ability to provide custom reporters. We will add detail in playwright.config.ts to generate the html report, once the test execution is finished.
Here’s an example script demonstrating API testing for POST operation using Playwright:
import { test, expect } from '@playwright/test';

 test('API Testing - POST with Playwright', async ({ request }) => {

     // Perform a POST request
     const postResponse = await request.post('https://jsonplaceholder.typicode.com/users', {
       data: {
         title: 'Manager',
         body: 'Test',
         userId: 10,
       }
     });

     // Check the response status code
     expect(postResponse.status()).toBe(201);

      // Parse the response data
     const postResponseBody = await postResponse.json();
     console.log(postResponseBody);

     // Validate the response
     expect(postResponseBody).toHaveProperty('title', 'Manager');
     expect(postResponseBody).toHaveProperty('body', 'Test');
     expect(postResponseBody).toHaveProperty('userId', 10);
   });
Explanation:
1. Imports
This line imports the testand expectfunctions from Playwright’s testing library. These functions provide a structure for writing tests and asserting conditions within them.
import { test, expect } from '@playwright/test';
2. Test Definition
This defines an asynchronous test case named “API Testing – POST with Playwright”. The test receives a request object as a parameter, which is used to perform HTTP requests.
test('API Testing - POST with Playwright', async ({ request })
3. Performing a POST Request
Sends a POST request to the specified URL. data transmits the body of the request.
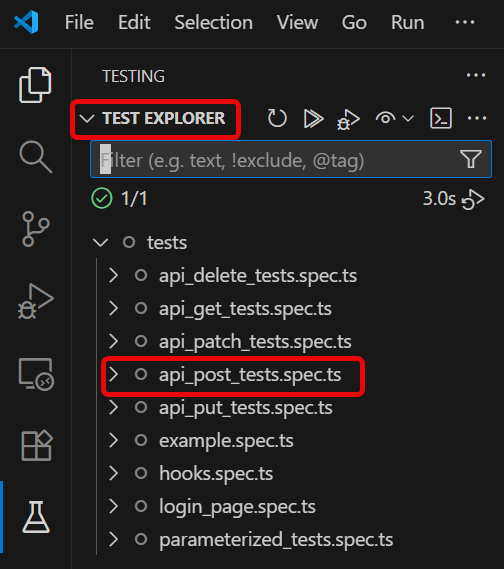
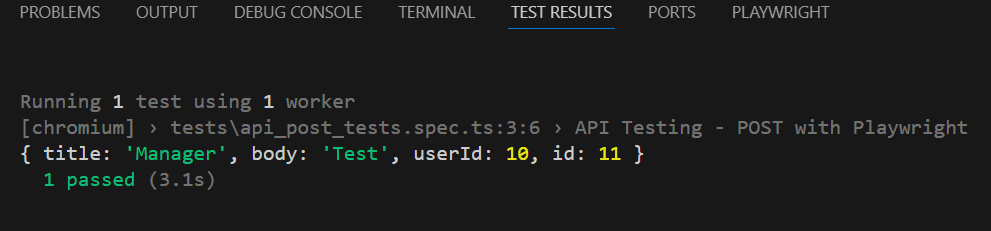
Go to the funnel shape icon called “Testing” or “Test Explorer View”. You can run the tests from the test Explorer view too now. You can run all of the tests in all of the test specs in this directory.
You can also come in and run all of the tests in a particular specification file. Alternatively, run individual tests within a specification file. Here, I want to run the tests of api_post_tests.spec.ts file.
The output of the above program is
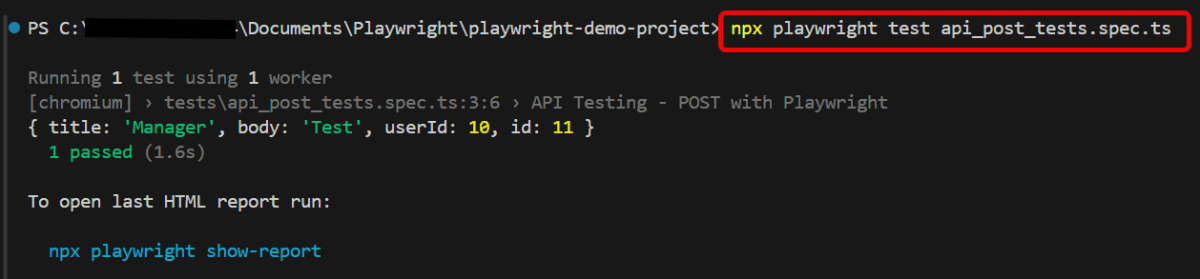
5. Execute the tests through Command Line
You can also run the tests through the command line. Go to the terminal and use the below command:-
npx playwright test api_post_tests.spec.ts
This command runs all the tests present in this file.
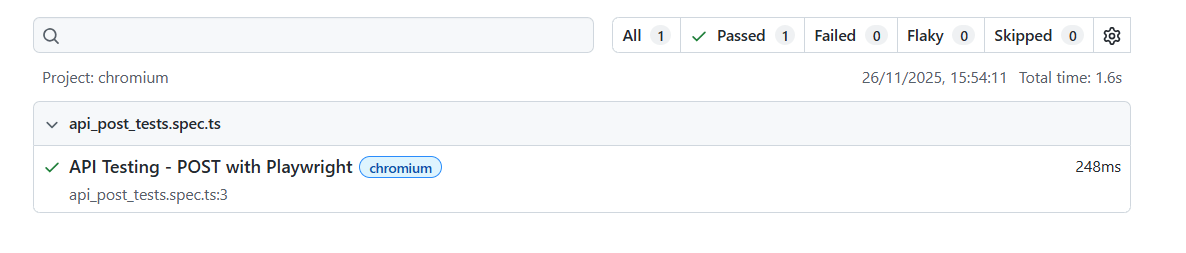
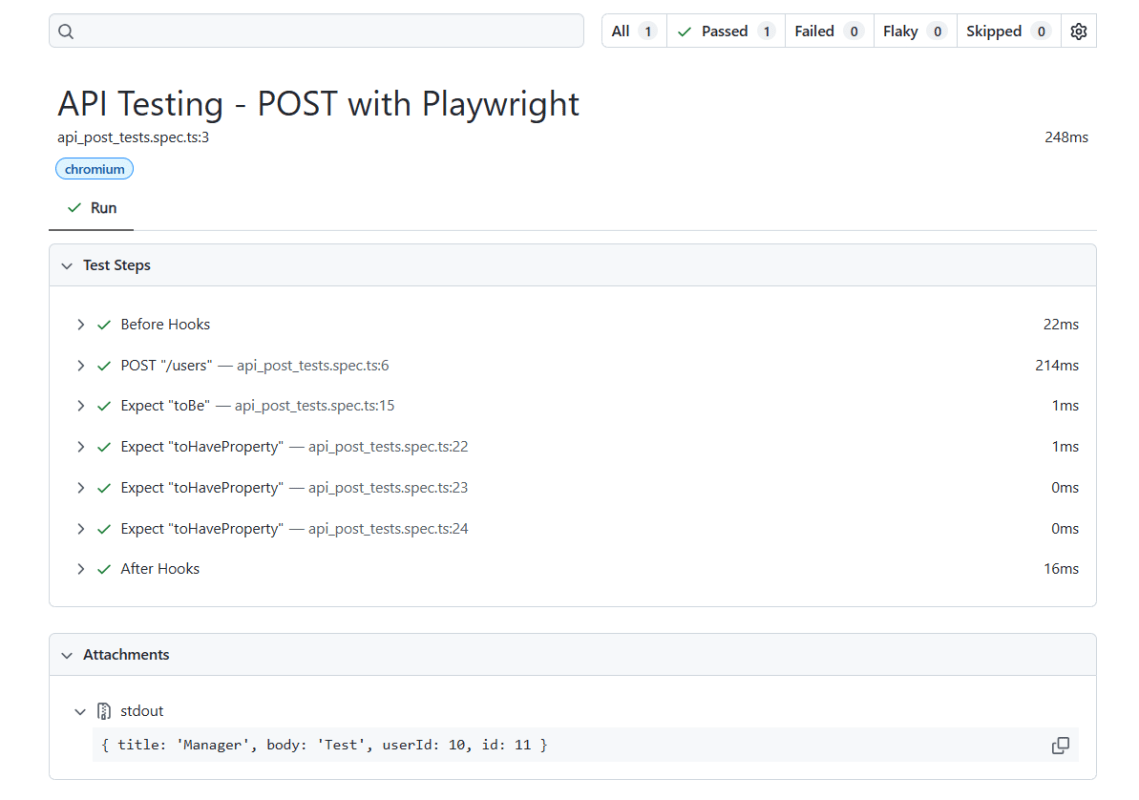
6. Evaluate Test Results
Analyze console outputs and assertions to validate the response data, ensuring that your API endpoints are functioning as designed.
Playwright generates a test report after the execution of the tests. This test report can be viewed by using the below command:
Playwright can be used to get access to the REST API of the application.
There are instances when you might prefer to send requests directly from Node.js without the need to load a webpage or execute JavaScript within it. Here are a few scenarios where this approach can be particularly useful:
Evaluating your server API directly for testing purposes. Configuring the server-side state prior to interacting with your web application during a test. Verifying server-side conditions after performing certain actions within the browser.
In this tutorial, we will execute GET request in Playwright.
What is GET Request?
A GET request is an HTTP method used to retrieve data from a specified resource on a server, such as when you browse a website or an API. It’s considered a safe, read-only operation that should not change any data on the server.
1. Setup Your Playwright Testing Environment:
Verify that the Playwright installed in your project. If you haven’t yet installed it, you can use:
npm install playwright
2. Update playwright.config.ts
Playwright Test comes with a few built-in reporters for different needs and ability to provide custom reporters. We will add detail in playwright.config.ts to generate the html report, once the test execution is finished.
Here’s an example script demonstrating API testing for GET operation using Playwright:
import { test, expect } from '@playwright/test';
test('API Testing - GET with Playwright', async ({ request }) => {
// Perform a GET request
const response = await request.get('https://jsonplaceholder.typicode.com/users/1');
// Check the response status code
expect(response.status()).toBe(200);
// Parse the response data
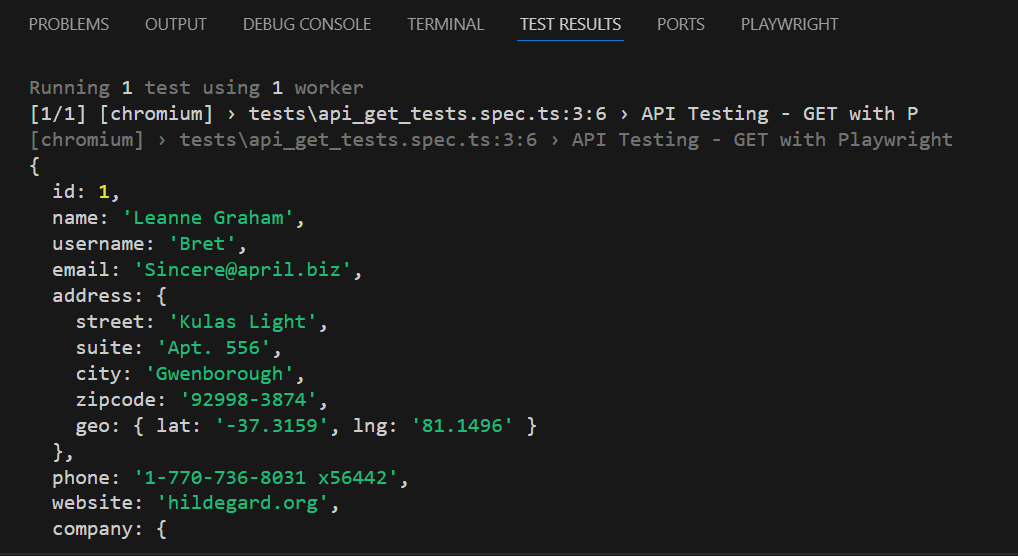
const responseBody = await response.json();
console.log(responseBody);
// Assertions based on expected response
expect(responseBody).toHaveProperty('id', 1);
expect(responseBody).toHaveProperty('name','Leanne Graham');
expect(responseBody).toHaveProperty('address.zipcode','92998-3874');
expect(responseBody).toHaveProperty('address.geo.lat','-37.3159');
});
Explanation:
1. Imports
This line imports the testand expectfunctions from Playwright’s testing library. These functions provide a structure for writing tests and asserting conditions within them.
import { test, expect } from '@playwright/test';
2. Test Definition
This defines an asynchronous test case named “API Testing with Playwright”. The test receives a `request` object as a parameter, which is used to perform HTTP requests.
test('API Testing - GET with Playwright', async ({ request }) => {
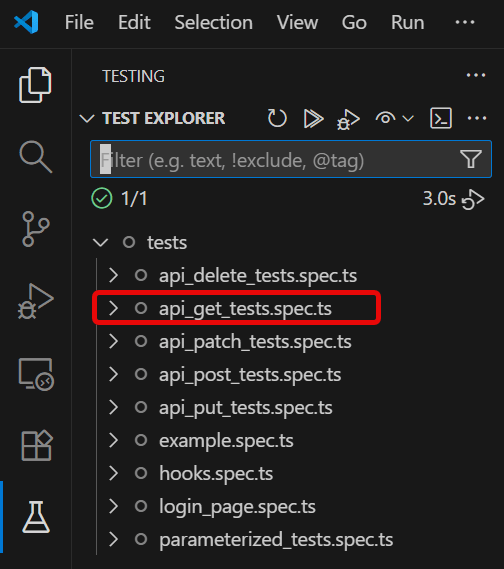
Go to the funnel shape icon called “Testing” or “Test Explorer View”. You can run the tests from the test Explorer view too now. You can run all of the tests in all of the test specs in this directory.
You can also come in and run all of the tests in a particular specification file. Alternatively, run individual tests within a specification file. Here, I want to run the tests of api_get_tests.spec.ts file.
The output of the above program is
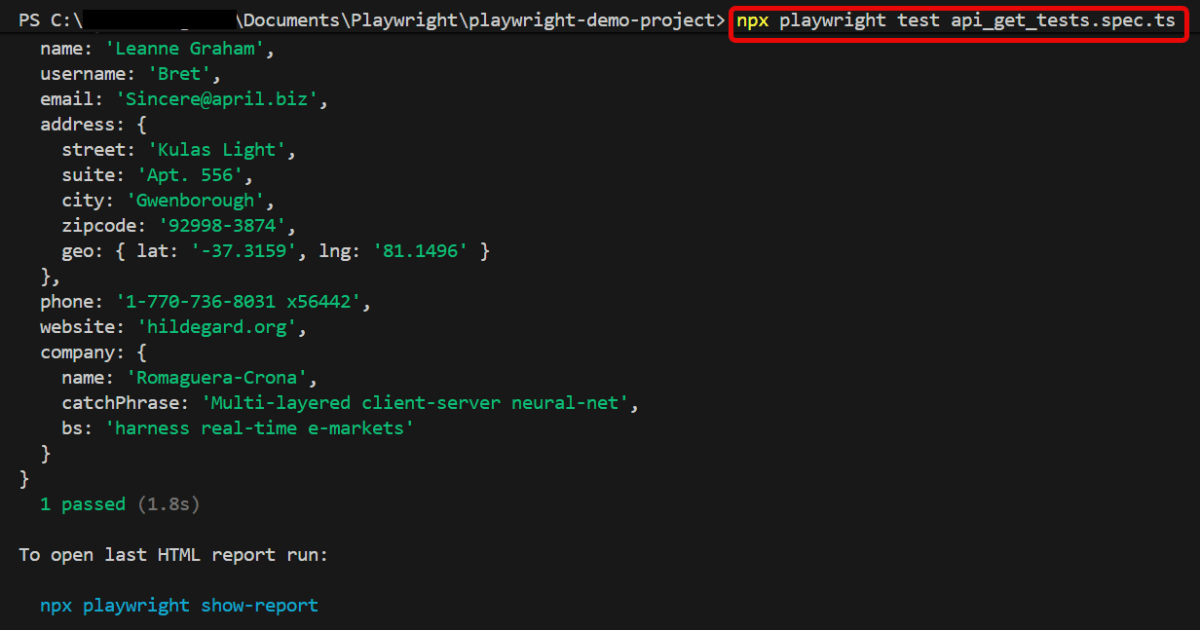
5. Execute the tests through Command Line
You can also run the tests through the command line. Go to the terminal and use the below command:-
npx playwright test api_get_tests.spec.ts
This command runs all the tests present in this file.
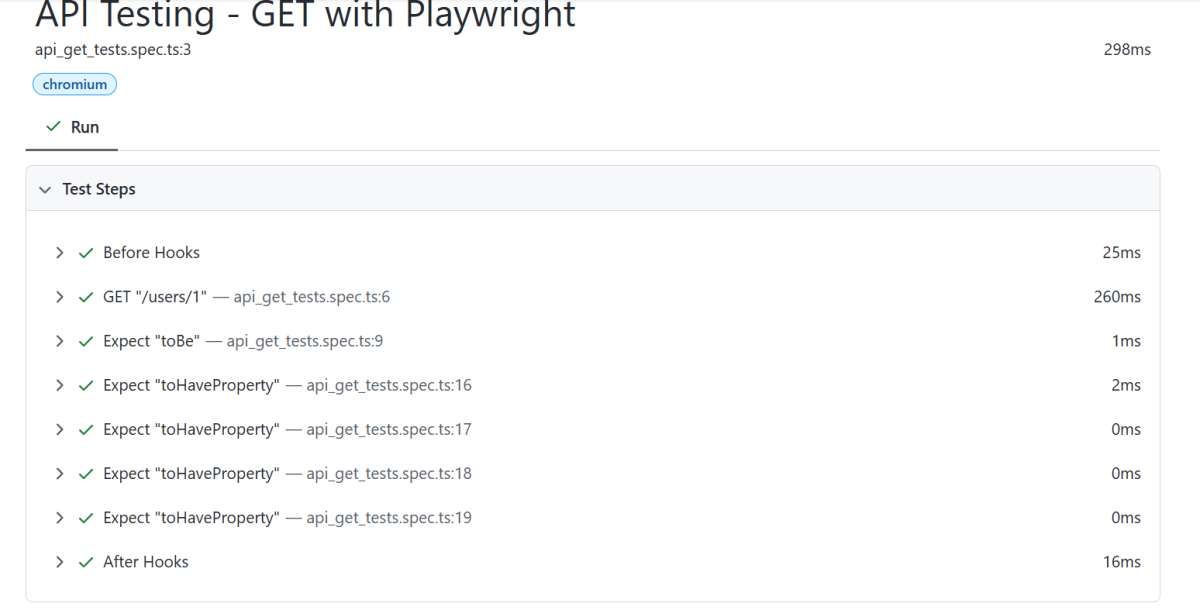
6. Evaluate Test Results
Analyze console outputs and assertions to validate the response data, ensuring that your API endpoints are functioning as designed.
Playwright generates a test report after the execution of the tests. This test report can be viewed by using the below command:
Playwright is a modern and powerful end-to-end testing framework developed by Microsoft, specifically designed for the automation of web applications. It supports programming languages like Java, Python, C#, and NodeJS. Playwright comes with Apache 2.0 License and is most popular with NodeJS with Javascript/Typescript.