HOME
In my previous tutorials, we have discussed about various types of locators available in Selenium WebDriver, which are used to identify various web elements on a web page. Some of the locators widely used are Id, ClassName, Name, LinkText, PartialLinkText, XPath, CSS Selector and so on. In this blog, will study the mechanism to locate web elements on Google Chrome, Firefox and Internet Explorer.
Google Chrome
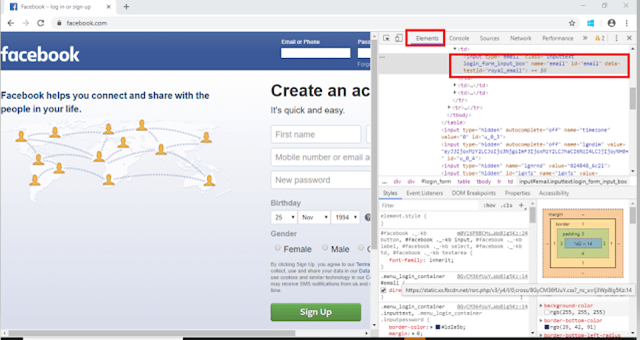
- First step is to launch the Chrome Browser with desired URL. Here, we have launched Chrome browser and accessed Facebook page. I want to find the locator of Email or Phone textbox, so I will click on that textbox, right click, and click on “Inspect”.

2. Take a note that “Element” tab highlighted in the screenshot. Thus, element tab is the one, which displays all the HTML properties belonging to the current web page. Navigate to the “Element” tab if it is not open by default on the launch.
3. In the screenshot, we can see the HTML code of Email or Phone Textbox. Right click on this text and then again click on Copy where will see options like – Copy Selector, Copy XPath, Copy full XPath
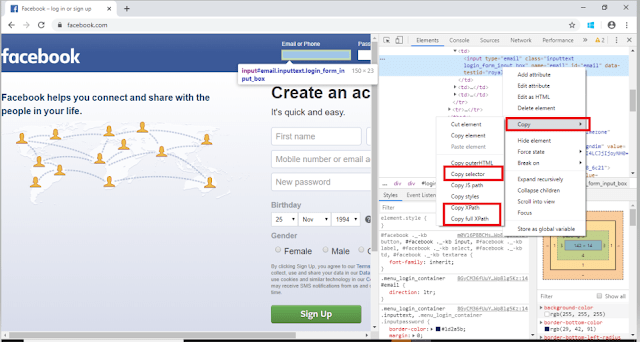
Copy Selector will tell the CSS Selector path of the WebElement
#email
Copy XPath will tell the Xpath of the WebElement
//*[@id="email"]
Copy full XPath will tell the absolute path of the WebElement
/html/body/div[1]/div[2]/div/div/div/div/div[2]/form/table/tbody/tr[2]/td[1]/input
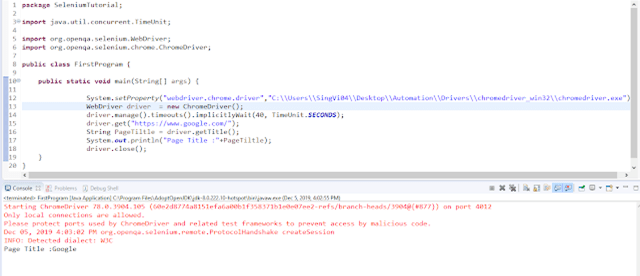
Firstly, we should instantiate a Chrome/Chromium session by doing the following:
import org.openqa.selenium.WebDriver;
import org.openqa.selenium.chrome.ChromeDriver;

WebDriver driver = new ChromeDriver();
Set the path to the chromedriver
executableSystem.setProperty("webdriver.chrome.driver","C:\\Users\\Vibha\\Desktop\\Automation\\Drivers\\chromedriver_win32\\chromedriver.exe");
The chromedriver is implement as a WebDriver remote server that instructs the browser what to do by exposing Chrome’s internal automation proxy interface.
Firefox
1. First step is to launch the Firefox Browser with desired URL, ie Facebook. I want to find the locator of Email or Phone textbox, so I will click on that textbox and right click and click on “Inspect Element (Q)”.

2. Take a note that “Inspector” tab is highlight in the screenshot. Thus, element tab is the one, which displays all the HTML properties belonging to the current web page. Navigate to the “Inspector” tab if it is not open by default on the launch.

3. In the screenshot, we can see the HTML code of Email or Phone Textbox. Right click on this text and then again click on Copy where will see options like – Copy CSS Selector, Copy XPath, Copy CSS Path

Copy CSS Path will tell the CSS path of the WebElement
html#facebook body.fbIndex.UIPage_LoggedOut._-kb._605a.b_c3pyn-ahh.gecko.win.x1.Locale_en_GB.cores-gte4._19_u.hasAXNavMenubar div#u_0_e._li div#pagelet_bluebar div#blueBarDOMInspector div._53jh div.loggedout_menubar_container div.clearfix.loggedout_menubar div.menu_login_container.rfloat._ohf form#login_form table tbody tr td input#email.inputtext.login_form_input_box
Copy Selector will tell the CSS Selector path of the WebElement
#email
Copy XPath will tell the Xpath of the WebElement
//*[@id="email"]
System.setProperty("webdriver.gecko.driver","C:\\Users\\Vibha\\Desktop\\Drivers\\geckodriver-v0.26.0-win64\\geckodriver.exe");
WebDriver driver = new FirefoxDriver();
Internet Explorer
1. First step is to launch the Firefox Browser with desired URL. Here, we have launched Firefox browser and accessed Facebook page. I want to find the locator of Email or Phone textbox, so I will click on that textbox, right click, and click on “Inspect Element”.

2. Take a note that “DOM Explorer” tab is highlight in the screenshot. Thus, element tab is the one, which displays all the HTML properties belonging to the current web page. Navigate to the “DOM Explorer” tab if it is not open by default on the launch.

System.setProperty("webdriver.ie.driver","C:\\Users\\SingVi04\\Desktop\\Automation\\Drivers\\IEDriverServer_x64_3.150.1\\IEDriverServer.exe");
WebDriver driver = new InternetExplorerDriver();