In the previous tutorial, I explained various locators like id, className, tagName, name, linktext, and partiallinktext present in Selenium to locate web elements on the web page. In this tutorial, I will explain about another type of locator called XPath.
In Selenium automation, if you are unable to locate a web element using id, class, name, etc, then XPath comes into the picture to locate the web element. The full form of XPath is XML Path. It is used to locate a web element on a web page using HTML DOM structure. To know more about the path, refer to my previous blog. Below is the syntax of XPath

//: select the current node.
tagname: name of the tag of a particular node.
@: to select attribute.
Attribute: name of the attribute of the node.
Value: value of the attribute
1) Basic XPath
XPath’s expression selects nodes based on ID, class, etc. from an XML web page.
Go to http://www.facebook.com and inspect the Email or Phone textbox. How to inspect a web element on the web page is explained in the previous blog. Some of the basic examples of XPath is displayed below:
By.xpath("//input[@name='email']")
By.xpath("//input[@id=’email’]")
By.xpath("//input[@type='email']")
By.xpath("//input[@class=’inputtext’]")
By.xpath("//*[@class=’inputtext’]")
By.xpath("//input[@class=’inputtext’][@type='email']")
In the last example, we have created XPath using multiple attributes for the single HTML tag.

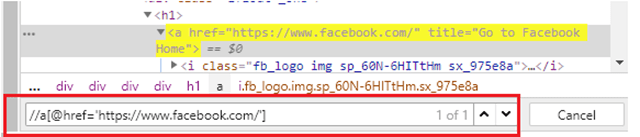
Syntax
By.xpath("//a[@href='https://www.facebook.com/']")
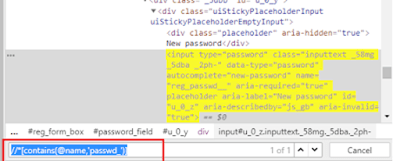
2) Contains
It is used if the value of any web element changes dynamically. Using this expression, you can find the element with partial text.
Syntax
By.xpath("//*[contains(@name,'passwd_')]")
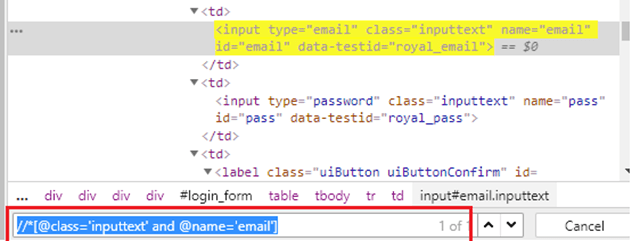
3) OR & AND
OR & AND expression uses 2 conditions to identify a web element.
In the case of OR, if any of the conditions is true, then the element will be located. Whereas in the case of AND, both the conditions should be true to locate the element.
Syntax
By.xpath("//*[@class='inputtext' or @name='email']")

Here, if you observe, class – ‘inputtext’ is same for 2 web elements, so with OR condition it will locate 2 web elements.
Syntax
By.xpath("//*[@class='inputtext' and @name='email']")
4) Start-with function
This function finds the web elements whose value changes dynamically. In the expression, we will use that value of the web element which doesn’t change. Let’s see a small example of using the start-with() function.
Syntax
By.xpath("//*[starts-with(@id,'yui_3_18_0_3_1555510217471_')]")

5) Text()
This expression is used with the text function to locate an element with exact text. Let me show you how to use the Text() method.
Syntax
By.xpath("//*[text(),"Create an account"]")

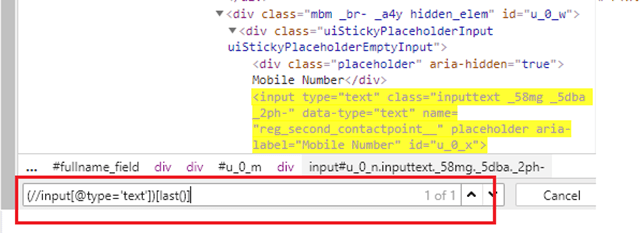
6) Last()
Select the last element (of the mentioned type) out of all input elements present.
Syntax
By.xpath("//input[@type='text'])[last()]")
There are 5 web elements with input type -text. But with this expression, it has selected the last one.
7) Position()
Selects the element out of all input elements present depending on the position number provided
Syntax
By.xpath("//input[@type='text'])[2]")

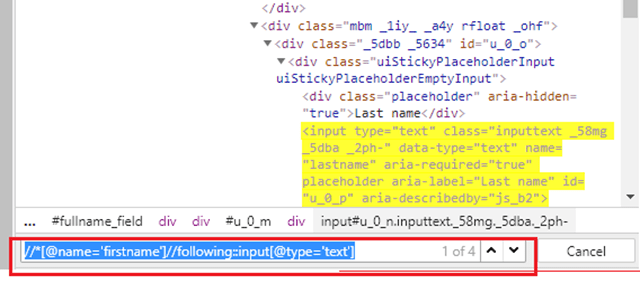
8) Following
By using this, we could select everything on the web page after the closing tag of the current node.
The xpath of firstname is as follows:-
By.xpath("//*[@name='firstname']")
To identify the input field of type text after the FirstName field, we need to use the below XPath.
By.xpath("//*[@name='firstname']//following::input[@type='text']")
To identify just the input field after the FirstName field, we need to use the below XPath.
By.xpath("//*[@name=’firstname’]//following::input[1]")
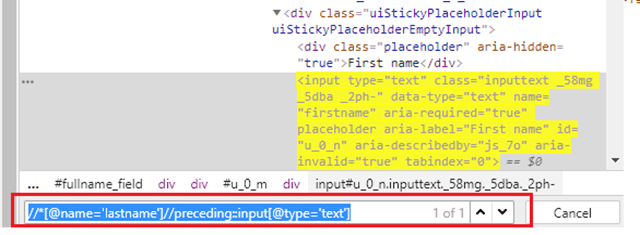
9) Preceding
Selects all nodes that appear before the current node in the document, except ancestors, attribute nodes, and namespace nodes.
The XPath of the LastName field is as follows
By.xpath("//*[@name='lastname']")
To identify the web element before lastname field is as follows
By.xpath("//*[@name='lastname']//preceding::input[1]")
To identify the input field of type text before the LastName field, we need to use below XPath
By.xpath("[@name='lastname']//preceding::input[@type='text']")
Now, let’s write a small program to show the use of XPath. In this program,
- Firefox is used as the browser.
- The path of the Mozilla Firefox driver is set by using System.SetProperty. Mozilla Firefox driver is called gecko, so do not get confused.
- driver.get is used to navigate to amazon site. The search box of the webpage is located using XPath – (“//*[@id=’twotabsearchtextbox’]”))
- sendkeys() is used to search for value hard drive.
- Search Button is clicked by using XPath – (“//*[@class=’nav-input’]”))
import java.util.concurrent.TimeUnit;
import org.openqa.selenium.By;
import org.openqa.selenium.WebDriver;
import org.openqa.selenium.firefox.FirefoxDriver;

public class Selenium_Site {
      public static void main(String[] args) {
              System.setProperty("webdriver.gecko.driver","C:\\Users\\vibha\\Downloads\\geckodriver-v0.24.0-win64\\geckodriver.exe");
            WebDriver driver = new FirefoxDriver();
            driver.manage().timeouts().implicitlyWait(60, TimeUnit.SECONDS);
            driver.get("https://www.amazon.com//");
            driver.manage().window().maximize();

            //XPath for Search box
            driver.findElement(By.xpath("//*[@id='twotabsearchtextbox']")).sendKeys("hard drive");

            //XPath for search button
            driver.findElement(By.xpath("//*[@class='nav-input']")).click();
     }
}

