Last Updated On
In this article, we will explain how to update an existing XML file. We will do this by adding new elements using the DOM (Document Object Model) parser.
Table of Contents
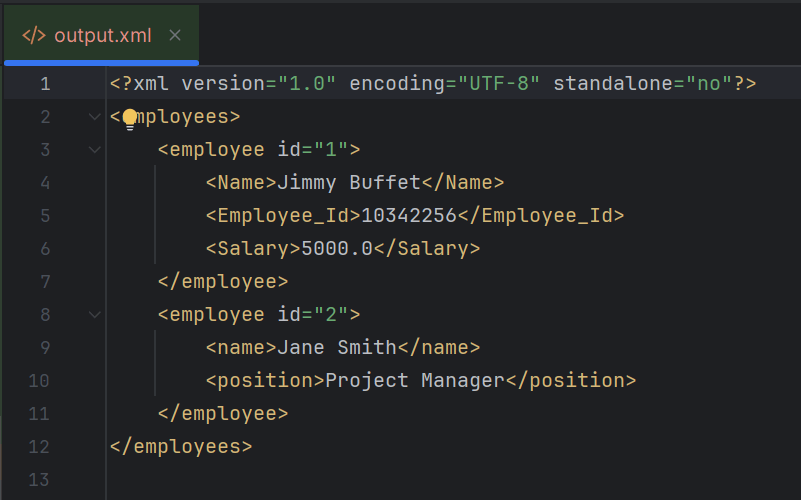
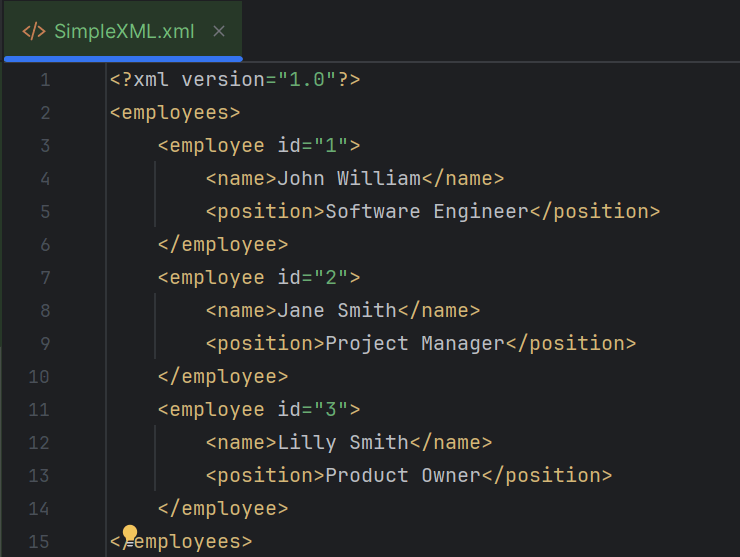
Below is the sample XML which is created and saved in resources/Payloads as SimpleXML.xml. We are going to modify this XML.
Updating existing Element:
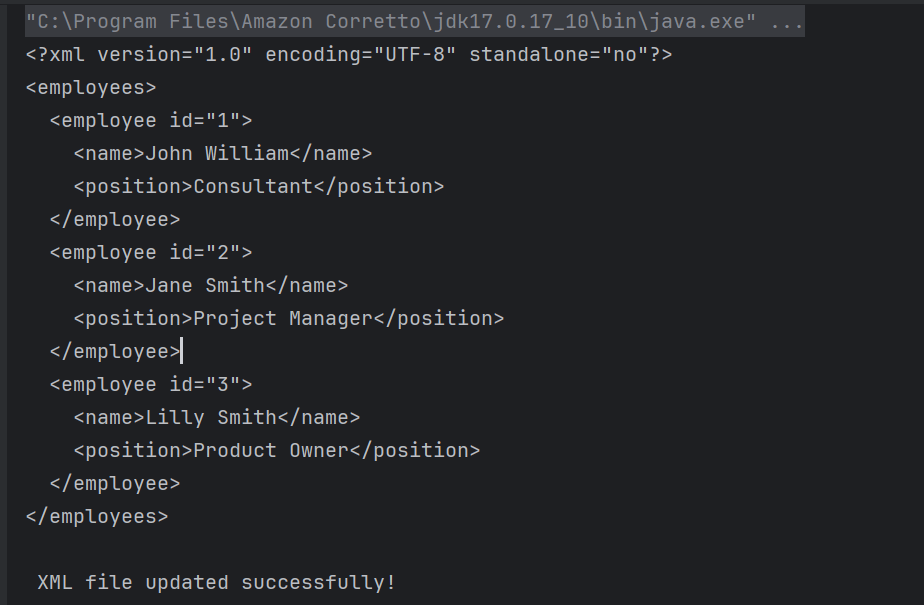
Here, I’m updating the position of employee id “1” from “Software Engineer” to “Consultant”.
The complete program looks like as shown below:
package XML.DOM;
import org.w3c.dom.Document;
import org.w3c.dom.Element;
import org.w3c.dom.Node;
import org.w3c.dom.NodeList;
import org.xml.sax.SAXException;
import javax.xml.parsers.DocumentBuilder;
import javax.xml.parsers.DocumentBuilderFactory;
import javax.xml.parsers.ParserConfigurationException;
import javax.xml.transform.OutputKeys;
import javax.xml.transform.Transformer;
import javax.xml.transform.TransformerException;
import javax.xml.transform.TransformerFactory;
import javax.xml.transform.dom.DOMSource;
import javax.xml.transform.stream.StreamResult;
import java.io.File;
import java.io.IOException;
public class DOM_ModifyXMLDemo {
public static void main(String[] args) {
try {
//Create a DocumentBuilderFactory and DocumentBuilder
DocumentBuilderFactory factory = DocumentBuilderFactory.newInstance();
DocumentBuilder builder = factory.newDocumentBuilder();
// Parse the XML file into a Document
Document document = builder.parse(new File("src/test/resources/Payloads/SimpleXML.xml"));
// Normalize XML structure
document.getDocumentElement().normalize();
// Step 3: Update the XML content
NodeList nodeList = document.getElementsByTagName("employee");
for (int i = 0; i < nodeList.getLength(); i++) {
Element employee = (Element) nodeList.item(i);
String id = employee.getAttribute("id");
if ("1".equals(id)) {
Element position = (Element) employee.getElementsByTagName("position").item(0);
position.setTextContent("Consultant");
}
}
//Traverse the nodes to normalize spaces in text nodes
Node rootNode = document.getDocumentElement();
normalizeSpace(rootNode);
//Write changes back to the XML file
TransformerFactory transformerFactory = TransformerFactory.newInstance();
Transformer transformer = transformerFactory.newTransformer();
transformer.setOutputProperty(OutputKeys.INDENT, "yes");
transformer.setOutputProperty("{http://xml.apache.org/xslt}indent-amount", "2");
//Writing updated content into the file
DOMSource domSource = new DOMSource(document);
StreamResult fileResult = new StreamResult(new File("src/test/resources/Payloads/UpdatedXML.xml"));
transformer.transform(domSource, fileResult);
// Print updated XML to console
StreamResult consoleResult = new StreamResult(System.out);
transformer.transform(domSource, consoleResult);
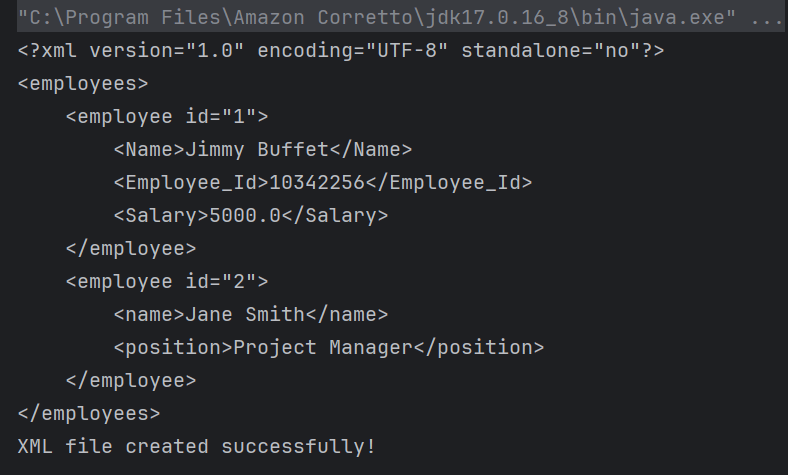
System.out.println("\n XML file updated successfully!");
} catch (ParserConfigurationException | TransformerException | IOException e) {
e.printStackTrace();
} catch (SAXException e) {
throw new RuntimeException(e);
}
}
private static void normalizeSpace(Node node) {
if (node.getNodeType() == Node.TEXT_NODE) {
String trimmedText = node.getTextContent().trim().replaceAll("\\s+", " ");
node.setTextContent(trimmedText);
}
NodeList children = node.getChildNodes();
for (int i = 0; i < children.getLength(); i++) {
normalizeSpace(children.item(i));
}
}
}
Explanation
Here’s a detailed breakdown of the code:
1. Creating a DocumentBuilder Object
It has ‘newDocumentBuilder()’ method that creates an instance of the class ‘DocumentBuilder’. This DocumentBuilder class is used to get input in the form of streams, files, URLs and SAX InputSources.
DocumentBuilderFactory factory = DocumentBuilderFactory.newInstance();
DocumentBuilder builder = factory.newDocumentBuilder();
2. Parsing the XML File
The code parses “SimpleXML.xml” from the specified path and normalizes the XML structure (i.e., adjusts the whitespace within the document).
Document document = builder.parse(new File("src/test/resources/Payloads/SimpleXML.xml"));
3. Normalize XML Structure
The method normalize() is invoked on the document’s root element. It cleans up the XML by merging adjacent text nodes. It also removes empty ones.
document.getDocumentElement().normalize();
4. Update XML Content
A NodeList of “employee” elements is retrieved, and each element is iterated over. The code checks each “employee” element’s “id” attribute. If an employee with id=”1″ is found, its “position” element’s text content is updated to “Consultant”.
  NodeList nodeList = document.getElementsByTagName("employee");

            for (int i = 0; i < nodeList.getLength(); i++) {
                Element employee = (Element) nodeList.item(i);
                String id = employee.getAttribute("id");

                if ("1".equals(id)) {
                    Element position = (Element) employee.getElementsByTagName("position").item(0);
                    position.setTextContent("Consultant");
                }
            }
5. Normalize Spaces in Text Nodes
The normalizeSpace method is defined to recursively traverse nodes, trimming and normalizing spaces in text nodes to ensure consistent formatting. This is called with the root node as an argument.
private static void normalizeSpace(Node node) {
        if (node.getNodeType() == Node.TEXT_NODE) {
            String trimmedText = node.getTextContent().trim().replaceAll("\\s+", " ");
            node.setTextContent(trimmedText);
        }
        NodeList children = node.getChildNodes();
        for (int i = 0; i < children.getLength(); i++) {
            normalizeSpace(children.item(i));
        }
    }
6. Write Changes Back to XML File
After building the elements inside the document with their corresponding attributes, we must write this content into an XML file. We do this by creating a Transformer object, which transforms our source document into StreamResult. It then stores the result in the specified file path with the given name.
TransformerFactory transformerFactory = TransformerFactory.newInstance();
Transformer transformer = transformerFactory.newTransformer();

transformer.setOutputProperty(OutputKeys.INDENT, "yes"); // Pretty print the XML
transformer.setOutputProperty("{http://xml.apache.org/xslt}indent-amount", "4");

DOMSource domSource = new DOMSource(document);

 // Write XML to file
 StreamResult fileResult = new StreamResult(new File("src/test/resources/Payloads/UpdatedXML.xml"));
transformer.transform(domSource, fileResult);
7. Printing the output on the console
We can test our XML file by printing it on the console. This is an optional step.
StreamResult consoleResult = new StreamResult(System.out);
transformer.transform(domSource, consoleResult);
8. Exception Handling
The code handles exceptions that arise from parser configuration, transformation, I/O operations, or SAX parsing.
try {
 } catch (ParserConfigurationException | TransformerException | IOException e) {
            e.printStackTrace();
        } catch (SAXException e) {
            throw new RuntimeException(e);
        }
    }
Creating and Appending New Elements:
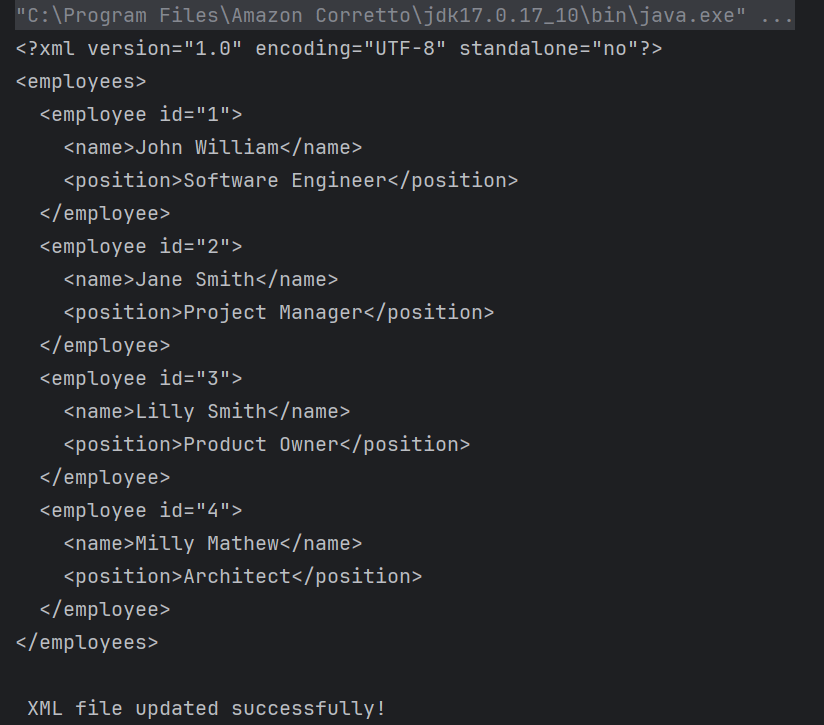
It reads an existing XML file. It adds a new “employee” element with nested elements (“name” and “position”). It normalizes spaces within text nodes. Then, it writes the updated content back to an XML file.
package XML.DOM;

import org.w3c.dom.Document;
import org.w3c.dom.Element;
import org.w3c.dom.Node;
import org.w3c.dom.NodeList;
import org.xml.sax.SAXException;

import javax.xml.parsers.DocumentBuilder;
import javax.xml.parsers.DocumentBuilderFactory;
import javax.xml.parsers.ParserConfigurationException;
import javax.xml.transform.OutputKeys;
import javax.xml.transform.Transformer;
import javax.xml.transform.TransformerException;
import javax.xml.transform.TransformerFactory;
import javax.xml.transform.dom.DOMSource;
import javax.xml.transform.stream.StreamResult;
import java.io.File;
import java.io.IOException;

import static org.apache.commons.lang3.StringUtils.normalizeSpace;

public class DOM_ModifyXMLAddElementsDemo {

    public static void main(String[] args) {

        try {

            //Create a DocumentBuilderFactory and DocumentBuilder
            DocumentBuilderFactory factory = DocumentBuilderFactory.newInstance();
            DocumentBuilder builder = factory.newDocumentBuilder();

            // Parse the XML file into a Document
            Document document = builder.parse(new File("src/test/resources/Payloads/SimpleXML.xml"));

            // Normalize XML structure
            document.getDocumentElement().normalize();

            //Locate the root element
            Element rootElement = document.getDocumentElement();

            // Create a new employee element
            Element employee = document.createElement("employee");
            employee.setAttribute("id", "4");

            // Create name element
            Element name = document.createElement("name");
            name.appendChild(document.createTextNode("Milly Mathew"));
            employee.appendChild(name);

            // Create position element
            Element position = document.createElement("position");
            position.appendChild(document.createTextNode("Architect"));
            employee.appendChild(position);

            //Append the new employee node to the root element
            rootElement.appendChild(employee);

            //Traverse the nodes to normalize spaces in text nodes
            Node rootNode = document.getDocumentElement();
            normalizeSpace(rootNode);

            //Write changes back to the XML file
            TransformerFactory transformerFactory = TransformerFactory.newInstance();
            Transformer transformer = transformerFactory.newTransformer();
            transformer.setOutputProperty(OutputKeys.INDENT, "yes");
            transformer.setOutputProperty("{http://xml.apache.org/xslt}indent-amount", "2");

            //Writing updated content into the file
            DOMSource domSource = new DOMSource(document);

            StreamResult fileResult = new StreamResult(new File("src/test/resources/Payloads/UpdatedXML1.xml"));
            transformer.transform(domSource, fileResult);

            // Print updated XML to console
            StreamResult consoleResult = new StreamResult(System.out);
            transformer.transform(domSource, consoleResult);

            System.out.println("\n XML file updated successfully!");

        } catch (ParserConfigurationException | TransformerException | IOException e) {
            e.printStackTrace();
        } catch (SAXException e) {
            throw new RuntimeException(e);
        }
    }

    private static void normalizeSpace(Node node) {
        if (node.getNodeType() == Node.TEXT_NODE) {
            String trimmedText = node.getTextContent().trim().replaceAll("\\s+", " ");
            node.setTextContent(trimmedText);
        }
        NodeList children = node.getChildNodes();
        for (int i = 0; i < children.getLength(); i++) {
            normalizeSpace(children.item(i));
        }
    }

}
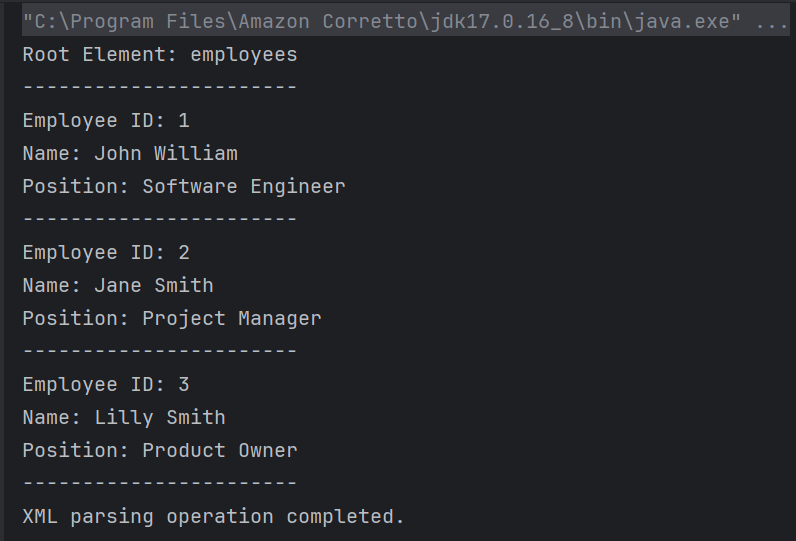
The output of the above program is
Explanation
Step 1, 2 and 3 are same as the above program.
4. Locating the Root Element
It retrieves the root element of the XML document using getDocumentElement().
Element rootElement = document.getDocumentElement();
5. Creating and Appending New Elements
A new “employee” element with an attribute “id” is created. Nested elements “name” and “position” are created with relevant text nodes “Milly Mathew” and “Architect”. These elements are appended to the “employee” element, which is then appended to the root element of the XML document.
 // Create a new employee element
 Element employee = document.createElement("employee");
employee.setAttribute("id", "4");

// Create name element
Element name = document.createElement("name");
name.appendChild(document.createTextNode("Milly Mathew"));
employee.appendChild(name);

// Create position element
Element position = document.createElement("position");
position.appendChild(document.createTextNode("Architect"));
employee.appendChild(position);

//Append the new employee node to the root element
rootElement.appendChild(employee);
Step 6, 7 and 8 are same as the above program.
Limitations of JAVA DOM
- DOM loads the entire XML file into memory as a tree structure. For very large XML files, this can consume a significant amount of memory. It may lead to potential memory exhaustion. This affects system performance.
- Parsing large XML files with DOM can be slower compared to other parsers, such as SAX. This is because the entire document must be read and loaded into memory before any processing can begin.
We are done! Congratulations on making it through this tutorial and hope you found it useful! Happy Learning!!