The traditional way to use any browser in Selenium tests is to download browser binaries, and we need to set the path of these files in our script like below or its location should be added to the classpath.
System.setProperty("webdriver.chrome.driver", "/absolute/path/to/binary/chromedriver");
The process of manually downloading and managing these drivers for each of the operating systems is very painful. We also have to check when new versions of the binaries are released / new browser versions are released. We should check the compatibility for all the executables and add them.
Note: – Selenium 4.6 and above has inbuilt tool to handle drivers. If you are using Selenium version less than 4.6, then you can use WebDriverManager.
How to download all the driver executables automatically?
The automatic download of the drivers can be done by WebDriverManager. WebDriverManager is a library that allows controlling web browsers programmatically. It provides a cross-browser API that can be used to drive web browsers (e.g., Chrome, Edge, or Firefox, among others) using different programming languages (e.g., Java, JavaScript, Python, C#, or Ruby). The primary use of Selenium WebDriver is implementing automated tests for web applications.
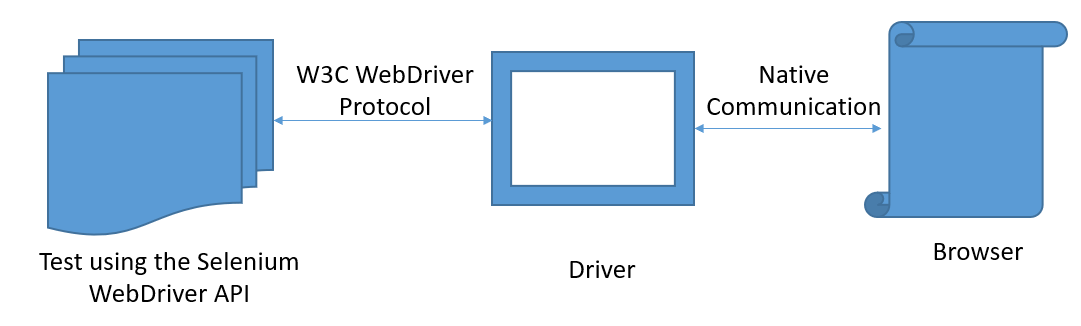
The communication between the WebDriver API and the driver binary is done using a standard protocol called W3C WebDriver (formerly the so-called JSON Wire Protocol). Then, the communication between the driver and the browser is done using the native capabilities of each browser.
How To add WebDriverManager to a Selenium project manually?
Download the latest version of WebDriverManager from here.

It will download a zip file. Now extract the jar/zip file. It will show various .jar under the folder, as shown below:

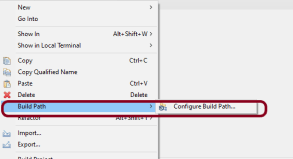
Once we extract the zip file, we have to reference these jar files in our project. For this, navigate to project properties and click Build Path-> Configure Build Path in Eclipse
Click “Add External Jars” as per the steps highlighted below to include all the WebDriverManager jars extracted.
After clicking on the “Add External JARs“, all the selected extracted JARs are added to the project.
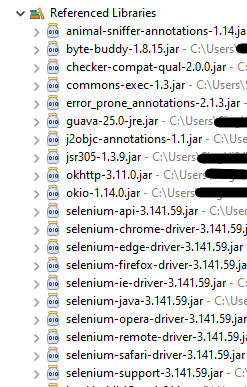
When this finishes, the project references show these referenced jars in the project explorer as highlighted below, and they are ready to be consumed in the Selenium test scripts.
Chrome
The below code snippet shows a quick usage of WebDriverManager with Chrome:
import org.openqa.selenium.WebDriver;
import org.openqa.selenium.chrome.ChromeDriver;
import org.openqa.selenium.chrome.ChromeOptions;
import io.github.bonigarcia.wdm.WebDriverManager;
public class Demo {
public static void main(String[] args) {
WebDriverManager.chromedriver().setup();
// Create an object of Chrome Options class
ChromeOptions chromeOptions = new ChromeOptions();
// Create an object of WebDriver class and pass the Chrome Options object as
// an argument
WebDriver driver = new ChromeDriver(chromeOptions);
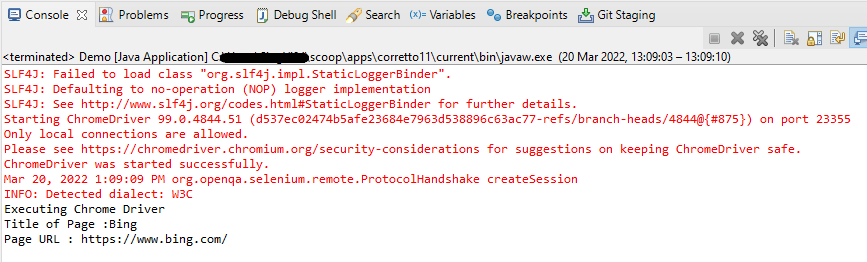
System.out.println("Executing Chrome Driver");
driver.get("https://www.bing.com/");
System.out.println("Title of Page :" + driver.getTitle());
System.out.println("Page URL : " + driver.getCurrentUrl());
// Close the driver
driver.close();
}
}
The output of the above program is
FireFox Driver
The below code snippet shows a quick usage of WebDriverManager with FireFox:
import org.openqa.selenium.WebDriver;
import org.openqa.selenium.firefox.FirefoxDriver;
import org.openqa.selenium.firefox.FirefoxOptions;
import io.github.bonigarcia.wdm.WebDriverManager;
public class FireFoxDemo {
public static void main(String[] args) {
WebDriverManager.firefoxdriver().setup();
// Create an object of Firefox Options class
FirefoxOptions firefoxOptions = new FirefoxOptions();
// Create an object of WebDriver class and pass the Firefox Options object
// as an argument
WebDriver driver = new FirefoxDriver(firefoxOptions);
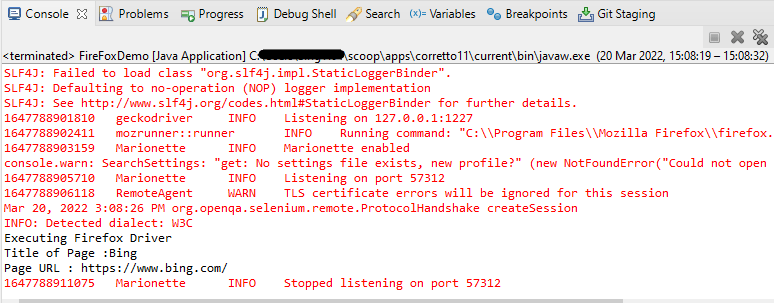
System.out.println("Executing Firefox Driver");
driver.get("https://www.bing.com/");
System.out.println("Title of Page :" + driver.getTitle());
System.out.println("Page URL : " + driver.getCurrentUrl());
// Close the driver
driver.close();
}
}
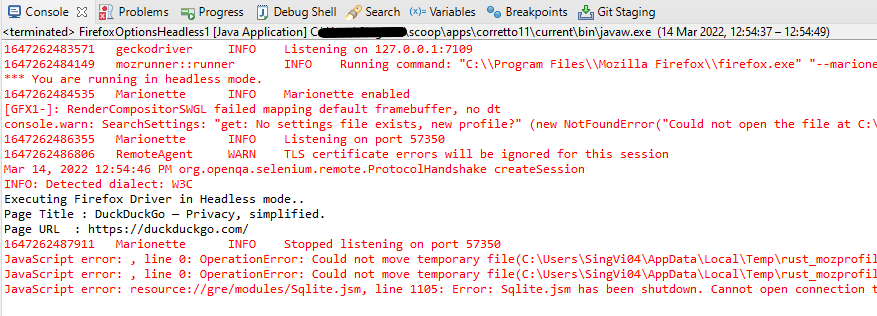
The output of the above program is
Microsoft Edge
The below code snippet shows a quick usage of WebDriverManager with Microsoft Edge:
import org.openqa.selenium.WebDriver;
import org.openqa.selenium.edge.EdgeDriver;
import org.openqa.selenium.edge.EdgeOptions;
import io.github.bonigarcia.wdm.WebDriverManager;

public class EdgeDemo {

	public static void main(String[] args) {

		WebDriverManager.edgedriver().setup();

		// Create an object of Edge Options class
		EdgeOptions edgeOptions = new EdgeOptions();

		// Create an object of WebDriver class and pass the Edge Options object
		// as an argument
		WebDriver driver = new EdgeDriver(edgeOptions);

		System.out.println("Executing Microsoft Edge Driver");

		driver.get("https://www.bing.com/");
		System.out.println("Title of Page :" + driver.getTitle());
		System.out.println("Page URL : " + driver.getCurrentUrl());

		// Close the driver
		driver.close();

	}
}
The output of the above program is

The basic use of these managers is the following:
WebDriverManager.chromedriver().setup();
WebDriverManager.firefoxdriver().setup();
WebDriverManager.edgedriver().setup();
WebDriverManager.operadriver().setup();
WebDriverManager.chromiumdriver().setup()
WebDriverManager.iedriver().setup();
How To add WebDriverManager to a Selenium project using Maven or Gradle?
To use WebDriverManager in a Maven built project, the below-mentioned dependency is needed to add to the pom.xml.
<!-- https://mvnrepository.com/artifact/io.github.bonigarcia/webdrivermanager -->
<dependency>
    <groupId>io.github.bonigarcia</groupId>
    <artifactId>webdrivermanager</artifactId>
    <version>5.1.0</version>
</dependency>
For Gradle project, add the below to the build.gradle.
dependencies {
    testCompile("io.github.bonigarcia:webdrivermanager:5.1.0")
}
How to instantiate a specific browser version using WebDriverManager?
WebDriverManager provides the ability to download a specific version of the browser. For example, the latest chromedriver version is 100.0.4896.20 (released on 2022-03-04). But if we want an earlier version, say, Chromedriver version 98.0.4758.102, we have to add the following code.
import org.openqa.selenium.WebDriver;
import org.openqa.selenium.chrome.ChromeDriver;
import org.openqa.selenium.chrome.ChromeOptions;
import io.github.bonigarcia.wdm.WebDriverManager;

public class Demo {

	public static void main(String[] args) {

		WebDriverManager.chromedriver().driverVersion("98.0.4758.102").setup();

		// Create an object of Chrome Options class
		ChromeOptions chromeOptions = new ChromeOptions();

		// Create an object of WebDriver class and pass the Chrome Options object as
		// an argument
		WebDriver driver = new ChromeDriver(chromeOptions);

		System.out.println("Executing Chrome Driver");

		driver.get("https://www.bing.com/");
		System.out.println("Title of Page :" + driver.getTitle());
		System.out.println("Page URL : " + driver.getCurrentUrl());

		// Close the driver
		driver.close();

	}
}
The output of the above program is
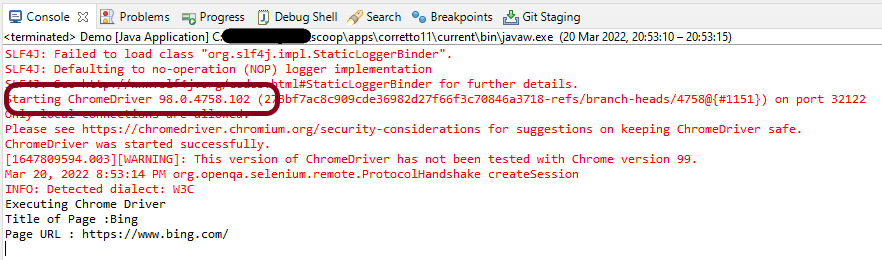
As we can see from the above screenshot, as a result of executing the above program, the Chromedriver started successfully. We can see the details of starting the chrome driver instance in the first line of output. Here we have set the Chrome version to “98.0.4758.102″.
Congratulations!! We have learned to download drivers automatically.