This tutorial will discuss Hard Assert and Soft Assert in TestNG. Before starting with Hard and Soft Assert, go through What is Assert in TestNG.
Table of Contents
What is Assertion?
Assertions in TestNG are a way to verify that the expected result and the actual result match not in the test case. A test is considered successful ONLY if it is completed without throwing any exceptions. An example of assertion can be logging into the website, checking the title of the webpage, verifying the functionality of an input box that takes only integers, etc.
If the project is a Maven project, then please add the latest TestNG dependency in the pom.xml.
 <dependency>
            <groupId>org.testng</groupId>
            <artifactId>testng</artifactId>
            <version>7.10.2</version>
            <scope>test</scope>
 </dependency>
What is Hard Assert?
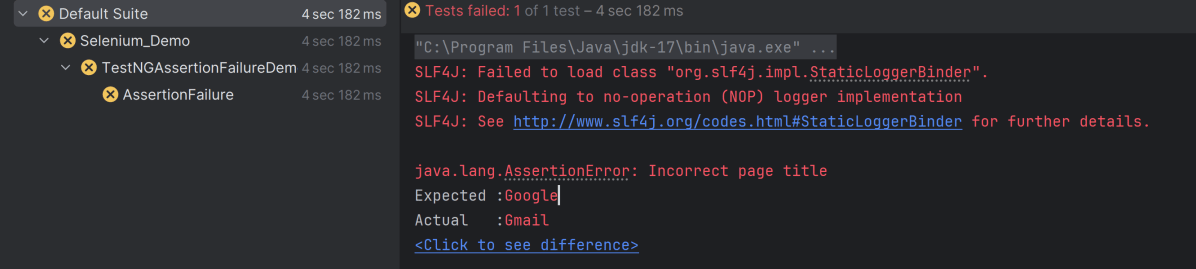
Hard Assertion throws AssertionError immediately when an Assert Condition fails and moves to the next @Test method
Suppose, there are 2 assertions in a Test and the first assertion fails, then HardAssertion does not execute the second Assertion Condition and declares the test as failed
As you can see in the below example, there are 2 assert conditions under Test – AssertionFailure(). As the first Assert Condition fails, it moved directly to the second test without executing another Assert Condition.
package org.example;

import org.openqa.selenium.By;
import org.openqa.selenium.WebDriver;
import org.openqa.selenium.firefox.FirefoxDriver;
import org.openqa.selenium.firefox.FirefoxOptions;
import org.testng.Assert;
import org.testng.annotations.Test;

public class HardAssertionDemo {

    @Test
    public void AssertionFailure() {

        FirefoxOptions firefoxOptions = new FirefoxOptions();
        WebDriver driver = new FirefoxDriver(firefoxOptions);

        driver.get("https://duckduckgo.com/");
        String expectedTitle = "DuckDuckGo";

        String actualTitle = driver.getTitle();
        String actualText1 = driver.findElement(By.xpath("//*[@class='homepage-cta-section_title__Lovig heading_heading2__oEFPn heading_heading__IiMSV']")).getText();

        /* Hard Assert */
        System.out.println("Verify Title :" + actualTitle);
        Assert.assertEquals(actualTitle, expectedTitle, "Incorrect page title");

        System.out.println("Verify Text :" + actualText1);
        Assert.assertEquals(actualText1, "Privacy Protection For Any Device");

        driver.quit();
    }

    @Test
    public void print() {
        System.out.println("Hard Assertion is displayed");
    }
}
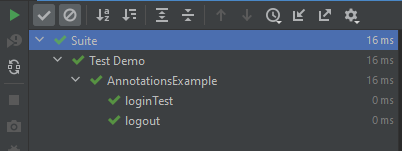
The output of the above program is

What is Soft Assert?
To overcome the above-mentioned problem, there is another type of assertion called Soft Assert.
Soft Assert does not throw an exception when an Assert Condition fails, and continues with the next step after the Assert Condition.
Soft assert does not include by default in TestNG. For this, you need to include the below package :
org.testng.asserts.SoftAssert;
The first step is to create an instance of SoftAssert class.
SoftAssert softAssertion = new SoftAssert();
After this, we can use this softAssert variable instead of hard assert.
softAssertion.assertEquals(expectedTitle, actualTitle, "Incorrect page title");
Create an object of SoftAssertion to run Assert Conditions
Below is an example of a Soft Assert.
package org.example;

import org.openqa.selenium.By;
import org.openqa.selenium.WebDriver;
import org.openqa.selenium.firefox.FirefoxDriver;
import org.openqa.selenium.firefox.FirefoxOptions;
import org.testng.annotations.Test;
import org.testng.asserts.SoftAssert;

public class SoftAssertionDemo {

    @Test
    public void assertionFailure() {

        SoftAssert softAssertion = new SoftAssert();
        FirefoxOptions firefoxOptions = new FirefoxOptions();
        WebDriver driver = new FirefoxDriver(firefoxOptions);

        driver.manage().window().maximize();
        driver.get("https://duckduckgo.com/");

        String expectedTitle = "DuckDuckGo";

        String actualTitle = driver.getTitle();
        String actualText1 = driver.findElement(By.xpath("//*[@class='homepage-cta-section_title__Lovig heading_heading2__oEFPn heading_heading__IiMSV']")).getText();

        /* Soft Assert */
        System.out.println("Verify Title :" + actualTitle);
        softAssertion.assertEquals(actualTitle, expectedTitle, "Incorrect page title");

        System.out.println("Verify Text :" + actualText1);
        softAssertion.assertEquals(actualText1, "Privacy Protection For Any Device");

        driver.quit();
    }

    @Test
    public void print() {
        System.out.println("Soft Assertion is displayed");
    }

}
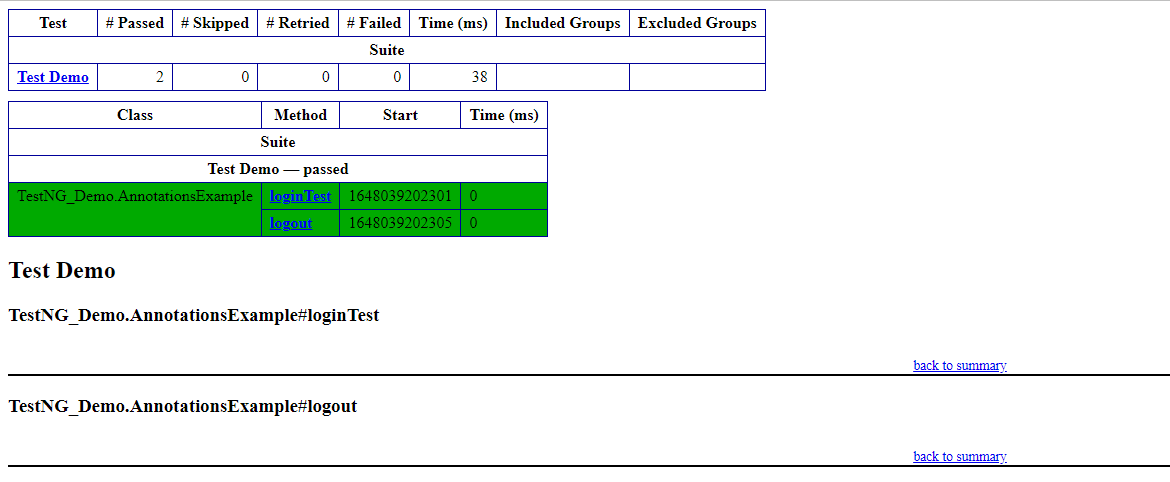
The output of the above program is

AssertAll
If there is any exception, and you want to throw it, then you need to use assertAll() method as a last statement in the @Test and test suite again to continue with the next @Test as it is.
package org.example;

import org.openqa.selenium.By;
import org.openqa.selenium.WebDriver;
import org.openqa.selenium.firefox.FirefoxDriver;
import org.openqa.selenium.firefox.FirefoxOptions;
import org.testng.annotations.Test;
import org.testng.asserts.SoftAssert;

public class AssertAllDemo {


    @Test
    public void assertionFailure() {

        SoftAssert softAssertion = new SoftAssert();

        FirefoxOptions firefoxOptions = new FirefoxOptions();
        WebDriver driver = new FirefoxDriver(firefoxOptions);

        driver.manage().window().maximize();
        driver.get("https://duckduckgo.com/");

        String expectedTitle = "DuckDuckGo";

        String actualTitle = driver.getTitle();
        String actualText1 = driver.findElement(By.xpath("//*[@class='homepage-cta-section_title__Lovig heading_heading2__oEFPn heading_heading__IiMSV']")).getText();


        /* AssertAll */
        System.out.println("Verify Title :" + actualTitle);
        softAssertion.assertEquals(actualTitle, expectedTitle, "Incorrect page title");

        System.out.println("Verify Text :" + actualText1);
        softAssertion.assertEquals(actualText1, "Privacy Protection For Any Device");

        softAssertion.assertAll();

        driver.quit();
    }

    @Test
    public void print() {
        System.out.println("Soft Assertion is displayed");
    }

}
The output of the above program is

In the above program, we can see that both assertions of Test – assertionFailure are executed, but as the first assertion has failed, the test – assertionFailure is marked as failed.
Congratulations on making it through this tutorial and hope you found it useful! Happy Learning!! Cheers!!


