In this tutorial, I will explain the creation of JSON Object Payload with the help of POJO (Plain Old Java Object).
What is POJO?
POJO stands for Plain Old Java Object. It is a very simple object, and it has no bounds or we can say that it has no restrictions other than the Java language specification. Also, it does not require any classpath.
A big advantage of POJO is it increases the readability and reusability of our project code and developers find it easy when understanding the code. Also, POJO is easy to write and anyone can understand them easily.
Now let’s deep dive into some technical terms about the POJO. Below are a few points about the POJO are:
A POJO should not have to extend prespecified classes.
Secondly, a POJO should not have implemented any prespecified interface.
Lastly, POJO should not contain prespecified annotations
A POJO class can follow some rules for better usability. These rules are:-
Each variable should be declared as private just to restrict direct access.
Each variable that needs to be accessed outside class may have a getter, a setter, or both methods. If the value of a field is stored after some calculations, then we must not have any setter method for that.
It Should have a default public constructor.
Can override toString(), hashcode, and equals() methods.
POJO classes are extensively used for creating JSON and XML payloads for API.
In the below example, let me create a simple JSON with some nodes which is actually a 1:1 mapping i.e. each key has a single value, and the type of values is mixed.
Let us create variables in the POJO class now for the above JSON. Now, a class name Employee will be created with the private data members as mentioned in the above JSON. Since we have created all variables as private, then there should be a way to manipulate or retrieve these data. So we create the corresponding getter and setter methods for these data members.
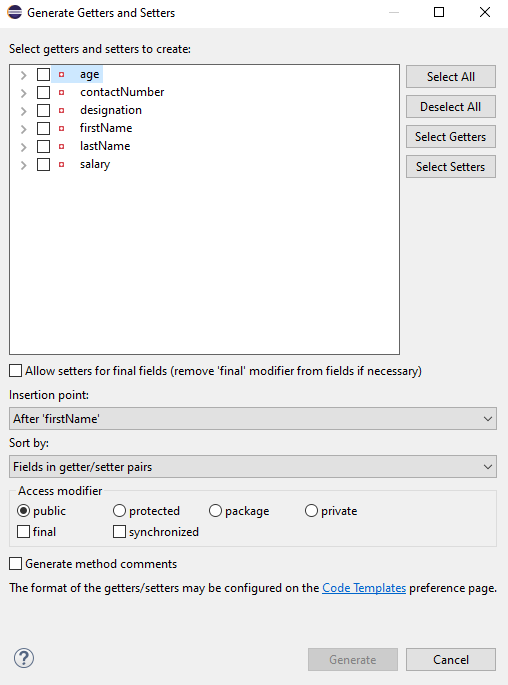
It is very tedious to create getter and setter methods for all the data members for big JSON strings. Every IDE gives you a shortcut to generate getter and setter methods. Here, I am using Eclipse and creating these getter and setter methods.
Select all the data members and Right-clickon the page. Then select Source and then select Generate Getter and Setter methods.
This opens a new screen as shown below.
You can select the data member for which you want to create the getter and setter method. I want to create the getter and setter methods for all the data members, so click on Select All and then click on the Generate Button. This will generate the getter and setter methods for all the data members.
Below is the sample code of the Employee table, which contains the data members needed for Employee JSON and their corresponding getter and setter methods.
public class Employee {

	// private variables or data members of POJO class
	private String firstName;
	private String lastName;
	private int age;
	private double salary;
	private String designation;
	private String contactNumber;
	private String emailId;

	// Getter and setter methods
	public String getFirstName() {
		return firstName;
	}

	public void setFirstName(String firstName) {
		this.firstName = firstName;
	}

	public String getLastName() {
		return lastName;
	}

	public void setLastName(String lastName) {
		this.lastName = lastName;
	}

	public int getAge() {
		return age;
	}

	public void setAge(int age) {
		this.age = age;
	}

	public double getSalary() {
		return salary;
	}

	public void setSalary(double salary) {
		this.salary = salary;
	}

	public String getDesignation() {
		return designation;
	}

	public void setDesignation(String designation) {
		this.designation = designation;
	}

	public String getContactNumber() {
		return contactNumber;
	}

	public void setContactNumber(String contactNumber) {
		this.contactNumber = contactNumber;
	}

	public String getEmailId() {
		return emailId;
	}

	public void setEmailId(String emailId) {
		this.emailId = emailId;
	}

}
Using the above POJO class, you can create any number of custom Employee objects and each object can be converted into a JSON Object and Each JSON object can be parsed into Employee POJO.
We will create a JSON object from POJO and vice versa now, which is generally called serialization and deserialization using Jackson APIs.
Serialization – Serialization is a process where you convert an Instance of a Class (Object of a class) into a Byte Stream. Here, we are converting Employee class object to JSON representation or Object
Deserialization – It is the reverse of serializing. In this process, we will read the Serialized byte stream from the file and convert it back into the Class instance representation. Here, we are converting a JSON Object to an Employee class object.
We are using Jackson API for Serialization and Deserialization. So, add the Jackson dependency to the project.
ObjectMapper provides functionality for reading and writing JSON, either to and from basic POJOs (Plain Old Java Objects), or to and from a general-purpose JSON Tree Model (JsonNode), as well as related functionality for performing conversions. It is also highly customizable to work both with different styles of JSON content and to support more advanced object concepts such as polymorphism and object identity.
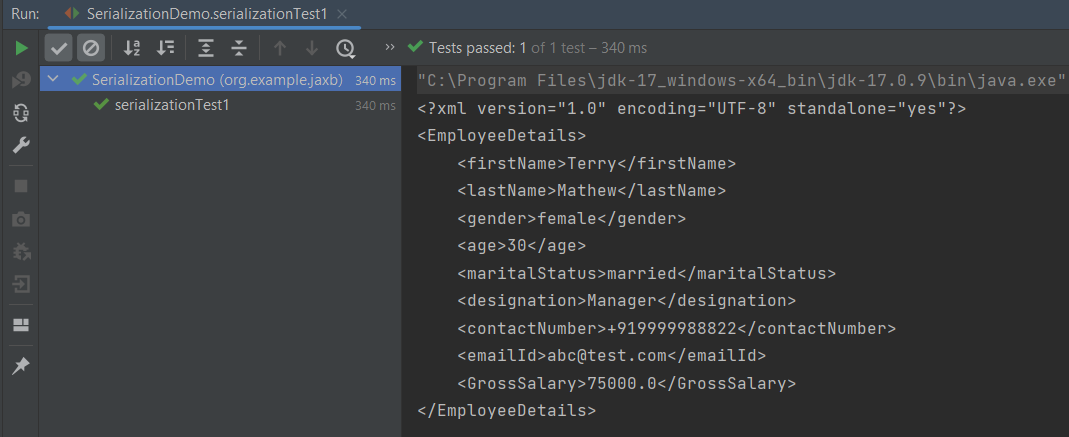
Now, let us create a Test Class to show Serialization.
public class EmployeeTest {

	@Test
	public void serializationTest()  {

		Employee employee = new Employee();
		employee.setFirstName("Vibha");
		employee.setLastName("Singh");
		employee.setAge(30);
		employee.setSalary(75000);
		employee.setDesignation("Manager");

		// Converting a Java class object to a JSON payload as string
		ObjectMapper mapper = new ObjectMapper();
		String employeeJson = mapper.writeValueAsString(employee);
		String employeePrettyJson = mapper.writerWithDefaultPrettyPrinter().writeValueAsString(employee);
		System.out.println(employeeJson);
		System.out.println(employeePrettyJson);
   }
}try {
			String employeeJson = mapper.writeValueAsString(employee);
			System.out.println(employeeJson);
			String employeePrettyJson = mapper.writerWithDefaultPrettyPrinter().writeValueAsString(employee);
			System.out.println(employeePrettyJson);
		} catch (JsonProcessingException e) {
			e.printStackTrace();
		}
	}
The output of the above program is
Here, ObjectMapper from fasterxml.jackson.databind is used for Serialization.
writeValueAsString() is a method that can be used to serialize any Java value as a String.
writerWithDefaultPrettyPrinter() is used to pretty-print the JSON output. It is a Factory method for constructing ObjectWriter that will serialize objects using the default pretty printer for indentation.
I hope this has helped to clear your doubts regarding POJO and how to create JSON objects using POJO.
We are done! Congratulations on making it through this tutorial and hope you found it useful! Happy Learning!!
When you are doing API testing, sometimes the APIs or endpoints are protected. This means you need to be authenticated and authorized to perform certain actions. REST assured supports several authentication schemes, for example, OAuth, digest, certificate, form, and pre-emptive basic authentication.
In this post, we’ll look at how to pass the authorization token in the header in REST Assured.
What is an authorization token?
An authorization token, often referred to as an access token, is a piece of data or credential that is used to authenticate and authorize access to protected resources or operations in a system.
Add the below-mentioned dependencies to the Maven project.
This tutorial explains how to use JAXB (Java Architecture for XML Binding) to convert Java Objects to XML documents.
JAXB provides a fast and convenient way to marshal (write) Java Objects into XML and un-marshal (read) XML into Java Objects. It supports a binding framework that maps XML elements and attributes to Java fields and properties using Java annotations.
With Java releases lower than Java 11, JAXB was part of the JVM and you could use it directly without defining additional libraries.
As of Java 11, JAXB is not part of the JRE anymore, and you need to configure the relevant libraries via your dependency management system, for example, either Maven or Gradle.
Configure the Java compiler level to be at least 11 and add the JAXB dependencies to your pom file.
When we run the code above, we may check the console output to verify that we have successfully converted Java object to XML:
By default, the Marshaller uses UTF-8 encoding when generating XML data.
The javax.xml.bind.JAXBContext class provides a client’s entry point to JAXB API. By default, JAXB does not format the XML document. This saves space and prevents that any white-space may accidentally be interpreted as significant.
To have JAXB format the output, we simply set the Marshaller.JAXB_FORMATTED_OUTPUT property to true on the Marshaller. The marshal method uses an object and an output file where to store the generated XML as parameters.
You can see that we have used JAXB Annotations like @XMLRootElement are changed from Employee to EmployeeDetails.
@XMLElement has set the element name to GrossSalary from Salary.
The below example is the short way of writing the same test and saving XML. We need to add a constructor in the POJO class so that we can set the values to the variables through the Constructor.
import jakarta.xml.bind.annotation.*;

@XmlRootElement(name = "EmployeeDetails")
@XmlAccessorType(XmlAccessType.FIELD)

//Define the order in which the fields are written in XML
@XmlType(propOrder = { "firstName", "lastName", "gender", "age", "maritalStatus", "designation", "contactNumber",
        "emailId", "salary" })

public class Employee {

    private String firstName;
    private String lastName;
    private int age;

    @XmlElement(name = "GrossSalary")
    private double salary;
    private String designation;
    private String contactNumber;
    private String emailId;
    private String gender;
    private String maritalStatus;

    public Employee() {
        super();

    }

    public Employee(String firstName, String lastName, int age, double salary, String designation, String contactNumber,
                    String emailId, String gender, String maritalStatus) {

        this.firstName = firstName;
        this.lastName = lastName;
        this.age = age;


        this.salary = salary;

        this.designation = designation;
        this.contactNumber = contactNumber;
        this.emailId = emailId;
        this.gender = gender;
        this.maritalStatus = maritalStatus;
    }

    // Getter and setter methods
    public String getFirstName() {
        return firstName;
    }

    public void setFirstName(String firstName) {
        this.firstName = firstName;
    }

    public String getLastName() {
        return lastName;
    }

    public void setLastName(String lastName) {
        this.lastName = lastName;
    }

    public int getAge() {
        return age;
    }

    public void setAge(int age) {
        this.age = age;
    }

    public double getSalary() {
        return salary;
    }

    public void setSalary(double salary) {
        this.salary = salary;
    }

    public String getDesignation() {
        return designation;
    }

    public void setDesignation(String designation) {
        this.designation = designation;
    }

    public String getContactNumber() {
        return contactNumber;
    }

    public void setContactNumber(String contactNumber) {
        this.contactNumber = contactNumber;
    }

    public String getEmailId() {
        return emailId;
    }

    public void setEmailId(String emailId) {
        this.emailId = emailId;
    }

    public String getGender() {
        return gender;
    }

    public void setGender(String gender) {
        this.gender = gender;
    }

    public String getMaritalStatus() {
        return maritalStatus;
    }

    public void setMaritalStatus(String maritalStatus) {
        this.maritalStatus = maritalStatus;
    }

    @Override
    public String toString() {
        return "Employee [FirstName=" + firstName + ", LastName=" + lastName + ", Age=" + age + ", Salary=" + salary
                + ", Designation=" + designation + ", ContactNumber=" + contactNumber + ", EmailId=" + emailId
                + ", Gender=" + gender + ", MaritalStatus=" + maritalStatus + "]";
    }
}
The below JAXB example for XML marshalling convert Java objects into an XML.
import jakarta.xml.bind.JAXBContext;
import jakarta.xml.bind.JAXBException;
import jakarta.xml.bind.Marshaller;
import jakarta.xml.bind.PropertyException;
import org.junit.Test;
import java.io.File;
import java.io.StringWriter;
public class SerializationDemo {
@Test
public void serializationTest2() {
try {
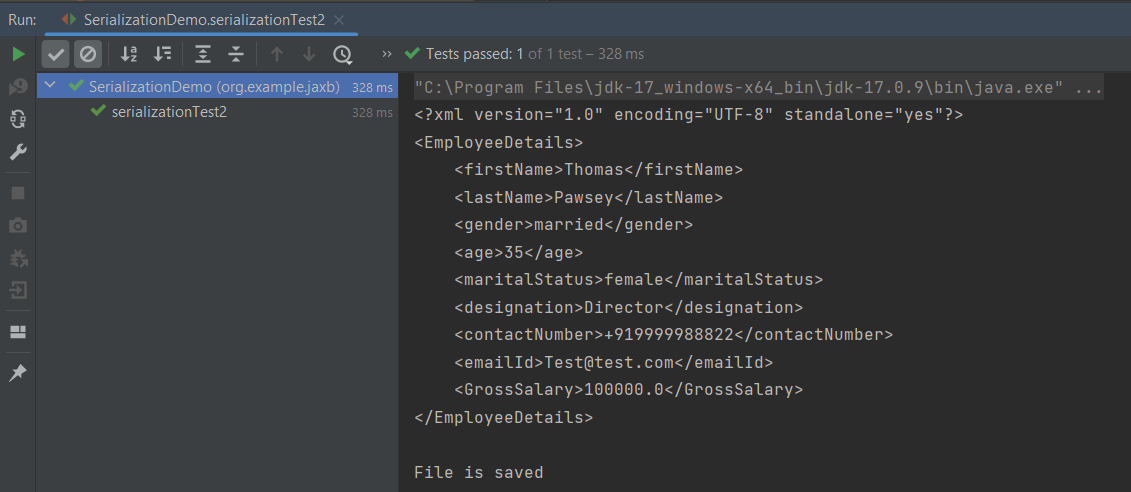
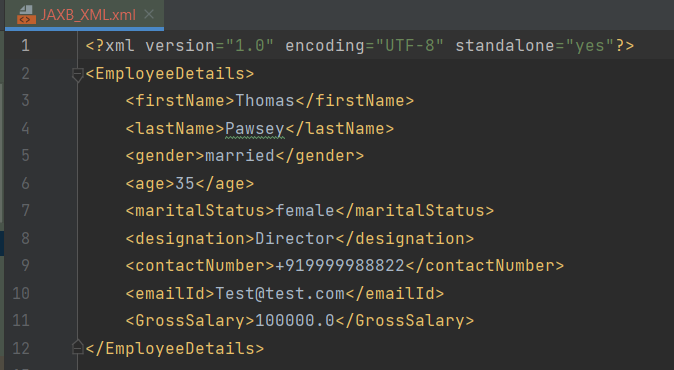
Employee employee = new Employee("Thomas", "Pawsey", 35, 100000, "Director", "+919999988822","Test@test.com", "married", "female");
// Create JAXB Context
JAXBContext context = JAXBContext.newInstance(Employee.class);
// Create Marshaller
Marshaller jaxbMarshaller = context.createMarshaller();
// Required formatting
jaxbMarshaller.setProperty(Marshaller.JAXB_FORMATTED_OUTPUT, Boolean.TRUE);
// Write XML to StringWriter
StringWriter writer = new StringWriter();
jaxbMarshaller.marshal(employee, writer);
// Convert XML to String
String xmlContent = writer.toString();
System.out.println(xmlContent);
// Save the file
String userDir = System.getProperty("user.dir");
jaxbMarshaller.marshal(employee, new File(userDir + "\\src\\test\\resources\\JAXB_XML.xml"));
System.out.println("File is saved");
} catch (PropertyException e) {
e.printStackTrace();
} catch (JAXBException e) {
e.printStackTrace();
}
}
}
When we run the code above, we may check the console output to verify that we have successfully converted Java object to XML:
The XML is saved under src/test/resources. To see this file, after the execution of the test, you need to refresh the project.
Similarly, we can unmarshal an XML to Java Objects in the next tutorial.
We are done! Congratulations on making it through this tutorial and hope you found it useful! Happy Learning!!
The Jackson XML module adds some additional support for XML-specific features, just like JSON has some additional features. These annotations allow us to control the XML namespace and local name for elements, including the root element, whether a field is rendered in an element or as plain text, whether the content of an element is rendered in a CData wrapper, and whether a collection should use a wrapper element or not.
We need to add Jackson XML dependency to the project.
It is used to define the name of the root element used for the root-level object when serialized, which normally uses the name of the type (class). This can only adjust the Namespace and Local name – since the root element can never be serialized as an attribute.
Jackson allows us to read the contents of an XML file and deserialize the XML back into a Java object. In our example, we will read an XML document containing details about an Employee, and use Jackson to extract this data and use it to create Java objects containing the same information.
First, let us create an XML document matching our class to read from.
Create deserialize.xml with the following contents:
Deserialization – It is the reverse of serializing. In this process, we will read the Serialized byte stream from the file and convert it back into the Class instance representation. Here, we are converting a XML to an Employee class object.
Simple deserialized program
Let us add a deserializeFromXML() function to deserialize the XML file above into a Java object:
import com.fasterxml.jackson.core.exc.StreamReadException;
import com.fasterxml.jackson.databind.DatabindException;
import com.fasterxml.jackson.dataformat.xml.XmlMapper;
import org.example.simple.Employee;
import org.junit.Test;
import java.io.File;
import java.io.IOException;
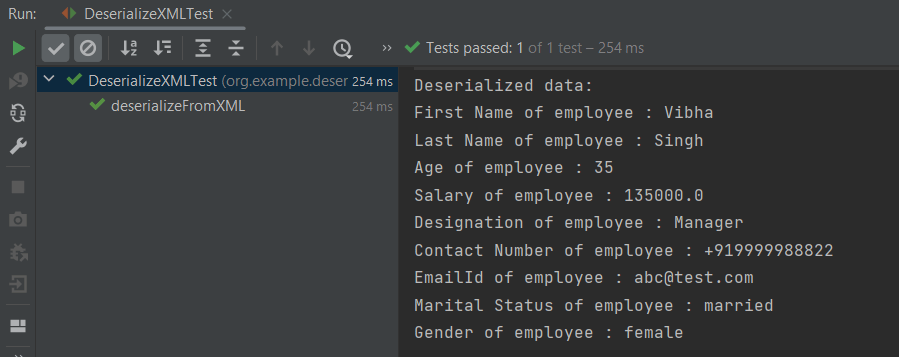
public class DeserializeXMLTest {
@Test
public void deserializeFromXML() {
XmlMapper xmlMapper = new XmlMapper();
String userDir = System.getProperty("user.dir");
// Converting Employee XML to Employee class object
try {
Employee emp = xmlMapper.readValue(new File(userDir + "\\src\\test\\resources\\XMLExample.xml"),
Employee.class);
System.out.println("Deserialized data: ");
System.out.println("First Name of employee : " + emp.getFirstName());
System.out.println("Last Name of employee : " + emp.getLastName());
System.out.println("Age of employee : " + emp.getAge());
System.out.println("Salary of employee : " + emp.getSalary());
System.out.println("Designation of employee : " + emp.getDesignation());
System.out.println("Contact Number of employee : " + emp.getContactNumber());
System.out.println("EmailId of employee : " + emp.getEmailId());
System.out.println("Marital Status of employee : " + emp.getMaritalStatus());
System.out.println("Gender of employee : " + emp.getGender());
} catch (StreamReadException e) {
e.printStackTrace();
} catch (DatabindException e) {
e.printStackTrace();
} catch (IOException e) {
e.printStackTrace();
}
}
}
The output of the above program is shown below:
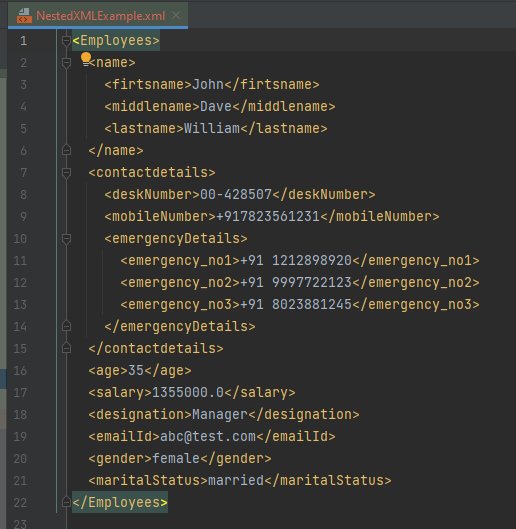
Manipulating Nested Elements in XML
Let us enhance our XML file to add nested elements and loops, and modify our code to deserialize the following updated structure.
The previous tutorials have explained the conversion of Java Objects to JSON payload and vice versa, i.e. conversion of JSON payload to Java Objects using Jackson API.
This tutorial explains parsing the XML document to Java objects using Jackson API.
To parse the above XML, we will use the Jackson library. Use the latest Jackson Library.
We will create an XML from POJO and vice versa now, which is generally called serialization and deserialization using Jackson APIs.
XmlMapper is a subclass of ObjectMapperwhich is used in JSON serialization. However, it adds some XML-specific tweaks to the parent class.
XmlMapper xmlMapper = new XmlMapper();
We can now look at how to use it to do the actual serialization. Let’s create a Java class first:
Below is the sample code of the Employee table, which contains the data members needed for Employee XML and their corresponding getter and setter methods.
public class Employee {
// Data members of POJO class
private String firstName;
private String lastName;
private int age;
private double salary;
private String designation;
private String contactNumber;
private String emailId;
private String gender;
private String maritalStatus;
// Getter and setter methods
public String getFirstName() {
return firstName;
}
public void setFirstName(String firstName) {
this.firstName = firstName;
}
public String getLastName() {
return lastName;
}
public void setLastName(String lastName) {
this.lastName = lastName;
}
public int getAge() {
return age;
}
public void setAge(int age) {
this.age = age;
}
public double getSalary() {
return salary;
}
public void setSalary(double salary) {
this.salary = salary;
}
public String getDesignation() {
return designation;
}
public void setDesignation(String designation) {
this.designation = designation;
}
public String getContactNumber() {
return contactNumber;
}
public void setContactNumber(String contactNumber) {
this.contactNumber = contactNumber;
}
public String getEmailId() {
return emailId;
}
public void setEmailId(String emailId) {
this.emailId = emailId;
}
public String getGender() {
return gender;
}
public void setGender(String gender) {
this.gender = gender;
}
public String getMaritalStatus() {
return maritalStatus;
}
public void setMaritalStatus(String maritalStatus) {
this.maritalStatus = maritalStatus;
}
}
Here, I have added JUnit4 dependency for the @Test annotation.
Writing XML is done using the various writeValue() methods that Jackson exposes.
import com.fasterxml.jackson.core.JsonProcessingException;
import com.fasterxml.jackson.dataformat.xml.XmlMapper;
import org.junit.Test;
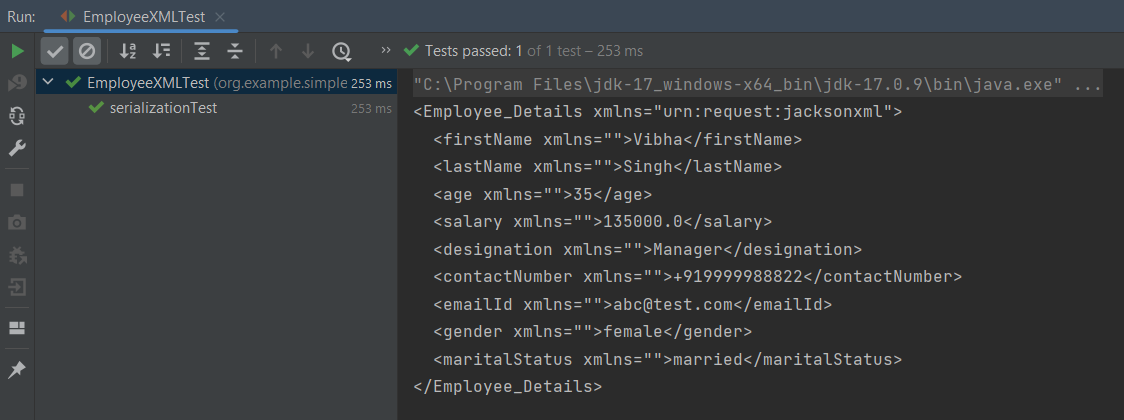
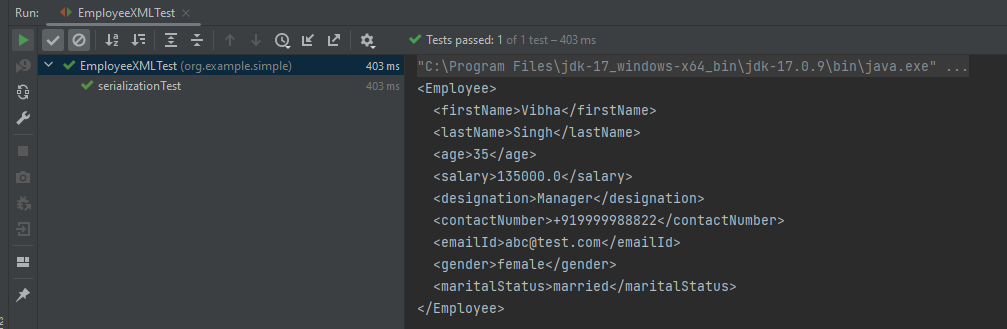
public class EmployeeXMLTest {
@Test
public void serializationTest() {
// Create an object of POJO class
Employee employee = new Employee();
employee.setFirstName("Vibha");
employee.setLastName("Singh");
employee.setAge(35);
employee.setSalary(135000);
employee.setDesignation("Manager");
employee.setContactNumber("+919999988822");
employee.setEmailId("abc@test.com");
employee.setMaritalStatus("married");
employee.setGender("female");
// Converting a Java class object to XML
XmlMapper xmlMapper = new XmlMapper();
try {
String employeeXml = xmlMapper.writerWithDefaultPrettyPrinter().writeValueAsString(employee);
System.out.println(employeeXml);
} catch (JsonProcessingException e) {
e.printStackTrace();
}
}
}
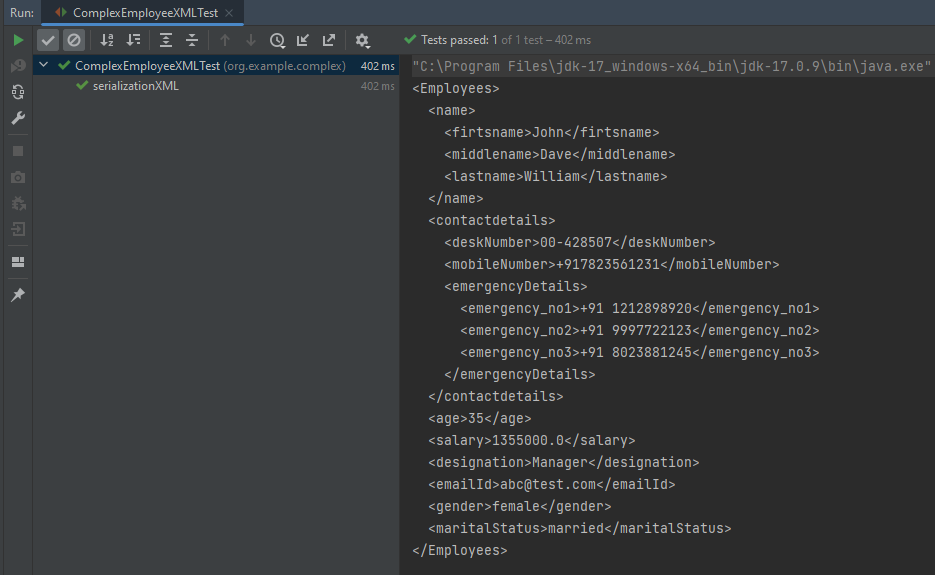
Here, In this new structure, we have introduced a nested nameelement as well as contactdetails element which is further nested to emergencyDetailselements. With our current code, we cannot extract or create the new nested section. So, along with creating a POJO class for Employees, will create a POJO class for name, contactDetails, and emergencyDetails.
Employees
public class Employees {

	Name name;
	ContactDetails contactdetails;

	private int age;
	private double salary;
	private String designation;
	private String emailId;
	private String gender;
	private String maritalStatus;

	// Getter and setter methods
	public Name getName() {
		return name;
	}

	public void setName(Name name) {
		this.name = name;
	}

	public ContactDetails getContactdetails() {
		return contactdetails;
	}

	public void setContactdetails(ContactDetails contactdetails) {
		this.contactdetails = contactdetails;
	}

	public int getAge() {
		return age;
	}

	public void setAge(int age) {
		this.age = age;
	}

	public double getSalary() {
		return salary;
	}

	public void setSalary(double salary) {
		this.salary = salary;
	}

	public String getDesignation() {
		return designation;
	}

	public void setDesignation(String designation) {
		this.designation = designation;
	}

	public String getEmailId() {
		return emailId;
	}

	public void setEmailId(String emailId) {
		this.emailId = emailId;
	}

	public String getGender() {
		return gender;
	}

	public void setGender(String gender) {
		this.gender = gender;
	}

	public String getMaritalStatus() {
		return maritalStatus;
	}

	public void setMaritalStatus(String maritalStatus) {
		this.maritalStatus = maritalStatus;
	}

}
Name
public class Name {

	private String firtsname;
	private String middlename;
	private String lastname;

	public String getFirtsname() {
		return firtsname;
	}

	public void setFirtsname(String firtsname) {
		this.firtsname = firtsname;
	}

	public String getMiddlename() {
		return middlename;
	}

	public void setMiddlename(String middlename) {
		this.middlename = middlename;
	}

	public String getLastname() {
		return lastname;
	}

	public void setLastname(String lastname) {
		this.lastname = lastname;
	}

}
ContactDetails-As you can see that EmergencyDetails element which contains emergency_no1, emergency_no2, and emergency_no3 are nested within ContactDetails, so we have created a separate POJO class for EmergencyDetails.
public class ContactDetails {

	private String deskNumber;
	private String mobileNumber;

	EmergencyDetails emergencyDetails;

	public EmergencyDetails getEmergencyDetails() {
		return emergencyDetails;
	}

	public void setEmergencyDetails(EmergencyDetails emergencyDetails) {
		this.emergencyDetails = emergencyDetails;
	}

	public String getDeskNumber() {
		return deskNumber;
	}

	public void setDeskNumber(String deskNumber) {
		this.deskNumber = deskNumber;
	}

	public String getMobileNumber() {
		return mobileNumber;
	}

	public void setMobileNumber(String mobileNumber) {
		this.mobileNumber = mobileNumber;
	}

}
EmergencyDetails
public class EmergencyDetails {

	private String emergency_no1;
	private String emergency_no2;
	private String emergency_no3;

	public String getEmergency_no1() {
		return emergency_no1;
	}

	public void setEmergency_no1(String emergency_no1) {
		this.emergency_no1 = emergency_no1;
	}

	public String getEmergency_no2() {
		return emergency_no2;
	}

	public void setEmergency_no2(String emergency_no2) {
		this.emergency_no2 = emergency_no2;
	}

	public String getEmergency_no3() {
		return emergency_no3;
	}

	public void setEmergency_no3(String emergency_no3) {
		this.emergency_no3 = emergency_no3;
	}

}
Next, we create our serializeToXML() method:
import com.fasterxml.jackson.core.JsonProcessingException;
import com.fasterxml.jackson.core.exc.StreamWriteException;
import com.fasterxml.jackson.databind.DatabindException;
import com.fasterxml.jackson.dataformat.xml.XmlMapper;
import org.junit.Test;
import java.io.File;
import java.io.IOException;

public class ComplexEmployeeXMLTest {
    @Test
    public void serializationXML() {

        Employees employee = new Employees();

        Name empname = new Name();
        empname.setFirtsname("John");
        empname.setMiddlename("Dave");
        empname.setLastname("William");

        employee.setName(empname);
        employee.setAge(35);
        employee.setSalary(1355000);
        employee.setDesignation("Manager");

        ContactDetails contdetails = new ContactDetails();
        contdetails.setDeskNumber("00-428507");
        contdetails.setMobileNumber("+917823561231");

        EmergencyDetails emergency = new EmergencyDetails();
        emergency.setEmergency_no1("+91 1212898920");
        emergency.setEmergency_no2("+91 9997722123");
        emergency.setEmergency_no3("+91 8023881245");
        contdetails.setEmergencyDetails(emergency);

        employee.setContactdetails(contdetails);

        employee.setEmailId("abc@test.com");
        employee.setMaritalStatus("married");
        employee.setGender("female");

        XmlMapper xmlMapper = new XmlMapper();

        try {
            String employeeXml = xmlMapper.writerWithDefaultPrettyPrinter().writeValueAsString(employee);
            System.out.println(employeeXml);
        } catch (JsonProcessingException e) {
            e.printStackTrace();
        }

        //To save the XML in a file and place under the project
        String userDir = System.getProperty("user.dir");
        try {
            xmlMapper.writerWithDefaultPrettyPrinter()
                    .writeValue(new File(userDir + "\\src\\test\\resources\\NestedXMLExample.xml"), employee);
        } catch (StreamWriteException e) {
            e.printStackTrace();
        } catch (DatabindException e) {
            e.printStackTrace();
        } catch (IOException e) {
            e.printStackTrace();
        }
    }
}
The output of the above program is
The file is saved under src/test/resources as NestedXMLExample.
Open the xml file and it contains the XML Request Body.
There is another way to do the same job of converting Java Object to a complex XML, but which looks more sophisticated and less a number of lines of code.
I’ll use the same complex XML structure.
In this method, we will create a default constructor as well as a parametrized Constructor to pass the arguments for each POJO Class.
Employees
public class Employees {

	Name name;
	ContactDetails contactdetails;

	private int age;
	private double salary;
	private String designation;
	private String emailId;
	private String gender;
	private String maritalStatus;

	public Employees() {
		super();
	}

	public Employees(Name name, ContactDetails contactdetails, int age, double salary, String designation,
			String emailId, String gender, String maritalStatus) {

		this.name = name;
		this.contactdetails = contactdetails;
		this.age = age;
		this.salary = salary;
		this.designation = designation;
		this.emailId = emailId;
		this.gender = gender;
		this.maritalStatus = maritalStatus;
	}

	// Getter and setter methods
	public Name getName() {
		return name;
	}

	public void setName(Name name) {
		this.name = name;
	}

	public ContactDetails getContactdetails() {
		return contactdetails;
	}

	public void setContactdetails(ContactDetails contactdetails) {
		this.contactdetails = contactdetails;
	}

	public int getAge() {
		return age;
	}

	public void setAge(int age) {
		this.age = age;
	}

	public double getSalary() {
		return salary;
	}

	public void setSalary(double salary) {
		this.salary = salary;
	}

	public String getDesignation() {
		return designation;
	}

	public void setDesignation(String designation) {
		this.designation = designation;
	}

	public String getEmailId() {
		return emailId;
	}

	public void setEmailId(String emailId) {
		this.emailId = emailId;
	}

	public String getGender() {
		return gender;
	}

	public void setGender(String gender) {
		this.gender = gender;
	}

	public String getMaritalStatus() {
		return maritalStatus;
	}

	public void setMaritalStatus(String maritalStatus) {
		this.maritalStatus = maritalStatus;
	}

}
Name
public class Name {

	private String firtsname;
	private String middlename;
	private String lastname;

	public Name() {
		super();
	}

	public Name(String firtsname, String middlename, String lastname) {
		super();
		this.firtsname = firtsname;
		this.middlename = middlename;
		this.lastname = lastname;
	}

	public String getFirtsname() {
		return firtsname;
	}

	public void setFirtsname(String firtsname) {
		this.firtsname = firtsname;
	}

	public String getMiddlename() {
		return middlename;
	}

	public void setMiddlename(String middlename) {
		this.middlename = middlename;
	}

	public String getLastname() {
		return lastname;
	}

	public void setLastname(String lastname) {
		this.lastname = lastname;
	}
}
ContactDetails
public class ContactDetails {

	private String deskNumber;
	private String mobileNumber;
	EmergencyDetails emergencyDetails;

	public ContactDetails() {
		super();
	}

	public ContactDetails(String deskNumber, String mobileNumber, EmergencyDetails emergencyDetails) {
		super();
		this.deskNumber = deskNumber;
		this.mobileNumber = mobileNumber;
		this.emergencyDetails = emergencyDetails;
	}

	public EmergencyDetails getEmergencyDetails() {
		return emergencyDetails;
	}

	public void setEmergencyDetails(EmergencyDetails emergencyDetails) {
		this.emergencyDetails = emergencyDetails;
	}

	public String getDeskNumber() {
		return deskNumber;
	}

	public void setDeskNumber(String deskNumber) {
		this.deskNumber = deskNumber;
	}

	public String getMobileNumber() {
		return mobileNumber;
	}

	public void setMobileNumber(String mobileNumber) {
		this.mobileNumber = mobileNumber;
	}
}
EmergencyDetails
public class EmergencyDetails {

	private String emergency_no1;
	private String emergency_no2;
	private String emergency_no3;

	public EmergencyDetails() {
		super();
	}

	public EmergencyDetails(String emergency_no1, String emergency_no2, String emergency_no3) {
		super();
		this.emergency_no1 = emergency_no1;
		this.emergency_no2 = emergency_no2;
		this.emergency_no3 = emergency_no3;
	}

	public String getEmergency_no1() {
		return emergency_no1;
	}

	public void setEmergency_no1(String emergency_no1) {
		this.emergency_no1 = emergency_no1;
	}

	public String getEmergency_no2() {
		return emergency_no2;
	}

	public void setEmergency_no2(String emergency_no2) {
		this.emergency_no2 = emergency_no2;
	}

	public String getEmergency_no3() {
		return emergency_no3;
	}

	public void setEmergency_no3(String emergency_no3) {
		this.emergency_no3 = emergency_no3;
	}
}
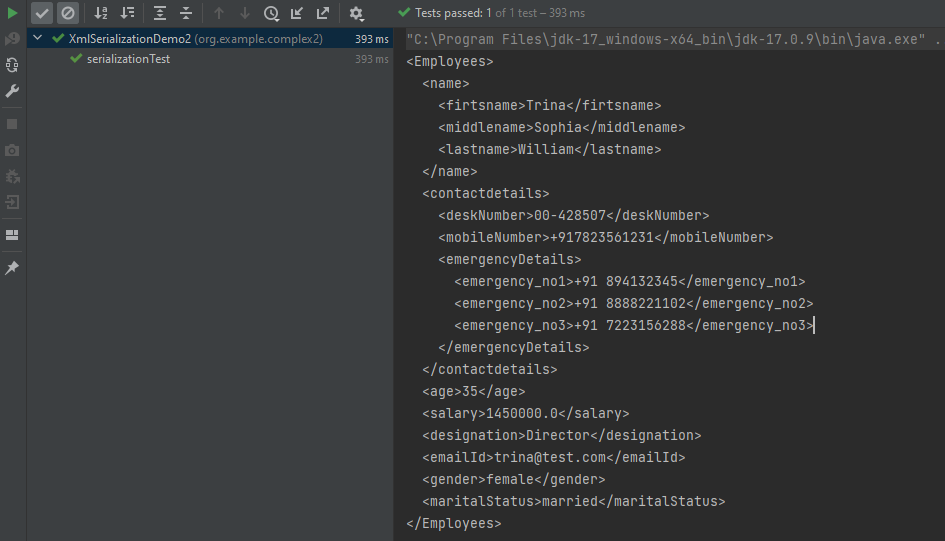
Now, let us create a Serialization Test.
import com.fasterxml.jackson.core.JsonProcessingException;
import com.fasterxml.jackson.dataformat.xml.XmlMapper;
import org.junit.Test;

import java.io.File;
import java.io.FileWriter;
import java.io.IOException;

public class XmlSerializationDemo2 {
    @Test
    public void serializationTest() {

        try {

            EmergencyDetails emergency = new EmergencyDetails("+91 894132345", "+91 8888221102", "+91 7223156288");
            ContactDetails contdetails = new ContactDetails("00-428507", "+917823561231", emergency);
            Name empname = new Name("Trina", "Sophia", "William");

            // Converting a Java class object to a XML
            XmlMapper xmlMapper = new XmlMapper();

            String xmlString = xmlMapper.writerWithDefaultPrettyPrinter().writeValueAsString(new Employees(empname,
                    contdetails, 35, 1450000.00, "Director", "trina@test.com", "female", "married"));
            System.out.println(xmlString);

            // write XML string to file
            String userDir = System.getProperty("user.dir");
            File xmlOutput = new File(userDir + "\\src\\test\\resources\\XMLExample.xml");
            FileWriter fileWriter = new FileWriter(xmlOutput);
            fileWriter.write(xmlString);
            fileWriter.close();

        } catch (JsonProcessingException e) {
            e.printStackTrace();
        } catch (IOException e) {
            e.printStackTrace();
        }
    }
}
The output of the above program is
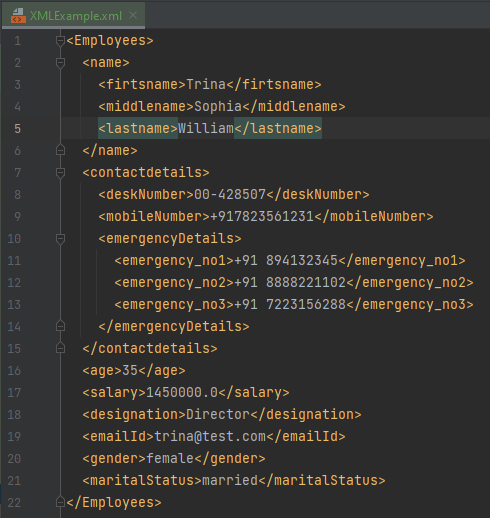
The newly created XML file is saved under src/test/resources as shown in the below image.
Open the xml file and it contains the XML Request Body.
We have successfully serialized our Java object into XML and written it into an XML file.
In our serializationTest() function, we create an XmlMapper object, which is a child class to the ObjectMapper class used in JSON serialization. This class converts our Java Object into an XML output that we can now write to a file.
Google has developed a JSON library for Java called Gson. We can create JSON and translate it into Java objects using Gson. Gson can output JSON in compact format by default. The setPrettyPrinting() function of the GsonBuilder class must be used to set up the Gson instance in order to enable pretty printing. This method tells Gson to produce JSON that fits on a page for pretty printing.
Add the below dependency to POM.xml to use Gson API.
Let us create a table named Employee which contains the data members same as node names in the above JSON payload and their corresponding getter and setter methods.
public class Employee {

	// private data members of POJO class
	private String firstName;
	private String lastName;
	private int age;
	private double salary;
	private String designation;
	private String contactNumber;
	private String emailId;

	// Getter and setter methods
	public String getFirstName() {
		return firstName;
	}

	public void setFirstName(String firstName) {
		this.firstName = firstName;
	}

	public String getLastName() {
		return lastName;
	}

	public void setLastName(String lastName) {
		this.lastName = lastName;
	}

	public int getAge() {
		return age;
	}

	public void setAge(int age) {
		this.age = age;
	}

	public double getSalary() {
		return salary;
	}

	public void setSalary(double salary) {
		this.salary = salary;
	}

	public String getDesignation() {
		return designation;
	}

	public void setDesignation(String designation) {
		this.designation = designation;
	}

	public String getContactNumber() {
		return contactNumber;
	}

	public void setContactNumber(String contactNumber) {
		this.contactNumber = contactNumber;
	}

	public String getEmailId() {
		return emailId;
	}

	public void setEmailId(String emailId) {
		this.emailId = emailId;
	}

}
We will convert a Java Object to a JSON object as a String and also will write it into a .json file. There are many variations for the method toJson().
You can create a Gson instance by invoking a new Gson() if the default configuration is all you need, as shown in the below example.
  @Test
    public void withoutPretty() {

        // Create an object of POJO class
        Employee employee = new Employee();
        employee.setFirstName("Vibha");
        employee.setLastName("Singh");
        employee.setAge(30);
        employee.setSalary(75000);
        employee.setDesignation("Manager");
        employee.setContactNumber("+919999988822");
        employee.setEmailId("abc@test.com");

        Gson gson = new Gson();
        String employeeJsonPayload = gson.toJson(employee);
        System.out.println("Json :" + employeeJsonPayload);

    }
The execution message is shown below.
Syntax
public GsonBuilder setPrettyPrinting()
Below is the program to print the JSON in pretty format.
@Test
    public void withPretty() {
        // Create an object of POJO class
        Employee employee = new Employee();
        employee.setFirstName("Vibha");
        employee.setLastName("Singh");
        employee.setAge(30);
        employee.setSalary(75000);
        employee.setDesignation("Manager");
        employee.setContactNumber("+919999988822");
        employee.setEmailId("abc@test.com");

        Gson gson = new GsonBuilder().setPrettyPrinting().create();

        String json = gson.toJson(employee);

        System.out.println("Pretty Json :" + json);

    }
The output of the above program is
We are done! Congratulations on making it through this tutorial and hope you found it useful! Happy Learning!!
Let us create a table named Employee which contains the data members same as node names in the above JSON payload with @Expose annotation and their corresponding getter and setter methods.
package com.example.gson;

import com.google.gson.annotations.Expose;

import java.math.BigDecimal;
import java.util.List;
import java.util.Map;

public class Employee {

    // private data members of POJO class

    @Expose(serialize = true)
    private String firstName;

    @Expose(serialize = true)
    private String lastName;

    @Expose(serialize = false)
    private int age;

    @Expose(serialize = true)
    private Map<String, BigDecimal> salary;

    @Expose()
    private String designation;

    @Expose(serialize = false)
    private String contactNumber;

    @Expose(serialize = true)
    private List<String> emailId;

    // Getter and setter methods
    public String getFirstName() {
        return firstName;
    }

    public void setFirstName(String firstName) {
        this.firstName = firstName;
    }

    public String getLastName() {
        return lastName;
    }

    public void setLastName(String lastName) {
        this.lastName = lastName;
    }

    public int getAge() {
        return age;
    }

    public void setAge(int age) {
        this.age = age;
    }

    public Map<String, BigDecimal> getSalary() {
        return salary;
    }

    public void setSalary(Map<String, BigDecimal> salary) {
        this.salary = salary;
    }

    public String getDesignation() {
        return designation;
    }

    public void setDesignation(String designation) {
        this.designation = designation;
    }

    public String getContactNumber() {
        return contactNumber;
    }

    public void setContactNumber(String contactNumber) {
        this.contactNumber = contactNumber;
    }

    public List<String> getEmailId() {
        return emailId;
    }

    public void setEmailId(List<String> emailId) {
        this.emailId = emailId;
    }

    @Override
    public String toString() {
        return "(firstName: " + firstName + "," +
                "lastName: " + lastName + "," +
                "age: " + age + ", " +
                "salary: " + salary + "," +
                "designation: " + designation + ", " +
                "contactNumber: " + contactNumber + ", " +
                "emailId: " + emailId + ")";

    }
}
Suppose the attribute age and contactNumber in the Employee class should not serialize because it’s sensitive information. Hence, we must decorate these attributes with the annotation @Expose(serialize=false):
To use @Expose annotation, we must create a Gson instance by using the GsonBuilder class and its excludeFieldsWithoutExposeAnnotation() method.
import com.google.gson.Gson;
import com.google.gson.GsonBuilder;
import org.junit.Test;
import java.math.BigDecimal;
import java.util.Arrays;
import java.util.HashMap;
import java.util.Map;

public class GsonExpose_Demo {

    @Test
    public void gsonExposeTest()  {

        // Create an object of POJO class
        Employee employee = new Employee();
        employee.setFirstName("Vibha");
        employee.setLastName("Singh");
        employee.setAge(30);
        Map<String, BigDecimal> salary = new HashMap() {{
            put("2010", new BigDecimal(10000));
            put("2012", new BigDecimal(12000));
            put("2018", new BigDecimal(14000));
        }};

        employee.setSalary(salary);
        employee.setDesignation("Manager");
        employee.setContactNumber("+919999988822");
        employee.setEmailId(Arrays.asList("abc@test.com","vibha@test.com"));

        Gson gson = new GsonBuilder().setPrettyPrinting().excludeFieldsWithoutExposeAnnotation().create();
        String employeeJsonPayload = gson.toJson(employee);
        System.out.println("Json :" + employeeJsonPayload);

    }
}
The output of the above program is shown below.
We can see here that age and contactNumber are not shown in the JSON body.
We are done! Congratulations on making it through this tutorial and hope you found it useful! Happy Learning!!
Gson is a Java library that can be used to convert Java Objects into their JSON representation. It can also be used to convert a JSON string to an equivalent Java object. Gson can work with arbitrary Java objects, including pre-existing objects for those you do not have source code.
Provide simple toJson() and fromJson() methods to convert Java objects to JSON and vice versa.
Add the below dependency to POM.xml to use Gson API.
Let us create a table named Employee which contains the data members same as node names in the above JSON payload and their corresponding getter and setter methods.
import java.math.BigDecimal;
import java.util.Map;

public class Employee {

    // private data members of POJO class
    private String firstName;
    private String lastName;
    private int age;
    private Map<String, BigDecimal> salary;
    private String designation;
    private String contactNumber;
    private String emailId;

    // Getter and setter methods
    public String getFirstName() {
        return firstName;
    }

    public void setFirstName(String firstName) {
        this.firstName = firstName;
    }

    public String getLastName() {
        return lastName;
    }

    public void setLastName(String lastName) {
        this.lastName = lastName;
    }

    public int getAge() {
        return age;
    }

    public void setAge(int age) {
        this.age = age;
    }

    public Map<String, BigDecimal> getSalary() {
        return salary;
    }

    public void setSalary(Map<String, BigDecimal> salary) {
        this.salary = salary;
    }

    public String getDesignation() {
        return designation;
    }

    public void setDesignation(String designation) {
        this.designation = designation;
    }

    public String getContactNumber() {
        return contactNumber;
    }

    public void setContactNumber(String contactNumber) {
        this.contactNumber = contactNumber;
    }

    public String getEmailId() {
        return emailId;
    }

    public void setEmailId(String emailId) {
        this.emailId = emailId;
    }

    @Override
    public String toString() {
        return "(firstName: " + firstName + "," +
                "lastName: " + lastName + "," +
                "age: " + age + ", " +
                "salary: " + salary + "," +
                "designation: " + designation + ", " +
                "contactNumber: " + contactNumber + ", " +
                "emailId: " + emailId + ")";

    }
}
We will convert a JSON Object to a Java Object.
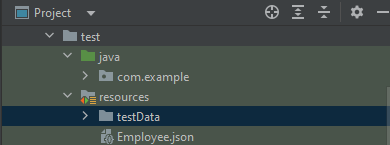
The JSON file – Employee.json is present in src/test/resources.
Below is the image of JSON.
You can create a Gson instance by invoking a new Gson() if the default configuration is all you need, as shown in the below example.
Gson is a Java library that can be used to convert Java Objects into their JSON representation. It can also be used to convert a JSON string to an equivalent Java object. Gson can work with arbitrary Java objects, including pre-existing objects those you do not have source code.
Provide simple toJson() and fromJson() methods to convert Java objects to JSON and vice versa.
Allow pre-existing unmodifiable objects to be converted to and from JSON.
Extensive support of Java Generics.
Allow custom representations for objects.
Support arbitrarily complex objects (with deep inheritance hierarchies and extensive use of generic types).
Add the below dependency to POM.xml to use Gson API.
Let us create a table named Employee which contains the data members same as node names in the above JSON payload and their corresponding getter and setter methods.
public class Employee {

	// private data members of POJO class
	private String firstName;
	private String lastName;
	private int age;
	private double salary;
	private String designation;
	private String contactNumber;
	private String emailId;

	// Getter and setter methods
	public String getFirstName() {
		return firstName;
	}

	public void setFirstName(String firstName) {
		this.firstName = firstName;
	}

	public String getLastName() {
		return lastName;
	}

	public void setLastName(String lastName) {
		this.lastName = lastName;
	}

	public int getAge() {
		return age;
	}

	public void setAge(int age) {
		this.age = age;
	}

	public double getSalary() {
		return salary;
	}

	public void setSalary(double salary) {
		this.salary = salary;
	}

	public String getDesignation() {
		return designation;
	}

	public void setDesignation(String designation) {
		this.designation = designation;
	}

	public String getContactNumber() {
		return contactNumber;
	}

	public void setContactNumber(String contactNumber) {
		this.contactNumber = contactNumber;
	}

	public String getEmailId() {
		return emailId;
	}

	public void setEmailId(String emailId) {
		this.emailId = emailId;
	}

}
We will convert a Java Object to a JSON object as a String and also will write it into a .json file. There are many variations for the method toJson().
You can create a Gson instance by invoking a new Gson() if the default configuration is all you need, as shown in the below example.
You can also use GsonBuilder to build a Gson instance with various configuration options such as versioning support, pretty-printing, custom JsonSerializer, JsonDeserializer.