The environment is a set of key-value pairs. We can use environments to group related sets of values together and manage access to shared Postman data if you are working as part of a team.
Why do we need an environment?
Imagine we have 4 different environments – Dev, QA, UAT, and Pre Prod. These environments need different credentials to login to the application. So, we will create same request with different credentials or will keep on changing the credential of same request every time. This is a messy approach. So, the ideal scenario is we create environment variables for the changing attributes and select the environment for particular attributes. In this way, we have a single request with different combination of attributes.
How do we create an environment?
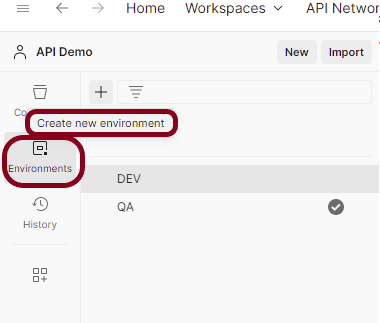
Select Environments on the left and select +.
Enter a name for your environment, and initialize it with any variables you need. You can also specify variables for the environment later.
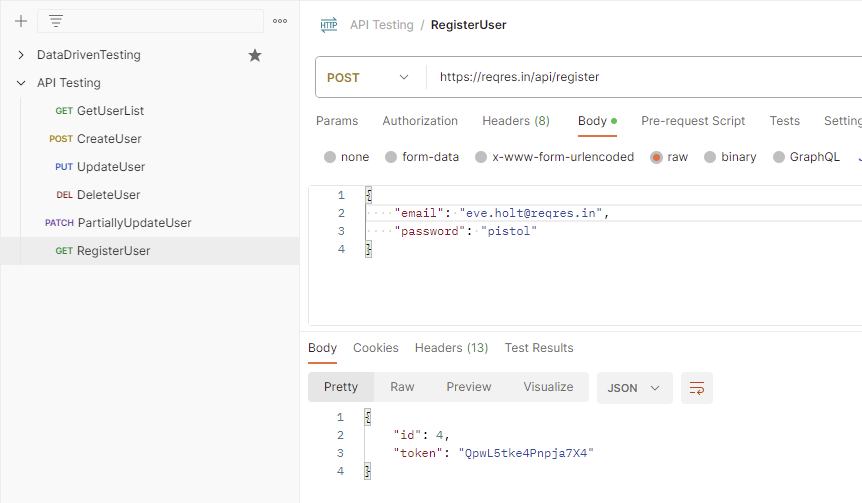
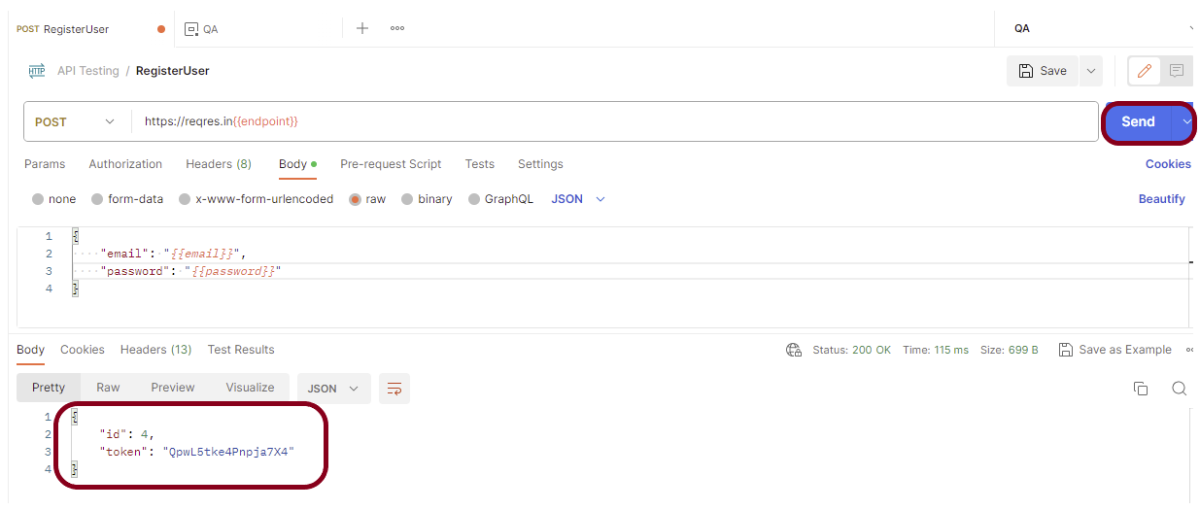
Save the request. Click on the “Send” button to verify the API returns a successful response as shown in the below image.
Step 2 – Create an environment and add key-value pairs (variables)
Create a new environment as explained in the above tutorial.
Add the values that are dynamic for different environments. Click the “Save” button to save the variables.
In the Keyfield, enter the name of the environment variable that will be used in the Postman Collection. In the Valuefield, enter the value that will replace the variable when the call is made. For example:
Enter a name for your variable, and specify its Initialand Currentvalues. By default, the current value will copy the initial value.
The Initial Value is synced to your account using the Postman servers. It’s shared with any collaborators who have access to the environment.
The Current Value is used in your local instance of Postman and is never synced to your account or shared with your team unless you choose to persist it.
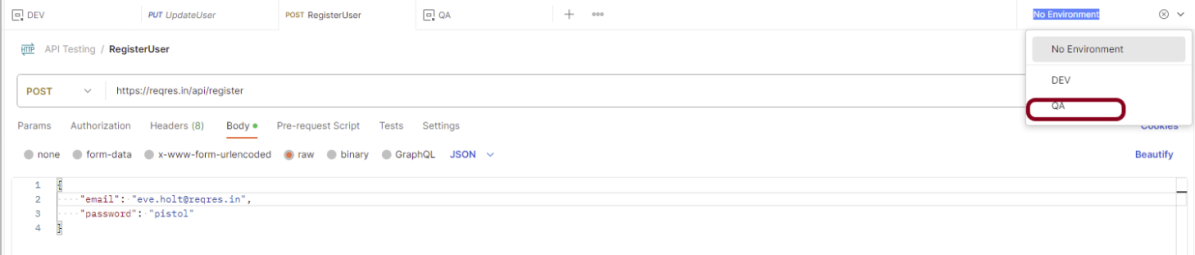
Step 3 – Select the environment from dropdown
Go to the new request and select the environment created just now. In this case, I have selected “QA” environment. Refer to the newly created variables in the request.
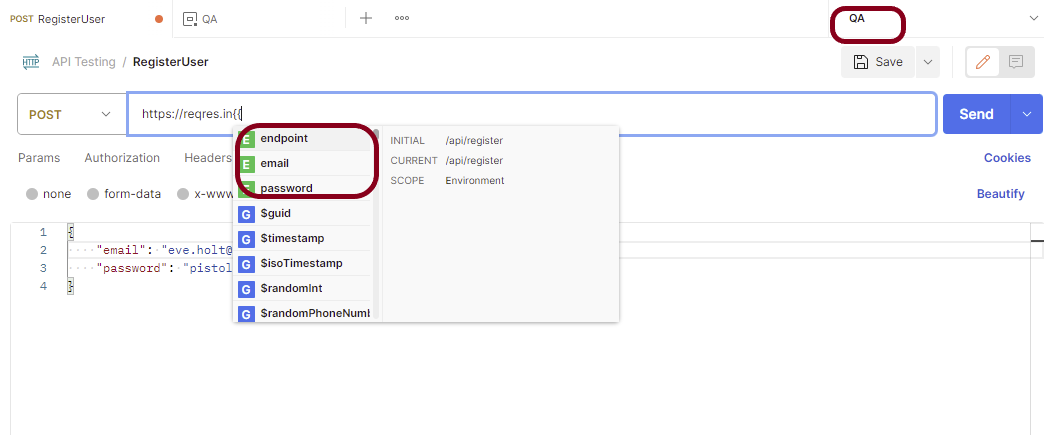
Step 4 – Refer the newly created variables in the request
Here, we can see that it is showing all 3 variables that we have defined in the previous step. To use an environment variable value in a request, reference it by name, surrounded with double curly braces:
Hover over a variable reference to get its current value.
Step 5 – Run the request
Click on the “Send” button. The request will be sent, and the response displayed as in shown the below image.
Congratulations on making it through this tutorial and hope you found it useful! Happy Learning!! Cheers!!
A NewmanHTML reporter that has been extended to include the separation of the iteration runs so these are no longer aggregated together and also some additional handlebars helpers to enable users to create better custom templates
This reporter comes with a dashboard-style summary landing page and a set of different tabs that contain detailed request information. There are also a few optional configuration flags available, to tailor the final report in a number of different ways.
Prerequisite:
NodeJS is installed
Newman is installed
Implementation Steps
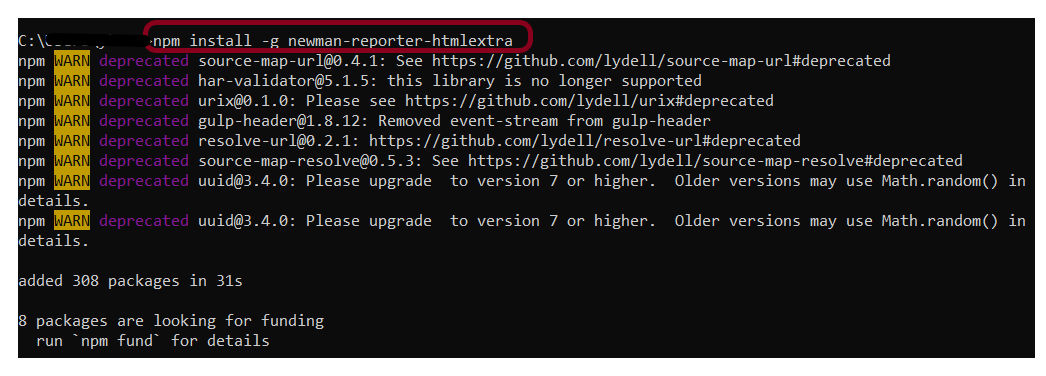
Step 1: Install newman-reporter-htmlextra package
Go to cmd prompt and type the below command:-
npm install -g newman-reporter-htmlextra
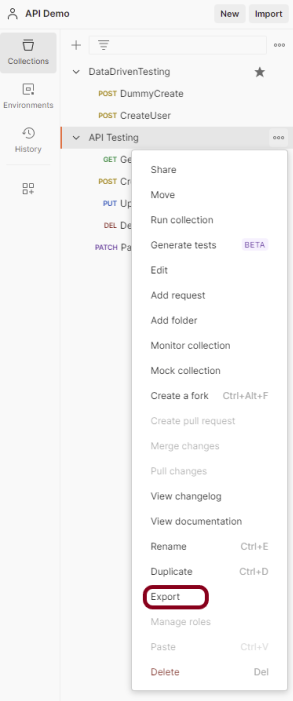
Step 2: Export the already created Postman tests
Export your Postman API collection as JSON file. To know how to export Collection in Postman, please refer to this tutorial – How to Export Postman Collections?.
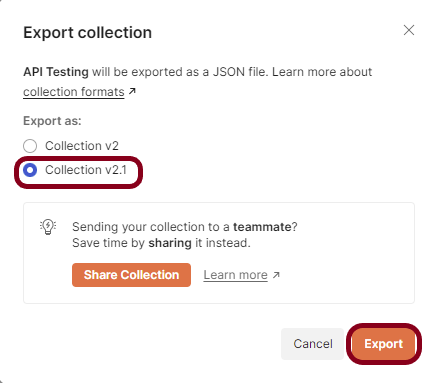
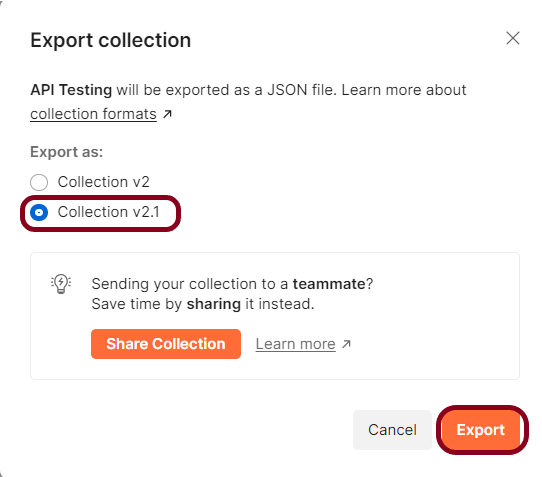
This screen provides the option to export the JSON file as Collection v2 or Collection v2.1 and click on the “Export” button.
Open the Command Line and go to that location of the collection JSON file.
Step 3: Run the API collection through the command line
Use the below command to execute the tests and generate an HTML Report. The following command will create a new report in the ./newman directory, if the directory does not exist, it will be created as part of the Newman run.
newman run API_Newman_Tests.json -r htmlextra
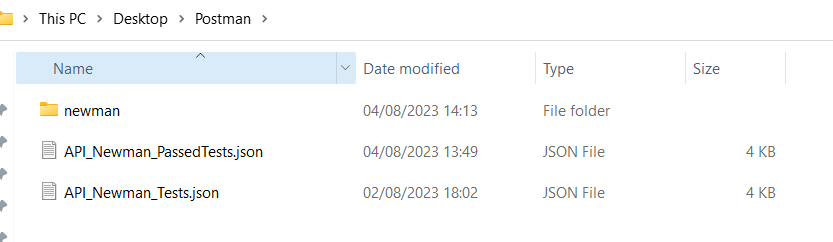
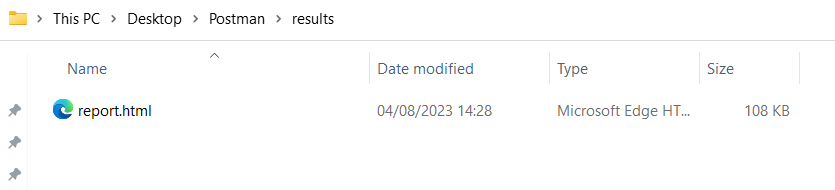
Go inside the newman folder and see a .html report is present.
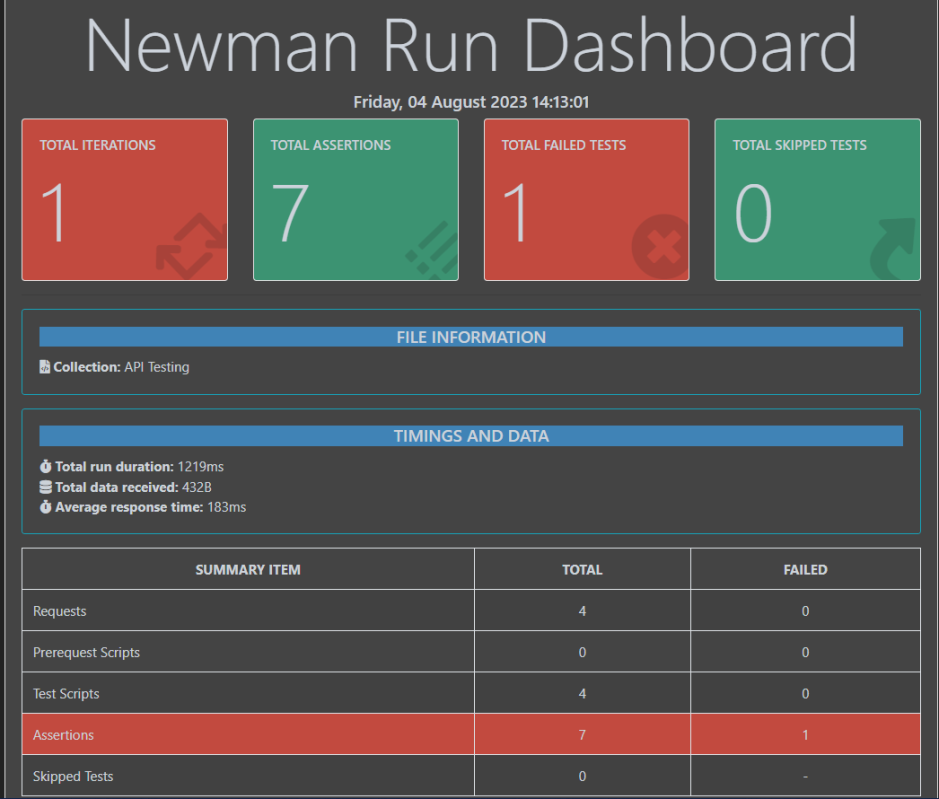
Step 4: View Newman HTML Report
Double-click on the .html report and this will display. On the summary page, we get a summary of the test results we have run. We get detailed information like a number of iterations, assertions, skipped tests, and failed tests. From the Total Requests tab, we can get a lot of information like baseurl, the request body, the response header, and the response format. For more details, we can go to the Failed tests tab to check which scripts failed, the status code, and the assertion error message.
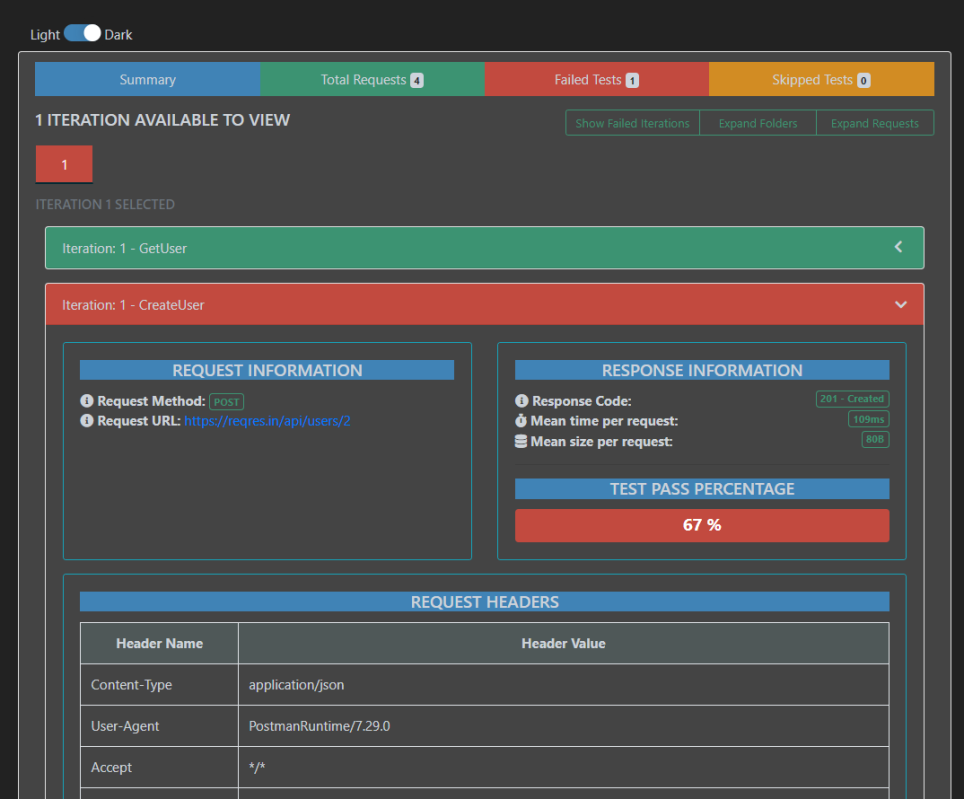
Go to the Total Requests tab to get all the information regarding the request method used, request URL, request body, response body, time taken to process the request, the means size of the request, and so on.
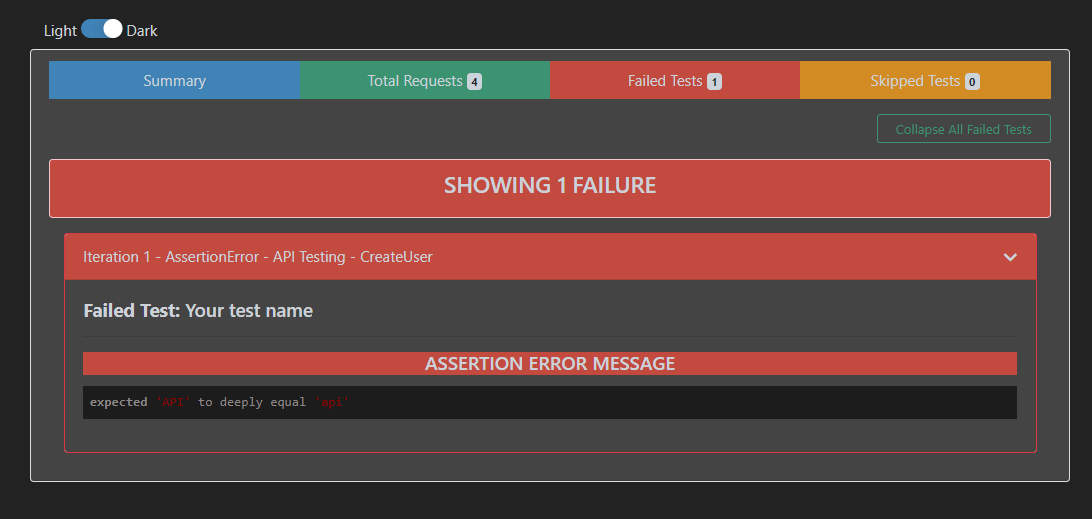
Go to the Failed Tests tab and see all the details about the failed tests.
Step 5: Additional CLI Options
Specify a path for the HTML Report.
Specify a path where the output HTML file will be written to disk.
Use the below command.
newman run API_Newman_Tests.json -r htmlextra --reporter-htmlextra-export ./results/report.html
If the path is not specified, the file will be written to the newmain/ in the current working directory.
That’s it! Congratulations on making it through this tutorial and hope you found it useful! Happy Learning!!
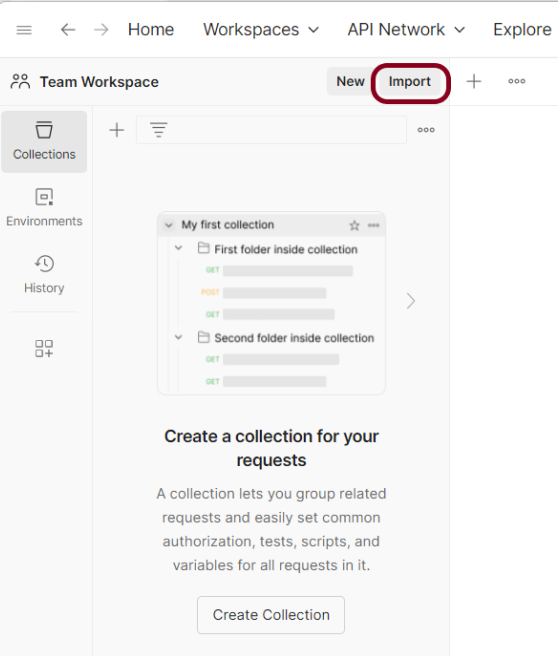
Postman is a powerful tool that allows developers to test APs efficiently. One of the key features of Postman is the ability to create and share collections, which are groups of API requests that can be organized together. In this tutorial, I will discuss how to import Postman collections.
Step 1: Open Postman and navigate to the Collections tab on the left-hand side. Click on the “Import” button located in the top-left corner of the screen.
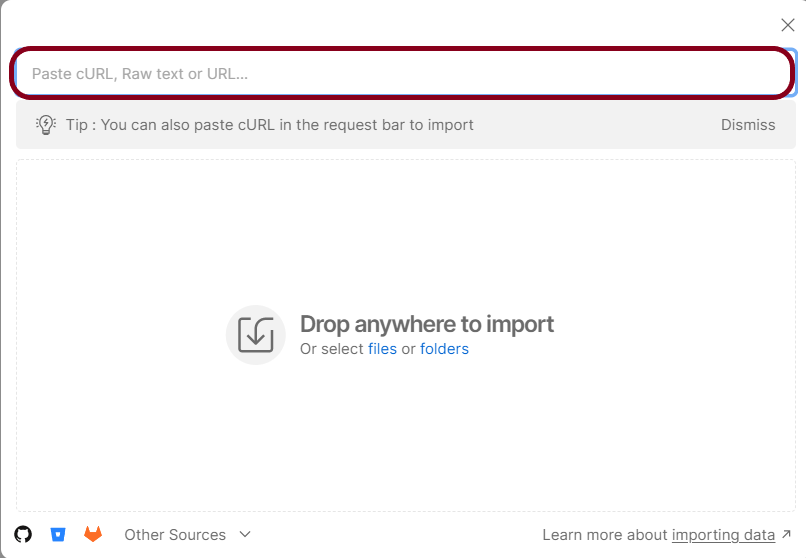
Step 2: In the “Import File” modal, click on the “Choose Files” button and select the Postman collection file you wish to import.
Step 3: Once the file has been selected, click on the “Import” button to initiate the import process.
Step 4: After the import process is complete, you should see your newly imported collection listed in the Collections tab.
Step 5: Run the tests present in the Collection to see if the import is successful.
Congratulations on making it through this tutorial and hope you found it useful! Happy Learning!!
Newman enables you to run and test a Postman Collection directly from the command line. It’s built with extensibility in mind so that you can integrate it with your continuous integration (CI) servers and build systems.
Let’s learn about Newman and how to run the Postman collection using a command line.
Implementation Steps
Step 1: Check if node.js is already installed or not
Open your cmd from your machine
node -v
If found: ‘node’ is not recognized as an internal or external command, operable program, or batch file
That means node.js is not installed on your system yet.
Step 2: Check if npm is already installed or not
npm is node package manager which is used to installed packages over node.
npm -v
‘npm’ is not recognized as an internal or external command, operable program or batch file message means that node is not found in the system.
Step 3: Install node.js
Newman is node.js program and to get newman we have to first install node.js
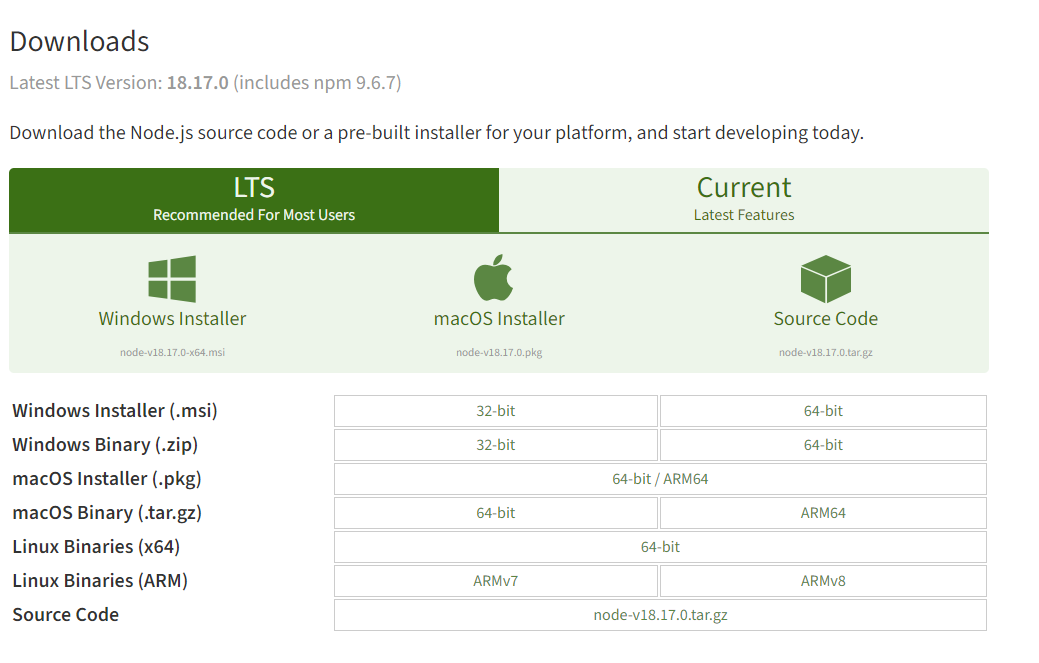
Depending upon the system requirement, select and download 32-bit or 64-bit for Window or macOS operating system Node.js installer.
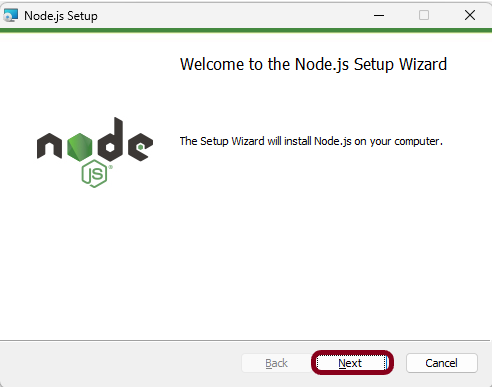
Once the installer finishes downloading, launch it. Open the downloads link in your browser and click the file. Or, browse to the location where you have saved the file and double-click it to launch. Click the “Next” button.
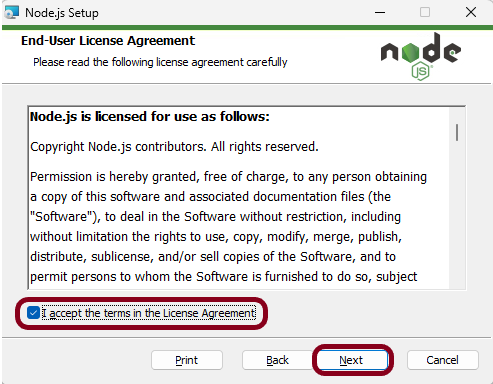
Select the option “I accept the terms in the License Agreement” and click the “Next” button.
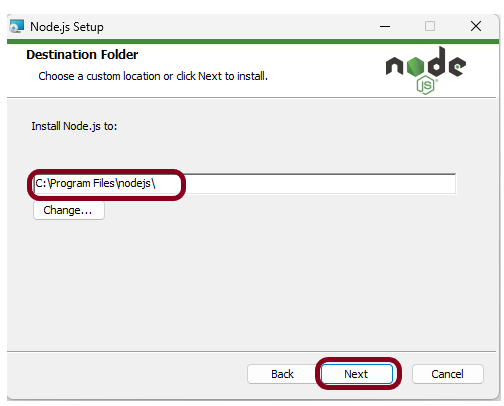
The installer will prompt you for the installation location. Leave the default location, unless you have a specific need to install it somewhere else. Click the “Next”button.
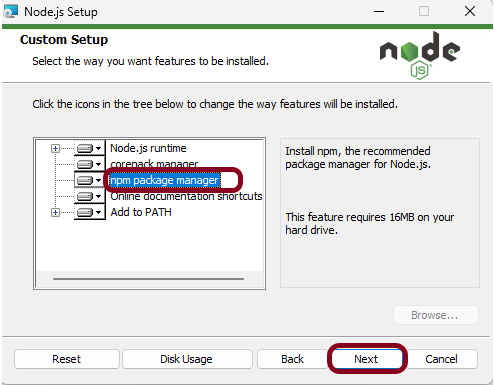
This screen shows that npm package manager is also getting installed. Click the “Next” button.
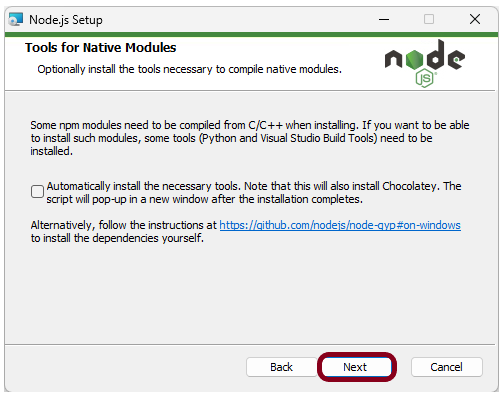
Select the “Next” button.
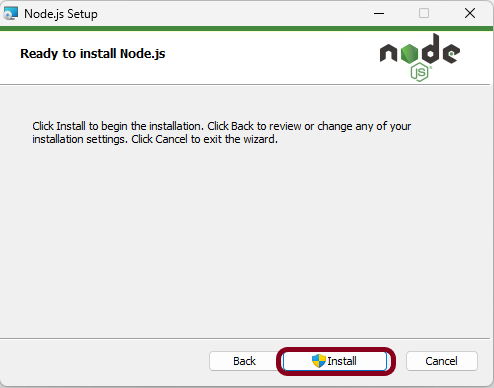
Click on the “Install” button.
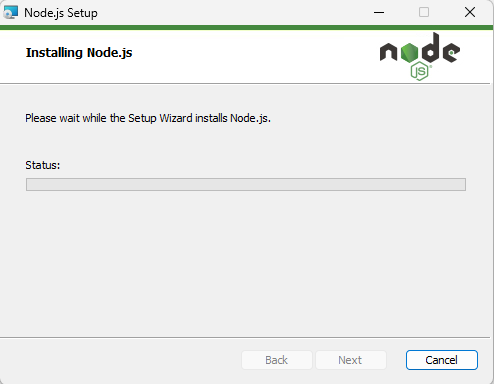
This screen shows that installation is in progress.
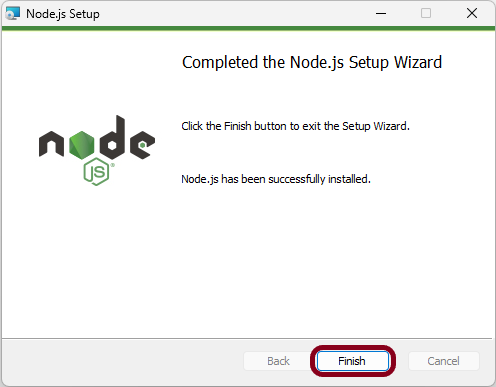
Click the “Finish” button to end the installation process.
Step 4: Check if node.js and npm are successfully installed
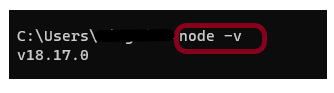
Close the cmd prompt and reopen the cmd prompt. Type node-v command and see if the version is displayed or not. The below image shows that node.js of version 18.17 is installed on the machine.
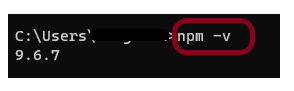
Type npm-v command and see if the version is displayed or not. The below image shows that npm of version 9.6.7 is installed on the machine.
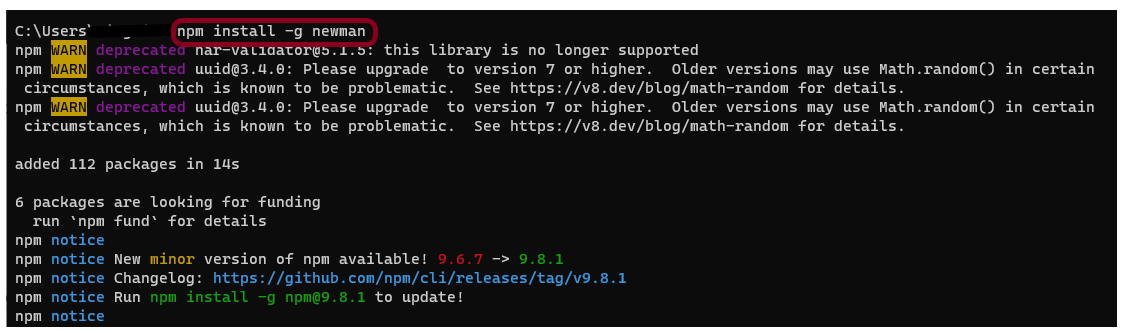
Step 5: Install Newman
npm install -g newman
It will get Newman then install in your system. It will take couple of second.
After finishing the installation you can see it has added all the packages from contributors.
Step 6: Export the already created Postman tests
Export your Postman API collection as json file
This screen provides the option to export the json file as Collection v2 or Collection v2.1 and click on the “Export” button.
On cmd go to that location of collection json file
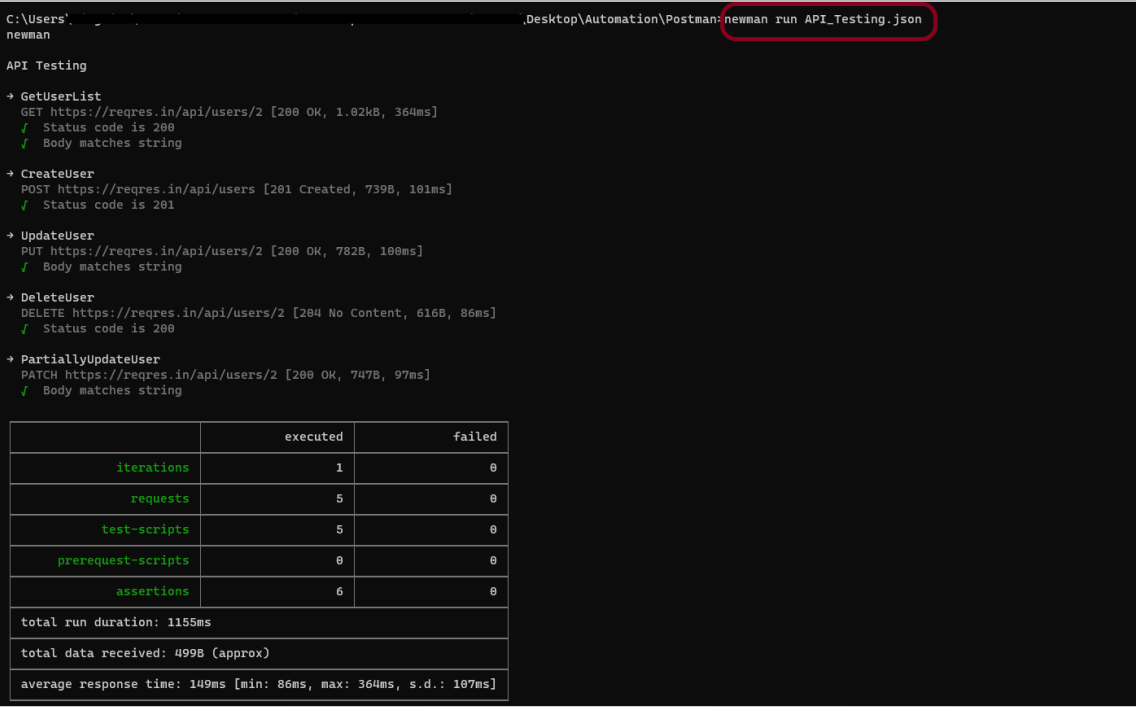
cd C:\Users\Vibha\Desktop\Automation\Postman
Step 7: Run the API collection through command line
newman run API_Testing.json
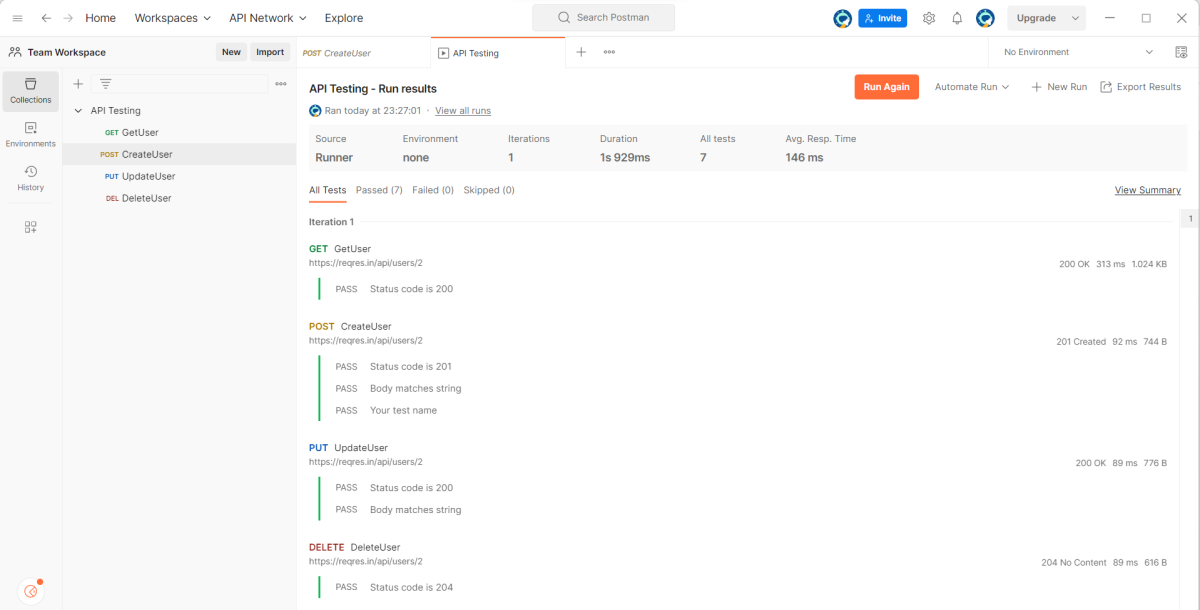
The output of the above command is shown below. There is a log of entire over all summary showing iterations, requests, test-scripts, prerequest-scripts, assertions, total run duration, total data received, average response time and in case of any failure we get the details of failure and all.
Congratulations!! We have run the Postman tests through command line. I hope this tutorial is useful to you.
In this tutorial, we will go through the steps to export a Collection in Postman.
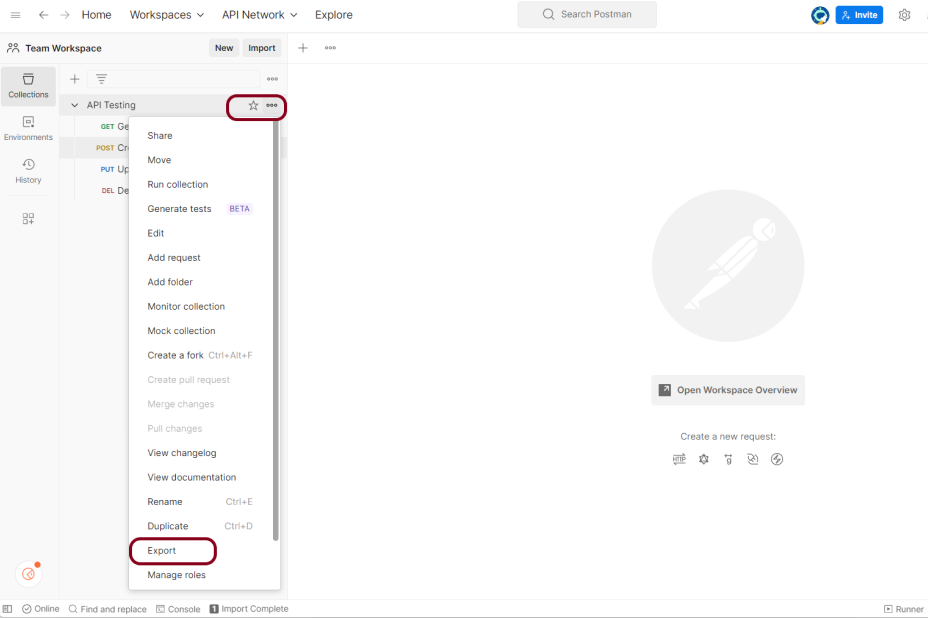
Step 1: Open Postman and navigate to the collection you want to export. Click on the ellipsis (…) icon next to the collection name.
Step 2: Select “Export” from the drop-down menu. Choose the format in which you want to export the collection. Postman supports a variety of formats including JSON, CSV, and YAML.
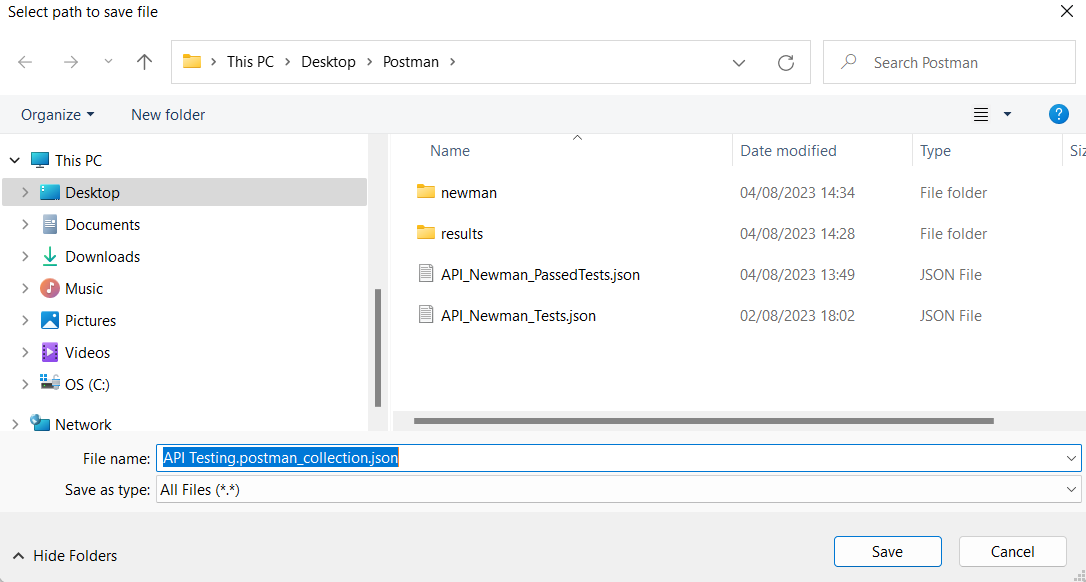
Step 3: Choose the location on your computer where you want to save the exported file.
Step 4: Click “Save” to export the collection.
Please keep in mind that if you wish to export a huge collection in Postman, the export procedure may take a few minutes. You may quickly share your Postman collections with others or backup your collections for future use using the exported file.
We are done! Congratulations on making it through this tutorial and hope you found it useful! Happy Learning!!
Consider a sample JSON which has 4 sets of data. This data we will be passing to a POST request.
Create a request in Postman
Create a request in Postman. Below is the URL of the request.
https://reqres.in/api/users
Paste the body of the request in the Body part of the Postman.
Create Tests for the request
Click on the “Tests”. Write the tests as shown below:
pm.test : This is the function for writing test specifications, pm here refers to Postman api and test refers to the specification of the function which is for testing purposes
Status code is 201 : This line is just a string which is the test name. When your test is performed, this string will be written in front of the result.
function(){}: The next parameter is the function that is passed to perform the test
pm.response : This is used to capture the response received and perform assertions on it such as status code, headers etc.
If you need help in creating the test, you can refer to the snippets present on the right side of the console.
Type of Tests
1.Test to check Status code
This test check the status code of the response. Here, we are checking status code if the status code is 201, then pass the test.
pm.test("Status code is 201", function () {
    pm.response.to.have.status(201);
});
The output of the above test is
2. Test to check the Status code from a list of codes
This test check the status code of the response. Here, we are checking status code if the status code is either 201 or 202, then pass the test.
pm.test("Successful POST request", function () {
    pm.expect(pm.response.code).to.be.oneOf([201,202]);
});
The output of the above test is
3. Test to check status code is not 404
This test check the status code of the response. Here, we are checking status code if the status code is not 404, then pass the test.
pm.test("The endpoint does not return unexpected status code", () => {

  // change 404 to the response code you do not expect
  pm.response.to.not.have.status(404);
});
The output of the above test is
4. Test to check the status code name
This test check the name of the status of the response. Here, we are checking if the name of the status is “Created”, then pass the test.
pm.test("Status code name has string", function () {
    pm.response.to.have.status("Created");
});
The output of the above test is
5. Test to check Content-Type is present
This test check if the response contains header as Content-Type, then pass the test.
pm.test("Content-Type is present", function () {
    pm.response.to.have.header("Content-Type");
});
The output of the above test is
6. Test to check the expected header
This test check the headers like content-type, accept, token and so on. Here, we have checked if the content-type is “application/json” or not. If yes, then pass the test.
This test checks the text in the response. Here, it is checking if the response has text “Postman”, then passes the test.
pm.test("Body matches string", function () {
    pm.expect(pm.response.text()).to.include("Postman");
});
The output of the above test is
8. Test to check response body contains JSON value
This test checks the JSON data in the response. Here, it is checking if the JSON response contains attribute name whose value is “Postman”, then passes the test.
pm.test("Value of name", function () {
    var jsonData = pm.response.json();
    pm.expect(jsonData.name).to.eql("Postman");
});
The output of the above test is
9. Test to check field value in response
This test checks the key-value of the response. Here, it is checking if the response has key as “name “and value as “Postman” and key as job and name as “Test”, then passes the test.
pm.test("API response contains the expected fields", () => {
  const response = pm.response.json();

  // the line below checks value of the name field is Postman.
  pm.expect(response).to.have.property("name", "Postman");

  // the line below checks value of the job field is Test (string).
  pm.expect(response).to.have.property("job", "Test");
});
The output of the above test is
10. Test to check response time
This test check the response time of the response. Here, it is checking is the time taken by the response to return is less than 200 ms, then pass the test.
pm.test("Response time is less than 200ms", function () {
    pm.expect(pm.response.responseTime).to.be.below(200);
});
The output of the above test is
11. Test an assertion value type
This test check the test data type of the values of the keys. Here, we are checking if the data type for the id is number, then pass the test.
Test the type of any part of the response:
const responseJson = pm.response.json();
pm.test("Test Data Type of the response", () => {

    pm.expect(responseJson.job).to.be.a("string");
    pm.expect(parseInt(responseJson.id)).to.be.a("number");
});
The output of the above test is
12. Test to check multiple assertions
This test checks the multiple assertions in the response.
pm.test("The response has all properties", () => {
    //parse the response JSON and test three properties
    const responseJson = pm.response.json();
    pm.expect(responseJson.name).to.eql("Postman");
    pm.expect(responseJson.job).to.be.a('string')
    pm.expect(responseJson.id).to.have.lengthOf(3);
});
The output of the above test is
If any of the contained assertions fails, the test as a whole will fail. All assertions must be successful for the test to pass.
13. Test to check nested field value in response
This test checks the nested field value in the response.
Sample Response
pm.test("API response contains the expected fields", () => {
  const response = pm.response.json();

  // the line below checks value of the id field is 2 (number).
  pm.expect(response).to.have.property("id", 2);

  // the line below checks value of the name field is Morty Smith (string).
  pm.expect(response).to.have.property("name", "Morty Smith");

  // the line below checks value of the origin.name field is Earth (C-137) (string).
  pm.expect(response).to.have.nested.property("location.name", "Citadel of Ricks");
});
The output of the above test is
14. Test to check nested array value in response
We can use the below script to check the value of the second item in the episode array of the endpoint.
Create a request in Postman. Below is the URL of the request.
https://reqres.in/api/users
Paste the body of the request in the Body part of the Postman.
Here, name and job are the variables that we will be passing to the POST request. So, we have parameterized these 2 variables.
Create Tests for the request
Click on the “Tests”. Write the tests as shown below:
If you need help in creating the test, you can refer to the snippets present on the right side of the console.
Here, data.json is the name of the json we are using in this example.
To read the JSON data we need to upload a JSON file from the collection runner.
Run the Collection from Postman
Select the more actions icon next to the collection name. Click on the “Run Collection” option.
This shows all the requests present in this collection. Here, I want to run only CreateUser Request. So, I will uncheck the “Dummy User” option.
Run the tests manually
On the Functionaltab, select Run manually.
Click on the Select File and upload the data file. The Iterations field shows the number of data sets present in the data file. Here, we have 4 sets of data, so used Iterations as 4. The Delay field defines the time in ms between two iterations.
Click on the preview to see the data that is uploaded.
Click on the “RunDataDrivenTesting” button to run the tests available in the Collection.
We can see that our API has run four times. Each time, a different set of data is picked up.
2. Passing data using CSV File
All the steps remain the same here, except instead of a JSON, we will use a .csv file.
Click on the “Preview” button to view the data present in the .csv file.
Below are the sample tests.
pm.test("Status code is 200", function () {
    pm.response.to.have.status(201);
});

var expectedName = pm.variables.get("name");
var expectedRole = pm.variables.get("role");


pm.test("Verify name", function () {
    var jsonData = pm.response.json();
    pm.expect(jsonData.value).to.eql(expectedName);
});

pm.test("Verify role", function () {
    var jsonData = pm.response.json();
    pm.expect(jsonData.value).to.eql(expectedRole);
});
Run the collection again. Below is the image of the test execution in Postman.
We are done! Congratulations on making it through this tutorial and hope you found it useful! Happy Learning!!
In Postman, a collection is a group of API requests that are saved in Postman and can be organized into folders. Within a collection, any number of folders can be formed. All API requests can be saved and stored in a collection, which can be shared around the team in the Postman workspace. Organizing comparable requests into folders and collections enables the customer to better organize and document their demands.
For example, if you are testing or validating a restful API that has 10 different endpoints. Then, it makes sense to organize them in a collection that would make things like applying collection variables, import/export easier and could be run as part of a single collection.
How to create a Collection?
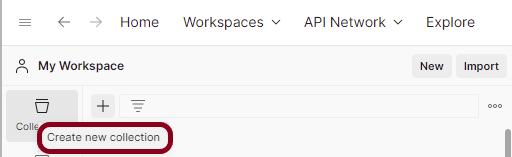
Step 1: Create a Collection, click on Collections, and then click on the “+” plus button.
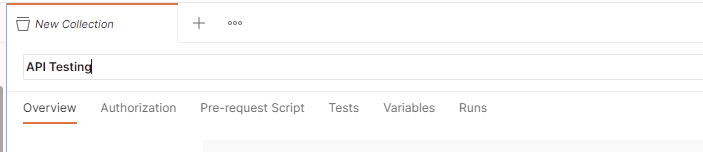
Step 2: Provide a name to the collection – “Demo”.
How to create a request in Collection?
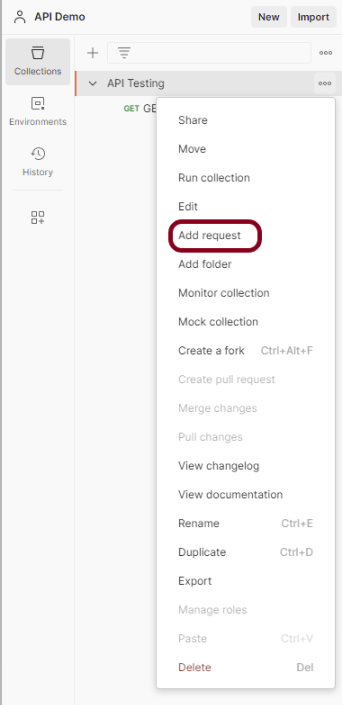
Step 1: To add new requests to the collection, click on Collection and click Add requests (please note it’s also possible to create a request first and then add it to the collection as well as move in requests from one collection to another).
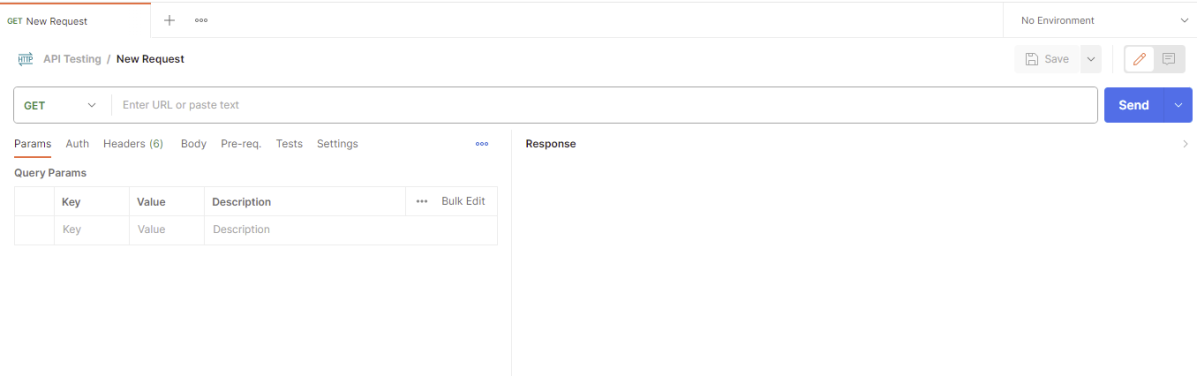
Below is the image of a new request in the collection.
How to delete a Collection?
Step 1: Select the more actions icon next to the collection name.
Select the “Delete”button.
If a deleted collection is larger than 30 MB, you won’t be able to recover it. To avoid this, you can split the collection into smaller pieces before deleting it, or back up the collection first.
Postman is an API platform for building and using APIs. It simplifies each step of the API lifecycle and streamlines collaboration, so you can create better APIs—faster.
The HTTP DELETE method is used to delete a resource from the server. Unlike GET requests, the DELETE requests may change the server state. The DELETE method is defined to be idempotent, which means that sending the same HTTP DELETE request multiple times will have the same effect on the server and will not additionally affect the state or cause additional side effects.
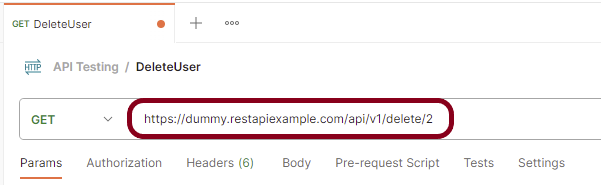
We will use the following URL for this Postman tutorial.
https://dummy.restapiexample.com/api/v1/delete/2
Implementation Steps
To create the first DELETE request in Postman, follow the following steps:
Create a Collection
Step 1: Create a Collection, click on Collections, and then click on the “+” plus button.
Step 2: Provide a name to the collection – “API Testing”.
Add a request to the Collection
Step 3: To create a new request, click on “Add a request” if it is a new Collection. Otherwise, click on the 3 dots and select “Add request”.
Step 4: Once you create a new request, then you will get the following window:
Enter the details of request
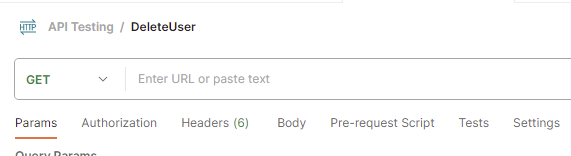
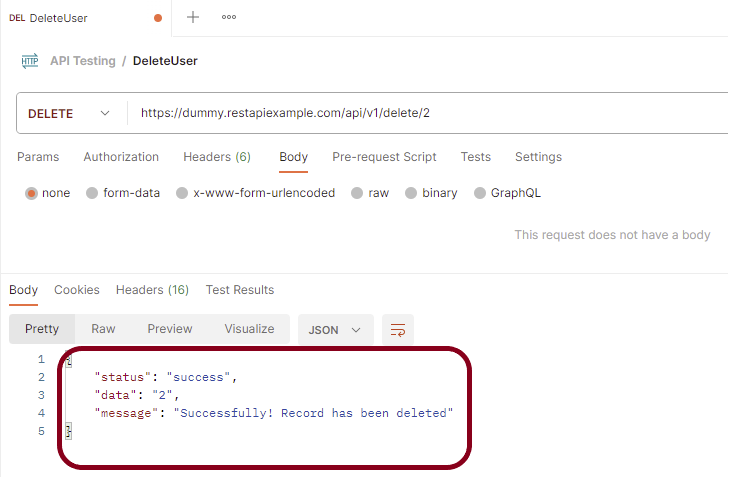
Step 5: Enter the “name” in the request. Here, the name is “DeleteUser”.
Step 5:Enter the “URL” in the address bar.
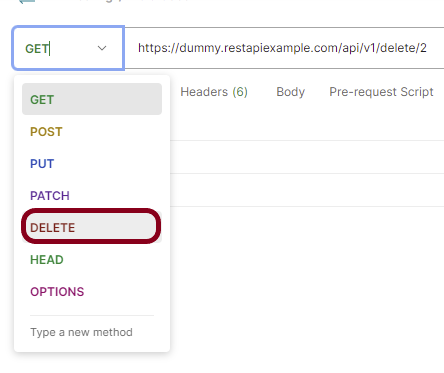
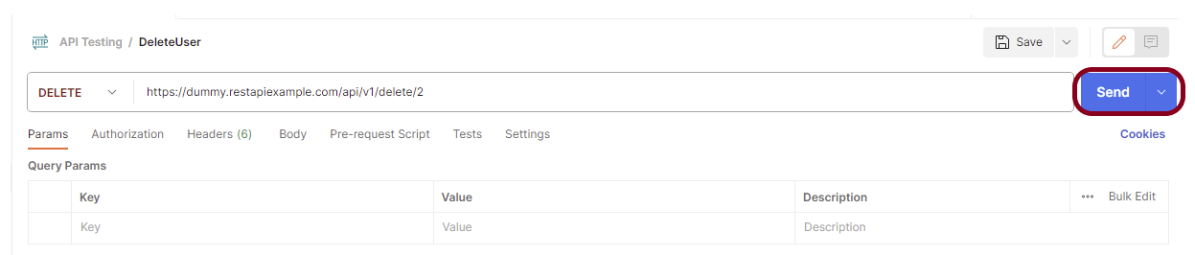
Step 6:Now, select the “DELETE” request from the list of request methods.
Step 7: Press the “Send” button.
Step 8: Once you press the send button, you will get the response from the server. Make sure you have a proper internet connection; otherwise, you will not get a response.
Verify the Response
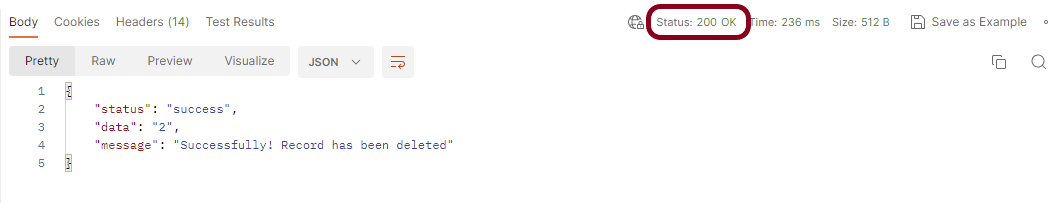
Status
You can check the status code. Here, we got the status code 200, which means we got a successful response to the request.
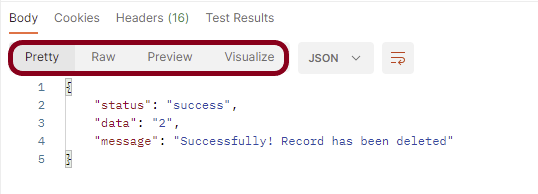
Body
In the Body tab of the response box, we have multiple options to see the response in a different format.
Format Type
Each request has a defined response to it as defined by the Content-Type header. That response can be in any format. Such as in the above example, we have JSON code file.
Below are the various format type present in Postman.
XML
HTML
Text
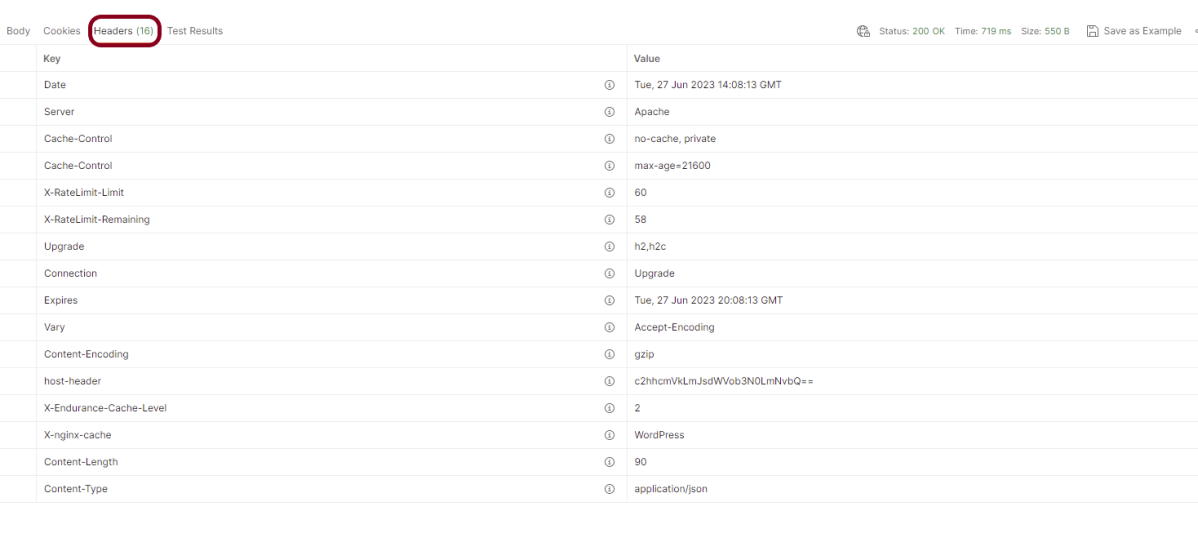
Headers
Headers are the extra information that is transferred to the server or the client. In Postman, headers will show like key-value pairs under the headers tab. Click on the Headers link as shown in the below image:
Congratulations on making it through this tutorial and hope you found it useful! Happy Learning!! Cheers!!