
Playwright is integrated with Java, Cucumber, and TestNG. This integration creates a robust and scalable test automation framework for modern web applications. It is a BDD-driven framework.
Table of Contents
- What is Playwright?
- What is Cucumber?
- What is TestNG?
- System requirements
- High-Level Architecture
- Setting Up Cucumber BDD Framework with Playwright and TestNG
- Create a new Maven Project
- Set Up the Environment
- Define Directory Structure
- Create a feature file under src/test/resources
- Create the utility package in src/test/java
- Create the hooks package in src/test/java
- Create the pages package in src/test/java
- Create the step package in src/test/java
- Create the step definition class in src/test/java
- Create a TestNG Cucumber Runner class in src/test/java
- Create testng.xml
- Run the test through Runner Class
- Run the tests from TestNG.xml
- Run the tests from the Command Line
- Cucumber Report Generation
- TestNG Report Generation
- Recap of Key Points
What is Playwright?
Page Object Model (POM) is a design pattern used in test automation. It enhances test maintenance and reduces code duplication. In this pattern, web pages are represented as classes. The various elements on the page are defined as variables in the class. All possible user interactions can then be implemented as methods in the class.
What is Cucumber?
Cucumber is Behavior Driven Development (BDD). It is a methodology that integrates non-technical stakeholders, testers, and developers into the same conversation. This is achieved by using clearly defined specifications.
In behavior-driven development with Cucumber, test cases are written in Gherkin syntax. They use a Given-When-Then structure. This structure closely mirrors user stories and business rules.
Benefits of Using Cucumber with Playwright
1. Readable, business-friendly tests: Cucumber’s Gherkin syntax (Given–When–Then) makes test scenarios easy to understand for non-technical stakeholders, bridging the gap between QA, developers, and business teams.
2. Better Test Maintainability: With standardized step definitions and modularized test architecture, scaling up your test suite is effortless. Altering the suite won’t harm the entire framework.
3. Clear reporting and traceability: Cucumber’s reports map test results directly to feature files. They map directly to scenarios. This makes it easier to track coverage and failures against requirements.
4. Cross-browser and cross-platform coverage: When combined with Playwright, Cucumber scenarios can be executed across Chromium, Firefox, and WebKit without changing feature files
5. Scales well in CI/CD pipelines: The combination supports parallel execution. It offers tagging and selective test runs. This makes it suitable for continuous testing in CI environments.
What is TestNG?
TestNG is a testing framework widely used with Selenium for building structured, maintainable, and efficient automated tests. Combining TestNG listeners with Playwright gives testers greater control over test monitoring, logging, and custom actions based on test outcomes. In TestNG you can initialize Playwright and Browser in @BeforeClass method and destroy them in @AfterClass.
System requirements
The following prerequisites are required to be installed on the machine to begin with a smooth setup and installation.
- Java 11 or higher
- IntelliJ IDE or any other IDE to create a project
- Maven
- Browsers on which tests need to be run, like Chrome, Firefox, etc.
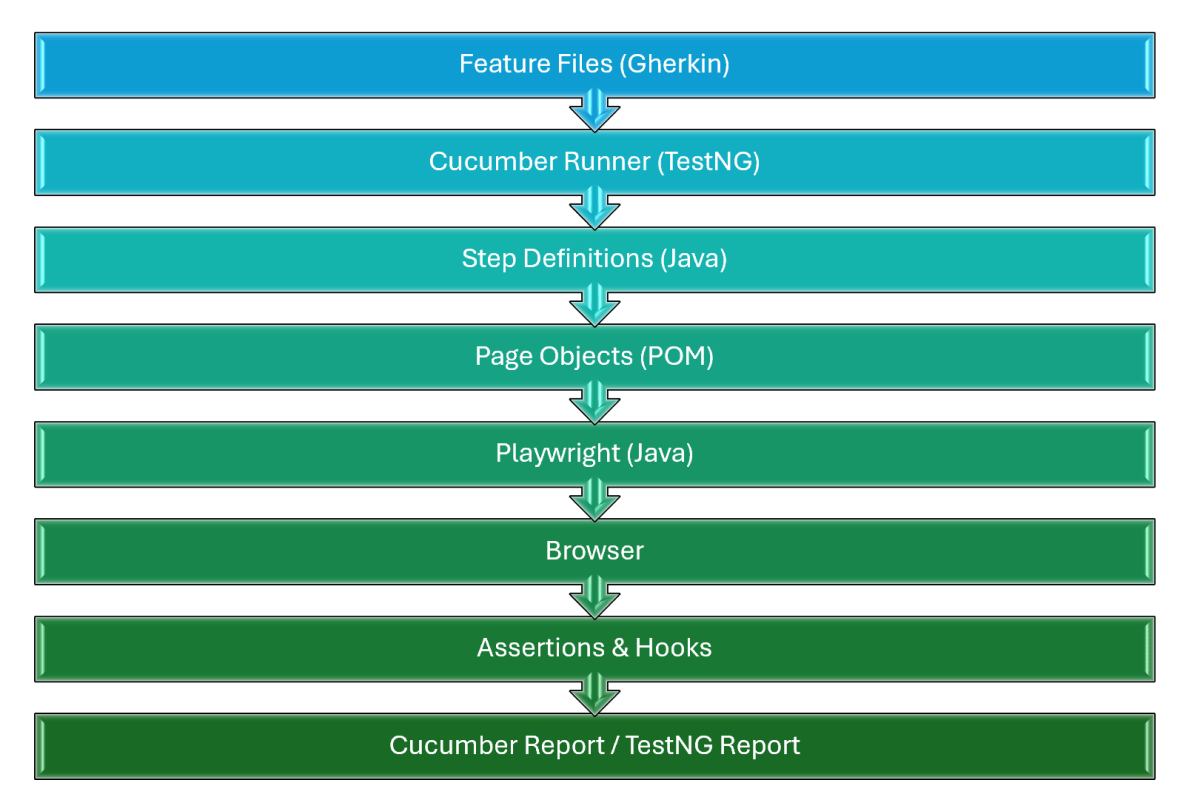
High-Level Architecture
Setting Up Cucumber BDD Framework with Playwright and TestNG
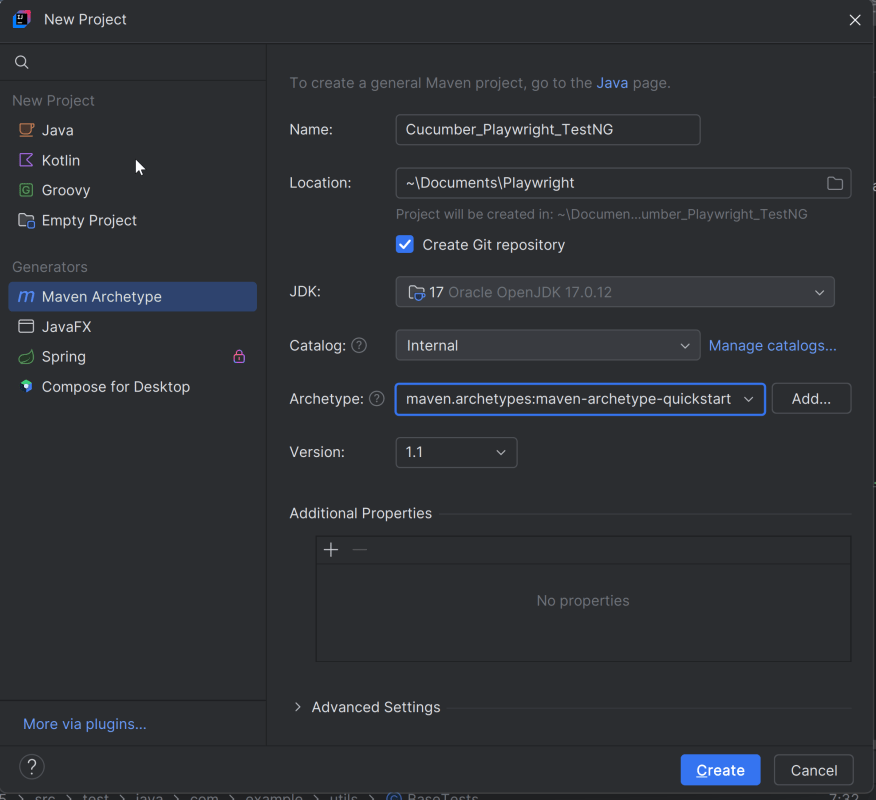
1. Create a new Maven Project
The first step in setup is to create a new Maven project. I will be using IntelliJ in this tutorial. The following steps need to be followed to create a new Maven project :
Open IntelliJ, Navigate to File >> New >> Project

In the New Project window, enter the following details:
- Name of the Project – Cucumber_Playwright_TestNG
- Location/path where the project needs to be saved – Documents/Playwright (my location)
- Select JDK version — I am using JDK 17
- Archetype — Search for “quickstart” and select maven-archetype-quickstart from the results
Click on the Create button to create the project.
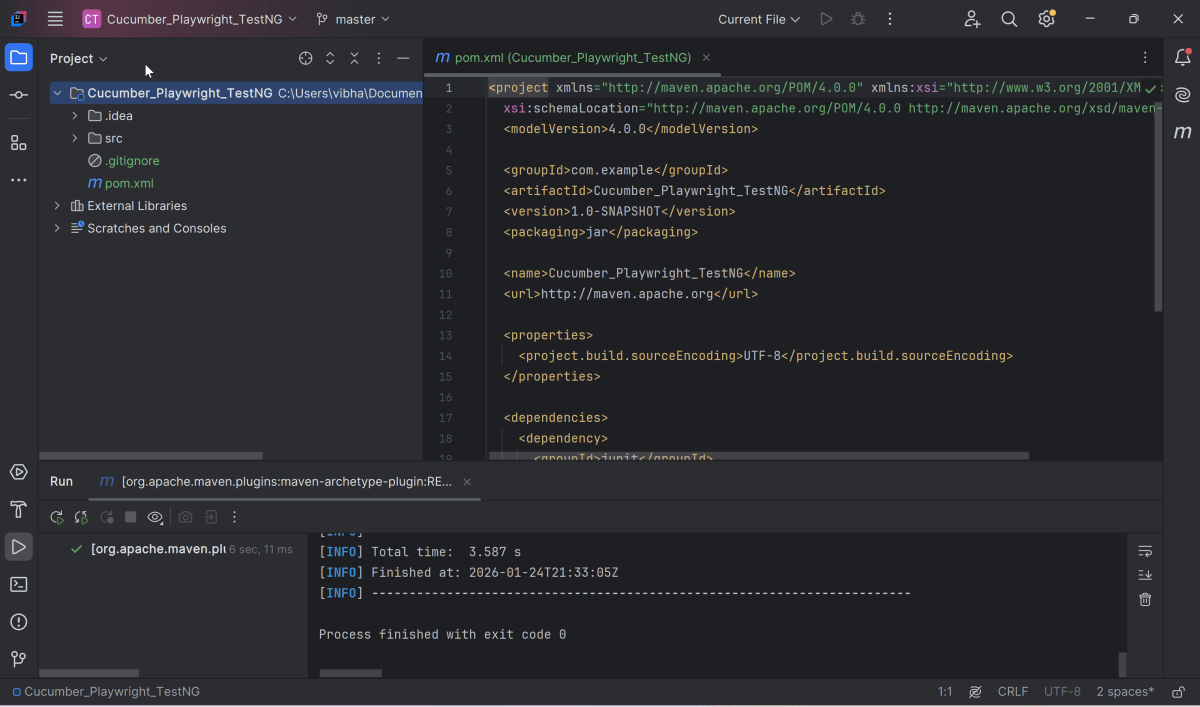
This will create a project as shown in IntelliJ.
2. Set Up the Environment
2.1 Add the Cucumber, Playwright Java, and TestNG dependencies
Add the Cucumber, Playwright Java, and TestNG dependencies to the pom.xml. The latest dependency can be found here.
<properties>
    <java.version>17</java.version>
    <project.build.sourceEncoding>UTF-8</project.build.sourceEncoding>
    <cucumber.version>7.33.0</cucumber.version>
    <testng.version>7.12.0</testng.version>
    <playwright.version>1.57.0</playwright.version>
    <maven.compiler.version>3.14.1</maven.compiler.version>
    <maven.surefire.version>3.5.4</maven.surefire.version>
    <maven.failsafe.version>3.5.4</maven.failsafe.version>
    <lombok.version>1.18.30</lombok.version>
    <maven.compiler.source>17</maven.compiler.source>
    <maven.compiler.target>17</maven.compiler.target>
</properties>

<dependencies>

    <!-- Cucumber with Java -->
    <dependency>
      <groupId>io.cucumber</groupId>
      <artifactId>cucumber-java</artifactId>
      <version>${cucumber.version}</version>
      <scope>test</scope>
    </dependency>

    <!-- Cucumber with TestNG -->
    <dependency>
      <groupId>io.cucumber</groupId>
      <artifactId>cucumber-testng</artifactId>
      <version>${cucumber.version}</version>
      <scope>test</scope>
    </dependency>

    <!-- TestNG -->
    <dependency>
      <groupId>org.testng</groupId>
      <artifactId>testng</artifactId>
      <version>${testng.version}</version>
      <scope>test</scope>
    </dependency>

    <!-- Playwright -->
    <dependency>
      <groupId>com.microsoft.playwright</groupId>
      <artifactId>playwright</artifactId>
      <version>${playwright.version}</version>
    </dependency>

</dependencies>
2.2 Add Maven Compiler Plugin and SureFire Plugin
The compiler plugin is used to compile the source code of a Maven project. This plugin has two goals, which are already bound to specific phases of the default lifecycle:
- compile – compile main source files
- testCompile – compile test source files
 <build>
    <plugins>
      <plugin>
        <groupId>org.apache.maven.plugins</groupId>
        <artifactId>maven-compiler-plugin</artifactId>
        <version>${maven.compiler.version}</version>
        <configuration>
          <source>${maven.compiler.source}</source>
          <target>${maven.compiler.target}</target>
        </configuration>
      </plugin>

      <plugin>
        <groupId>org.apache.maven.plugins</groupId>
        <artifactId>maven-surefire-plugin</artifactId>
        <version>${maven.surefire.version}</version>
        <configuration>
          <testFailureIgnore>true</testFailureIgnore>
          <includes>
            <include>**/*RunnerTests.java</include>
          </includes>
        </configuration>
      </plugin>

    </plugins>
  </build>
The entire POM.xml file is shown below:-
<project xmlns="http://maven.apache.org/POM/4.0.0" xmlns:xsi="http://www.w3.org/2001/XMLSchema-instance"
  xsi:schemaLocation="http://maven.apache.org/POM/4.0.0 http://maven.apache.org/xsd/maven-4.0.0.xsd">
  <modelVersion>4.0.0</modelVersion>

  <groupId>com.example</groupId>
  <artifactId>Cucumber_Playwright_TestNG</artifactId>
  <version>1.0-SNAPSHOT</version>
  <packaging>jar</packaging>

  <name>Cucumber_Playwright_TestNG</name>
  <url>http://maven.apache.org</url>

  <properties>
    <java.version>17</java.version>
    <project.build.sourceEncoding>UTF-8</project.build.sourceEncoding>
    <cucumber.version>7.33.0</cucumber.version>
    <testng.version>7.12.0</testng.version>
    <playwright.version>1.57.0</playwright.version>
    <maven.compiler.version>3.14.1</maven.compiler.version>
    <maven.surefire.version>3.5.4</maven.surefire.version>
    <maven.failsafe.version>3.5.4</maven.failsafe.version>
    <lombok.version>1.18.30</lombok.version>
    <maven.compiler.source>17</maven.compiler.source>
    <maven.compiler.target>17</maven.compiler.target>
  </properties>

  <dependencies>

    <!-- Cucumber with Java -->
    <dependency>
      <groupId>io.cucumber</groupId>
      <artifactId>cucumber-java</artifactId>
      <version>${cucumber.version}</version>
      <scope>test</scope>
    </dependency>

    <!-- Cucumber with TestNG -->
    <dependency>
      <groupId>io.cucumber</groupId>
      <artifactId>cucumber-testng</artifactId>
      <version>${cucumber.version}</version>
      <scope>test</scope>
    </dependency>

    <!-- TestNG -->
    <dependency>
      <groupId>org.testng</groupId>
      <artifactId>testng</artifactId>
      <version>${testng.version}</version>
      <scope>test</scope>
    </dependency>

    <!-- Playwright -->
    <dependency>
      <groupId>com.microsoft.playwright</groupId>
      <artifactId>playwright</artifactId>
      <version>${playwright.version}</version>
    </dependency>

  </dependencies>

 <build>
    <plugins>
      <plugin>
        <groupId>org.apache.maven.plugins</groupId>
        <artifactId>maven-compiler-plugin</artifactId>
        <version>${maven.compiler.version}</version>
        <configuration>
          <source>${maven.compiler.source}</source>
          <target>${maven.compiler.target}</target>
        </configuration>
      </plugin>

      <plugin>
        <groupId>org.apache.maven.plugins</groupId>
        <artifactId>maven-surefire-plugin</artifactId>
        <version>${maven.surefire.version}</version>
        <configuration>
          <testFailureIgnore>true</testFailureIgnore>
          <includes>
            <include>**/*RunnerTests.java</include>
          </includes>
        </configuration>
      </plugin>

    </plugins>
  </build>
</project>
3. Define Directory Structure
Creating a well-organized project structure is crucial for maintaining a scalable and efficient automation framework.
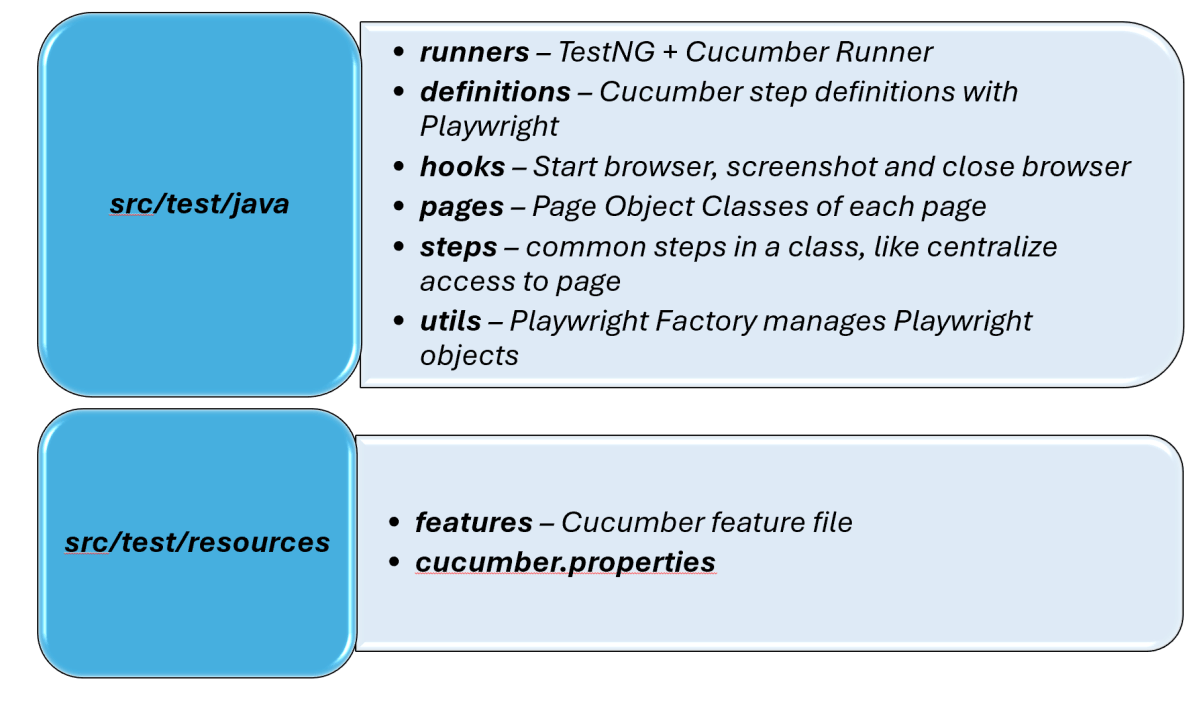
1. Maven Configuration (pom.xml): This file manages project dependencies, plugins, and other configurations.
2. Features (src/test/resources/…/features): Contains Gherkin feature files written in plain English.
3. StepDefinition (src/test/java/.../tests/): Here, you write your actual test cases, utilizing the page classes. Cucumber steps are implemented.
4. Runner (src/main/java/…runner/): It connects Cucumber feature files with TestNG and triggers execution.
5. Hooks (src/test/java/…/hooks): Hooks manage test lifecycle events like Launch browser before scenario, Close browser after scenario, Capture screenshots on failure
6. Page Classes (src/main/java/.../pages/): Each web page in your application should have a corresponding page class. This class encapsulates all the functionalities of the web page, following the Page Object Model.
7. Steps (src/test/java/…/steps): It is an extra abstraction layer between step definitions and pages. It contains code which is common across scenarios.
8. Utility Classes (src/main/java/.../utils/): These classes can include various utilities like configuration readers, browser factory, helper methods for common tasks, etc.
9. Test Data Files (src/test/resources/testdata/): Externalizes test data to avoid hardcoding. This includes items like usernames and passwords. These are stored in external files for easy management.
10. cucumber.properties: It contains global configuration for Cucumber.
11. testng.xml: This file is the central configuration file that defines how the test suite should be executed.
4. Create a feature file under src/test/resources
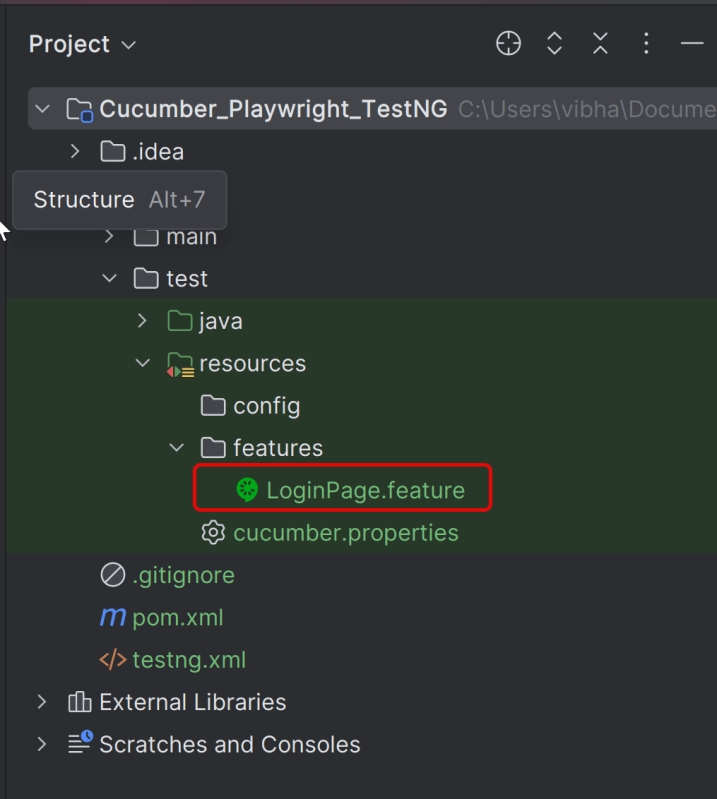
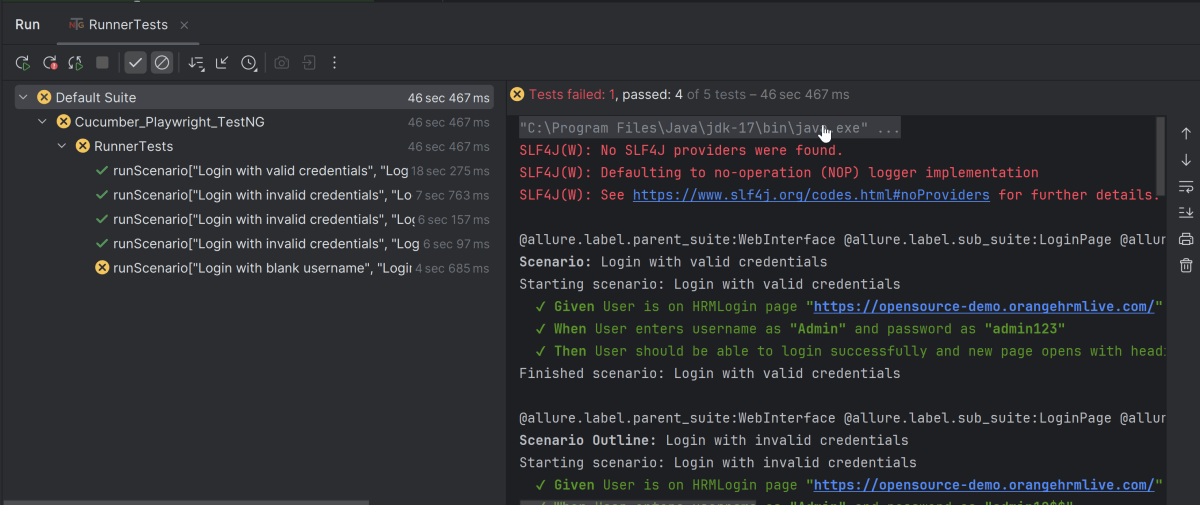
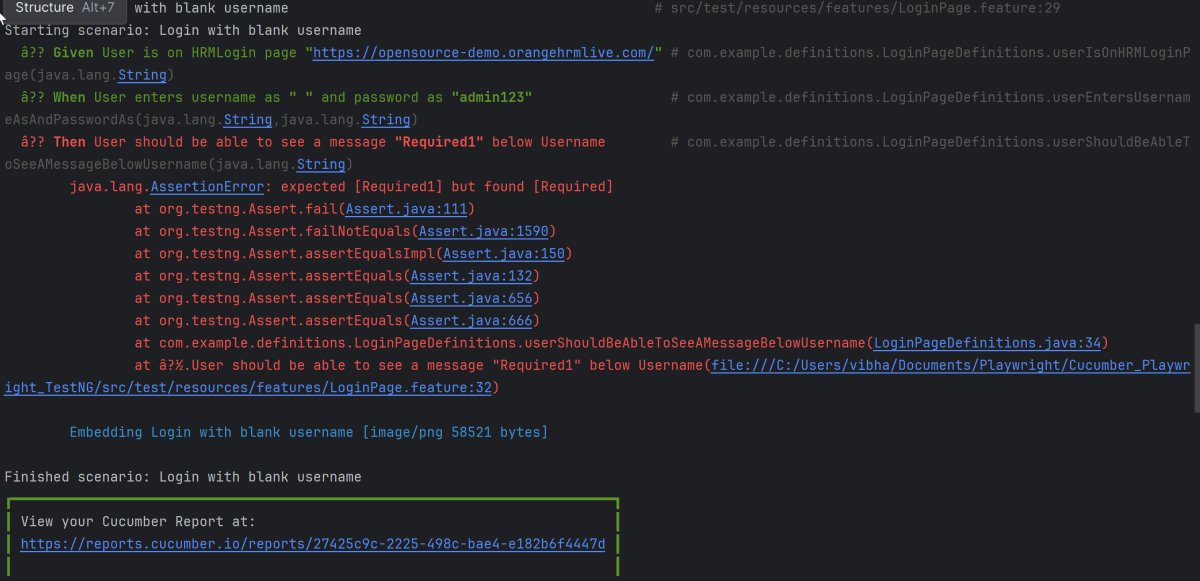
It is recommended to create a features folder in the src/test/resources directory. Create all the feature files in this features folder. Feature file should be saved as an extension of .feature. The test scenarios in the Feature file are written in Gherkins language. Add the test scenarios in this feature file. I have added sample test scenarios. Out of 5 tests, 4 will pass and 1 will fail.
Feature: Login to HRM Application

  Background:
    Given User is on HRMLogin page "https://opensource-demo.orangehrmlive.com/"

  @ValidCredentials
  Scenario: Login with valid credentials

    When User enters username as "Admin" and password as "admin123"
    Then User should be able to login successfully and new page opens with heading "Dashboard"

  @InvalidCredentials
  Scenario Outline: Login with invalid credentials

    When User enters username as "<username>" and password as "<password>"
    Then User should be able to see error message "<errorMessage>"

    Examples:
      | username   | password  | errorMessage           |
      | Admin      | admin12$$ | Invalid credentials    |
      | admin$$    | admin123  | Invalid credentials    |
      | abc123     | xyz$$     | Invalid credentials    |

  @MissingUsername
  Scenario: Login with blank username

    When User enters username as " " and password as "admin123"
    Then User should be able to see a message "Required1" below Username
5. Create the utility package in src/test/java
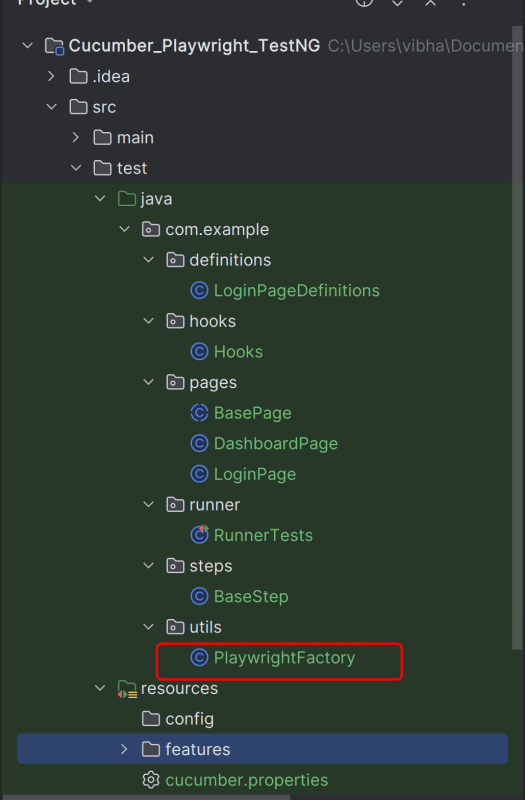
Create a Playwright Factory that contains the methods to start the browser and close the browser.
package com.example.utils;

import com.microsoft.playwright.*;

public class PlaywrightFactory {

    private static Playwright playwright;
    private static Browser browser;
    private static BrowserContext context;
    private static Page page;

    public static void initBrowser() {

        playwright = Playwright.create();
        browser = playwright.chromium().launch(new BrowserType.LaunchOptions().setHeadless(false));
        context = browser.newContext();
        page = context.newPage();
    }

    public static Page getPage() {
        return page;
    }

    public static void closeBrowser() {
        if (page != null) page.close();
        if (context != null) context.close();
        if (browser != null) browser.close();
        if (playwright != null) playwright.close();
    }
}
6. Create the hooks package in src/test/java
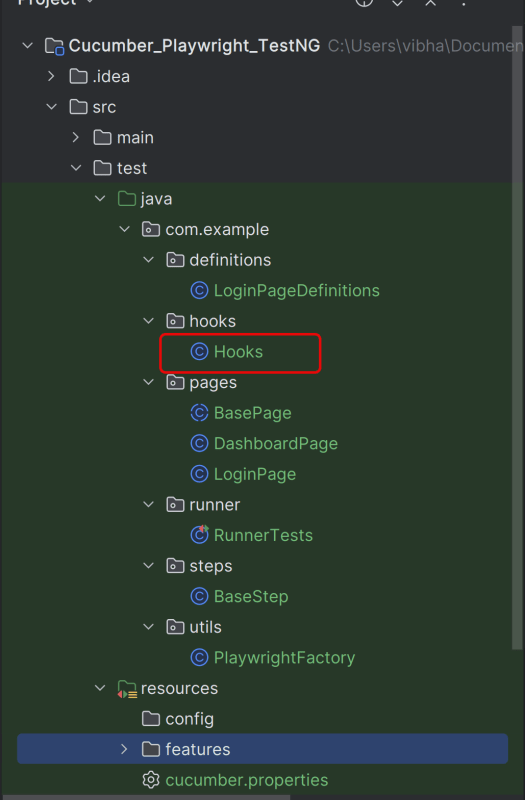
Create a Hook class that contain the code that runs before or after each scenario. Here, it is responsible for
- Starting the Playwright browser before a scenario
- Closing the browser after the scenario finishes
Below is the sample code.
package com.example.hooks;

import com.example.utils.PlaywrightFactory;
import com.microsoft.playwright.*;
import io.cucumber.java.After;
import io.cucumber.java.Before;
import io.cucumber.java.Scenario;

public class Hooks {

    @Before
    public void beforeScenario(Scenario scenario) {
        System.out.println("Starting scenario: " + scenario.getName());
        PlaywrightFactory.initBrowser();
    }

    @After
    public void afterScenario(Scenario scenario) {
        Page page = PlaywrightFactory.getPage();
        if (page != null && scenario.isFailed()) {
            scenario.attach(page.screenshot(), "image/png", scenario.getName());
        }
        PlaywrightFactory.closeBrowser();
        System.out.println("Finished scenario: " + scenario.getName());
    }
}
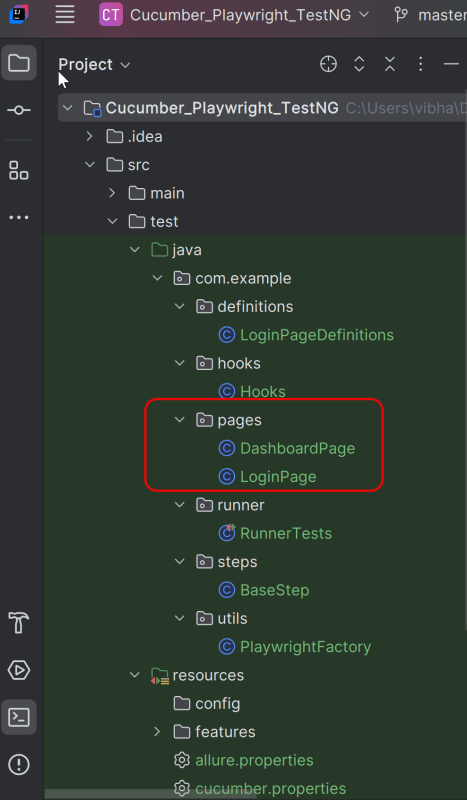
7. Create the pages package in src/test/java
Each web page in your application should have a corresponding page class. This class encapsulates all the functionalities of the web page, following the Page Object Model.
LoginPage
package com.example.pages;

import com.microsoft.playwright.*;

public class LoginPage {

    private Page page;

    // Locators
    private final Locator usernameLocator;
    private final Locator passwordLocator;
    private final Locator submitLocator;
    private final Locator invalidCredentialsLocator;
    private final Locator missingUsernameLocator;

    public LoginPage(Page page) {
        this.page = page;
        this.usernameLocator = page.locator("input[name='username']");
        this.passwordLocator = page.locator("input[name='password']");
        this.submitLocator = page.locator("button[type='submit']");
        this.invalidCredentialsLocator = page.locator("//p[contains(@class, \"oxd-text oxd-text--p oxd-alert-content-text\")]");
        this.missingUsernameLocator = page.locator("//span[contains(@class, 'oxd-text oxd-text--span oxd-input-field-error-message oxd-input-group__message')]");
    }

    public void login(String user, String pass){
        usernameLocator.fill(user);
        passwordLocator.fill(pass);
        submitLocator.click();
    }

    public void getUrl(String url){
        page.navigate(url);
    }

    public String getMissingUsernameErrorMessage() {
        return missingUsernameLocator.textContent();
    }

    public String getErrorMessage () {
        return invalidCredentialsLocator.textContent();
    }
}
DashboardPage
package com.example.pages;

import com.microsoft.playwright.Locator;
import com.microsoft.playwright.Page;

public class DashboardPage {

    private Page page;

    private final Locator headingLocator;

    public DashboardPage(Page page){
        this.page = page;
        this.headingLocator = page.locator("//h6[contains(@class, \"oxd-topbar-header-breadcrumb-module\")]");
    }

    public String getDashboardPageHeading() {
        return headingLocator.textContent();
    }

}
8. Create the step package in src/test/java
package com.example.steps;

import com.example.utils.PlaywrightFactory;
import com.microsoft.playwright.Page;

public class BaseStep {

    protected Page getPage() {
        Page page = PlaywrightFactory.getPage();
        if (page == null) {
            throw new RuntimeException(
                    "Page is NULL. Ensure @Before hook ran and glue includes hooks package."
            );
        }
        return page;
    }
}
9. Create the step definition class in src/test/java
Create the step definition class corresponding to the feature file to test the scenarios in the src/test/java directory. The StepDefinition files should be created in this definitions directory within the folder called definitions.
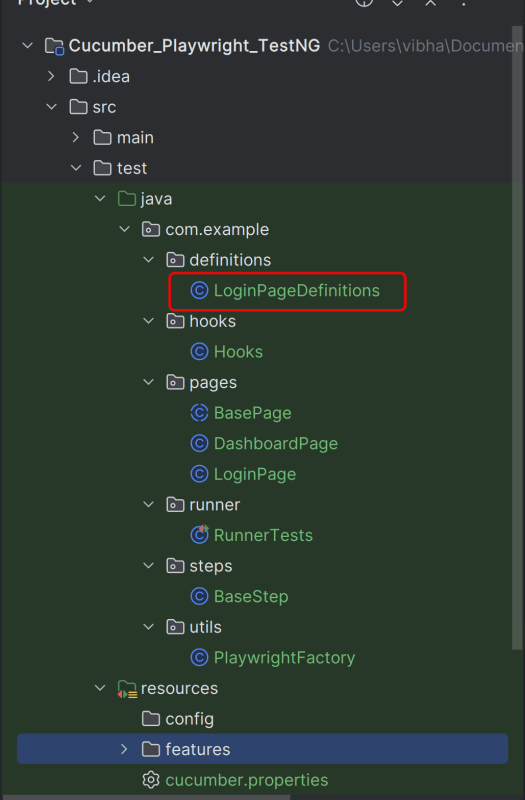
Below is the step definition of the LoginPage feature file.
package com.example.definitions;

import com.example.steps.BaseStep;
import com.example.pages.DashboardPage;
import com.example.pages.LoginPage;
import io.cucumber.java.en.Given;
import io.cucumber.java.en.Then;
import io.cucumber.java.en.When;
import org.testng.Assert;

public class LoginPageDefinitions extends BaseStep {

    private LoginPage loginPage;
    private DashboardPage dashboardPage;

    @Given("User is on HRMLogin page {string}")
    public void userIsOnHRMLoginPage(String baseUrl) {
        loginPage = new LoginPage(getPage());
        loginPage.getUrl(baseUrl);
    }

    @When("User enters username as {string} and password as {string}")
    public void userEntersUsernameAsAndPasswordAs(String username, String password) {
        loginPage.login(username, password);
    }

    @Then("User should be able to see error message {string}")
    public void userShouldBeAbleToSeeErrorMessage(String expectedErrorMessage) {
        Assert.assertEquals(loginPage.getErrorMessage(), expectedErrorMessage);
    }

    @Then("User should be able to see a message {string} below Username")
    public void userShouldBeAbleToSeeAMessageBelowUsername(String expectedErrorMessage) {
        Assert.assertEquals(loginPage.getMissingUsernameErrorMessage(), expectedErrorMessage);
    }

    @Then("User should be able to login successfully and new page opens with heading {string}")
    public void userShouldBeAbleToLoginSuccessfullyAndNewPageOpen(String expectedHeading) {
        dashboardPage = new DashboardPage(getPage());
        Assert.assertEquals(dashboardPage.getDashboardPageHeading(), expectedHeading);

    }

}
10. Create a TestNG Cucumber Runner class in src/test/java
We need to create a class called Runner class to run the tests. This class will use the TestNG annotation @RunWith(), which tells TestNG what is the test runner class. TestRunner should be created under src/test/java within the folder called runner.
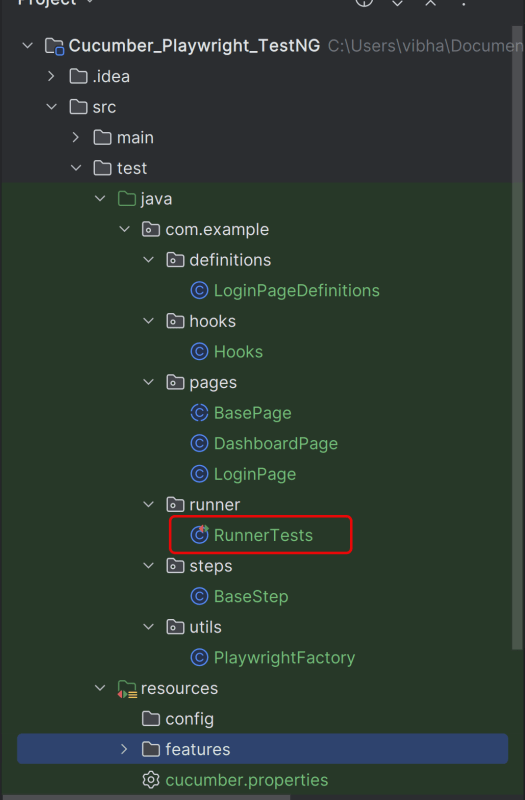
AbstractTestNGCucumberTests is a class provided by the Cucumber framework when we are integrating Cucumber with the TestNG test framework. This abstract class helps facilitate the execution of Cucumber tests using TestNG.
package com.example.runner;

import io.cucumber.testng.AbstractTestNGCucumberTests;
import io.cucumber.testng.CucumberOptions;

@CucumberOptions(features = "src/test/resources/features/LoginPage.feature",
        glue = {"com.example.hooks","com.example.definitions"},
        plugin = {
                "pretty",
        }
)

public class RunnerTests extends AbstractTestNGCucumberTests {

}
11. Create testng.xml
We need to specify the values of browser in the TestNG XML file that will pass to the test case file.
Let’s create a testng.xml file to run the test using TestNG.
Right click on the project, New >> File
<?xml version="1.0" encoding="UTF-8"?>
<!DOCTYPE suite SYSTEM "http://testng.org/testng-1.0.dtd">
<suite name="Playwright test suite" thread-count="3">
    <test name="Chromium Tests">
        <classes>
            <class name="com.example.runner.RunnerTests"/>
        </classes>
    </test>
</suite>
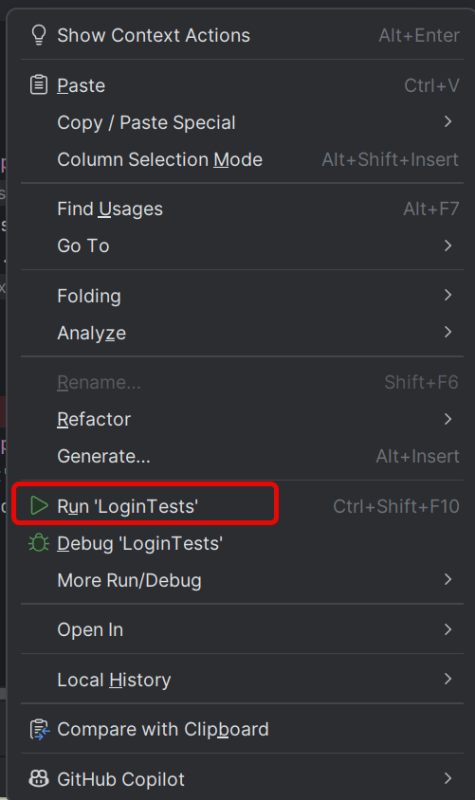
12. Run the test through Runner Class
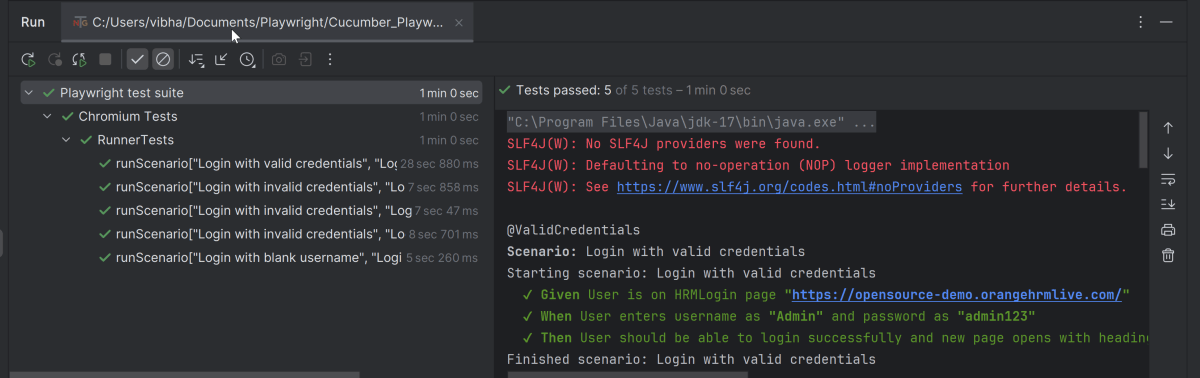
Go to the Runner class and right-click and select Run ‘RunnerTests’. The tests will run as TestNG tests (in IntelliJ).
Below is the test execution result.
13. Run the tests from TestNG.xml
Execute the tests by right-clicking on testng.xml and select Run ‘…testng.xml’
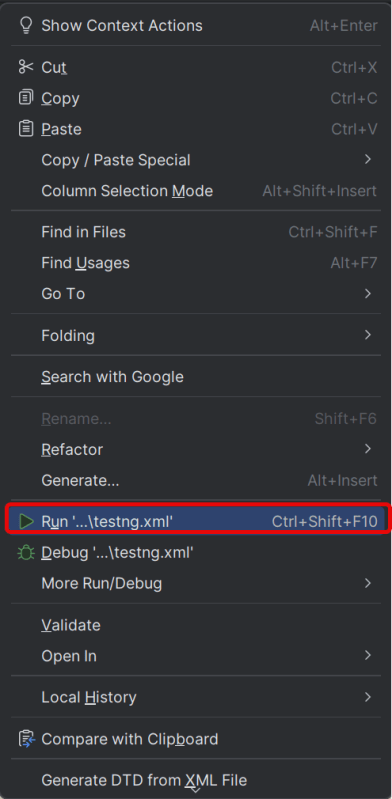
This will run the tests in chromium as mentioned in the .xml file.
The output of the above program is
14. Run the tests from the Command Line
Run the below command in the command prompt to run the tests and to get the test execution report.
mvn clean test
The execution screen looks like something as shown below.
15. Cucumber Report Generation
Add cucumber.properties under src/test/resources and add the below instructions in the file.
cucumber.publish.enabled=true
Below is the image of the Cucumber Report generated using the Cucumber Service.
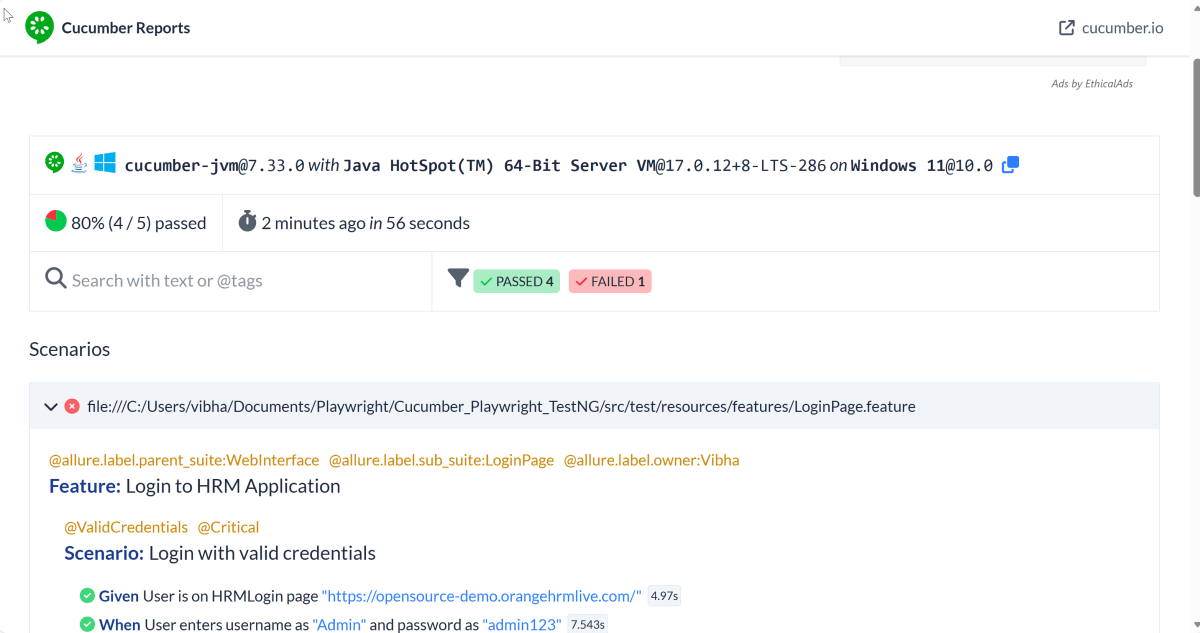
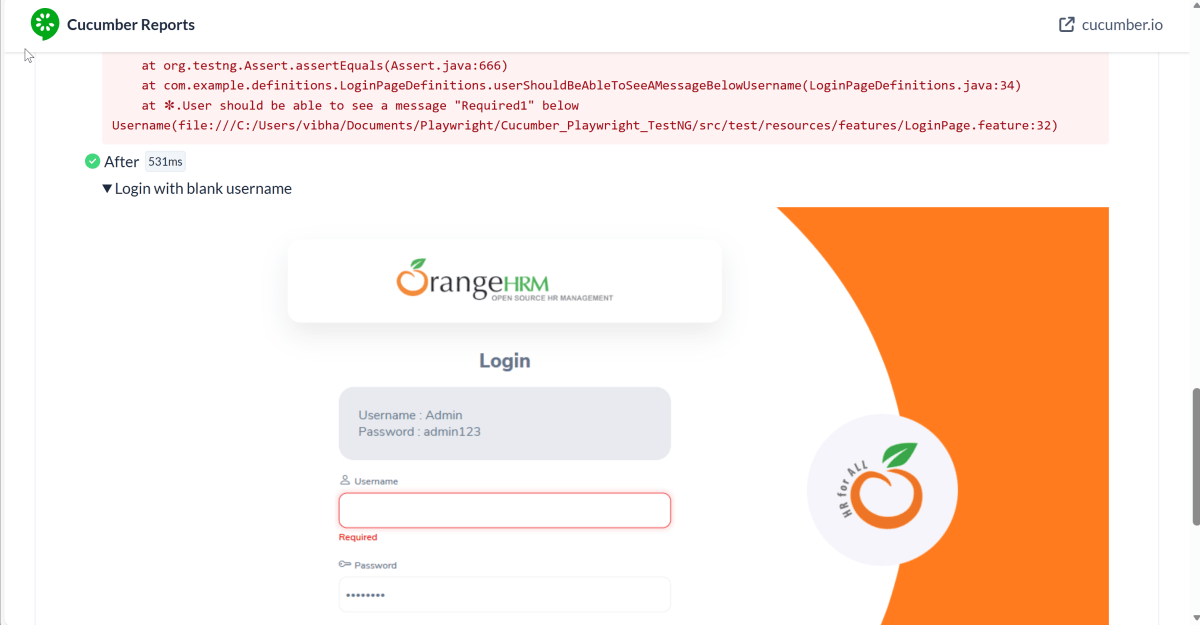
The screenshot of the failed test is also attached in the Cucumber Report.
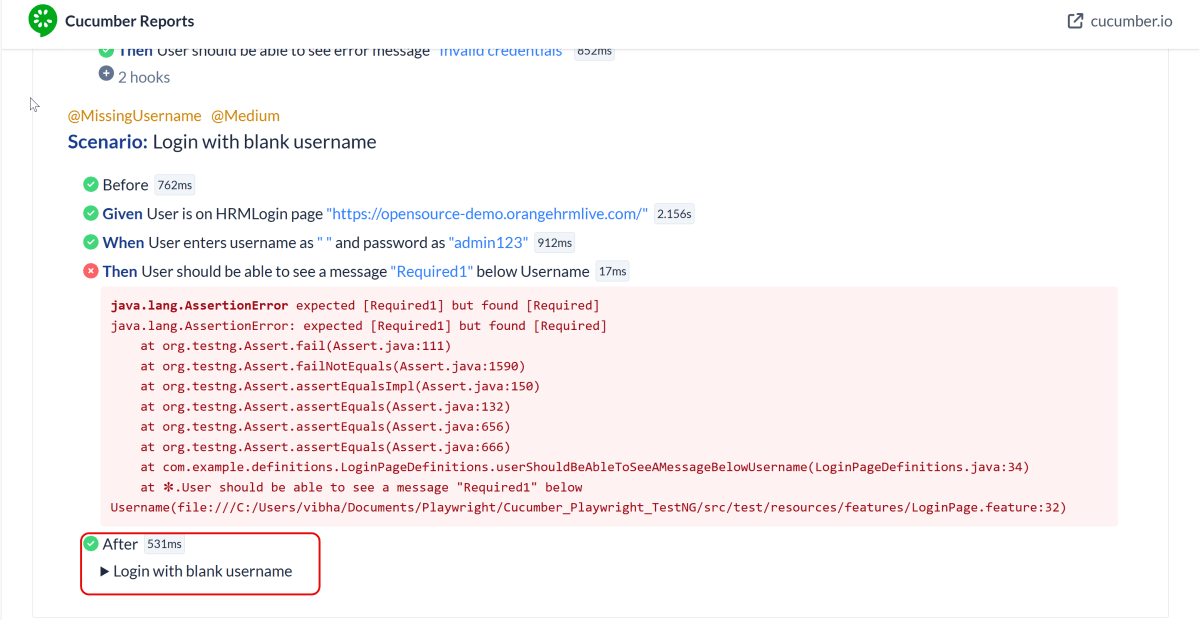
Click on the highlighted part. It contains the screenshot.
16. TestNG Report Generation
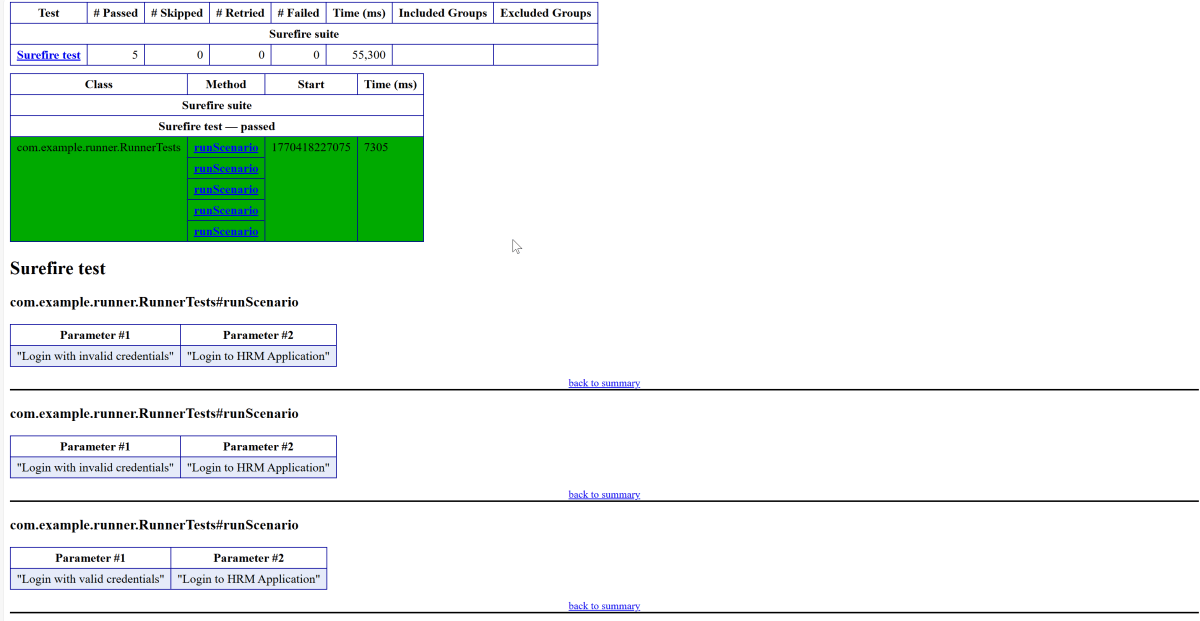
TestNG generates various types of reports under test-output folder like emailable-report.html, index.html, testng-results.xml.
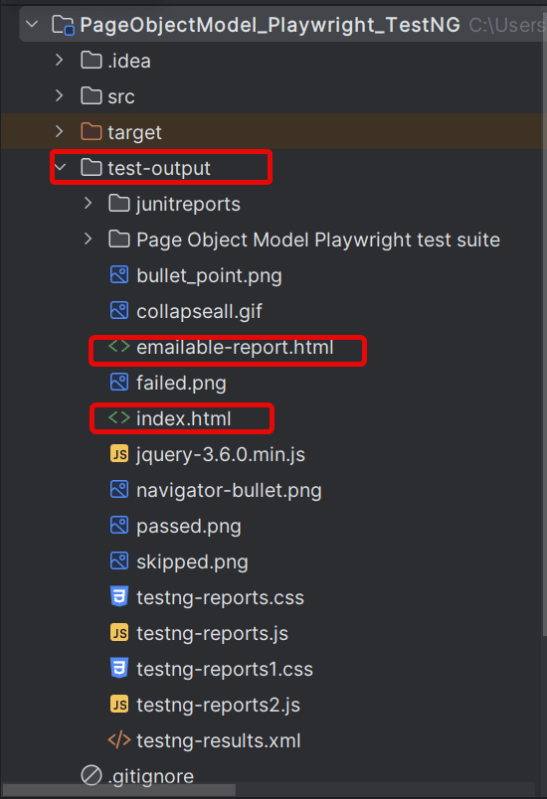
We are interested in the emailable-report.html report. Open emailable-report.html, as this is an HTML report, and open it with the browser. The below image shows emailable-report.html.
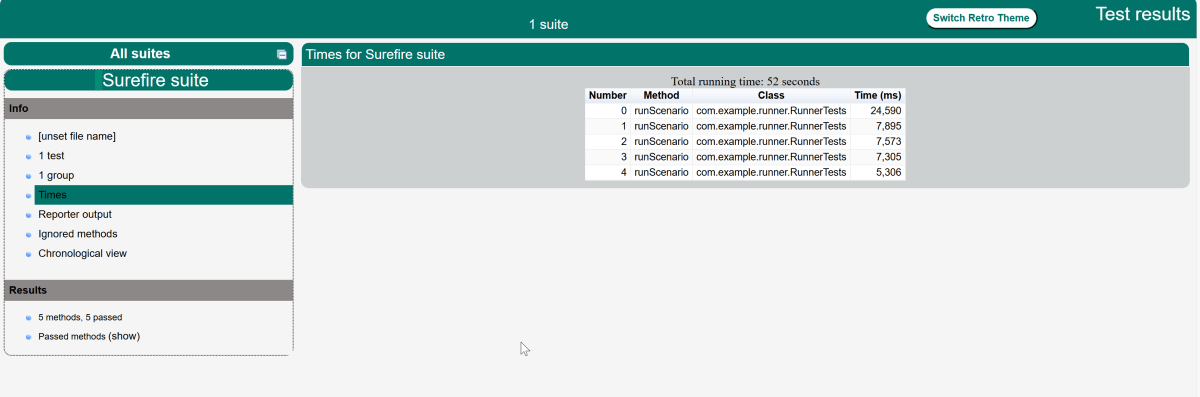
TestNG also produces an “index.html” report, and it resides under the test-output folder. The below image shows the index.html report. This is the latest theme of the report.
Recap of Key Points:
- Playwright and Java: We explored the powerful combination of Playwright with Java. We highlighted the benefits of this duo in automated testing.
- Build: Maven manage the dependencies and execution.
- Cucumber (BDD Framework): It enables Behavior-Driven Development (BDD).
- Feature: It uses Gherkin feature file to create the scenarios.
- StepDefinition: StepDefinition file contains the test code related to the feature file. When Cucumber executes a Gherkin step in a scenario, it will look for a matching step definition to execute.
- Test Runner: It acts as a bridge between the feature and StepDefinition file.
- TestNG: It controls the test execution lifecycle. It integrates with Cucumber via TestNG runner.
- Hooks: Hooks manage browser setup, teardown, and failure handling
