ExtentReport, one of the most popular and extensively used test reports, has been officially retired. Changes in automated testing techniques led to this decision. The same developer, Anshoo Arora, fills the void with ChainTest, a potent reporting system. With its enhanced capabilities, real-time data, and seamless integration options, ChainTest is anticipated to transform how we see test results.
Table of Contents
- What is ChainTest Report?
- Prerequisite
- Dependency List
- Structure of Project
- Implementation
- Step 1 – Add ChainTest Cucumber plugin dependency in Maven Project.
- Step 2 – Create a feature file under src/test/resources/features
- Step 3 – Create the classes for locators, actions, and utilities in src/main/java
- Step 4 – Create a StepDefinition class in src/test/java
- Step 5 – Create a Hook class in src/test/java
- Step 6 – Create a TestNG Cucumber Runner class in the src/test/java
- Step 7 – Add ChainTest plugin to the runner class
- Step 8 – Add chaintest.properties to src/test/resources directory
- Step 9 – Create a testng.xml at the root directory
- Step 10 – Run the tests from TestNG
- Step 11 – View ChainTest Reports
- Step 12 – Run the tests through command line
What is ChainTest Report?
ChainTest is a complete reporting system. It supports a variety of sources, including email and static data. It also handles real-time and historical analytics with ChainLP. The next-generation reporting framework ChainTest was developed for a number of test frameworks, such as Cucumber, JUnit, and TestNG.
Prerequisite
- Java 17 is installed
- Maven is installed
- Eclipse or IntelliJ is installed
Dependency List:
- Selenium – 4.28.1
- Java 17
- TestNG – 7.10.2
- Cucumber – 7.18.1
- Maven – 3.9.6
- ChainTest Cucumber– 1.0.11
Structure of Project

Implementation
Step 1 – Add ChainTest Cucumber plugin dependency in Maven Project.
<dependency>
      <groupId>com.aventstack</groupId>
      <artifactId>chaintest-cucumber-jvm</artifactId>
      <version>${chaintest.cucumberjvm.version}</version>
      <scope>provided</scope>
 </dependency>
The complete pom.xml looks like as shown below:
<project xmlns="http://maven.apache.org/POM/4.0.0" xmlns:xsi="http://www.w3.org/2001/XMLSchema-instance"
  xsi:schemaLocation="http://maven.apache.org/POM/4.0.0 http://maven.apache.org/xsd/maven-4.0.0.xsd">
  <modelVersion>4.0.0</modelVersion>

  <groupId>com.example</groupId>
  <artifactId>ChainTestReport_Cucumber_TestNG_Demo</artifactId>
  <version>1.0-SNAPSHOT</version>
  <packaging>jar</packaging>

  <name>ChainTestReport_Cucumber_TestNG_Demo</name>
  <url>http://maven.apache.org</url>

  <properties>
    <project.build.sourceEncoding>UTF-8</project.build.sourceEncoding>
    <cucumber.version>7.18.1</cucumber.version>
    <selenium.version>4.25.0</selenium.version>
    <testng.version>7.10.2</testng.version>
    <chaintest.cucumberjvm.version>1.0.11</chaintest.cucumberjvm.version>
    <apache.common.version>2.4</apache.common.version>
    <maven.compiler.plugin.version>3.13.0</maven.compiler.plugin.version>
    <maven.surefire.plugin.version>3.3.1</maven.surefire.plugin.version>
    <maven.compiler.source.version>17</maven.compiler.source.version>
    <maven.compiler.target.version>17</maven.compiler.target.version>
    <maven.cucumber.reporting.version>5.8.2</maven.cucumber.reporting.version>
  </properties>

  <dependencies>

    <dependency>
      <groupId>io.cucumber</groupId>
      <artifactId>cucumber-java</artifactId>
      <version>${cucumber.version}</version>
    </dependency>

    <dependency>
      <groupId>io.cucumber</groupId>
      <artifactId>cucumber-testng</artifactId>
      <version>${cucumber.version}</version>
      <scope>test</scope>
    </dependency>

    <!-- Selenium -->
    <dependency>
      <groupId>org.seleniumhq.selenium</groupId>
      <artifactId>selenium-java</artifactId>
      <version>${selenium.version}</version>
    </dependency>

    <!-- TestNG -->
    <dependency>
      <groupId>org.testng</groupId>
      <artifactId>testng</artifactId>
      <version>${testng.version}</version>
      <scope>test</scope>
    </dependency>

    <dependency>
      <groupId>com.aventstack</groupId>
      <artifactId>chaintest-cucumber-jvm</artifactId>
      <version>${chaintest.cucumberjvm.version}</version>
      <scope>provided</scope>
    </dependency>

  </dependencies>

  <build>
    <plugins>
      <plugin>
        <groupId>org.apache.maven.plugins</groupId>
        <artifactId>maven-compiler-plugin</artifactId>
        <version>${maven.compiler.plugin.version}</version>
        <configuration>
          <source>${maven.compiler.source.version}</source>
          <target>${maven.compiler.target.version}</target>
        </configuration>
      </plugin>
      <plugin>
        <groupId>org.apache.maven.plugins</groupId>
        <artifactId>maven-surefire-plugin</artifactId>
        <version>${maven.surefire.plugin.version}</version>
        <configuration>
          <testFailureIgnore>true</testFailureIgnore>
          <suiteXmlFiles>
            <suiteXmlFile>testng.xml</suiteXmlFile>
          </suiteXmlFiles>
        </configuration>
      </plugin>

    </plugins>
  </build>
</project>
Step 2 – Create a feature file under src/test/resources/features
It is recommended to create a features folder in the src/test/resources directory. Create all the feature files in this features folder. Feature file should be saved as an extension of .feature. The test scenarios in the Feature file are written in Gherkins language. Add the test scenarios in this feature file. I have added sample test scenarios.
Feature: Login to HRM Application

  Background:
    Given User is on HRMLogin page "https://opensource-demo.orangehrmlive.com/"

  @ValidCredentials
  Scenario: Login with valid credentials

    When User enters username as "Admin" and password as "admin123"
    Then User should be able to login successfully and new page open

  @InvalidCredentials
  Scenario Outline: Login with invalid credentials

    When User enters username as "<username>" and password as "<password>"
    Then User should be able to see error message "<errorMessage>"

    Examples:
      | username   | password  | errorMessage           |
      | Admin      | admin12$$ | Invalid credentials    |
      | admin$$    | admin123  | Invalid credentials    |
      | abc123     | xyz$$     | Invalid credentials    |

  @MissingUsername
  Scenario: Login with blank username - FailedTest

    When User enters username as " " and password as "admin123"
    Then User should be able to see a message "Required1" below Username
Step 3 – Create the classes for locators, actions, and utilities in src/main/java
LoginPageActions
package com.example.actions;

import com.example.locators.LoginPageLocators;
import org.openqa.selenium.support.PageFactory;
import com.example.utils.HelperClass;


public class LoginPageActions {

    LoginPageLocators loginPageLocators = null;

    public LoginPageActions() {

        this.loginPageLocators = new LoginPageLocators();
        PageFactory.initElements(HelperClass.getDriver(), loginPageLocators);
    }

    // Get the error message when username is blank
    public String getMissingUsernameText() {
        return loginPageLocators.missingUsernameErrorMessage.getText();
    }

    // Get the Error Message
    public String getErrorMessage() {
        return loginPageLocators.errorMessage.getText();
    }

    public void login(String strUserName, String strPassword) {

        // Fill user name
        loginPageLocators.userName.sendKeys(strUserName);

        // Fill password
        loginPageLocators.password.sendKeys(strPassword);

        // Click Login button
        loginPageLocators.login.click();

    }
}
HomePageActions
package com.example.actions;

import com.example.locators.HomePageLocators;
import org.openqa.selenium.support.PageFactory;
import com.example.utils.HelperClass;

public class HomePageActions {

    HomePageLocators homePageLocators = null;

    public HomePageActions() {

        this.homePageLocators = new HomePageLocators();
        PageFactory.initElements(HelperClass.getDriver(),homePageLocators);
    }

    public String getHomePageText() {
        System.out.println("Heading :" + homePageLocators.homePageUserName.getText());
        return homePageLocators.homePageUserName.getText();
    }

}
LoginPageLocators
package com.example.locators;

import org.openqa.selenium.WebElement;
import org.openqa.selenium.support.FindBy;

public class LoginPageLocators {

    @FindBy(name = "username")
    public WebElement userName;

    @FindBy(name = "password")
    public WebElement password;

    @FindBy(xpath = "//*[@id='app']/div[1]/div/div[1]/div/div[2]/div[2]/form/div[1]/div/span")
    public WebElement missingUsernameErrorMessage;

    @FindBy(xpath = "//*[@id='app']/div[1]/div/div[1]/div/div[2]/div[2]/form/div[3]/button")
    public WebElement login;

    @FindBy(xpath = "//*[@id='app']/div[1]/div/div[1]/div/div[2]/div[2]/div/div[1]/div[1]/p")
    public  WebElement errorMessage;

}
HomePageLocators
package com.example.locators;
import org.openqa.selenium.WebElement;
import org.openqa.selenium.support.FindBy;

public class HomePageLocators {

    @FindBy(xpath = "//span[@class='oxd-topbar-header-breadcrumb']/h6")

    public  WebElement homePageUserName;

}
HelperClass
package com.example.utils;

import java.time.Duration;
import org.openqa.selenium.WebDriver;
import org.openqa.selenium.chrome.ChromeDriver;
import org.openqa.selenium.chrome.ChromeOptions;

public class HelperClass {

    private static HelperClass helperClass;

    private static WebDriver driver;
    public final static int TIMEOUT = 5;

    private HelperClass() {

        ChromeOptions options = new ChromeOptions();
        options.addArguments("--start-maximized");
        driver = new ChromeDriver(options);
        driver.manage().timeouts().implicitlyWait(Duration.ofSeconds(TIMEOUT));
    }

    public static void openPage(String url) {
        driver.get(url);
    }

    public static WebDriver getDriver() {
        return driver;
    }

    public static void setUpDriver() {

        if (helperClass==null) {
            helperClass = new HelperClass();
        }
    }

    public static void tearDown() {

        if(driver!=null) {
            driver.quit();
        }

        helperClass = null;
    }

}
Step 4 – Create a StepDefinition class in src/test/java
Create a Java Class called Definition. In this class, we will create the Test Code related to the Given, When, Then of the Feature file. This will be in src/test/java.
package com.example.definitions;

import com.example.actions.HomePageActions;
import com.example.actions.LoginPageActions;

import io.cucumber.java.en.Given;
import io.cucumber.java.en.Then;
import io.cucumber.java.en.When;
import org.testng.Assert;
import com.example.utils.HelperClass;

public class LoginPageDefinitions {

    LoginPageActions objLogin = new LoginPageActions();
    HomePageActions objHomePage = new HomePageActions();

    @Given("User is on HRMLogin page {string}")
    public void loginTest(String url) {

        HelperClass.openPage(url);

    }

    @When("User enters username as {string} and password as {string}")
    public void goToHomePage(String userName, String passWord) {

        // login to application
        objLogin.login(userName, passWord);

    }

    @Then("User should be able to login successfully and new page open")
    public void verifyLogin() {

        // Verify home page
        Assert.assertTrue(objHomePage.getHomePageText().contains("Dashboard"));

    }

    @Then("User should be able to see error message {string}")
    public void verifyErrorMessage(String expectedErrorMessage) {

        // Verify error message
        Assert.assertEquals(objLogin.getErrorMessage(),expectedErrorMessage);

    }

    @Then("User should be able to see a message {string} below Username")
    public void verifyMissingUsernameMessage(String message) {

        Assert.assertEquals(objLogin.getMissingUsernameText(),message);
    }

}
Step 5 – Create a Hook class in src/test/java
Create the hook class that contains the Before and After hook. Use it to initialize the web browser. Then, close the web browser. I have added the code to take the screenshot of the failed scenario in @After Hook.
package com.example.definitions;
import org.openqa.selenium.OutputType;
import org.openqa.selenium.TakesScreenshot;

import io.cucumber.java.After;
import io.cucumber.java.Before;
import io.cucumber.java.Scenario;
import com.example.utils.HelperClass;

public class Hooks {

    @Before
    public static void setUp() {

        HelperClass.setUpDriver();
    }

    @After
    public static void tearDown(Scenario scenario) {

        //validate if scenario has failed
        if(scenario.isFailed()) {
            final byte[] screenshot = ((TakesScreenshot) HelperClass.getDriver()).getScreenshotAs(OutputType.BYTES);
            scenario.attach(screenshot, "image/png", scenario.getName());
        }

        HelperClass.tearDown();
    }
}
Step 6 – Create a TestNG Cucumber Runner class in the src/test/java
Below is the code for CucumberRunnerTests class.
package com.example.runner;

import io.cucumber.testng.AbstractTestNGCucumberTests;
import io.cucumber.testng.CucumberOptions;

@CucumberOptions(features = "src/test/resources/features/LoginPage.feature",
        glue = "com.example.definitions",
        plugin = {
                "pretty",
                "com.aventstack.chaintest.plugins.ChainTestCucumberListener:"
        }
)
public class RunnerTests extends AbstractTestNGCucumberTests {
}
Step 7 – Add ChainTest plugin to the runner class.
@CucumberOptions(plugin = {
  "com.aventstack.chaintest.plugins.ChainTestCucumberListener:"
})
Step 8 – Add chaintest.properties to src/test/resources directory
Add chaintest.properties to the classpath, example: src/test/resources/chaintest.properties.
# chaintest configuration
chaintest.project.name= ChaninTest Report with Cucumber and TestNG

# generators:
## chainlp
chaintest.generator.chainlp.enabled=true
chaintest.generator.chainlp.class-name=com.aventstack.chaintest.generator.ChainLPGenerator
chaintest.generator.chainlp.host.url=http://localhost/
chaintest.generator.chainlp.client.request-timeout-s=30
chaintest.generator.chainlp.client.expect-continue=false
chaintest.generator.chainlp.client.max-retries=3

## simple
chaintest.generator.simple.enabled=true
chaintest.generator.simple.document-title=chaintest
chaintest.generator.simple.class-name=com.aventstack.chaintest.generator.ChainTestSimpleGenerator
chaintest.generator.simple.output-file=target/chaintest/Index.html
chaintest.generator.simple.offline=false
chaintest.generator.simple.dark-theme=true
chaintest.generator.simple.datetime-format=yyyy-MM-dd hh:mm:ss a
chaintest.generator.simple.js=
chaintest.generator.simple.css=

## email
chaintest.generator.email.enabled=true
chaintest.generator.email.class-name=com.aventstack.chaintest.generator.ChainTestEmailGenerator
chaintest.generator.email.output-file=target/chaintest/Email.html
chaintest.generator.email.datetime-format=yyyy-MM-dd hh:mm:ss a
Step 9 – Create a testng.xml at the root directory.
Create a testng.xml at the root of the project. This xml holds parameter detail like allow passing parameters to test methods like browser name.
<?xml version="1.0" encoding="UTF-8"?>
<!DOCTYPE suite SYSTEM "https://testng.org/testng-1.0.dtd">
<suite name="Suite">
    <test  name="Cucumber with TestNG Test">
        <classes>
            <class name="com.example.runner.RunnerTests"/>
        </classes>
    </test> <!-- Test -->
</suite> <!-- Suite -->
Step 10 – Run the tests from TestNG
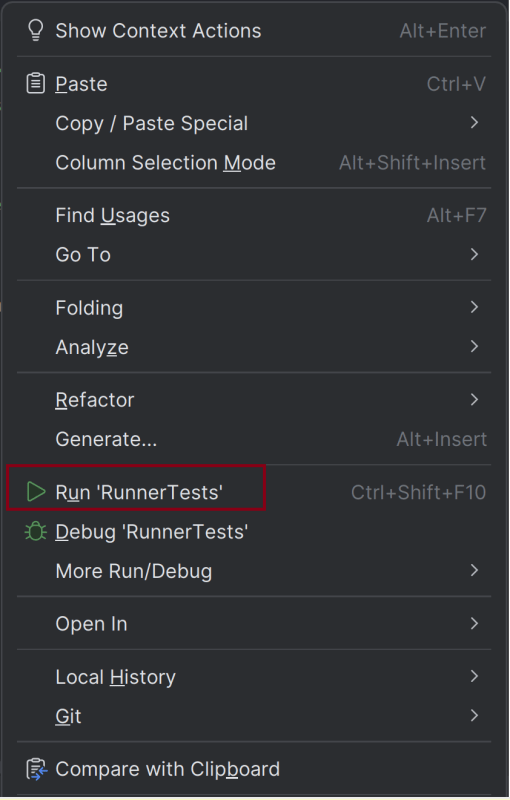
You can execute the test script by right-clicking on TestRunner class -> Run As TestNG. (Eclipse)
In the case of the IntelliJ project, right-click on the runner class and select Run ‘RunnerTests’.
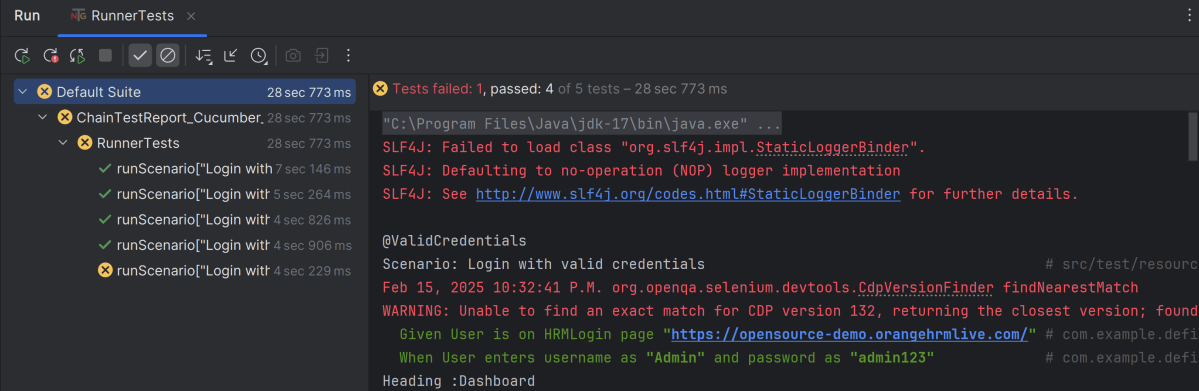
The execution status looks like as shown below. There are 5 tests and 1 test will fail.
Step 11 – View ChainTest Reports
ChainTest Reports are generated in target folder – Index.html and email.html.

Index.html
Right-click and open with Web Browser.
The index.html has a summary section that displays the summary of the execution. The summary includes the overview using a pictogram. It shows the start time and end time. The details of pass/fail tests are provided as shown in the image below.

Email.html
This report contains the high level summary of the test execution.

Step 12 – Run the tests through command line
To run the tests, use the below command
mvn clean test

We are done! Congratulations on making it through this tutorial and hope you found it useful! Happy Learning!!
You can get the project in GitHub, please refer this link