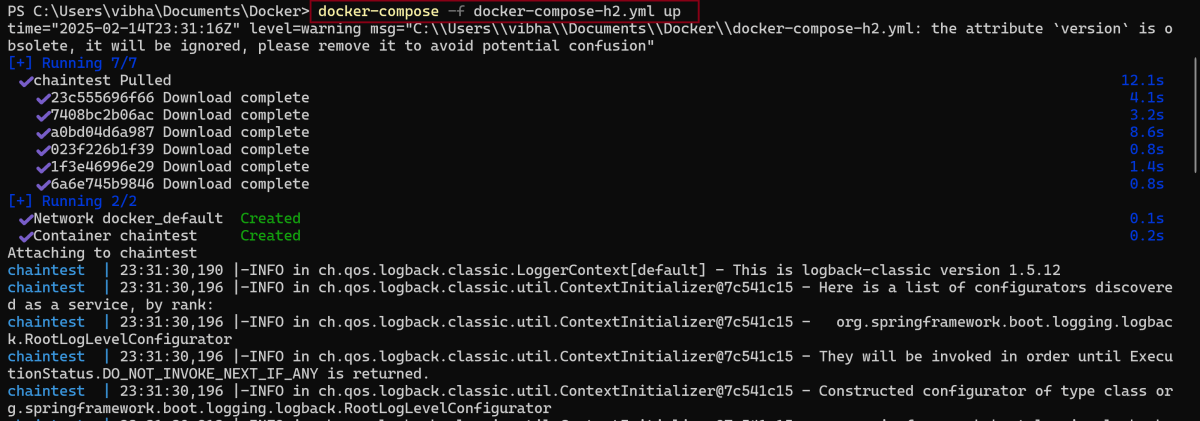
ChainTest Reports can be run on docker (dynamic report).
What is ChainLP?
ChainLP (Chain-Long-Playing like LP Record) is a Java (Spring) server which packs the Angular frontend and is distributed as a Docker image. ChainLP is the framework component providing historical analytics.
The recommended way to run ChainLP is with docker-compose. Currently, the supported databases are listed below but most RDBMS database should work.
H2
MySQL
PostgreSQL
For each database, there is a separate docker-compose.yml available at chainlp/docker. H2 provides the most straight-forward way to test, but it is NOT recommended for production use.
Add the following properties to chaintest.properties file in src/test/resources
# chaintest configuration
chaintest.project.name= ChaninTest Report with Cucumber and TestNG

# generators:
## chainlp
chaintest.generator.chainlp.enabled=true
chaintest.generator.chainlp.class-name=com.aventstack.chaintest.generator.ChainLPGenerator
chaintest.generator.chainlp.host.url=http://localhost/
chaintest.generator.chainlp.client.request-timeout-s=30
chaintest.generator.chainlp.client.expect-continue=false
chaintest.generator.chainlp.client.max-retries=3
Run the test either through command line or through Test Runner class.
Run the tests through command line
To run the tests, use the below command
mvn clean test
Updation of ChainTest Report
ChainTest Report is updated with the current test run as shown below:
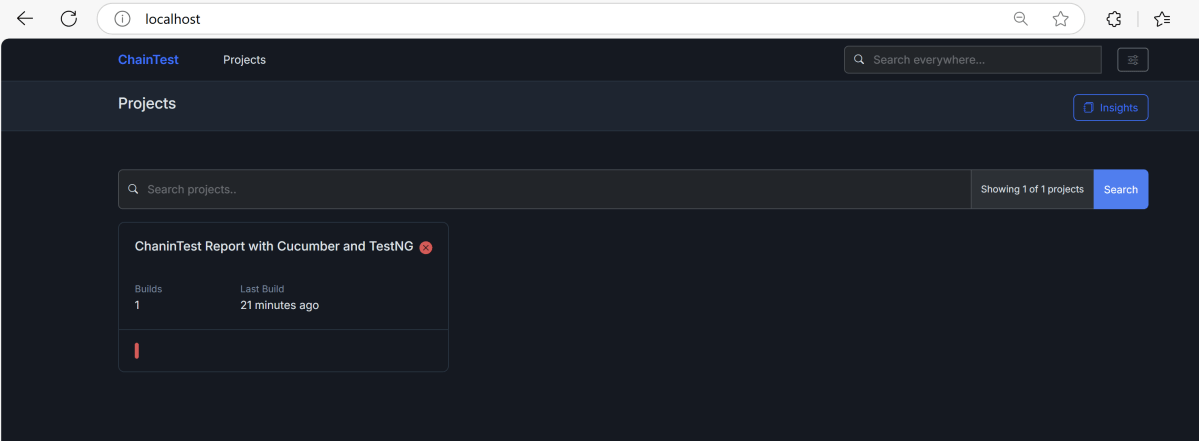
Click on the project and it will show the complete test execution report.
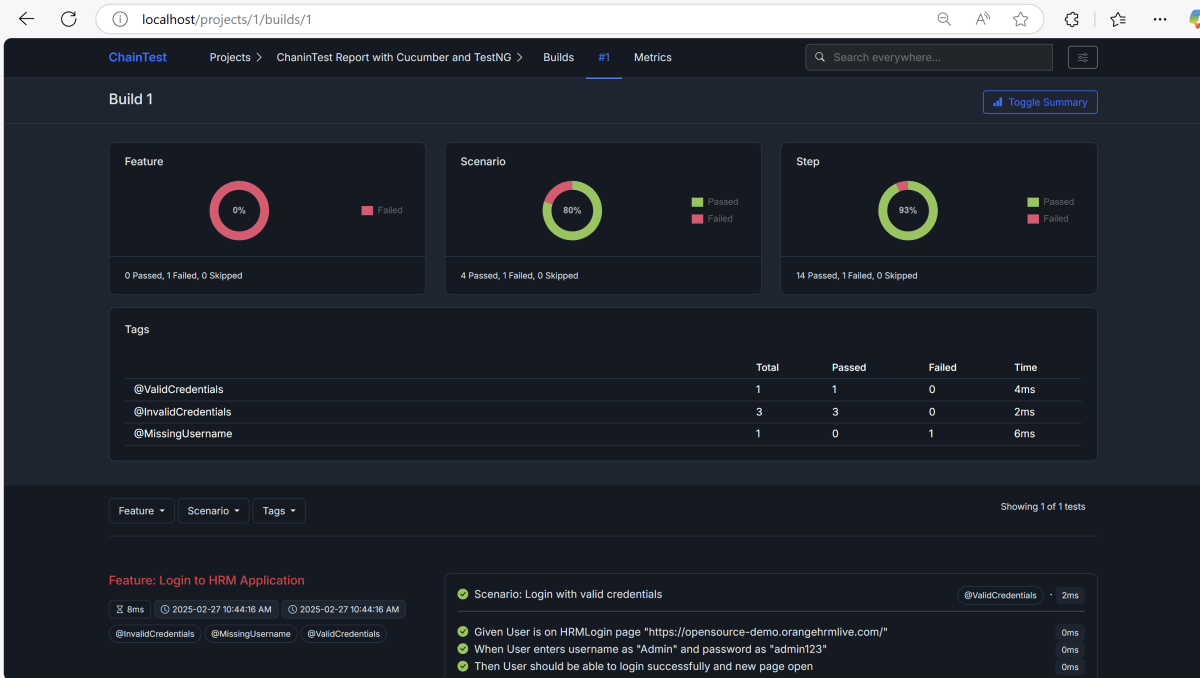
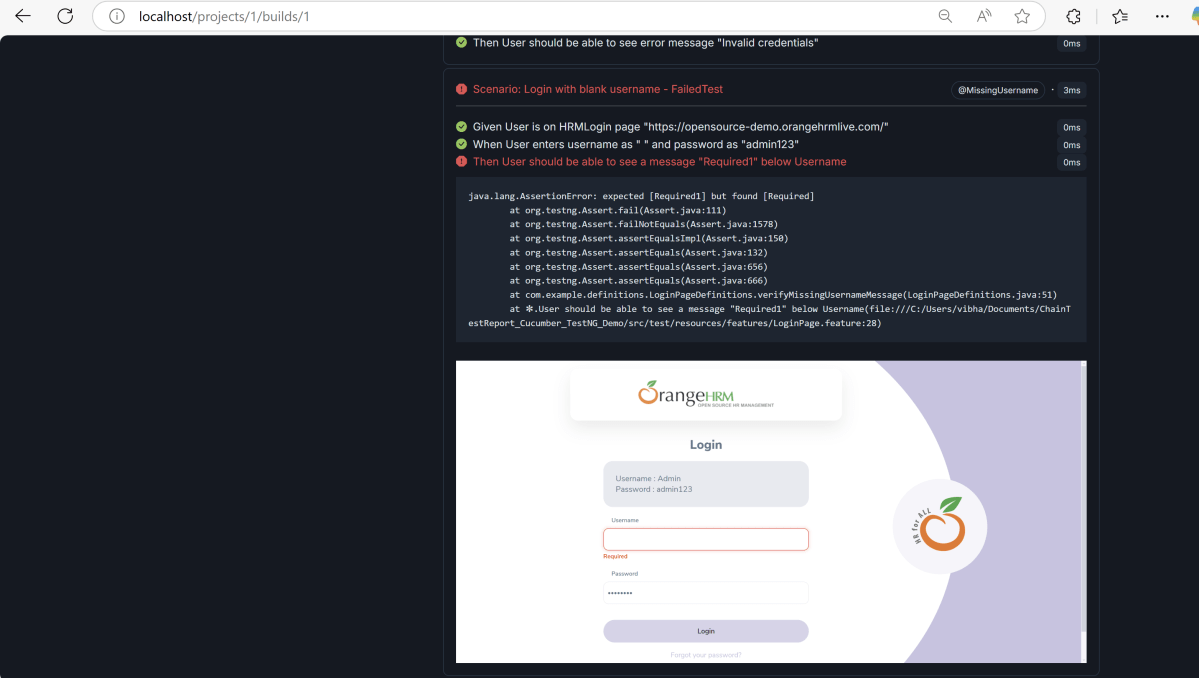
Click on cucumber-jvm option. It will show the detailed execution report. This report includes a pie chart for the feature, Scenario and Steps. Here, we have executed 1 feature file and 1 scenario. The Feature file has failed. So, the Feature pie chart shows 100% failed. There are 5 scenarios. Out of 5, 4 tests are passed. 1 test failed. Therefore, the Scenario pie chart shows 80% passed. This report also shows error message for the failed test.
We see that one of the tests has failed. The screenshot of the failed test is also attached in the report.
We are done! Congratulations on making it through this tutorial and hope you found it useful! Happy Learning!!
In this tutorial, will generate a ChainTest Report with Selenium and JUnit5. In the previous tutorial, I have explained the steps to generate ChainTest Report with Cucumber – ChainTest Report with Cucumber and TestNG.ChainTest Report is the replacement of Extent Report.
ChainTest is a complete reporting system, it supports a variety of sources, including email, static data, and real-time, historical analytics with ChainLP. The next-generation reporting framework ChainTest was developed for a number of test frameworks, such as Cucumber, JUnit, and TestNG.
package com.example;

import org.openqa.selenium.WebDriver;
import org.openqa.selenium.support.PageFactory;

public class BasePage {
    public WebDriver driver;

    public BasePage(WebDriver driver) {
        this.driver = driver;
        PageFactory.initElements(driver,this);
    }

}
LoginPage
package com.example;

import org.openqa.selenium.WebDriver;
import org.openqa.selenium.WebElement;
import org.openqa.selenium.support.FindBy;

public class LoginPage extends BasePage {

    public LoginPage(WebDriver driver) {
        super(driver);

    }

    @FindBy(name = "username")
    public WebElement userName;

    @FindBy(name = "password")
    public WebElement password;

    @FindBy(xpath = "//*[@type='submit']")
    public WebElement loginBtn;

    @FindBy(xpath = "//*[@id='flash']")
    public WebElement errorMessage;

    public void login(String strUserName, String strPassword) {
        userName.sendKeys(strUserName);
        password.sendKeys(strPassword);
        loginBtn.click();
    }

    public String getErrorMessage() {
        return errorMessage.getText();
    }

}
SecurePage
package com.example;

import org.openqa.selenium.WebDriver;
import org.openqa.selenium.WebElement;
import org.openqa.selenium.support.FindBy;

public class SecurePage extends BasePage {

    public SecurePage(WebDriver driver) {
        super(driver);

    }

    @FindBy(xpath = "//*[@id='flash']")
    public WebElement securePageTitle;

    public String getSecurePageTitle() {
        return securePageTitle.getText();
    }

}
Step3 – Annotate test class with @ExtendWith(ChainTestExecutionCallback.class)
BaseTests
package com.example;

import com.aventstack.chaintest.plugins.ChainTestExecutionCallback;
import org.junit.jupiter.api.extension.ExtendWith;
import org.junit.jupiter.api.extension.TestWatcher;
import org.openqa.selenium.WebDriver;
import org.openqa.selenium.chrome.ChromeDriver;
import org.openqa.selenium.chrome.ChromeOptions;
import org.junit.jupiter.api.AfterEach;
import org.junit.jupiter.api.BeforeEach;
import java.time.Duration;

@ExtendWith(ChainTestExecutionCallback.class)
public class BaseTests implements TestWatcher {

    public static WebDriver driver;
    public final static int TIMEOUT = 10;

    @BeforeEach
    public void setup() {
        ChromeOptions options = new ChromeOptions();
        options.addArguments("--remote-allow-origins=*");
        options.addArguments("--no-sandbox");
        options.addArguments("--disable-dev-shm-usage");
        driver = new ChromeDriver(options);

        driver.manage().window().maximize();
        driver.get("https://the-internet.herokuapp.com/login");
        driver.manage().timeouts().implicitlyWait(Duration.ofSeconds(TIMEOUT));
    }

    @AfterEach
    void tearDown() {
        driver.quit();
    }

}
LoginPageTests
package com.example;

import org.junit.jupiter.api.Assertions;
import org.junit.jupiter.api.Test;

public class LoginPageTests extends BaseTests {

    String actualLoginPageTitle;
    String actualErrorMessage;
    String actualSecurePageTitle;

    @Test
    public void verifyPageTitle() {

        actualLoginPageTitle = driver.getTitle();

        // Verify Page Title - Fail
        Assertions.assertEquals("The Internet !!",actualLoginPageTitle);

    }

    @Test
    public void invalidCredentials() {

        LoginPage loginPage = new LoginPage(driver);
        loginPage.login("tomsmith", "happy!");
        actualErrorMessage = loginPage.getErrorMessage();

        // Verify Error Message
        Assertions.assertTrue(actualErrorMessage.contains("Your password is invalid!"));

    }

    @Test
    public void validLogin() {

        LoginPage loginPage = new LoginPage(driver);
        loginPage.login("tomsmith", "SuperSecretPassword!");

        SecurePage securePage = new SecurePage(driver);
        actualSecurePageTitle = securePage.getSecurePageTitle();

        // Verify Home Page
        Assertions.assertTrue(actualSecurePageTitle.contains("You logged into a secure area!"));

    }
}
Step 4 – Add chaintest.properties file in src/test/resources
Add chaintest.properties to the classpath, example: src/test/resources/chaintest.properties.
# chaintest configuration
chaintest.project.name= ChaninTest Report with Selenium and JUnit5

# storage
chaintest.storage.service.enabled=false
# [azure-blob, aws-s3]
chaintest.storage.service=azure-blob
# s3 bucket or azure container name
chaintest.storage.service.container-name=

# generators:
## chainlp
chaintest.generator.chainlp.enabled=true
chaintest.generator.chainlp.class-name=com.aventstack.chaintest.generator.ChainLPGenerator
chaintest.generator.chainlp.host.url=http://localhost/
chaintest.generator.chainlp.client.request-timeout-s=30
chaintest.generator.chainlp.client.expect-continue=false
chaintest.generator.chainlp.client.max-retries=3

## simple
chaintest.generator.simple.enabled=true
chaintest.generator.simple.document-title=chaintest
chaintest.generator.simple.class-name=com.aventstack.chaintest.generator.ChainTestSimpleGenerator
chaintest.generator.simple.output-file=target/chaintest/Index.html
chaintest.generator.simple.offline=false
chaintest.generator.simple.dark-theme=true
chaintest.generator.simple.datetime-format=yyyy-MM-dd hh:mm:ss a
chaintest.generator.simple.js=
chaintest.generator.simple.css=

## email
chaintest.generator.email.enabled=true
chaintest.generator.email.class-name=com.aventstack.chaintest.generator.ChainTestEmailGenerator
chaintest.generator.email.output-file=target/chaintest/Email.html
chaintest.generator.email.datetime-format=yyyy-MM-dd hh:mm:ss a
Step 5 – Run the tests
Right click on LoginPageTests and select Run ‘LoginPageTests’
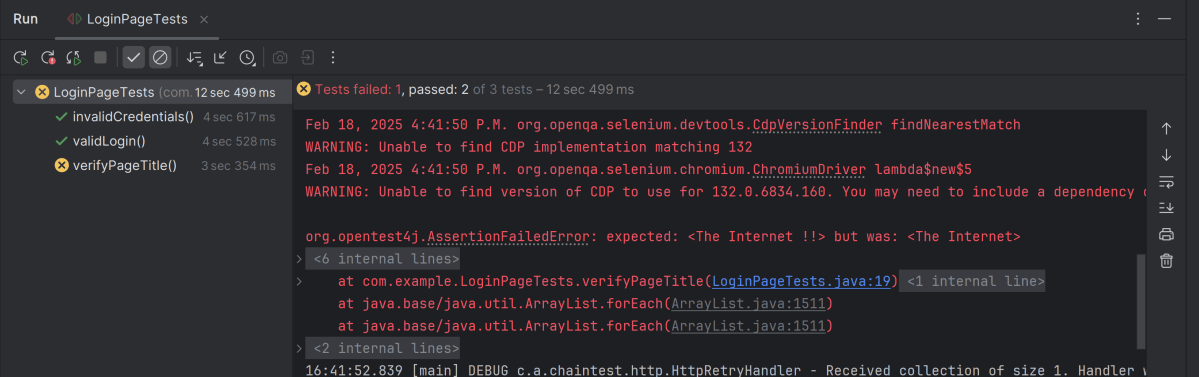
The execution status looks like as shown below. There are 3 tests and 1 test will fail.
Step 6 -View ChainTest Reports
ChainTest Reports are generated in target folder – Index.html and email.html.
Index.html
Right-click and open with Web Browser.
The index.html has a summary section that displays the summary of the execution. The summary includes the overview of the pass/fail using a pictogram, start time, end time, and pass/fail details of tests as shown in the image below.
Email.html
This report contains the high level summary of the test execution.
Step 7 – Run the tests through command line
To run the tests, use the below command
mvn clean test
We are done! Congratulations on making it through this tutorial and hope you found it useful! Happy Learning!!
ExtentReport, one of the most popular and extensively used test reports, has been officially retired. Changes in automated testing techniques led to this decision. The same developer, Anshoo Arora, fills the void with ChainTest, a potent reporting system. With its enhanced capabilities, real-time data, and seamless integration options, ChainTest is anticipated to transform how we see test results.
ChainTest is a complete reporting system. It supports a variety of sources, including email and static data. It also handles real-time and historical analytics with ChainLP. The next-generation reporting framework ChainTest was developed for a number of test frameworks, such as Cucumber, JUnit, and TestNG.
Step 2 – Create a feature file under src/test/resources/features
It is recommended to create a features folder in the src/test/resources directory. Create all the feature files in this features folder. Feature file should be saved as an extension of .feature. The test scenarios in the Feature file are written in Gherkins language. Add the test scenarios in this feature file. I have added sample test scenarios.
Feature: Login to HRM Application
Background:
Given User is on HRMLogin page "https://opensource-demo.orangehrmlive.com/"
@ValidCredentials
Scenario: Login with valid credentials
When User enters username as "Admin" and password as "admin123"
Then User should be able to login successfully and new page open
@InvalidCredentials
Scenario Outline: Login with invalid credentials
When User enters username as "<username>" and password as "<password>"
Then User should be able to see error message "<errorMessage>"
Examples:
| username | password | errorMessage |
| Admin | admin12$$ | Invalid credentials |
| admin$$ | admin123 | Invalid credentials |
| abc123 | xyz$$ | Invalid credentials |
@MissingUsername
Scenario: Login with blank username - FailedTest
When User enters username as " " and password as "admin123"
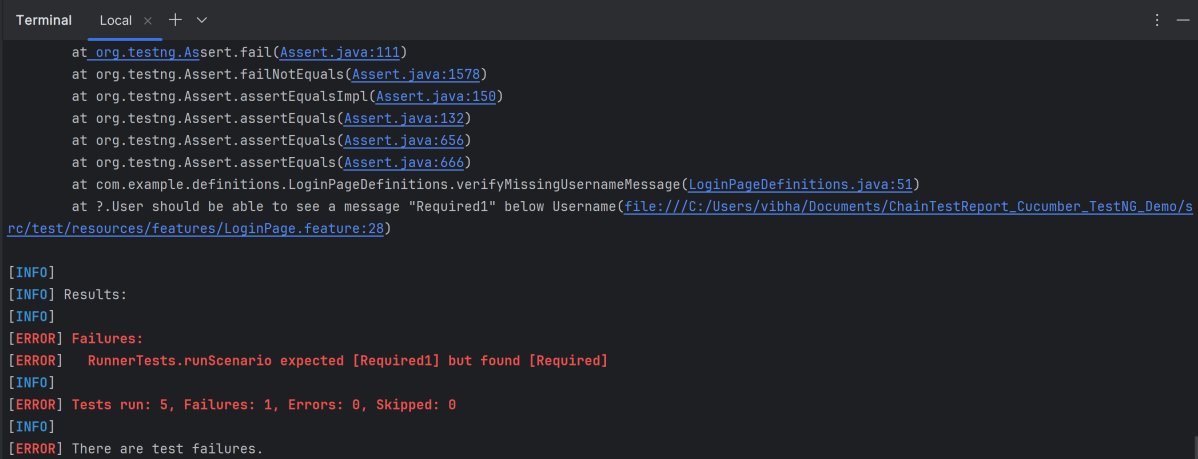
Then User should be able to see a message "Required1" below Username
Step 3 – Create the classes for locators, actions, and utilities in src/main/java
LoginPageActions
package com.example.actions;

import com.example.locators.LoginPageLocators;
import org.openqa.selenium.support.PageFactory;
import com.example.utils.HelperClass;


public class LoginPageActions {

    LoginPageLocators loginPageLocators = null;

    public LoginPageActions() {

        this.loginPageLocators = new LoginPageLocators();
        PageFactory.initElements(HelperClass.getDriver(), loginPageLocators);
    }

    // Get the error message when username is blank
    public String getMissingUsernameText() {
        return loginPageLocators.missingUsernameErrorMessage.getText();
    }

    // Get the Error Message
    public String getErrorMessage() {
        return loginPageLocators.errorMessage.getText();
    }

    public void login(String strUserName, String strPassword) {

        // Fill user name
        loginPageLocators.userName.sendKeys(strUserName);

        // Fill password
        loginPageLocators.password.sendKeys(strPassword);

        // Click Login button
        loginPageLocators.login.click();

    }
}
HomePageActions
package com.example.actions;

import com.example.locators.HomePageLocators;
import org.openqa.selenium.support.PageFactory;
import com.example.utils.HelperClass;

public class HomePageActions {

    HomePageLocators homePageLocators = null;

    public HomePageActions() {

        this.homePageLocators = new HomePageLocators();
        PageFactory.initElements(HelperClass.getDriver(),homePageLocators);
    }

    public String getHomePageText() {
        System.out.println("Heading :" + homePageLocators.homePageUserName.getText());
        return homePageLocators.homePageUserName.getText();
    }

}
LoginPageLocators
package com.example.locators;

import org.openqa.selenium.WebElement;
import org.openqa.selenium.support.FindBy;

public class LoginPageLocators {

    @FindBy(name = "username")
    public WebElement userName;

    @FindBy(name = "password")
    public WebElement password;

    @FindBy(xpath = "//*[@id='app']/div[1]/div/div[1]/div/div[2]/div[2]/form/div[1]/div/span")
    public WebElement missingUsernameErrorMessage;

    @FindBy(xpath = "//*[@id='app']/div[1]/div/div[1]/div/div[2]/div[2]/form/div[3]/button")
    public WebElement login;

    @FindBy(xpath = "//*[@id='app']/div[1]/div/div[1]/div/div[2]/div[2]/div/div[1]/div[1]/p")
    public  WebElement errorMessage;

}
HomePageLocators
package com.example.locators;
import org.openqa.selenium.WebElement;
import org.openqa.selenium.support.FindBy;

public class HomePageLocators {

    @FindBy(xpath = "//span[@class='oxd-topbar-header-breadcrumb']/h6")

    public  WebElement homePageUserName;

}
HelperClass
package com.example.utils;

import java.time.Duration;
import org.openqa.selenium.WebDriver;
import org.openqa.selenium.chrome.ChromeDriver;
import org.openqa.selenium.chrome.ChromeOptions;

public class HelperClass {

    private static HelperClass helperClass;

    private static WebDriver driver;
    public final static int TIMEOUT = 5;

    private HelperClass() {

        ChromeOptions options = new ChromeOptions();
        options.addArguments("--start-maximized");
        driver = new ChromeDriver(options);
        driver.manage().timeouts().implicitlyWait(Duration.ofSeconds(TIMEOUT));
    }

    public static void openPage(String url) {
        driver.get(url);
    }

    public static WebDriver getDriver() {
        return driver;
    }

    public static void setUpDriver() {

        if (helperClass==null) {
            helperClass = new HelperClass();
        }
    }

    public static void tearDown() {

        if(driver!=null) {
            driver.quit();
        }

        helperClass = null;
    }

}
Step 4 – Create a StepDefinition class in src/test/java
Create a Java Class called Definition. In this class, we will create the Test Code related to the Given, When, Then of the Feature file. This will be in src/test/java.
package com.example.definitions;

import com.example.actions.HomePageActions;
import com.example.actions.LoginPageActions;

import io.cucumber.java.en.Given;
import io.cucumber.java.en.Then;
import io.cucumber.java.en.When;
import org.testng.Assert;
import com.example.utils.HelperClass;

public class LoginPageDefinitions {

    LoginPageActions objLogin = new LoginPageActions();
    HomePageActions objHomePage = new HomePageActions();

    @Given("User is on HRMLogin page {string}")
    public void loginTest(String url) {

        HelperClass.openPage(url);

    }

    @When("User enters username as {string} and password as {string}")
    public void goToHomePage(String userName, String passWord) {

        // login to application
        objLogin.login(userName, passWord);

    }

    @Then("User should be able to login successfully and new page open")
    public void verifyLogin() {

        // Verify home page
        Assert.assertTrue(objHomePage.getHomePageText().contains("Dashboard"));

    }

    @Then("User should be able to see error message {string}")
    public void verifyErrorMessage(String expectedErrorMessage) {

        // Verify error message
        Assert.assertEquals(objLogin.getErrorMessage(),expectedErrorMessage);

    }

    @Then("User should be able to see a message {string} below Username")
    public void verifyMissingUsernameMessage(String message) {

        Assert.assertEquals(objLogin.getMissingUsernameText(),message);
    }

}
Step 5 – Create a Hook class in src/test/java
Create thehook class that contains the Before and After hook. Use it to initialize the web browser. Then, close the web browser. I have added the code to take the screenshot of the failed scenario in @After Hook.
package com.example.definitions;
import org.openqa.selenium.OutputType;
import org.openqa.selenium.TakesScreenshot;

import io.cucumber.java.After;
import io.cucumber.java.Before;
import io.cucumber.java.Scenario;
import com.example.utils.HelperClass;

public class Hooks {

    @Before
    public static void setUp() {

        HelperClass.setUpDriver();
    }

    @After
    public static void tearDown(Scenario scenario) {

        //validate if scenario has failed
        if(scenario.isFailed()) {
            final byte[] screenshot = ((TakesScreenshot) HelperClass.getDriver()).getScreenshotAs(OutputType.BYTES);
            scenario.attach(screenshot, "image/png", scenario.getName());
        }

        HelperClass.tearDown();
    }
}
Step 6 – Create a TestNG Cucumber Runner class in the src/test/java
Step 9 – Create a testng.xml at the root directory.
Create a testng.xml at the root of the project. This xml holds parameter detail like allow passing parameters to test methods like browser name.
<?xml version="1.0" encoding="UTF-8"?>
<!DOCTYPE suite SYSTEM "https://testng.org/testng-1.0.dtd">
<suite name="Suite">
    <test  name="Cucumber with TestNG Test">
        <classes>
            <class name="com.example.runner.RunnerTests"/>
        </classes>
    </test> <!-- Test -->
</suite> <!-- Suite -->
Step 10 – Run the tests from TestNG
You can execute the test script by right-clicking on TestRunner class -> Run As TestNG. (Eclipse)
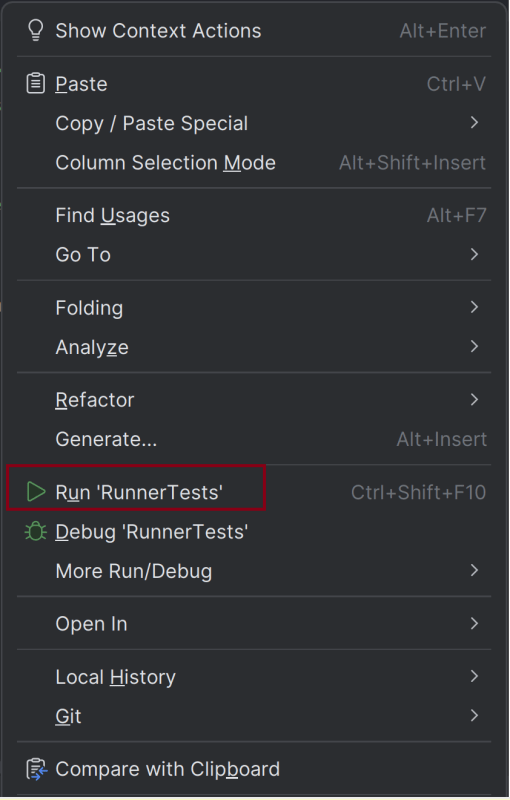
In the case of the IntelliJ project, right-click on the runner class and select Run ‘RunnerTests’.
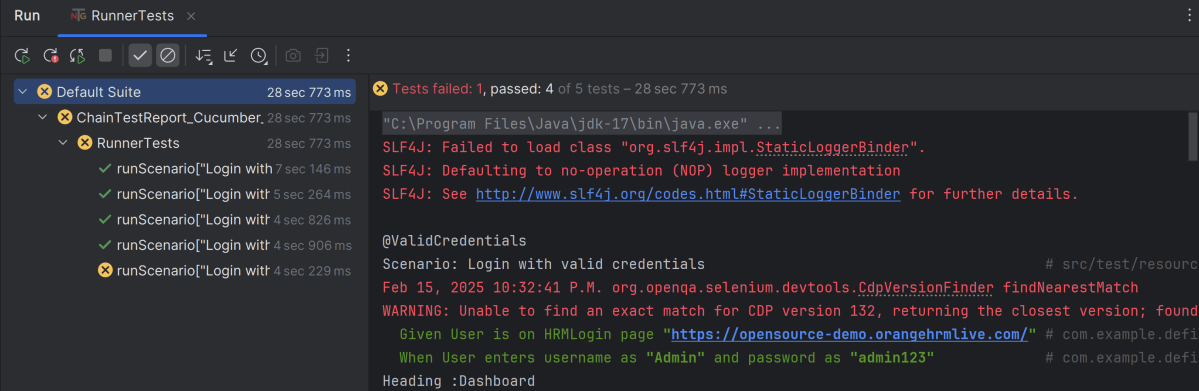
The execution status looks like as shown below. There are 5 tests and 1 test will fail.
Step 11 – View ChainTest Reports
ChainTest Reports are generated in target folder – Index.html and email.html.
Index.html
Right-click and open with Web Browser.
The index.html has a summary section that displays the summary of the execution. The summary includes the overview using a pictogram. It shows the start time and end time. The details of pass/fail tests are provided as shown in the image below.
Email.html
This report contains the high level summary of the test execution.
Step 12 – Run the tests through command line
To run the tests, use the below command
mvn clean test
We are done! Congratulations on making it through this tutorial and hope you found it useful! Happy Learning!!
In the previous tutorial, will explain ChainTest Report and its implementation with Selenium with TestNG. In this tutorial, we will discuss the steps to add the screenshot for the failed tests in the ChainTest Report.
The chaintest-core client is the framework component that supports plugins to store embeds for each report. For example, with SimpleGenerator, the client saves all embeds relative to the report file in the resources folder.
Starting chaintest-testng plugin 1.0.5+, screenshots can be attached to tests while the test is in-flight or completing in the @BeforeMethod and @AfterMethod hooks.
ExtentReport, one of the most popular and extensively used test reports, has been officially retired due to changes in automated testing techniques. The same developer, Anshoo Arora, fills the void with ChainTest, a potent reporting system. With its enhanced capabilities, real-time data, and seamless integration options, ChainTest is anticipated to transform how we see test results.
ChainTest is a complete reporting system, it supports a variety of sources, including email, static data, and real-time, historical analytics with ChainLP. The next-generation reporting framework ChainTest was developed for a number of test frameworks, such as Cucumber, JUnit, and TestNG.
Key Features of ChainTest Report
Combination of Report – ChainTest generates a combination of static report, email and dynamic report.
Real Time Analysis – ChainTest’s incorporation of real-time statistics allows teams to monitor test executions in real time. This feature is very helpful for extensive testing projects with tight deadlines.
Simple SetUp – Setting up ChainTest is simple and quick with an easily accessible properties file. The setup procedure is streamlined by the ease with which users can specify project names, server URLs, and report options.
Support multiple test framework – This is compatible with a number of test frameworks, such as Cucumber, JUnit, and TestNG. Integration with PyTest is also expected to be available soon.
Docker-Enabled Setup – Docker simplifies the process of setting up ChainTest. The Chain LP server can be spun up in a matter of minutes by users by pulling the Docker image, which streamlines deployment and minimizes system requirements.
Monitoring of Historical Data – The historical data tracking tool, which enables teams to examine performance trends across several builds, is one notable feature. This makes it easier to spot trends and enhance test-taking techniques.
Prerequisite
Java 17 is installed
Maven is installed
Eclipse or IntelliJ is installed
Dependency List:
Selenium – 4.28.1
Java 17
TestNG – 7.10.2
Maven – 3.9.6
ChainTest TestNG – 1.0.7
Structure of Project
Implementation
Add ChainTest TestNG plugin dependency in Maven Project.
Add ChainTestListener in the list of @Listeners of the test class. Here, I have added this to BaseTests class.
@Listeners(ChainTestListener.class)
public class BaseTests {
}
Create a testng.xml at the root directory.
Create a testng.xml at the root of the project. This xml contains parameter detail like allow passing parameters to test methods ie browser name.
<?xml version="1.0" encoding="UTF-8"?>
<!DOCTYPE suite SYSTEM "https://testng.org/testng-1.0.dtd">
<suite name="ChainTestReport with TestNG">

    <test name="Chrome Test">
        <parameter name="browserName" value="chrome" />
        <classes>
            <class name="com.example.LoginPageTests"/>
        </classes>
    </test> <!-- Test -->

    <test name="Firefox Test">
        <parameter name="browserName" value="firefox" />
        <classes>
            <class name="com.example.LoginPageTests"/>
        </classes>
    </test> <!-- Test -->

    <test name="Edge Test">
        <parameter name="browserName" value="edge" />
        <classes>
            <class name="com.example.LoginPageTests"/>
        </classes>
    </test> <!-- Test -->

</suite> <!-- Suite -->
Run the tests from testng.xml.
Right click on testng.xml and select Run ‘…\testng.xml’
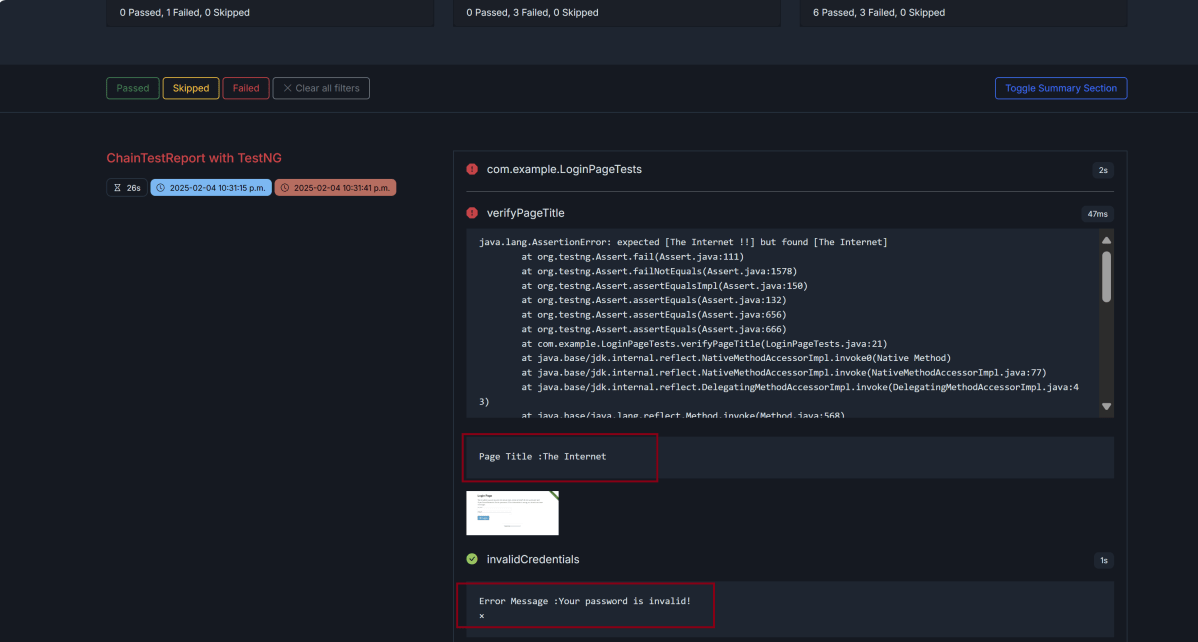
The execution status looks like as shown below. There are 3 tests and 1 test will fail. These 3 tests are executed in 3 different browsers – Chrome, Firefox and Edge. So, total we are executing 9 tests and out of them 6 passed and 3 failed.
View ChainTest Reports
ChainTest Reports are generated in target folder – Index.html and email.html.
Index.html
Right-click and open with Web Browser.
The index.html has a summary section that displays the summary of the execution. The summary includes the overview of the pass/fail using a pictogram, start time, end time, and pass/fail details of tests as shown in the image below.
Email.html
This report contains the high level summary of the test execution.
Run the tests through command line
To run the tests, use the below command
mvn clean test
We are done! Congratulations on making it through this tutorial and hope you found it useful! Happy Learning!!