In this tutorial, I will explain the use of Hooks in Cucumber.
What is a Hook in Cucumber?
Hooks are blocks of code that can run at various points in the Cucumber execution cycle. They are typically used for setup and teardown of the environment before and after each scenario. These hooks do not impact the scenarios or steps for which they are used. We can declare hooks in any class.
Why do we use Hooks?
There are scenarios where we have to perform some prerequisite steps before executing the test scenarios, like initiating a WebDriver, setting up database connection, setting up Test Data, and setting up browser cookies.
Similarly, there are some conditions that need to be done after completing the execution of test scenarios like killing the web driver, closing database connections, clearing the test data, clearing browser cookies, and so on.
Scenario hooks
Scenario hooks run for every scenario. There are 2 types of Scenario Hooks – @After and @Before
Before
Before hooks run before the first step of each scenario.
Syntax:
@Before
	public void setup() {

        System.out.println("------------------Before Executing-------------------------");
        WebDriverManager.chromedriver().setup();
        ChromeOptions chromeOptions = new ChromeOptions();
        chromeOptions.addArguments("--start-maximized");
        driver = new ChromeDriver(chromeOptions);
        driver.manage().timeouts().implicitlyWait(5, TimeUnit.SECONDS);
	}
After
After hooks run after the last step of each scenario, even when the step result is failed, undefined, pending, or skipped.
Syntax:
@After
	public void close() {
		driver.close();
		System.out.println("---------------After Executing---------------------------");
	}
Here is an example of Hooks – @Before and @After in a Cucumber program.
import io.cucumber.java.After;
import io.cucumber.java.Before;
import io.cucumber.java.en.Given;
import io.cucumber.java.en.Then;
import io.cucumber.java.en.When;
import io.github.bonigarcia.wdm.WebDriverManager;
import org.openqa.selenium.By;
import org.openqa.selenium.WebDriver;
import org.openqa.selenium.chrome.ChromeDriver;
import org.openqa.selenium.chrome.ChromeOptions;
import java.util.concurrent.TimeUnit;
import static org.hamcrest.CoreMatchers.containsString;
import static org.hamcrest.MatcherAssert.assertThat;

public class LoginPageDefinitions {
    WebDriver driver;

    @Before
    public void setup() {

        System.out.println("------------------Before Executing-------------------------");
        WebDriverManager.chromedriver().setup();
        ChromeOptions chromeOptions = new ChromeOptions();
        chromeOptions.addArguments("--start-maximized");
        driver = new ChromeDriver(chromeOptions);
        driver.manage().timeouts().implicitlyWait(5, TimeUnit.SECONDS);
    }

    @Given("User is on HRMLogin page")
    public void userOnHomePage() {
        System.out.println("Open Website");
        driver.get("https://opensource-demo.orangehrmlive.com/");
    }

    @When("User enters username as {string}")
    public void entersUsername(String userName){
        System.out.println("Enter username");
        driver.findElement(By.name("username")).sendKeys(userName);

    }


    @When("User enters password as {string}")
    public void entersPassword(String passWord) {
        System.out.println("Enter passWord");
        driver.findElement(By.name("password")).sendKeys(passWord);
        driver.findElement(By.xpath("//*[@id='app']/div[1]/div/div[1]/div/div[2]/div[2]/form/div[3]/button")).submit();

    }


    @Then("User should be able to login successfully")
    public void successfulLogin() throws InterruptedException {
        String newPageText = driver.findElement(By.xpath("//span[@class='oxd-topbar-header-breadcrumb']/h6")).getText();
        System.out.println("newPageText:" + newPageText);
        assertThat(newPageText, containsString("Dashboard"));
    }

    @After
    public void close() {
        driver.quit();
        System.out.println("--------------------After Executing-----------------------");
    }
}
The output of the above program is
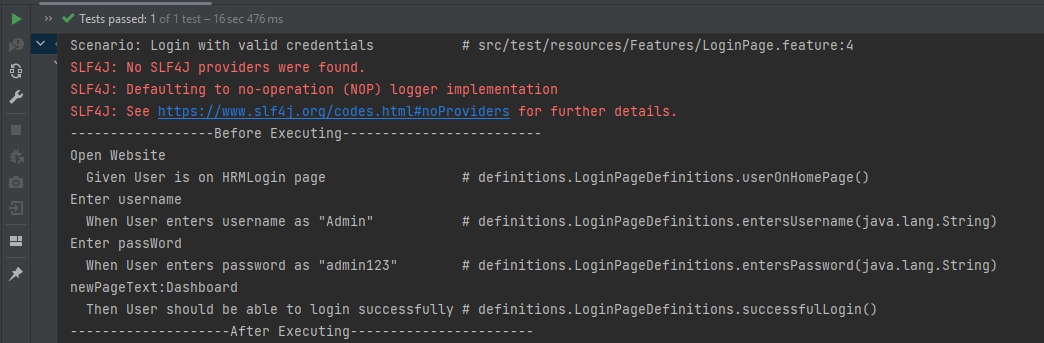
- At the start of execution, @Before annotation is setting up the web driver to execute the test.
- After setting up the web driver, the Given, When, and Then statements will be executed.
- Now, at last, @After hook will close the web driver.
Step hooks
Step hooks are invoked before and after a step. The hooks have ‘invoke around’ semantics. This means that if a BeforeStep hook is executed, the AfterStep hooks will also be executed regardless of the result of the step.
@BeforeStep – As the name suggests, it is executed before the execution of each step.
Syntax:
@BeforeStep
	public void beforeStepTest() {
		System.out.println("--------------BeforeStep Executing---------------");
	}
@AfterStep – As the name suggests, it is executed after the successful execution of each step. If a step does not pass, the following step and its hooks will be skipped.
Syntax:
@AfterStep
	public void afterStepTest() {
		System.out.println("--------------------AfterStep Executing---------------------");
	}
The complete program is shown below:
import io.cucumber.java.After;
import io.cucumber.java.AfterStep;
import io.cucumber.java.Before;
import io.cucumber.java.BeforeStep;
import io.cucumber.java.en.Given;
import io.cucumber.java.en.Then;
import io.cucumber.java.en.When;
import io.github.bonigarcia.wdm.WebDriverManager;
import org.openqa.selenium.By;
import org.openqa.selenium.WebDriver;
import org.openqa.selenium.chrome.ChromeDriver;
import org.openqa.selenium.chrome.ChromeOptions;
import java.util.concurrent.TimeUnit;
import static org.hamcrest.CoreMatchers.containsString;
import static org.hamcrest.MatcherAssert.assertThat;

public class LoginPageDefinitions {
    WebDriver driver;

    @Before
    public void setup() {

        System.out.println("------------------Before Executing-------------------------");
        WebDriverManager.chromedriver().setup();
        ChromeOptions chromeOptions = new ChromeOptions();
        chromeOptions.addArguments("--start-maximized");
        driver = new ChromeDriver(chromeOptions);
        driver.manage().timeouts().implicitlyWait(5, TimeUnit.SECONDS);
    }

    @BeforeStep
    public void beforeStepTest() {
        System.out.println("--------------BeforeStep Executing---------------");
    }

    @Given("User is on HRMLogin page")
    public void userOnHomePage() {
        System.out.println("Open Website");
        driver.get("https://opensource-demo.orangehrmlive.com/");
    }

    @When("User enters username as {string}")
    public void entersUsername(String userName){
        System.out.println("Enter username");
        driver.findElement(By.name("username")).sendKeys(userName);

    }

    @When("User enters password as {string}")
    public void entersPassword(String passWord) {
        System.out.println("Enter passWord");
        driver.findElement(By.name("password")).sendKeys(passWord);
        driver.findElement(By.xpath("//*[@id='app']/div[1]/div/div[1]/div/div[2]/div[2]/form/div[3]/button")).submit();

    }

    @Then("User should be able to login successfully")
    public void successfulLogin() throws InterruptedException {
        String newPageText = driver.findElement(By.xpath("//span[@class='oxd-topbar-header-breadcrumb']/h6")).getText();
        System.out.println("newPageText:" + newPageText);
        assertThat(newPageText, containsString("Dashboard"));
    }

    @AfterStep
    public void afterStepTest() {
        System.out.println("--------------------AfterStep Executing---------------------");
    }

    @After
    public void close() {
        driver.quit();
        System.out.println("--------------------After Executing-----------------------");
    }
}
The output of the above program is

- At the start of execution, @Before annotation is setting up the web driver to execute the test.
- After setting up the web driver, @BeforeStep is executed before executing the first step.
- After the execution of the first step (Given), @AfterStep is executed.
- Here, it can be seen that there are 4 steps and for each step, there is a combination of @BeforeStep and @AfterStep.
That’s it! Congratulations on making it through this tutorial and hope you found it useful! Happy Learning!! Cheers!!
