In this tutorial, we will see the use of the Response Assertion in JMeter.
Table of Contents
What is Response Assertion?
The response assertion control panel lets you add pattern strings to be compared against various fields of the request or response. The pattern strings are:
Contains, Matches: Perl5-style regular expressions
Equals, Substring: plain text, case-sensitive.

You can also choose whether the strings will be expected to match the entire response, or if the response is only expected to contain the pattern. You can attach multiple assertions to any controller for additional flexibility.

What is Assertion Results
The Assertion Results visualizer shows the Label of each sample taken. It also reports failures of any Assertions that are part of the test plan.

Note – Assertion Results MUST NOT BE USED during load test as it consumes a lot of resources (memory and CPU). Use it only for either functional testing or during Test Plan debugging and Validation.
Create a Test Plan in JMeter
Step 1 – Add Thread Group
Select Test Plan on the tree
Add Thread Group
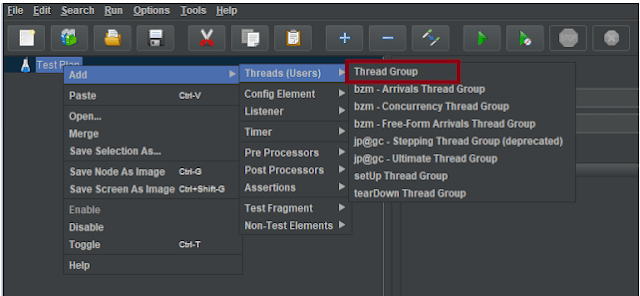
To add Thread Group: Right click on the “Test Plan” and add a new thread group: Add -> Threads (Users) -> Thread Group
In the Thread Group control panel, enter Thread Properties as follows:
Number of Threads: 1 – Number of users connects to the target website
Loop Count: 1 – Number of time to execute testing
Ramp-Up Period: 1

Step 2 – Adding JMeter elements
The JMeter element used here is HTTP Request Sampler. In HTTP Request Control Panel, the Path field indicates which URL request you want to send
Add HTTP Request Sampler
To add: Right-click on Thread Group and select: Add -> Sampler -> HTTP Request

Below mentioned are the values used in HTTP Request to perform the test
Name – HTTP Request
Server Name or IP – localhost
Port – 8000
Method – GET
Path – /example

Step 3 – Add Assertions
Add Response Assertion
The response assertion control panel lets you add pattern strings to be compared against various fields of the request or response.
To add: Right-click on HTTP Request and select: Add -> Assertions-> Response Assertions

Here, I have selected below options:-
Apply to : Main Sample only
Field to Test: Text Response
Pattern Matching Rules: Contains
Pattern To Test: Linda

Step 4 – Add Listeners
Add Assertion Results
The Assertion Results visualizer shows the Label of each sample taken. It also reports failures of any Assertions that are part of the test plan.
To add: Right-click on Thread Group and select: Add -> Listener-> Assertion Results

View Result Tree
View Result Tree show results of the user request in basic HTML format
To add: Right click Test Plan, Add -> Listener -> View Result Tree


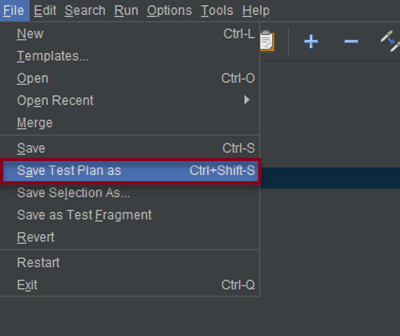
Step 5 – Save the Test Plan
To Save: Click File Select -> Save Test Plan as ->Give name of the Test Plan. It will be saved as .jmx format
Step 6 – Run the Test Plan
Click on Green Triangle as shown at the top to run the test

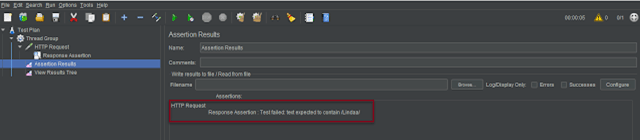
Step 7 – View the Execution Status in Assertion Results
Click on Assertion Results to see the status of Run. Successful request will like shown below.

If the test fails, we will see message mentioning the error in the Assertion Results
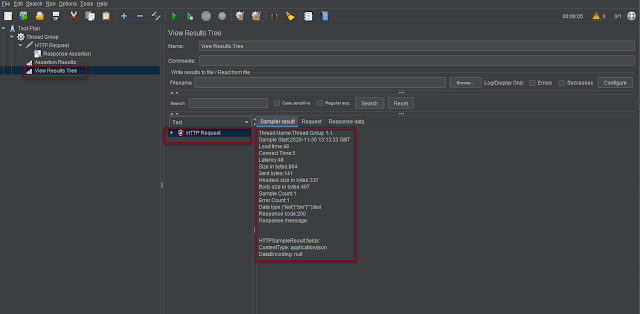
Step 8 – View the Execution Status in View Result Tree
Click on View Result Tree to see the status of Run. Successful request will like shown below.

View Result Tree with failed request looks like below.
That’s it! Congratulations on making it through this tutorial and hope you found it useful! Happy Learning!!
