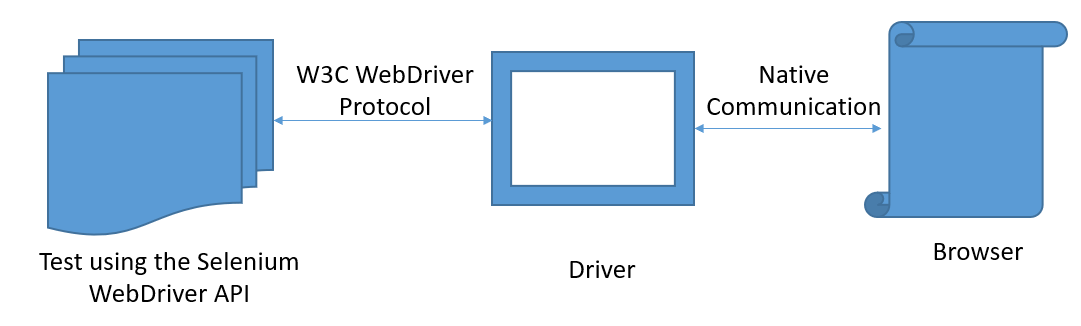
In the previous tutorial, it is explained how to automate Checkbox in Selenium. In this tutorial, we will learn how to handle Drop Down & Multiple Select Operations. DropDown & Multiple Select Operations work together and almost the same way. The only difference between these two deselecting statements & multiple selections is not allowed on DropDown.
Table of Contents
To identify DropDown or multi-select list on a web page, we can use any one of the options like id, name, xpath, css, etc.
To perform any operation on DropDown, we need to do 2 things:-
1) Selenium WebDrivers provides a class called “Select “class that is used to automate dropdown, and it is imported from the package:
org.openqa.selenium.support.ui.Select
2) Create a new Select object of class Select.
Select oSelect = new Select());
We can access all the methods residing inside the SELECT class by typing oSelect + dot.

Different Select Commands
Before we discuss various select commands, we should know how the HTML code of DropDown actually looks

1) selectByVisibleText
selectByVisibleText(String arg0): void – Choose the option given under any dropdowns and multiple selection boxes with selectByVisibleText method. It takes a parameter of String that is one of the Value of Select element and it returns nothing.
To select the text One
select.selectByVisibleText("One");
2) selectByIndex
selectByIndex(int arg0): void – It is almost the same as selectByVisibleText but the only difference here is that we provide the index number of the option here rather than the option text. It takes a parameter of int which is the index value of the Select element and it returns nothing.
To select the value 3 using index
select.selectByIndex(3);
3) selectByValue
selectByValue(String arg0): void – It selects the option of the value. It takes a parameter of String that is of the value of the Select element and it returns nothing.
To select the value of two
 Select mselect = new Select(driver.findElement(By.id("redirect")));
 mselect.selectByValue("two");
Let us explain this with the help of an example.
1) Launch a new Browser and open “https://www.selenium.dev/selenium/web/formPage.html“
2) Print the list of options in the dropdown.
3) Select option ‘One’ (Use selectByVisibleText)
4) Select option ‘3’ (Use selectByIndex)
5) Select option ‘two’ (Use selectByValue)
6) Close the browser

The complete program looks like as shown below:
package org.example;

import org.openqa.selenium.By;
import org.openqa.selenium.WebDriver;
import org.openqa.selenium.WebElement;
import org.openqa.selenium.firefox.FirefoxDriver;
import org.openqa.selenium.firefox.FirefoxOptions;
import org.openqa.selenium.support.ui.Select;

import java.time.Duration;
import java.util.List;

public class DropDown_Demo {

    public static void main(String[] args)  {

        // Initiate Firefox browser
        FirefoxOptions firefoxOptions = new FirefoxOptions();
        WebDriver driver = new FirefoxDriver(firefoxOptions);

        // Implicit Wait
        driver.manage().window().maximize();
        driver.manage().timeouts().implicitlyWait(Duration.ofSeconds(5));

        // Pass application url
        driver.get("https://www.selenium.dev/selenium/web/formPage.html");

        //Get the list of options from dropdown
        Select select = new Select(driver.findElement(By.name("select-default")));
        List<WebElement> listElements = select.getOptions();
        System.out.println("List of options in dropdown:" );
        for(WebElement options: listElements)
            System.out.println(options.getText());

        // Select option 'Two' (Use selectByVisibleText)
        System.out.println("Select the Option by Text - One");
        select.selectByVisibleText("One");

        // Select option '3' (Use selectByIndex)
        System.out.println("Select the Option by Index 3 - Still learning how to count, apparently");
        select.selectByIndex(3);

        // Select option 'two' (Use selectByValue)
        System.out.println("Select the Option by selectByValue - two");
        Select mselect = new Select(driver.findElement(By.id("redirect")));
        mselect.selectByValue("two");

        // close the browser
        driver.close();
    }

}
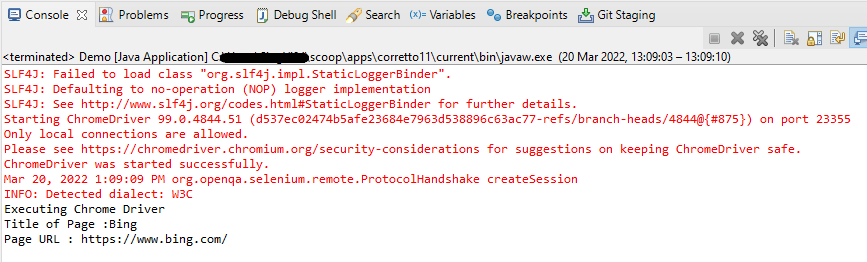
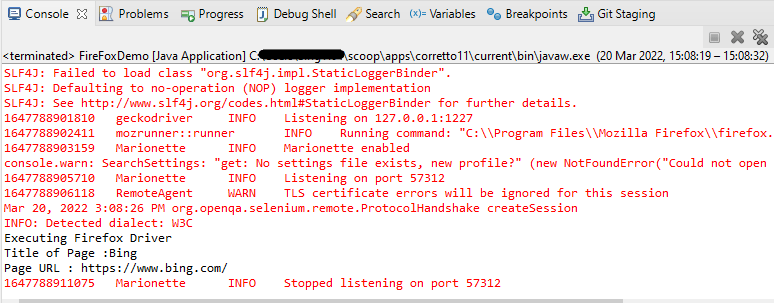
The output of the above program is

Different DeSelect Methods
The way we select different values of DropDown and Multi Select, we can deselect the options similarly.
1) deselectAll
deselectAll( ): void – Clear all selected entries. This is only valid when the SELECT supports multiple selections.
Syntax:
oSelect.deselectAll;
2) deselectByIndex
deselectByIndex(int arg0): void –Deselect the option at the given index.
Syntax:
oSelect.deselectByIndex;
3) deselectByValue
deselectByValue(String arg0): void –Deselect all options that have a value matching the argument.
Syntax:
oSelect.deselectByValue;
4) deselectByVisibleText
deselectByVisibleText(String arg0): void – Deselect all options that display text matching the argument.
Syntax:
oSelect.deselectByVisibleText


Below is an example of how to operate on multi-selection options.
1) Launch a new Browser and open “https://www.selenium.dev/selenium/web/formPage.html“
2) Print the list of options in the dropdown.
3) Select options ‘eggs’ and ‘sausages’.
4) Print and select all the options for the selected Multiple selection list.
5) Deselect option eggs.
6) Deselect all options
7) Close the browser
package org.example;

import org.openqa.selenium.By;
import org.openqa.selenium.WebDriver;
import org.openqa.selenium.WebElement;
import org.openqa.selenium.firefox.FirefoxDriver;
import org.openqa.selenium.firefox.FirefoxOptions;
import org.openqa.selenium.support.ui.Select;

import java.time.Duration;
import java.util.List;

public class MultiSelect_Demo {

    public static void main(String[] args) {

        // Initiate Firefox browser
        FirefoxOptions firefoxOptions = new FirefoxOptions();
        WebDriver driver = new FirefoxDriver(firefoxOptions);

        // Implicit Wait
        driver.manage().window().maximize();
        driver.manage().timeouts().implicitlyWait(Duration.ofSeconds(5));

        // Pass application url
        driver.get("https://www.selenium.dev/selenium/web/formPage.html");

        //Get the list of options from dropdown
        Select select = new Select(driver.findElement(By.name("multi")));
        List<WebElement> listElements = select.getOptions();
        System.out.println("List of options in dropdown:");
        for (WebElement options : listElements)
            System.out.println(options.getText());

        // Select option 'Ham' (Use selectByVisibleText)
        System.out.println("Select the Option by Text - Eggs");
        select.selectByVisibleText("Eggs");

        // Select option '2' (Use selectByIndex)
        System.out.println("Select the Option by Index 2 - Sausages");
        select.selectByIndex(2);

        System.out.println("*************************************");
        //Get the list of selected options
        System.out.println("The selected values in the dropdown options are -");
        List<WebElement> selectedOptions = select.getAllSelectedOptions();

        for(WebElement selectedOption: selectedOptions)
            System.out.println(selectedOption.getText());

        // Deselect the value "eggs" by Value
        System.out.println("*************************************");
        System.out.println("DeSelect option eggs by Value");
        select.deselectByValue("eggs");

        System.out.println("*************************************");
        System.out.println("The latest selected values in the dropdown options are -");
        List<WebElement> reselectedOptions = select.getAllSelectedOptions();

        for(WebElement selectedOption: reselectedOptions)
            System.out.println(selectedOption.getText());

        select.deselectAll();

        driver.quit();
    }
}
The output of the above program is

That’s it! Congratulations on making it through this tutorial and hope you found it useful! Happy Learning!!