There are two modes, strict and non-strict in JSONAssert. In most cases, you will probably want to set strict to false, since that will make the tests less brittle. Strict tests require all the elements requested to be returned, and only those elements (ie, the tests are non-extensible). Arrays of elements must be returned to the same order as expected.
In Lenient mode, extensibility will be allowed, and no strict ordering will be checked. Let’s see example programs for comparing JSON Arrays.
Comparing two Exact same JSON Arrays – LENIENT Mode
import org.json.JSONArray;
import org.junit.Test;
import org.skyscreamer.jsonassert.JSONAssert;
import org.skyscreamer.jsonassert.JSONCompareMode;

public class JsonArrayAssertDemo {

    @Test
    public void sameArray() {

        // same no of elements, values and in same order
        String jsonArray1 = "[\"Vibha\",\"Abha\",\"Nysha\"]";
        String jsonArray2 = "[\"Vibha\",\"Abha\",\"Nysha\"]";

        JSONAssert.assertEquals(jsonArray1, jsonArray2, JSONCompareMode.LENIENT);
   }
}
The output of the above program is
Comparing two JSON Arrays with the same fields but different in order – Lenient
    @Test
    public void sameArrayDifferentOrder() {

        // Same no of elements but different order
        String jsonArray1 = "[\"Vibha\",\"Abha\",\"Nysha\"]";
        String jsonArray2 = "[\"Nysha\",\"Vibha\",\"Abha\"]";

        JSONAssert.assertEquals(jsonArray1, jsonArray2, JSONCompareMode.LENIENT);
    }
The output of the above program is
LENIENT mode does not care about the order of the fields in the JSON.
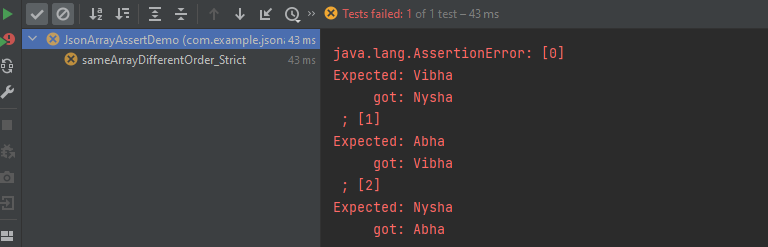
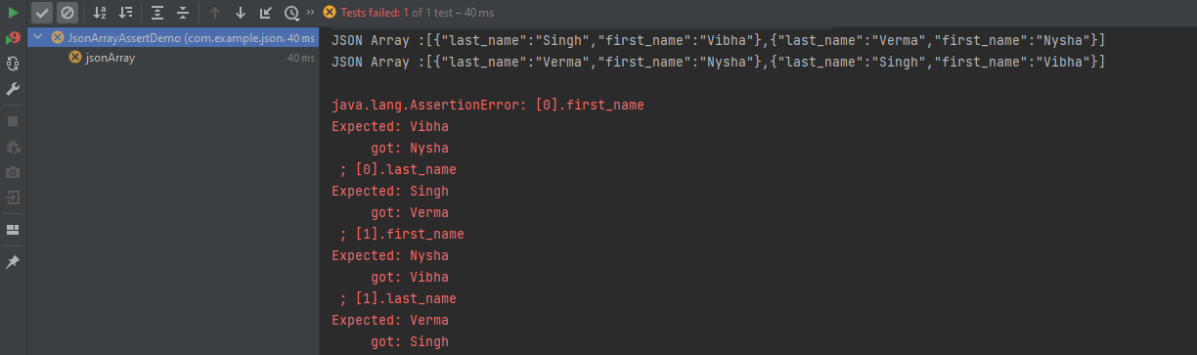
Comparing two JSON Arrays with the same fields but different in order – Strict
    @Test
    public void sameArrayDifferentOrder_Strict() {

        // same no of elements, values and in same order
        String jsonArray1 = "[\"Vibha\",\"Abha\",\"Nysha\"]";
        String jsonArray2 = "[\"Nysha\",\"Vibha\",\"Abha\"]";

        JSONAssert.assertEquals(jsonArray1, jsonArray2, JSONCompareMode.STRICT);
    }
The output of the above program is
STRICT mode cares about the order of the fields in the JSON Array.
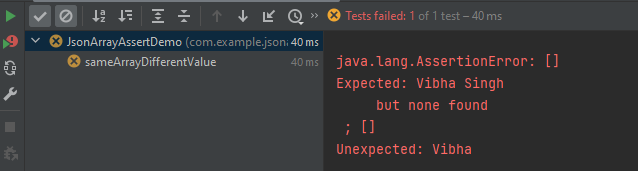
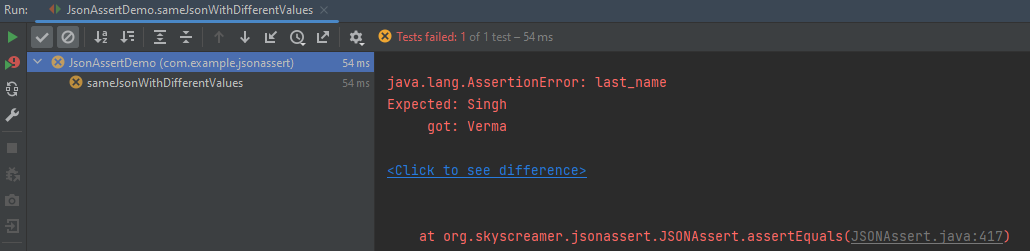
Comparing two JSON Arrays with the same fields but different values
    @Test
    public void sameArrayDifferentValue() {

        // Same no of elements but different values
        String jsonArray1 = "[\"Vibha Singh\",\"Abha\",\"Nysha\"]";
        String jsonArray2 = "[\"Vibha\",\"Abha\",\"Nysha\"]";

        JSONAssert.assertEquals(jsonArray1, jsonArray2, JSONCompareMode.LENIENT);
    }
The output of the above program is
In this scenario assertEquals() will fail as a value is not matching.
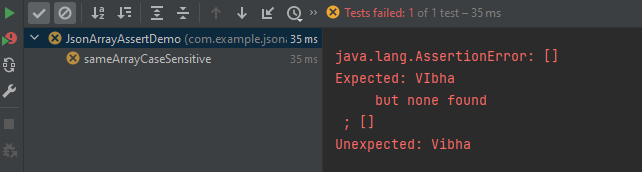
Comparing two JSON Arrays with the case sensitivity
   @Test
    public void sameArrayCaseSensitive() {

        // case sensitive
        String jsonArray1 = "[\"VIbha\",\"Abha\",\"Nysha\"]";
        String jsonArray2 = "[\"Vibha\",\"Abha\",\"Nysha\"]";

        JSONAssert.assertEquals(jsonArray1, jsonArray2, JSONCompareMode.LENIENT);
    }
The output of the above program is
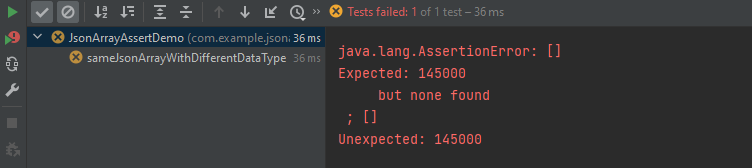
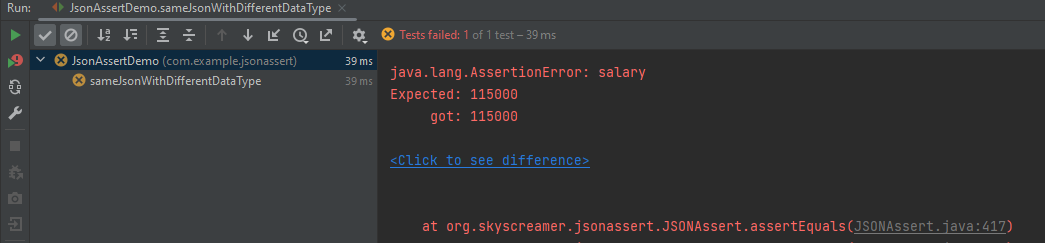
Comparing two JSON Arrays with the same fields but different datatype of values
Here, both the JSON Arrays have the same structure, but we have added one more attribute to the second one. In this case, the assertion fails as it counts the number of items in the arrays.
Comparing two JSON Arrays with the addition – STRICT mode
The compare mode can also be defined by using an overloaded method that takes boolean instead of JSONCompareMode where LENIENT = false and STRICT = true.
There are two modes, strict and non-strict in JSONAssert. In most cases, you will probably want to set strict to false, since that will make the tests less brittle. Strict tests require all the elements requested to be returned, and only those elements (ie, the tests are non-extensible). Arrays of elements must be returned to the same order as expected.
In Lenient mode extensibility will be allowed and no strict ordering will be checked. Let’s see example programs for comparing JSONs.
Comparing two Exact same JSON Objects – LENIENT Mode
Here, both the JSONs have the same structure, but we have added one more attribute to the second one. In this case, the assertion matches the first string with the second one and it looks the same. So, the test passes.
Let us reverse the assertion now. We are comparing the jsonObject2 which has 3 attributes with jsonObject1 which has 2 attributes. So, salary is not present in jsonObject1. In this case, the test fails.
The compare mode can also be defined by using an overloaded method that takes boolean instead of JSONCompareMode where LENIENT = false and STRICT = true.
To validate a JSON schema in Java, you can use libraries that provide support for JSON schema validation. JsonSchemaValidator is a Hamcrest matcher that can be used to validate that a JSON document matches a given JSON schema.
Add the following dependency in pom.xml. You can check the latest Maven dependency from here.
Query parameters are a way to pass information to an API flexibly and simply. They are added to the end of the API endpoint URL as a series of key-value pairs. To append query params to the end of a URL, a ‘?’ Is added followed immediately by a query parameter.
Query Param Example
https://reqres.in/api/users?page=2
Below is an example of Query Param.
import org.junit.Test;
import static io.restassured.RestAssured.given;
import static org.hamcrest.CoreMatchers.equalTo;
public class ParamDemo {
@Test
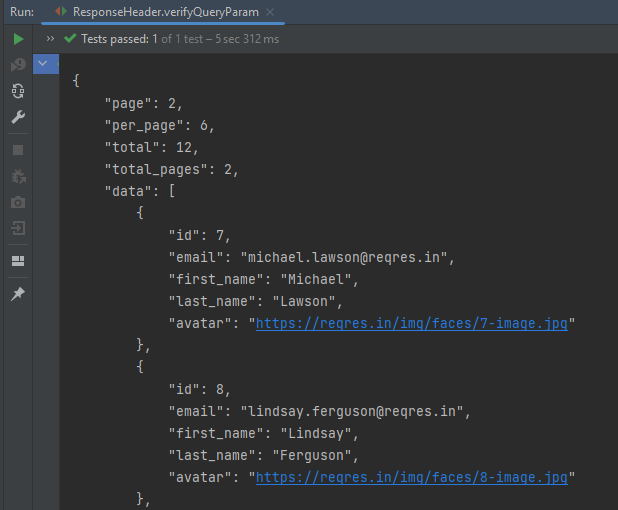
public void verifyQueryParam() {
String endpoint = "https://reqres.in/api/";
// Given
given()
.queryParam("page", "2")
// When
.when()
.get(endpoint + "users/")
// Then
.then()
// To verify the response body
.body("page", equalTo(2))
.body("per_page", equalTo(6))
.body("total_pages", equalTo(2));
}
}
The output of the above program is
.param() or queryParam(): If you don’t specify which, REST Assured will assume GET params are query params and POST params are form params.
Congratulations on making it through this tutorial and hope you found it useful! Happy Learning!!
Assertions are used to perform various kinds of validations in the tests and help us to decide whether the test has passed or failed.
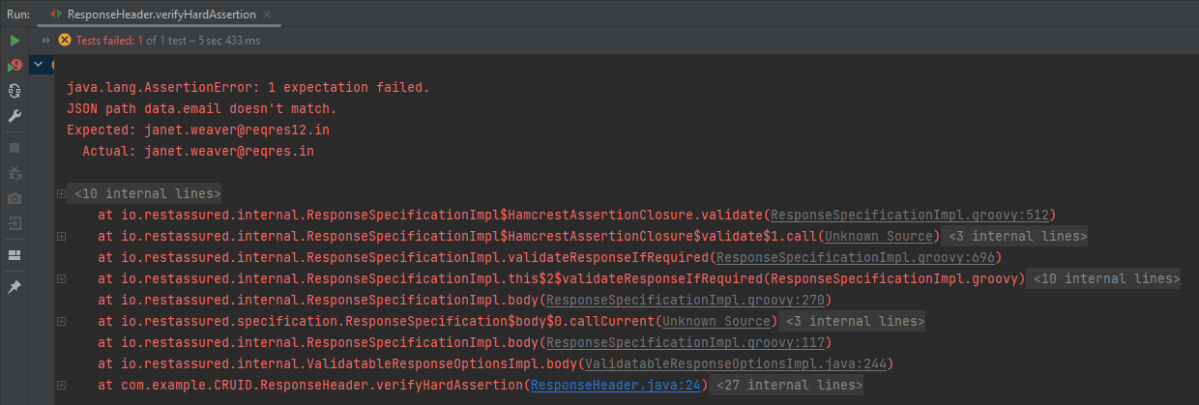
In the below example, we have 3 assertions, but if the first assertion fails, then the test fails without checking for the rest of the two assertions.
  @Test
   public void verifyHardAssertion() {

      // Given
      given()

              // When
              .when()
              .get("https://reqres.in/api/users/2")

              // Then
              .then()

              // To verify the response body
              .body("data.email", equalTo("janet.weaver@reqres12.in"))
              .body("data.first_name", equalTo("Janet1"))
              .body("data.last_name", equalTo("Weaver"));

    }
The output of the above program is
In the above example, email as well as first_name has incorrect data. But the assertion has checked email and as it has the incorrect data, it has failed the test without even checking for the rest two assertions.
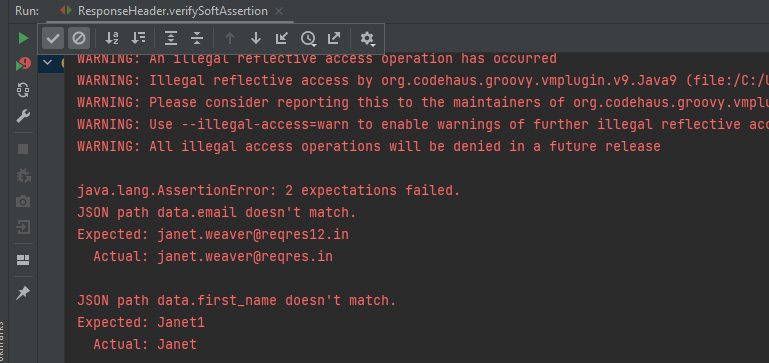
In the below example, the assertion will check all 3 and will print all the error messages. In .body() you need to specify all assertions separated by comma. The below code will validate all 3 assertions and then fail the test.
 @Test
  public void verifySoftAssertion() {

      // Given
      given()

              // When
              .when()
              .get("https://reqres.in/api/users/2")

              // Then
              .then()

              // To verify the response body
              .body("data.email", equalTo("janet.weaver@reqres12.in"),
                        "data.first_name", equalTo("Janet1"),
                        "data.last_name", equalTo("Weaver"));

    }
}
The output of the above program is
Congratulations on making it through this tutorial and hope you found it useful! Happy Learning!!
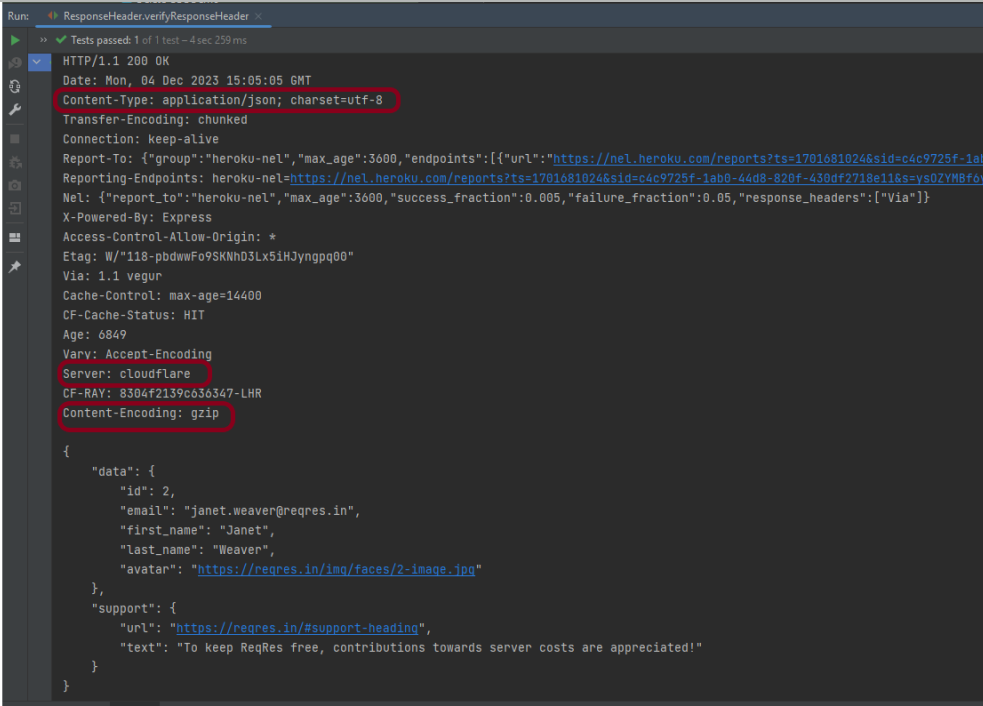
We can verify JSON response headers in Rest Assured. This is achieved with the help of the header method. Every response obtained from the server may contain zero or more headers that provide metadata about the response.
import org.junit.Test;
import static io.restassured.RestAssured.given;
import static org.hamcrest.CoreMatchers.containsString;

public class ResponseHeader {

    @Test
    public void verifyResponseHeader() {

      // Given
      given()

              // When
              .when()
              .get("https://reqres.in/api/users/2")

              // Then
              .then()
              .statusCode(200).statusLine("HTTP/1.1 200 OK")
              .log().all()
              .header("Content-Type" , "application/json; charset=utf-8")
              .header("Content-Encoding" , "gzip")
              .header("Server" , containsString("cloudflare"));

    }
}
The output of the above program is
In the above example, we can verify the Content-Type, Server, and Content-Encoding using the header.
REST Assured provides a convenient way to retrieve and assert response time. Rest Assured provides a method to get response time in milliseconds by default or the time unit we want. We can also validate if the response time is less than, greater than, or in between the expected values as well.
Interface ResponseOptions
This interface contains four methods:-
getTime() – The response time in milliseconds (or -1 if no response time could be measured)
getTimeIn(TimeUnit timeunit) – The response time in the given time unit (or -1 if no response time could be measured)
time() – The response time in milliseconds (or -1 if no response time could be measured)
timeIn( TimeUnit timeunit ) – The response time in the given time unit (or -1 if no response time could be measured)
Technically, getTime() and time() both are the same, and getTimeIn() and timeIn() both are the same.
Below is an example.
import io.restassured.RestAssured;
import io.restassured.response.Response;
import io.restassured.specification.RequestSpecification;
import org.junit.Test;
import java.util.concurrent.TimeUnit;

public class ResponseTime {


    @Test
    public void getResponseTime() {

        RequestSpecification  requestSpecification = RestAssured.given();

        // Calling GET method
        Response response = requestSpecification.get("https://reqres.in/api/users/2");

        // Let's print response body.
        String resString = response.prettyPrint();
        System.out.println("Response Details : " + resString);

        //Get Response Time
        System.out.println("Response Time in milliseconds: " + response.getTime());

        System.out.println("Response Time in seconds: " + response.getTimeIn(TimeUnit.SECONDS));

        System.out.println("Response Time in milliseconds: " + response.time());

        System.out.println("Response Time in seconds: " + response.timeIn(TimeUnit.SECONDS));

    }

    }
The output of the above program is
Interface ValidatableResponseOptions
This interface has overloaded time() methods that accept Matcher.
time(Matcher matcher) – Validate that the response time (in milliseconds) matches the supplied matcher.
import org.hamcrest.Matchers;
import org.junit.Test;
import static io.restassured.RestAssured.given;

public class ResponseTime {

    @Test
    public void verifyResponseTime() {

        // Given
        given()

                // When
                .when()
                .get("https://reqres.in/api/users/2")

                // Then
                .then()
                .statusCode(200).statusLine("HTTP/1.1 200 OK")

                // Asserting response time is less than 2000 milliseconds
                .time(Matchers.lessThan(3000L));

    }
}
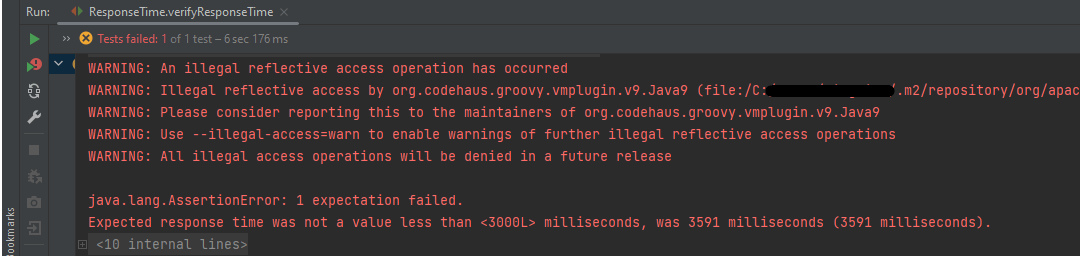
The output of the above program is
In the above example, we can see that the time taken by the request to provide the response is 3591 ms, which is greater than 3000 ms, so the test failed.
Similarly, we can use greaterthan() method too.
    @Test
    public void verifyGreaterResponseTime() {

        // Given
        given()

                // When
                .when()
                .get("https://reqres.in/api/users/2")

                // Then
                .then()
                .statusCode(200).statusLine("HTTP/1.1 200 OK")

                // Asserting response time is greater than 3000 milliseconds
                .time(Matchers.greaterThan(2000L));
    }
The output of the above program is
If you want to verify the time range, it can also be done using the Matchers. Below is an example of the same.
    @Test
    public void verifyResponseTimeRange() {

        // Given
        given()

                // When
                .when()
                .get("https://reqres.in/api/users/2")

                // Then
                .then()
                .statusCode(200).statusLine("HTTP/1.1 200 OK")

                // Asserting response time is greater than 1000 milliseconds and less than 2000 milliseconds
                .time(Matchers.both(Matchers.greaterThanOrEqualTo(1000L)).and(Matchers.lessThanOrEqualTo(2000L)));
    }
The output of the above program is
In the above example, the response time is 2550 ms, which does not fall in the range of 1000-2000 ms. So, the test is failed.
We are done! Congratulations on making it through this tutorial and hope you found it useful! Happy Learning!!
The previous tutorials have explained the conversion of Java Objects to JSON payload and vice versa, i.e. conversion of JSON payload to Java Objects using Jackson API.
This tutorial explains parsing the XML document to Java objects using Jackson API.
To parse the above XML, we will use the Jackson library. Use the latest Jackson Library.
We will create an XML from POJO and vice versa now, which is generally called serialization and deserialization using Jackson APIs.
XmlMapper is a subclass of ObjectMapperwhich is used in JSON serialization. However, it adds some XML-specific tweaks to the parent class.
XmlMapper xmlMapper = new XmlMapper();
We can now look at how to use it to do the actual serialization. Let’s create a Java class first:
Below is the sample code of the Employee table, which contains the data members needed for Employee XML and their corresponding getter and setter methods.
public class Employee {

	// Data members of POJO class
	private String firstName;
	private String lastName;
	private int age;
	private double salary;
	private String designation;
	private String contactNumber;
	private String emailId;
	private String gender;
	private String maritalStatus;

	// Getter and setter methods
	public String getFirstName() {
		return firstName;
	}

	public void setFirstName(String firstName) {
		this.firstName = firstName;
	}

	public String getLastName() {
		return lastName;
	}

	public void setLastName(String lastName) {
		this.lastName = lastName;
	}

	public int getAge() {
		return age;
	}

	public void setAge(int age) {
		this.age = age;
	}

	public double getSalary() {
		return salary;
	}

	public void setSalary(double salary) {
		this.salary = salary;
	}

	public String getDesignation() {
		return designation;
	}

	public void setDesignation(String designation) {
		this.designation = designation;
	}

	public String getContactNumber() {
		return contactNumber;
	}

	public void setContactNumber(String contactNumber) {
		this.contactNumber = contactNumber;
	}

	public String getEmailId() {
		return emailId;
	}

	public void setEmailId(String emailId) {
		this.emailId = emailId;
	}

	public String getGender() {
		return gender;
	}

	public void setGender(String gender) {
		this.gender = gender;
	}

	public String getMaritalStatus() {
		return maritalStatus;
	}

	public void setMaritalStatus(String maritalStatus) {
		this.maritalStatus = maritalStatus;
	}

}
Here, I have added JUnit4 dependency for the @Test annotation.
Writing XML is done using the various writeValue() methods that Jackson exposes.
import com.fasterxml.jackson.core.JsonProcessingException;
import com.fasterxml.jackson.dataformat.xml.XmlMapper;
import org.junit.Test;
public class EmployeeXMLTest {
@Test
public void serializationTest() {
// Create an object of POJO class
Employee employee = new Employee();
employee.setFirstName("Vibha");
employee.setLastName("Singh");
employee.setAge(35);
employee.setSalary(135000);
employee.setDesignation("Manager");
employee.setContactNumber("+919999988822");
employee.setEmailId("abc@test.com");
employee.setMaritalStatus("married");
employee.setGender("female");
// Converting a Java class object to XML
XmlMapper xmlMapper = new XmlMapper();
try {
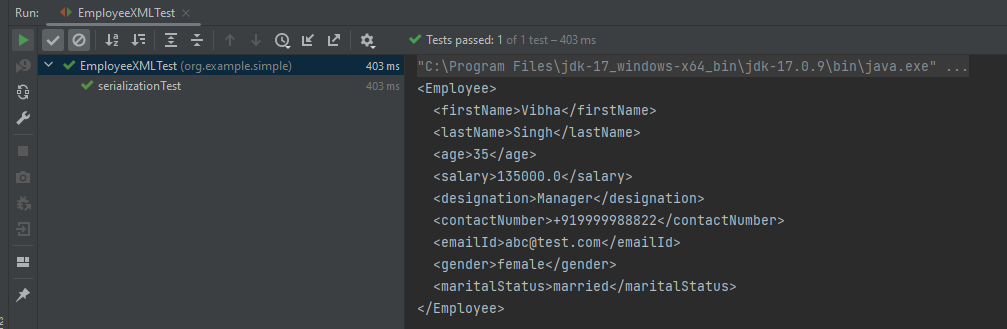
String employeeXml = xmlMapper.writerWithDefaultPrettyPrinter().writeValueAsString(employee);
System.out.println(employeeXml);
} catch (JsonProcessingException e) {
e.printStackTrace();
}
}
}
Here, In this new structure, we have introduced a nested nameelement as well as contactdetails element which is further nested to emergencyDetailselements. With our current code, we cannot extract or create the new nested section. So, along with creating a POJO class for Employees, will create a POJO class for name, contactDetails, and emergencyDetails.
Employees
public class Employees {

	Name name;
	ContactDetails contactdetails;

	private int age;
	private double salary;
	private String designation;
	private String emailId;
	private String gender;
	private String maritalStatus;

	// Getter and setter methods
	public Name getName() {
		return name;
	}

	public void setName(Name name) {
		this.name = name;
	}

	public ContactDetails getContactdetails() {
		return contactdetails;
	}

	public void setContactdetails(ContactDetails contactdetails) {
		this.contactdetails = contactdetails;
	}

	public int getAge() {
		return age;
	}

	public void setAge(int age) {
		this.age = age;
	}

	public double getSalary() {
		return salary;
	}

	public void setSalary(double salary) {
		this.salary = salary;
	}

	public String getDesignation() {
		return designation;
	}

	public void setDesignation(String designation) {
		this.designation = designation;
	}

	public String getEmailId() {
		return emailId;
	}

	public void setEmailId(String emailId) {
		this.emailId = emailId;
	}

	public String getGender() {
		return gender;
	}

	public void setGender(String gender) {
		this.gender = gender;
	}

	public String getMaritalStatus() {
		return maritalStatus;
	}

	public void setMaritalStatus(String maritalStatus) {
		this.maritalStatus = maritalStatus;
	}

}
Name
public class Name {

	private String firtsname;
	private String middlename;
	private String lastname;

	public String getFirtsname() {
		return firtsname;
	}

	public void setFirtsname(String firtsname) {
		this.firtsname = firtsname;
	}

	public String getMiddlename() {
		return middlename;
	}

	public void setMiddlename(String middlename) {
		this.middlename = middlename;
	}

	public String getLastname() {
		return lastname;
	}

	public void setLastname(String lastname) {
		this.lastname = lastname;
	}

}
ContactDetails-As you can see that EmergencyDetails element which contains emergency_no1, emergency_no2, and emergency_no3 are nested within ContactDetails, so we have created a separate POJO class for EmergencyDetails.
public class ContactDetails {

	private String deskNumber;
	private String mobileNumber;

	EmergencyDetails emergencyDetails;

	public EmergencyDetails getEmergencyDetails() {
		return emergencyDetails;
	}

	public void setEmergencyDetails(EmergencyDetails emergencyDetails) {
		this.emergencyDetails = emergencyDetails;
	}

	public String getDeskNumber() {
		return deskNumber;
	}

	public void setDeskNumber(String deskNumber) {
		this.deskNumber = deskNumber;
	}

	public String getMobileNumber() {
		return mobileNumber;
	}

	public void setMobileNumber(String mobileNumber) {
		this.mobileNumber = mobileNumber;
	}

}
EmergencyDetails
public class EmergencyDetails {

	private String emergency_no1;
	private String emergency_no2;
	private String emergency_no3;

	public String getEmergency_no1() {
		return emergency_no1;
	}

	public void setEmergency_no1(String emergency_no1) {
		this.emergency_no1 = emergency_no1;
	}

	public String getEmergency_no2() {
		return emergency_no2;
	}

	public void setEmergency_no2(String emergency_no2) {
		this.emergency_no2 = emergency_no2;
	}

	public String getEmergency_no3() {
		return emergency_no3;
	}

	public void setEmergency_no3(String emergency_no3) {
		this.emergency_no3 = emergency_no3;
	}

}
Next, we create our serializeToXML() method:
import com.fasterxml.jackson.core.JsonProcessingException;
import com.fasterxml.jackson.core.exc.StreamWriteException;
import com.fasterxml.jackson.databind.DatabindException;
import com.fasterxml.jackson.dataformat.xml.XmlMapper;
import org.junit.Test;
import java.io.File;
import java.io.IOException;
public class ComplexEmployeeXMLTest {
@Test
public void serializationXML() {
Employees employee = new Employees();
Name empname = new Name();
empname.setFirtsname("John");
empname.setMiddlename("Dave");
empname.setLastname("William");
employee.setName(empname);
employee.setAge(35);
employee.setSalary(1355000);
employee.setDesignation("Manager");
ContactDetails contdetails = new ContactDetails();
contdetails.setDeskNumber("00-428507");
contdetails.setMobileNumber("+917823561231");
EmergencyDetails emergency = new EmergencyDetails();
emergency.setEmergency_no1("+91 1212898920");
emergency.setEmergency_no2("+91 9997722123");
emergency.setEmergency_no3("+91 8023881245");
contdetails.setEmergencyDetails(emergency);
employee.setContactdetails(contdetails);
employee.setEmailId("abc@test.com");
employee.setMaritalStatus("married");
employee.setGender("female");
XmlMapper xmlMapper = new XmlMapper();
try {
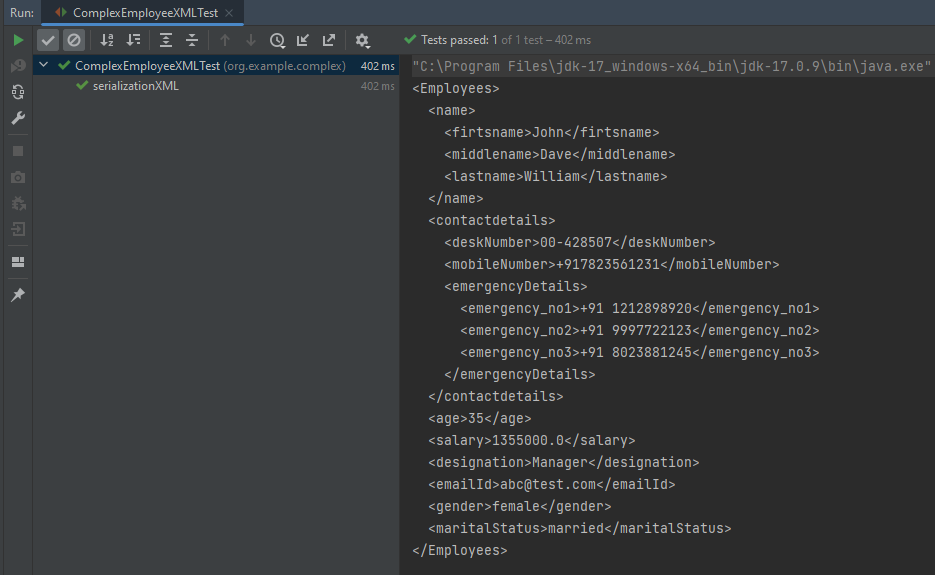
String employeeXml = xmlMapper.writerWithDefaultPrettyPrinter().writeValueAsString(employee);
System.out.println(employeeXml);
} catch (JsonProcessingException e) {
e.printStackTrace();
}
//To save the XML in a file and place under the project
String userDir = System.getProperty("user.dir");
try {
xmlMapper.writerWithDefaultPrettyPrinter()
.writeValue(new File(userDir + "\\src\\test\\resources\\NestedXMLExample.xml"), employee);
} catch (StreamWriteException e) {
e.printStackTrace();
} catch (DatabindException e) {
e.printStackTrace();
} catch (IOException e) {
e.printStackTrace();
}
}
}
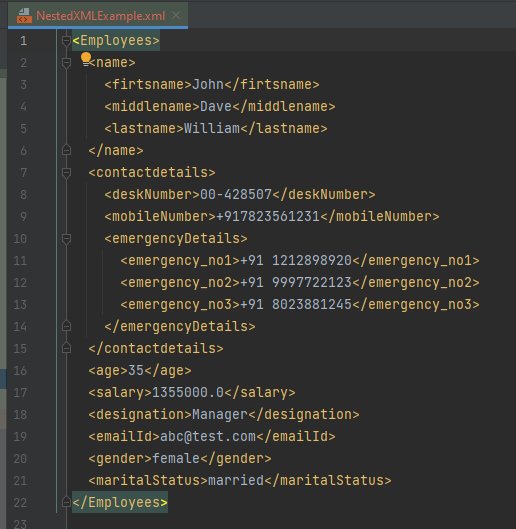
The output of the above program is
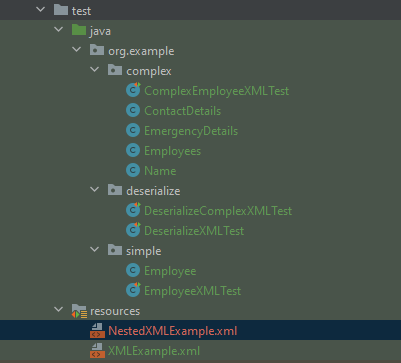
The file is saved under src/test/resources as NestedXMLExample.
Open the xml file and it contains the XML Request Body.
There is another way to do the same job of converting Java Object to a complex XML, but which looks more sophisticated and less a number of lines of code.
I’ll use the same complex XML structure.
In this method, we will create a default constructor as well as a parametrized Constructor to pass the arguments for each POJO Class.
Employees
public class Employees {

	Name name;
	ContactDetails contactdetails;

	private int age;
	private double salary;
	private String designation;
	private String emailId;
	private String gender;
	private String maritalStatus;

	public Employees() {
		super();
	}

	public Employees(Name name, ContactDetails contactdetails, int age, double salary, String designation,
			String emailId, String gender, String maritalStatus) {

		this.name = name;
		this.contactdetails = contactdetails;
		this.age = age;
		this.salary = salary;
		this.designation = designation;
		this.emailId = emailId;
		this.gender = gender;
		this.maritalStatus = maritalStatus;
	}

	// Getter and setter methods
	public Name getName() {
		return name;
	}

	public void setName(Name name) {
		this.name = name;
	}

	public ContactDetails getContactdetails() {
		return contactdetails;
	}

	public void setContactdetails(ContactDetails contactdetails) {
		this.contactdetails = contactdetails;
	}

	public int getAge() {
		return age;
	}

	public void setAge(int age) {
		this.age = age;
	}

	public double getSalary() {
		return salary;
	}

	public void setSalary(double salary) {
		this.salary = salary;
	}

	public String getDesignation() {
		return designation;
	}

	public void setDesignation(String designation) {
		this.designation = designation;
	}

	public String getEmailId() {
		return emailId;
	}

	public void setEmailId(String emailId) {
		this.emailId = emailId;
	}

	public String getGender() {
		return gender;
	}

	public void setGender(String gender) {
		this.gender = gender;
	}

	public String getMaritalStatus() {
		return maritalStatus;
	}

	public void setMaritalStatus(String maritalStatus) {
		this.maritalStatus = maritalStatus;
	}

}
Name
public class Name {

	private String firtsname;
	private String middlename;
	private String lastname;

	public Name() {
		super();
	}

	public Name(String firtsname, String middlename, String lastname) {
		super();
		this.firtsname = firtsname;
		this.middlename = middlename;
		this.lastname = lastname;
	}

	public String getFirtsname() {
		return firtsname;
	}

	public void setFirtsname(String firtsname) {
		this.firtsname = firtsname;
	}

	public String getMiddlename() {
		return middlename;
	}

	public void setMiddlename(String middlename) {
		this.middlename = middlename;
	}

	public String getLastname() {
		return lastname;
	}

	public void setLastname(String lastname) {
		this.lastname = lastname;
	}
}
ContactDetails
public class ContactDetails {

	private String deskNumber;
	private String mobileNumber;
	EmergencyDetails emergencyDetails;

	public ContactDetails() {
		super();
	}

	public ContactDetails(String deskNumber, String mobileNumber, EmergencyDetails emergencyDetails) {
		super();
		this.deskNumber = deskNumber;
		this.mobileNumber = mobileNumber;
		this.emergencyDetails = emergencyDetails;
	}

	public EmergencyDetails getEmergencyDetails() {
		return emergencyDetails;
	}

	public void setEmergencyDetails(EmergencyDetails emergencyDetails) {
		this.emergencyDetails = emergencyDetails;
	}

	public String getDeskNumber() {
		return deskNumber;
	}

	public void setDeskNumber(String deskNumber) {
		this.deskNumber = deskNumber;
	}

	public String getMobileNumber() {
		return mobileNumber;
	}

	public void setMobileNumber(String mobileNumber) {
		this.mobileNumber = mobileNumber;
	}
}
EmergencyDetails
public class EmergencyDetails {

	private String emergency_no1;
	private String emergency_no2;
	private String emergency_no3;

	public EmergencyDetails() {
		super();
	}

	public EmergencyDetails(String emergency_no1, String emergency_no2, String emergency_no3) {
		super();
		this.emergency_no1 = emergency_no1;
		this.emergency_no2 = emergency_no2;
		this.emergency_no3 = emergency_no3;
	}

	public String getEmergency_no1() {
		return emergency_no1;
	}

	public void setEmergency_no1(String emergency_no1) {
		this.emergency_no1 = emergency_no1;
	}

	public String getEmergency_no2() {
		return emergency_no2;
	}

	public void setEmergency_no2(String emergency_no2) {
		this.emergency_no2 = emergency_no2;
	}

	public String getEmergency_no3() {
		return emergency_no3;
	}

	public void setEmergency_no3(String emergency_no3) {
		this.emergency_no3 = emergency_no3;
	}
}
Now, let us create a Serialization Test.
import com.fasterxml.jackson.core.JsonProcessingException;
import com.fasterxml.jackson.dataformat.xml.XmlMapper;
import org.junit.Test;

import java.io.File;
import java.io.FileWriter;
import java.io.IOException;

public class XmlSerializationDemo2 {
    @Test
    public void serializationTest() {

        try {

            EmergencyDetails emergency = new EmergencyDetails("+91 894132345", "+91 8888221102", "+91 7223156288");
            ContactDetails contdetails = new ContactDetails("00-428507", "+917823561231", emergency);
            Name empname = new Name("Trina", "Sophia", "William");

            // Converting a Java class object to a XML
            XmlMapper xmlMapper = new XmlMapper();

            String xmlString = xmlMapper.writerWithDefaultPrettyPrinter().writeValueAsString(new Employees(empname,
                    contdetails, 35, 1450000.00, "Director", "trina@test.com", "female", "married"));
            System.out.println(xmlString);

            // write XML string to file
            String userDir = System.getProperty("user.dir");
            File xmlOutput = new File(userDir + "\\src\\test\\resources\\XMLExample.xml");
            FileWriter fileWriter = new FileWriter(xmlOutput);
            fileWriter.write(xmlString);
            fileWriter.close();

        } catch (JsonProcessingException e) {
            e.printStackTrace();
        } catch (IOException e) {
            e.printStackTrace();
        }
    }
}
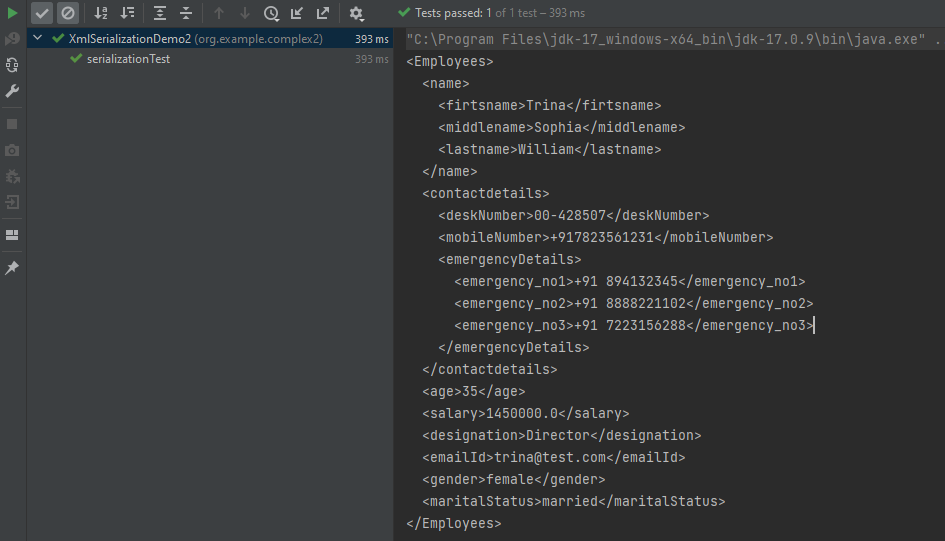
The output of the above program is
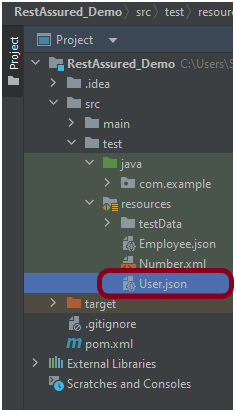
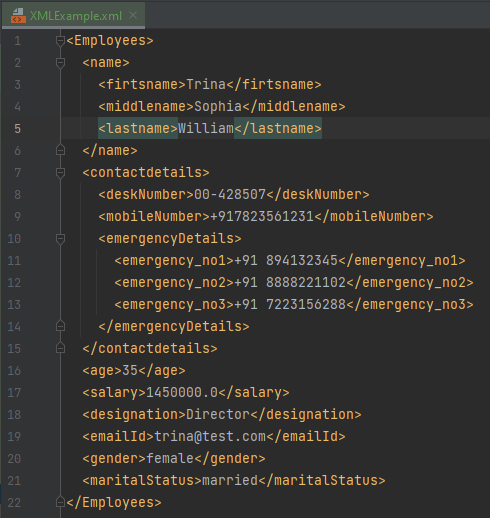
The newly created XML file is saved under src/test/resources as shown in the below image.
Open the xml file and it contains the XML Request Body.
We have successfully serialized our Java object into XML and written it into an XML file.
In our serializationTest() function, we create an XmlMapper object, which is a child class to the ObjectMapper class used in JSON serialization. This class converts our Java Object into an XML output that we can now write to a file.
In this tutorial, we will convert a Java list into a JSON Object. Most of the times, the JSONs built in the organizations are complex. It contains string, int, list, arrays and soon.
In this tutorial, we will use the below mentioned dependency.
We can create a JSON Object using a Map in Java. A JSON Object is a key-value pair and can be easily created using a Java Map. A Map in Java also represents a collection of key-value pairs.
To create a request body using JSON Object using HashMap, we need to add a Maven dependency.
I have created a simple Java map and filled it with the values that represent JSON properties.
import io.restassured.RestAssured;
import io.restassured.http.ContentType;
import org.junit.Test;
import java.util.HashMap;
import java.util.Map;
import static org.hamcrest.Matchers.equalTo;

public class Json_Demo {

    @Test
    public void passBodyAsMap() {
        Map<String, String> map = new HashMap<String, String>();
        map.put("employee_name", "MapTest");
        map.put("employee_salary", "99999");
        map.put("employee_age", "30");
        map.put("profile_image", "test.png");
        RestAssured.given()
                .contentType(ContentType.JSON)
                .body(map)
                .log().all()

                .when()
                .post("https://dummy.restapiexample.com/api/v1/create")

                .then()
                .assertThat().statusCode(200)
                .body("data.employee_name", equalTo("MapTest"))
                .body("data.employee_age", equalTo("30"))
                .body("data.employee_salary", equalTo("99999"))
                .body("message", equalTo("Successfully! Record has been added.")).log().all();
    }
}
The request body as well as the response body will look as shown below:-
Above one is a simple JSON Request Body. Let us take an example of a Complex Request Body or nested Request Body as shown below.
Let us create a Java program to understand this:
import io.restassured.RestAssured;
import io.restassured.http.ContentType;
import org.junit.Test;
import java.util.HashMap;
import java.util.Map;
import static org.hamcrest.Matchers.equalTo;

public class Json_Demo {

    @Test
    public void passBodyAsMultipleMap() {

        // First JSON Object using Hash Map
        Map<String, Object> data = new HashMap<String, Object>();
        data.put("employee_name", "MapTest");
        data.put("profile_image", "test.png");

        // Second JSON Object using Hash Map
        Map<String, String> msg = new HashMap<String, String>();
        msg.put("updated_message", "Details of New Resource");
        msg.put("employee_age", "30");
        data.put("details", msg);
        data.put("employee_salary", "99999");
        RestAssured.given().contentType(ContentType.JSON).body(data).log().all()
                // WHEN
                .when().post("https://dummy.restapiexample.com/api/v1/create")
                // THEN
                .then().assertThat().statusCode(200).body("data.employee_name", equalTo("MapTest"))
                .body("data.details.updated_message", equalTo("Details of New Resource"))
                .body("data.details.employee_age", equalTo("30")).body("data.employee_salary", equalTo("99999"))
                .body("message", equalTo("Successfully! Record has been added.")).log().all();
    }
}
The request body as well as the response body will look as shown below image. The first part is the body of the request and the second part is the response provided by the API.
Congratulations on making it through this tutorial and hope you found it useful! Happy Learning!!